


原文出處:http://www.the-greathouses.net/blog/category/pcduino/ 該文章主要講述使用串口連接pcduino,然後再啓動時進入到U-BOOT,修改U-BOO環境參數以使板子掛載SD卡的分區作爲文件系統,原文作者使用dosfstools來設置SD卡分區的文件系統類型,使用rsync拷貝系統文件,另外由於U-boot環境參數修改後無法保存,原文作者修改了u-boot-sunxi使其能在pcduino中使用,使用該修改過的u-boot-sunxi可導出導入保存在nand中的環境參數。另外原文作者沒有說明分區問題,本人在試驗的時候使用自帶的fdisk工具對SD進行分區。
Part I
This evening I decided it was time to check out the boot loader and boot command options on the pcDuino. To access the serial port on the J5 debug port I used aSparkfun FTDI Basic Breakout-3.3v
— a simple to use logic level serial to USB interface. With the power off and the FTDI Basic disconnected from the computer, I connected the serial lines and ground.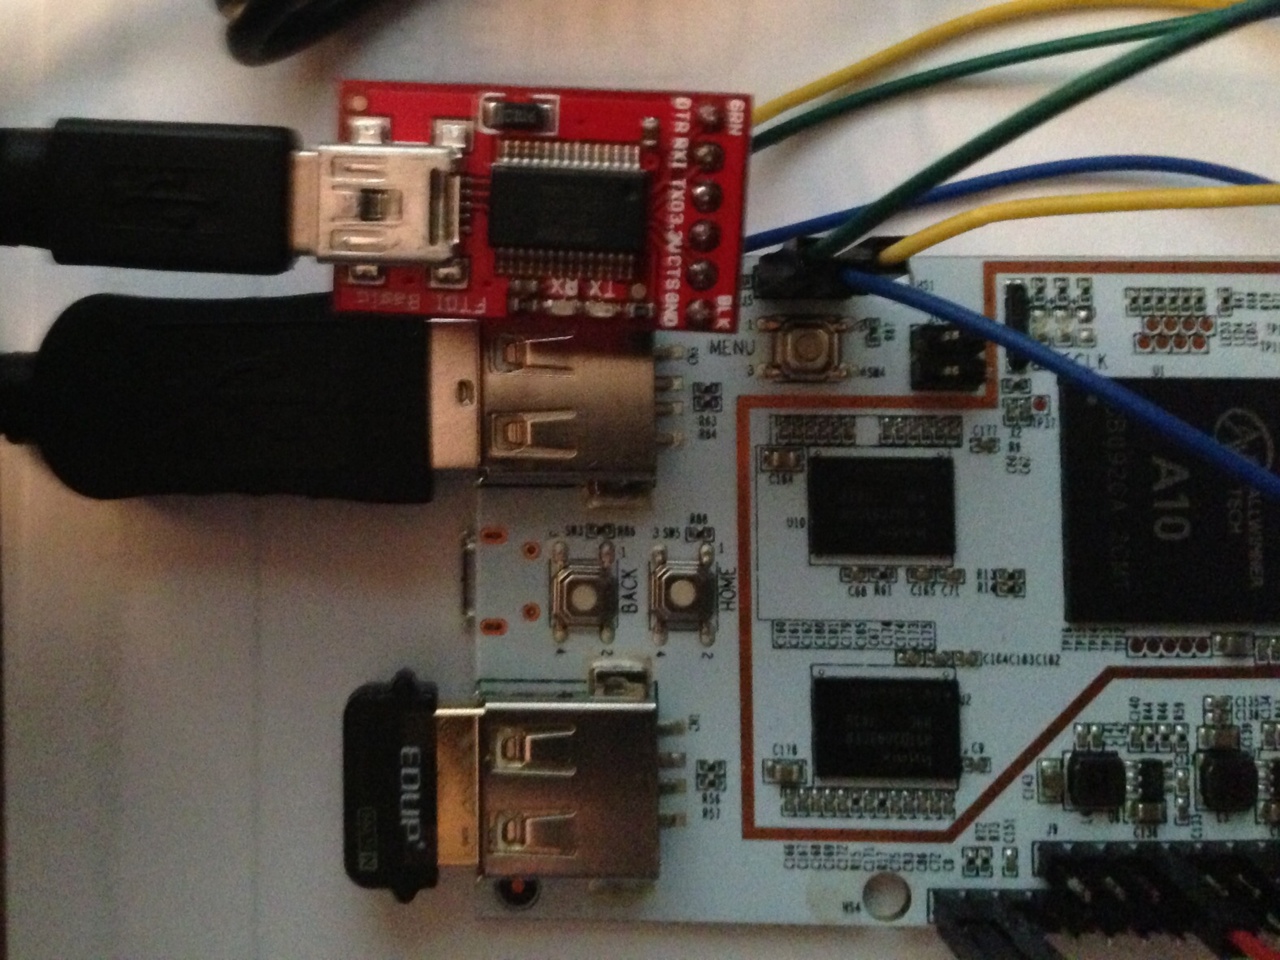
Connections
| pcDuiono J5 Pin | FTDI Basic | Description |
| 1 – RX | 3 – TXO | pcDuino to FTDI serial data |
| 2 – GND | 6 – GND | common signal reference |
| 3 – TX | 2 – RXI | FTDI to pcDuino serial data |
After double checking the connections, I plugged the FTDI Basic into my Windows laptop computer. After confirming the port assignment, I usedTeraTerm to open the serial port on my computer. The serial communication configuration needed to be set for 115200 Baud, 8-bit, No parity, 1 stop bit, no flow control, and the serial port assigned by Windows to the FTDI Basic.
Power On and Boot
After applying power to the pcDuino, the bootloader (U-Boot) startup sequence showed in the terminal window, followed by the familiar Linux boot messages as the kernel was loaded and Linux started. Surprisingly, at the end of the Linux boot, I was presented with aroot prompt. Instead of presenting a login prompt, the debug port goes directly to a root shell. This I will need to change!
[  12.776652]Freeinginit memory:5108K
/dev/nandd
e2fsck1.42.7(21-Jan-2013)
/dev/nandd:clean,60026/96000files,314839/384000blocks
[  12.837041]EXT3-fs(nandd):usinginternal journal
[  12.842051]kjournaldstarting.  Commitinterval5seconds
[  12.847559]EXT3-fs(nandd):mountedfilesystem withordereddata mode
[  13.098102]setto DVI mode
[  13.101848]get_hdmi_mode==DVI
[  13.140992]hostnameused greateststackdepth:5648bytes left
[  13.200950]hwclockused greateststackdepth:5592bytes left
[  13.253305]plymouthdused greateststackdepth:5208bytes left
[  13.262105]init:ureadahead main process(71)terminatedwith status5
[  13.685501]dfused greateststackdepth:5168bytes left
[  13.708732]grepused greateststackdepth:4960bytes left

*StartingNTP serverntpd                                                    Welcome to Linaro 12.11(GNU/Linux3.0.8+armv7l)

*Documentation:  https://wiki.linaro.org/
                                                                        [OK]
[  20.106130]android_usb:alreadydisabled
root@ubuntu:~#
U-Boot Fun
Now for the real reason I wanted to try this. Access to U-Boot and the boot command line.
In the serial terminal window, I rebooted the pcDuino…
root@ubuntu:~# shutdown -r now
root@ubuntu:~#
Broadcast message from root@ubuntu
        (/dev/ttyS0)at19:14...

The systemisgoing down forrebootNOW!
*Askingall remainingprocessestoterminate...                        [OK]
*Allprocesses endedwithin1seconds....                              [OK]
nm-dispatcher.action:Caughtsignal15,shutting down...
nm-dispatcher.action:Disconnectedfrom thesystembus,exiting.
*Deconfiguringnetwork interfaces...                                  [OK]
*Unmountingtemporary filesystems...                                  [OK]
*Deactivatingswap...                                                  [OK]
*Unmountinglocal filesystems...                                      [OK]
umount:/run/lock:notmounted
*Willnow restart
[  631.725545]Restartingsystem.
… and interrupted the U-Boot start up by pressing the space bar at the “Hit any key to stop autoboot” prompt.
HELLO!BOOT0is starting!
boot0 version :1.5.0
dram size =1024
Succeed in opening nand flash.
Succeed in reading Boot1 file head.
The sizeofBoot1 is0x00056000.
The filestoredin 0X00000000of block 2isperfect.
Check is correct.
Ready to disable icache.
Succeed in loading Boot1.
Jump to Boot1.
[      0.181]boot1 version: 1.5.0
[      0.181]pmu type =3
[      0.182]bat vol =0
[      0.213]axi:ahb:apb=3:2:2
[      0.213]set dcdc2=1400,clock=1008successed
[      0.215]key
[      0.227]no key found
[      0.227]flash init start
[      0.239]flash init finish
[      0.241]fs init ok
[      0.242]fattype FAT16
[      0.242]fs mount ok
[      0.247]script finish
[      0.249]power finish
[      0.257]BootMain start
[      0.257]0
[      0.272]usbdc_vol =4000,usbdc_cur =0
[      0.272]usbpc_vol =4000,usbpc_cur =0
[      0.275]init to usbpc
[      0.278]set pc
[      0.368]power_start=0x00000002
[      0.368]pre sys mode
[      0.368]startup status= -1
[      0.371]key value =0
[      0.374]unable to findrecovery_key key_maxvalue
[      0.382]test for multios boot withdisplay
[      1.006]show pic finish
[      1.006]load kernel start
[      1.024]load kernel successed
[      1.024]start address= 0x4a000000
[      1.026]power exit detect
[

U-Boot2011.09-rc1-svn62(Feb01 2013-22:20:45)AllwinnerTechnology

CPU:  SUNXIFamily
Board:A10-EVB
DRAM:  512MiB
NAND:  1900MiB
In:    serial
Out:  serial
Err:  serial
--------fastbootpartitions--------
-totalpartitions:5-
-name-        -start-      -size-
bootloader  :1000000      2000000
env        :3000000      1000000
boot        :4000000      1000000
rootfs      :5000000      5dc00000
UDISK      :62c00000      14000000
-----------------------------------
no miscpartitionisfound
Hit any key tostopautoboot:  0
sunxi#
Greeted by the U-Boot prompt. No to check for what commands are available for modifying the environment using thehelp command.
sunxi#help
?      -alias for 'help'
base    -printor set address offset
boot    -bootdefault,i.e.,run'bootcmd'
boota  -boota  -boot android bootimgfrommemory

bootd  -boot default,i.e.,run'bootcmd'
bootm  -boot application imagefrommemory
cmp    -memory compare
cp      -memorycopy
crc32  -checksum calculation
env    -environmenthandling commands
exit    -exitscript
false  -donothing,unsuccessfully
fastboot-fastboot-use USB Fastbootprotocol

fatdown-download data toados filesystem
fatinfo-print information aboutfilesystem
fatload-load binary filefromados filesystem
fatls  -list files inadirectory(default/)
go      -startapplication ataddress'addr'
help    -printcommand description/usage
key_test-Testthe keyvalueand dump key registers
loop    -infiniteloop onaddressrange
md      -memorydisplay
mm      -memorymodify(auto-incrementingaddress)
mmc    -MMC sub system
mmcinfo-display MMC info
mtest  -simple RAM read/writetest
mw      -memorywrite(fill)
nand    -NANDsub-system
nboot  -boot from NANDdevice
nm      -memorymodify(constantaddress)
printenv-printenvironment variables
reset  -Perform RESET ofthe CPU
run    -run commands inan environment variable
saveenv-save environment variablestopersistentstorage
setenv  -setenvironment variables
showvar-print local hushshellvariables
sunxi_flash-sunxi_flashsub-system
test    -minimaltest like/bin/sh
true    -donothing,successfully
version-print monitor,compilerandlinker version
sunxi#
Current environment settings.
sunxi#env print
boot_fastboot=fastboot
boot_normal=fatloadnand00x48000000uImage;bootm0x48000000
boot_recovery=nandread40007800recovery;boota40007800
bootargs=console=ttyS0,115200root=/dev/nanddinit=/initloglevel=8rootfstype=ext4rootwait
bootcmd=runsetargsload1 boot_normal
bootdelay=3
console=ttyS0,115200
fastboot_key_value_max=0x8
fastboot_key_value_min=0x2
init=/init
load1=fatloadnand043000000evb.bin
loglevel=8
mmc_root=/dev/mmcblk0p7
nand_root=/dev/nandd
partitions=nanda@boot:nandb@rootfs:nandc@UDISK
recovery_key_value_max=0x13
recovery_key_value_min=0x10
setargs=setenvbootargsconsole=${console}root=${nand_root}init=${init}loglevel=${loglevel}
stderr=serial
stdin=serial
stdout=serial

Environmentsize:749/131068bytes
sunxi#
Interesting. By default, the A10 settins are loaded to memory from evb.bin and the kernel is loaded fromuImage from the NAND flash/boot partition. The default kernel command line sets/root to the NAND flash root partition. Then off it goes.
Part II
In Part 1 I described connecting to the pcDuino serial port and accessing the U-Boot subsystem. With this access to the boot environment, the task of booting to a root file system other than the NAND flash looked promising.
Configuring the SD Card
The pcDuino accepts a micro-SD card (I just refer to it as SD to save typing) for additional storage. It is best to partition and format the card with a Linux file system for use on the pcDuino.If you are attempting this, the following steps will result in a loss of all data already on an SD card.
For some of the steps below, additional software needed to be installed on the pcDuino. For formatting a DOS FAT partition, thedosfstools package must be installed. For copying the files between filesystems, I use thersync package.
sudo apt-get update
sudo apt-get install-ydosfstools
suod apt-get install-yrsync
First, the SD card must be inserted in the card slot and partitioned. By default, the pcDuino will attempt to automatically mount the SD card partitions, so these partitions must be unmounted after inserting the card. I’m lazy, so I just ask the system to unmount every thing accociated with the SD card slot. The redirection to /dev/null is to avoid error messages I would just ignore.
formin/dev/mmcblk0*;dosudo umount $m>/dev/null2>/dev/null;doneNext, the new partitions need defined. I set my card up with a small (16MB) FAT partition for future use as a/boot file system, and used the remaining space for the root file system. The pcDuino desktop DiskManager allows the formatting to be done from from a graphical interface. Or, as I prefer, the fdisk command line application can be used.
Once the partitions are created, the file systems need to be created, mounted, and a copy of the existing operating system copied to the corresponding locations. For my configuration, the following commands were used to accomplish this task.
mkfs.vfat/dev/mmcblk0p1
mkfs.ext4/dev/mmcblk0p2
With the new file systems on the card, I needed to make certain they were not automatically mounted.
formin/dev/mmcblk0*;dosudo umount $m>/dev/null2>/dev/null;doneThen, the file systems were copied. Starting with the /boot partition
sudo mount /dev/mmcblk0p1/mnt
sudo mount /dev/nanda/boot
sudo rsync -aqPx-H--numeric-ids/boot//mnt
sudo umount /mnt
sudo umount /boot
And the root / file system
sudo mount /dev/mmcblk0p2/mnt
sudo rsync -aqPx-H--numeric-ids//mnt
sudo umount /mnt
Testing the SD card image
To test, I rebooted the system with the serial debug output connected to my lap top as I described inPart 1 and entered into the U-Boot command line. From the U-Boot prompt, I set the default root device to my root partition on the SD card and booted.
setenv nand_root /dev/mmcblk0p2
boot
After booting, it was necessary to check if the root / was being used from the SD card.
df-h
Filesystem      Size  UsedAvailUse%Mountedon
/dev/mmcblk0p2  15G  1.4G  13G  10%/
...
CONFIRMED: The pcDuino will boot to an alternate root file system. All that’s needed now is to make it permanent.
Setting a permanent new root file system
Time to reboot the system and back into U-Boot to make the environment change permanent. Thesaveenv command is used to permanently write environment changes to non-volatile storage. In the case of the pcDuino the environment is saved to a specific NAND flash area.
setenv nand_root /dev/mmcblk0p2
saveenv
boot
No errors were displayed, and a check of the mounted file systems showed the SD card was being used for the root file system. Time for the critical test. Reboot without entering U-Boot to confirm the change is permanent.
sudo reboot
...
df-h
Filesystem      Size  UsedAvailUse%Mountedon
/dev/nandd      1.9G  1.2G  700M  63%/
...
FAILURE! The changes are not persistent. The saveenv did not work. No errors were displayed, but the environment was not updated.
Postmortem
After a detailed investigation, I concluded the saveenv was non-functional in the pcDuino U-Boot version. The NAND flash write routines are not present or operational. More details of the investigation into alternatives for controlling the boot process will be in Part 3 and a workable solution will be presented. Stay tuned!
Part III
In Part 1 and Part 2 of this series of posts I outlined the attempts I have made at using U-Boot to control the booting of the pcDuino. Specifically, I have been trying to configure the second stage boot to be from my SD card instead of the on board NAND flash. Unfortunately, the U-Boot implementation as installed does not allow persistent setting of the environment for boot from an alternative interface. And the installed U-Boot does not support the newerboot.scr oruEnv.txt extensions. The newer U-Boot versions available onlinux-sunxi are not compatible with the pcDuino. I also tried thefw_printenv andfw_setenv U-Boot tools, but they only work with /dev/mtdX NAND configurations. I was not able to find a ready made solution, so I had to roll my own.
The U-Boot environment
The U-Boot environment is stored as simple list of strings in non-volatile memory with a 32-bit CRC added for validating the memory content. Typically, to modify the environment, a user will interrupt the boot process and access the U-Boot command line prompt. This can be made available on a serial port, or in some cases, on the main console. Once there is access to the U-Boot command line, it is only necessary to update the existing environment usingsetenv and then save the updates back to non-volatile memory using saveenv. For the pcDuino, the environment is stored in the NAND flash and should be updated with the new settings. The NAND flash update is not implemented. There are no error messages displayed, the environment is just not saved.
This led me to investigating where the environment is stored on the pcDuino. This was not hard to determine with a quick check of the pcDuino NAND file systems. The U-Boot environment is stored in the second NAND partition — /dev/nandb — as viewed from the Linux environment. Nothing special formatting is performed on the partition, it is treated as a raw data area, with the environment stored as 128K bytes of data starting at the beginning.
Now that I had the location of the environment, I thought should be able to use the default tools available with U-Boot to update this area. I proceeded to fetch the full source package for U-Boot from linux-sunxi and compiled the U-Boot tools without any problems. I then proceeded to try fw_printenv to confirm access to the environment.
That’s when my problems started with the tools. First, I had to create a fw_env.config file in the/etc directory. No problem, I just copied the sample and tried again. Next problem… no/dev/mtdX devices were found. That’s right. On the pcDuion, the NAND flash provides file system mapping via the/dev/nandX devices. Should be a simple matter of updating the/etc/fw_env.config file. Right? No. I updated the configuration, and tried again. This time I had a non-supportedioctl error output fromfw_printenv.
Time to look at the source code and find out how to make this work with the pcDuino. To make a long story short, the U-Boot supplied tools are centered around the/dev/mtd NAND flash implementation. It would not be a simple matter to update them in a compatible manner for supporting the pcDuino. My decision was to create my own tools specifically for the pcDuino.
U-Boot tools for pcDuino
After deciding I needed to write my own tools, I had a working prototype in less than 30 minutes. The most complicated portion of the code was calculating the CRC-32 and I was able to find existing code for that task. This was fine for me, but I knew there was additional interest in the pcDuino community. I added some error handling and default modes to the code and am making it available for general use.Read the warning at the end of this post!
Here are the files for setting your environment on the pcDuino. Extract to a directory on your pcDuino and follow the instructions in the include README.txt file. I am distributing as a source package that you will need to compile on your system. I am assuming that anyone who wants to try this does have some basic Linux skills.
Download the file from here: u-boot-pcduino-env.tgz
Quick instructions for downloading, installing, compiling and using from the command line.
sudo apt-get install-ywget
wget http://www.the-greathouses.net/files/u-boot-pcduino-env.tgz
tar xzvfu-boot-pcduino-env.tgz
cdu-boot-pcduino-env
make
After building the tools, you can run them from the build directory or install to /usr/local/bin using:
sudo make installRefer to my previous posting (Part 2) for setting up an SD card partition for use as your root partition.
WARNING
ONLY TRY THE ABOVE IF YOU UNDERSTAND WHAT YOU ARE DOING. Connecting to the serial debug port has the potential to damage your pcDuino if your connections are incorrect. Changes to the U-Boot environment can render your pcDuino unbootable. YOU HAVE BEEN WARNED!