2018年2月19日星期一 Lee
這個實驗步驟比較簡單,只能用來演示下搭建過程,實際生產環境複雜的很多。
實驗環境:
centos6.5 x86_64
IP: 10.0.20.25
這裏實驗沒有用HDFS,生產環境的話,hbase還是要把數據存到hdfs上比較安全的。
1. 安裝單機zookeeper
cd /root/
tar xf zookeeper-3.4.8.tar.gz -C ./
mv zookeeper-3.4.8 /opt/zk
cd /opt/zk
cat conf/zoo.cfg 內容如下:
tickTime=2000
initLimit=10
syncLimit=5
dataDir=/tmp/zookeeper
clientPort=2181
/opt/zk/bin/zkServer.sh start /opt/zk1/zk1.cfg
/opt/zk/bin/zkCli.sh -server 10.0.20.25:2181
2. 安裝單機hbase
tar xf hbase-1.2.6-bin.tar.gz –C /usr/local
cd /usr/local/
ln –s hbase-1.2.6 hbase
cd hbase
mkdir data   // 用來存放hbase的data數據【生產環境下,處於安全性考慮,hbase數據是存放到hdfs的】
cd conf
vim hbase-env.sh 最後追加3行:
export JAVA_HOME=/usr/java/jdk1.8.0_91
export PATH=${JAVA_HOME}/bin:$PATH
export HBASE_MANAGES_ZK=false
cat hbase-site.xml 添加紅色部分的代碼:
<?xml version="1.0"?>
<?xml-stylesheet type="text/xsl" href="configuration.xsl"?>
<configuration>
 <property>
    <name>hbase.rootdir</name>
    <value>/usr/local/hbase/data/</value>
  </property>

<property>
    <name>hbase.master.info.port</name>
    <value>16001</value>
</property>

 <property>
    <name>hbase.cluster.distributed</name>
    <value>true</value>  <!-- false是單機模式,true是分佈式模式。若爲false,Hbase和Zookeeper會運行在同一個JVM裏面。-->
  </property>

  <property>
    <name>hbase.zookeeper.quorum</name>
    <value>localhost:2181</value>
  </property>
</configuration>更詳細的可參看:https://www.cnblogs.com/yangsy0915/p/5544533.html
cat regionservers 內容如下:localhost
注意regionservers 裏面寫的內容和上面的hbase.zookeeper.quorum裏面的hostname一樣。
啓動hbase:
cd /usr/local/hbase/bin
./start-hbase.sh  即可啓動hbase
驗證:
ss –lnt | grep 16001
ps aux|grep hbase
補充,HDFS+hbase+3節點zk的 hbase-site.xml配置文件寫法:
<configuration>
 //設置將數據寫入hdfs的目錄
  <property>
    <name>hbase.rootdir</name>
    <value>hdfs://master:9000/usr/local/hadoop-2.6.0/hbaseData</value>
  </property>
 //設置hbase模式爲集羣模式
<property>
    <name>hbase.cluster.distributed</name>
    <value>true</value>
</property>
 //設置hbase的master端口地址
<property>
  <name>hbase.master</name>
  <value>hdfs://master:60000</value>
</property>
//HBase Master web界面綁定的端口,默認爲0.0.0.0
<property>
  <name>hbase.master.info.port</name>
  <value>60010</value>
</property>
//連接zookeeper的端口設置
    <property>
        <name>hbase.zookeeper.property.clientPort</name>
        <value>2183</value>
    </property>
  //設置zookeeper的連接地址(必須爲基數個)
 <property>
           <name>hbase.zookeeper.quorum</name>
           <value>master,slave1,slave2</value>
   </property>
//Zookeeper的zoo.conf中的路徑配置,快照的存儲位置
<property>
        <name>hbase.zookeeper.property.dataDir</name>
        <value>/usr/local/zookeeper-3.4.6/data</value>
</property>
//Zookeeper連接超時時間
<property>
  <name>zookeeper.session.timeout</name>
  <value>60000</value>
</property>
</configuration>
3. 安裝opentsdb
官方網站:http://opentsdb.net/docs/build/html/installation.html#id1
rpm –ivh opentsdb-2.3.0.rpm
cd /etc/opentsdb
vim opentsdb.conf 內容如下:
tsd.network.port = 4242
tsd.network.bind = 0.0.0.0
tsd.network.worker_threads = 8
tsd.http.staticroot = /usr/share/opentsdb/static/
tsd.http.cachedir = /tmp/opentsdb
tsd.core.auto_create_metrics = true
tsd.core.plugin_path = /usr/share/opentsdb/plugins
tsd.storage.hbase.zk_quorum = localhost:2181
啓動之前,需要到hbase上面去創建表:
cd /usr/share/opentsdb/tools
env COMPRESSION=NONE HBASE_HOME=/usr/local/hbase ./create_table.sh
啓動及驗證:
/etc/init.d/opentsdb start
ss -lnt | grep 4242
ps aux|grep opentsdb
訪問瀏覽器的http://10.0.20.25:4242
4. 寫數據測試
http api寫數據方法:
官方文檔:http://opentsdb.net/docs/build/html/api_http/put.html
可以使用chrome插件,如下方式post數據到opentsdb。【返回值204表示提交成功】
也可以使用tcollector來採集系統數據,並寫入到opentsdb,方法如下:
git clone https://github.com/OpenTSDB/tcollector.git
cd tcollector
如果不修改tcollector.py文件的話,默認採集程序會把採集的東西上送到localhost本地的opentsdb裏面。【默認參數如下圖】
./tcollector start // 即可在後臺啓動採集程序
ps aux | grep tcollector
如果需要採集mysql等其他軟件的監控狀態,需要去 collectors/etc/ 這個目錄下的對應腳本里面,添加相關的賬戶名和密碼,以便採集程序蒐集信息。
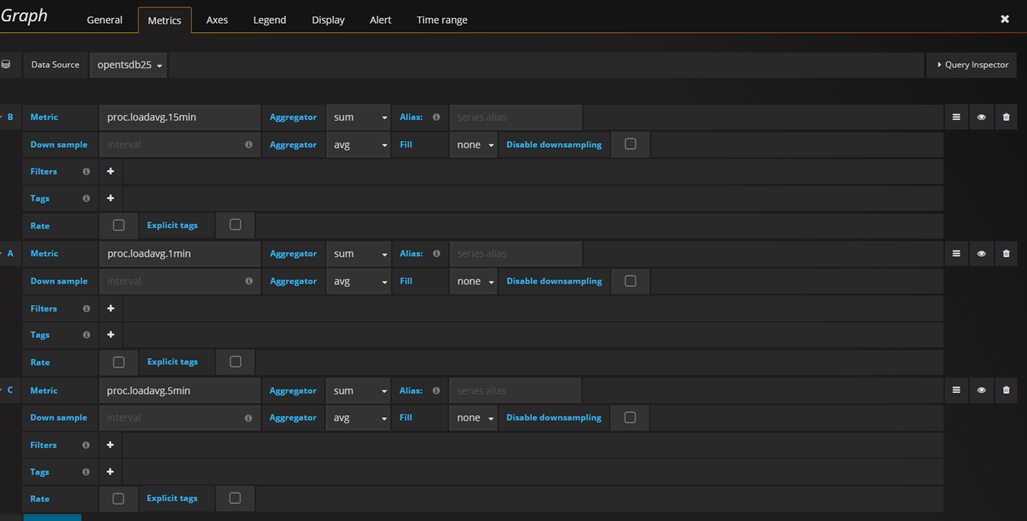
然後,就可以到opentsdb的web界面去繪圖了,下面是我採集了好幾個小時的數據展示:
放到grfana裏面,數據顯示會更好看點。
配置大致這樣的: