


上次我們介紹到USM之IDS suricata,今天我要與大家分享的是安全管理平臺百寶箱中的主機IDS檢測系統[HIDS],主機IDS檢測系統是對網絡IDS檢測系統的補充。下面就讓我們一起聊一聊Ossec吧。
1、簡介
OSSEC是一款開源的IDS檢測系統,包括了日誌分析、完整性檢查、rook-kit檢測,基於時間的警報和主動響應。OSSEC最大的優勢在於它幾乎可以運行在任何一種操作系統上,比如Windows, Linux, OpenBSD,FreeBSD, 以及 MacOS。
環境:
server: centos 6.7 x86_64 172.31.30.100 【具說OpenBSD安全性最好】
agent: fedora 27 x86_64 172.31.30.101
ossec_version: 2.8.3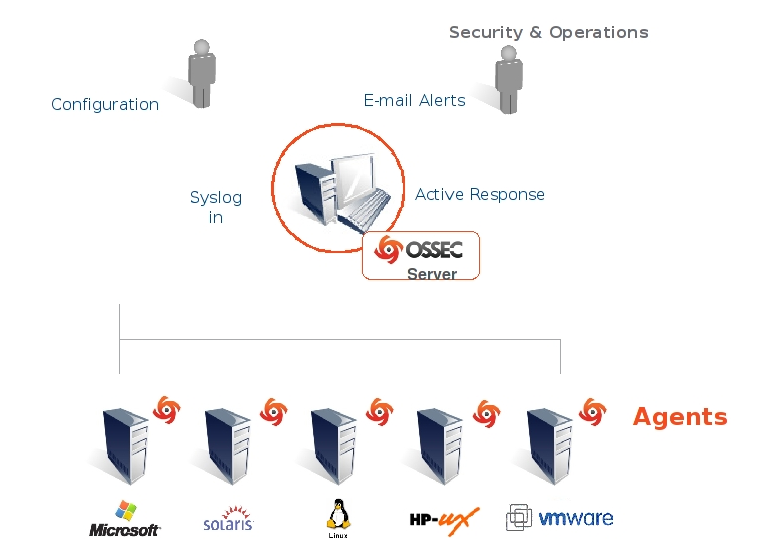
下載地址
wget https://codeload.github.com/ossec/ossec-hids/tar.gz/v2.8.3
源碼最新版:https://codeload.github.com/ossec/ossec-hids/tar.gz/2.9.3
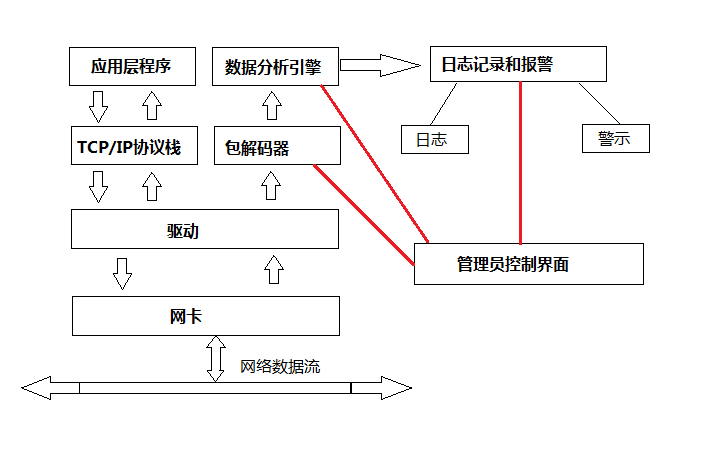
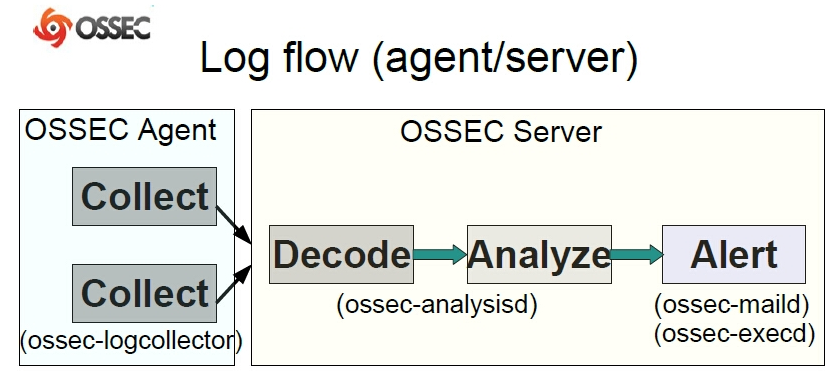
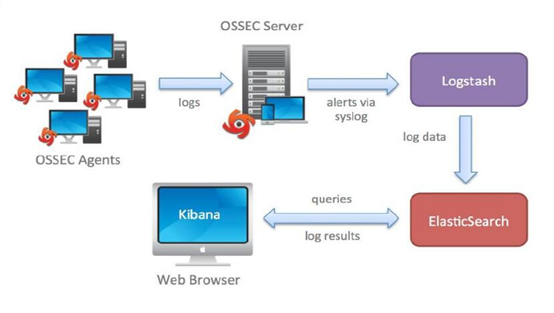
2、ossec 架構
-
ossec三種工作模式
- server【服務端】
- agent【代理端】
- local【本地模式】
-
一臺server默認可有代理256臺,最多支持2048臺,需先執行sysctl -w kern.maxfiles=2048
3、安裝
-
ossec server端安裝
1.關閉selinux,關閉iptables
-
2.解壓安裝
# tar xvzf ossec-hids-2.8.3.tar.gz# cd ossec-hids-2.8.3# ./install.sh -
3.啓動ossec
# service ossec start - 4.查看進程
# ps -aux |grep ossec
ossec client端安裝
# tar xvzf ossec-hids-2.8.3.tar.gz# cd ossec-hids-2.8.3# ./install.sh
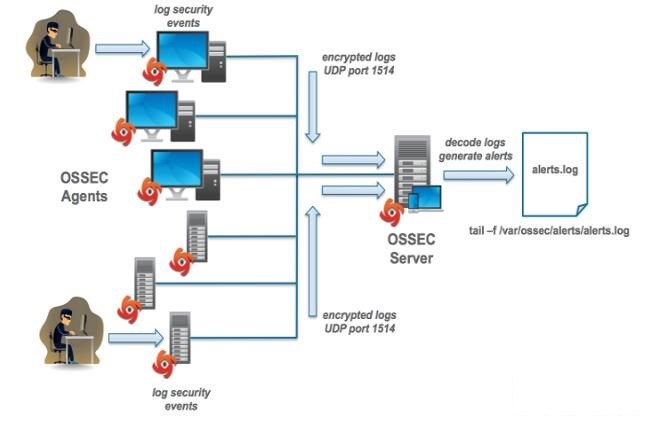
部署拓撲
可視化分析
ossec server添加ossec client
1.服務器端操作# /var/ossec/bin/manage_agents
****************************************
* OSSEC HIDS v2.8 Agent manager.  *
* The following options are available: *
****************************************
   (A)dd an agent (A).
   (E)xtract key for an agent (E).
   (L)ist already added agents (L).
   (R)emove an agent (R).
   (Q)uit.
Choose your action: A,E,L,R or Q: A 【添加agent】

- Adding a new agent (use '\q' to return to the main menu).
  Please provide the following:
   * A name for the new agent: node1 【agent名稱】

   * The IP Address of the new agent: 172.31.30.101 【agentIP地址】
   * An ID for the new agent[001]:
Agent information:
   ID:001
   Name:web
   IP Address:172.31.30.101

Confirm adding it?(y/n): y 【是】
Agent added.

****************************************
* OSSEC HIDS v2.8 Agent manager. *
* The following options are available: *
****************************************
   (A)dd an agent (A).
   (E)xtract key for an agent (E).
   (L)ist already added agents (L).
   (R)emove an agent (R).
   (Q)uit.
Choose your action: A,E,L,R or Q: E 【創建KEY】

Available agents:
   ID: 001, Name: web, IP: 172.31.30.101
Provide the ID of the agent to extract the key (or '\q' to quit): 001 【輸入agent ID】

這個key用於客戶端連接服務器
Agent key information for '001' is:
MDA2IG5vZGU1IDE3Mi4yOC4yMC4xMDcgOGIxZDc0MjgyZTFkZjRhZjE0ODU2MzAwMjc4ZTNlNjBhZWJiMmZhOTY3N2UxYjFhMGI2MmRlZmRjOGJkNmIzNQ==

** Press ENTER to return to the main menu.

****************************************
2.客戶端操作
1)導入 key# /var/ossec/bin/manage_agents
****************************************
* OSSEC HIDS v2.6 Agent manager. *
* The following options are available: *
****************************************
(I)mport key from the server (I).
(Q)uit.
Choose your action: I or Q: I 【導入KEY】將服務端KEY複製到下面並按回車MDA2IG5vZGU1IDE3Mi4yOC4yMC4xMDcgOGIxZDc0MjgyZTFkZjRhZjE0ODU2MzAwMjc4ZTNlNjBhZWJiMmZhOTY3N2UxYjFhMGI2MmRlZmRjOGJkNmIzNQ==2)啓動ossec# /var/ossec/bin/ossec-control start
3)查看端口# netstat -antup|grep ossec
- 啓動 OSSEC HIDS:
/var/ossec/bin/ossec-control start - 停止 OSSEC HIDS:
/var/ossec/bin/ossec-control stop
配置完成!
4、操作命令
# bin/ossec-control
> start: 啓動各項服務
> stop: 停止各項服務
> restart: 重啓各項服務
> status: 查看各項服務狀態
> enable: [database|client-syslog|agentless|debug] 啓動功能支持
> disable: [database|client-syslog|agentless|debug] 關閉功能支持
# bin/agent_control (僅服務端有)
-l 列舉所有可用的agents,服務端會有一個local,表示自身也作爲一個agent被監控
-lc 僅列舉活躍的agents
-i <id> 顯示對應id的Agent的信息
-R <id> 重啓對應id的Agent
-r -a 在所有agents上立即運行完整性和rootkit檢查
-r -u <id> 在指定的agent上立即運行完整性和rootkit檢查
-b <ip> 阻止指定的ip地址
-f <ar> 配合-b使用,指定運行哪個響應
-L 列舉可用的聯動
-s 更改輸出到CSV(用,分隔)
# bin/manage_agents
-V 顯示ossec版本信息
-l 列舉可用的agents,這裏不會顯示local的信息
-e <id> 得到某個agent的key(服務器用)
-r <id> 移除某個agent(服務器用)
-i <id> 導入key(客戶端用)
-f <file> 從文件導入keys(服務器用),文件格式爲IP,NAME
5、配置web訪問
安裝依賴包# yum -y install wget lrzsz gcc mysql mysql-server mysql-devel httpd php php-mysql postgresql
ossec-wui web界面# wget https://github.com/ossec/ossec-wui/archive/0.9.tar.gz# tar -xf ossec-wui-0.9.tar.gz# cd /var/www/html/ossec/ossec-wui
設置web用戶名密碼# ./setup.sh
Setting up ossec ui...
Username: admin
New password:
Re-type new password:
Adding password for user admin
Setup completed successfuly.添加web用戶# vi /etc/groupossec:x:500:apache
設置權限# chmod 770 tmp/# chgrp apache tmp/# vi /etc/httpd/conf.d/ossec.conf
<Directory /var/www/html/ossec/ossec-wui>
   Order deny,allow
   Deny from all
   Allow from 172.31.30.0/24

    Options FollowSymLinks
    AllowOverride None
    Order deny,allow
    allow from all

Options -MultiViews
   AuthName "OSSEC AUTH"
   AuthType Basic
   AuthUserFile /var/www/html/ossec/ossec-wui/.htpasswd
   Require valid-user
</Directory>
OSSEC的圖形界面
訪問URL: http://172.31.30.100/ossec/ossec-wui/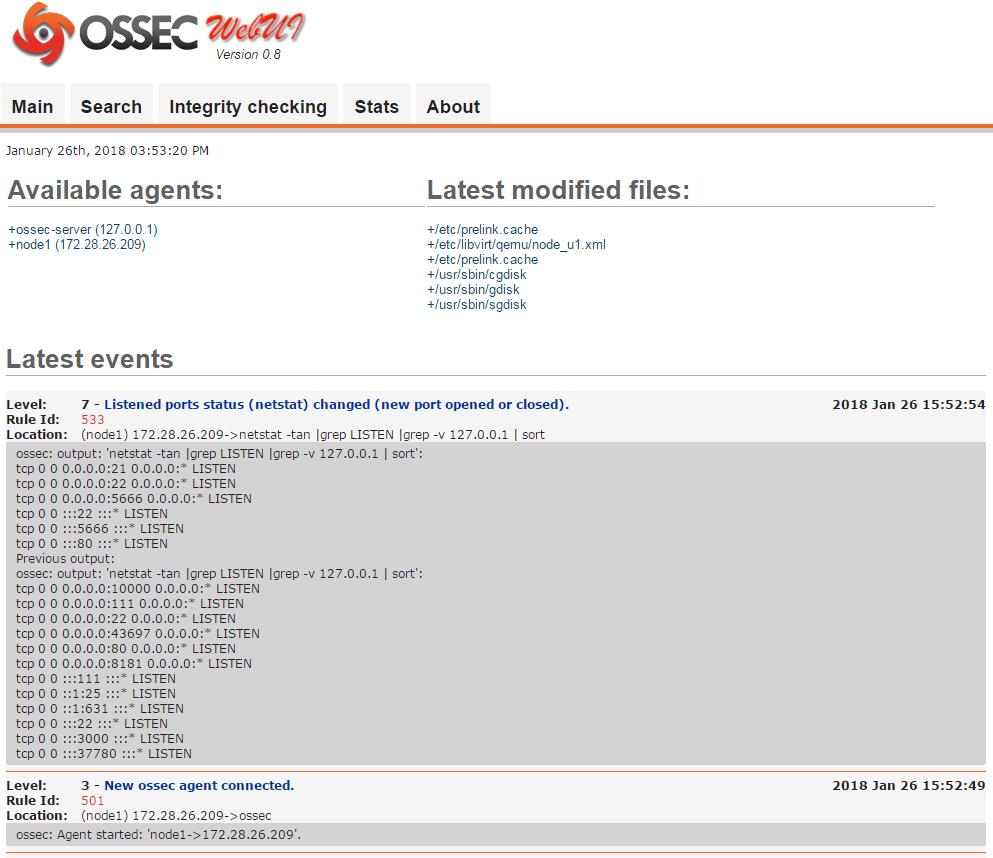
6、總結
如何深入使用OSSEC,就需要對OSSEC的規則進行細分和梳理,配置好相應的事件報警規則,採集到主機報警信息後,我們就可以進行安全防護和安全分析了。OSSEC除了***檢測系統功能外,一般還被用在SEM/SIM(安全事件管理(SEM: Security Event Management)/安全信息管理(SIM:SecurityInformation Management))解決方案中。今後我們會把OSSEC應用到USM中,作爲統一安全管理平臺的核心插件之一。
常見問題解決方法
1)agent未連接(Disconnected或Never connected)的狀態# /var/ossec/bin/ossec-control restart# /etc/init.d/ossec restart
用ngrep命令查看服務端的1514端口的流量信息,看看是否有日誌傳輸過來,一般等10s左右。# ngrep -q -d any port 1514
2)查看ossec是否支持mysql# cd /u01/ossec-hids-2.8.3/src# make setdb
Info: Compiled with MySQL support.
3)文件描述符限制
linux系統默認最大打開文件數爲1024,需要修改內核參數爲2048# ulimit -n 2048# sysctl -w kern.maxfiles=2048# sysctl -w net.core.rmem_default=5123840# sysctl -w net.core.rmem_max = 5123840
設置開機自啓動,在該文件最後添加# vi /etc/profile
ulimit -n 2048# vi /etc/security/limits.conf
ossec soft nofile 2048
ossec hard nofile 2048
ossecr soft nofile 2048
ossecr hard nofile 2048
設置完成之後,執行命令生效# source /etc/profile# sysctl -p
查看是否成功設置open files爲2048# ulimit -a