Docker容器之內網獨立IP訪問
實驗介紹
今天在學習Docker容器的時候,在虛擬機中創建並開啓了一個nginx的container,然後通過端口映射的方法,即將container的80端口映射到虛擬機的80端口,然後在宿主機上通過訪問虛擬機的IP從而訪問到Docker容器的Nginx服務。
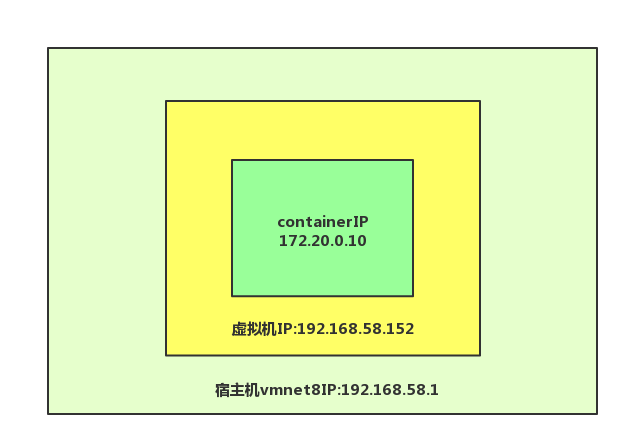
然後開始思考,能否通過分配給container一個獨立的IP,然後在宿主機上訪問這個獨立IP從而訪問Nginx服務。通過各種探索,百度,最終實現,下面開始實驗,這裏用的是虛擬機的NAT模式。
實驗圖解
實驗實施
- 安裝docker服務
[root@promote ~]# yum install docker -y - 關閉防火牆和SElinux
[root@promote ~]# systemctl stop firewalld.service [root@promote ~]# setenforce 0 - 開啓docker服務
[root@promote ~]# systemctl start docker.service [root@promote ~]# systemctl enable docker.service Created symlink from /etc/systemd/system/multi-user.target.wants/docker.service to /usr/lib/systemd/system/docker.service. #將docker服務設置爲開機啓動 - 啓動docker服務後,我們可以通過命令從服務端先搜索nginx鏡像。
![Docker容器之內網獨立IP訪問]()
- 下載星級最高的nginx鏡像,這裏順便說一下使用aliyun的docker源配置。
![Docker容器之內網獨立IP訪問]()
- 下載nginx服務鏡像。
[root@promote etc]# docker pull docker.io/nginx Using default tag: latest Trying to pull repository docker.io/library/nginx ... latest: Pulling from docker.io/library/nginx be8881be8156: Pull complete 32d9726baeef: Pull complete 87e5e6f71297: Pull complete Digest: sha256:d85914d547a6c92faa39ce7058bd7529baacab7e0cd4255442b04577c4d1f424 Status: Downloaded newer image for docker.io/nginx:latest - 在虛擬機中創建一個自定義網絡
[root@promote etc]# docker network create --subnet=172.20.0.0/24 docker-br0 f900579310b9e692ab5a2593d9845be24166120a9de1c16e3143fa5a9c875f96 #創建一個172.20.0.0網段,網橋的名字命名爲docker-br0,這兩個根據自己需要來![Docker容器之內網獨立IP訪問]()
- 在自定義的網段中選取一個IP作爲container的IP來啓動。
[root@promote etc]# docker images REPOSITORY TAG IMAGE ID CREATED SIZE docker.io/nginx latest c82521676580 2 weeks ago 109 MB #查看我們下載下來的鏡像,下面會用到IMAGE ID [root@promote etc]# docker run -itd --net docker-br0 --ip 172.20.0.10 --name nginx c82521676580 /bin/bash a2da3616efd0c53745fd7b33823733598be749c83cd4a84f72025664837b3a77 #i表示保持容器打開,t表示給docker分配一個僞終端,d表示以daemon守護進程的方式開啓 #--net指定網橋名稱,--ip指定啓動ip ,--name指定服務名稱 [root@promote etc]# docker ps -a CONTAINER ID IMAGE COMMAND CREATED STATUS PORTS NAMES a2da3616efd0 c82521676580 "/bin/bash" 4 minutes ago Up 4 minutes 80/tcp nginx #可以看到服務已經啓動 - 進入到容器中安裝一些工具
[root@promote etc]# docker exec -it nginx /bin/bash
#nginx就是上面指定的name
這個時候我們使用ifconfig
root@a2da3616efd0:/# ifconfig
bash: ifconfig: command not found
#可以看到並沒有這個命令,所以我們需要安裝net-tools工具


一開始我以爲使用yum方式安裝,發現沒用, 後來查看系統命令發現,容器裏面使用的是Debian Linux的apt-get命令,首先要更新源。
root@a2da3616efd0:/# apt-get update
#update 是更新 /etc/apt/sources.list 和 /etc/apt/sources.list.d列出的源地址,獲取最新軟件包信息。
Get:1 http://security.debian.org/debian-security stretch/updates InRelease [94.3 kB]
Get:3 http://security.debian.org/debian-security stretch/updates/main amd64 Packages [386 kB]
Ign:2 http://cdn-fastly.deb.debian.org/debian stretch InRelease
Get:4 http://cdn-fastly.deb.debian.org/debian stretch-updates InRelease [91.0 kB]
Get:5 http://cdn-fastly.deb.debian.org/debian stretch Release [118 kB]
Get:6 http://cdn-fastly.deb.debian.org/debian stretch-updates/main amd64 Packages [5148 B]
Get:7 http://cdn-fastly.deb.debian.org/debian stretch Release.gpg [2434 B]
Get:8 http://cdn-fastly.deb.debian.org/debian stretch/main amd64 Packages [7099 kB]
Fetched 7796 kB in 1min 50s (70.8 kB/s)
Reading package lists... Done

root@a2da3616efd0:/proc# apt-get upgrade
#升級已經安裝的軟件包即update中的
Reading package lists... Done
Building dependency tree
Reading state information... Done
Calculating upgrade... Done
0 upgraded, 0 newly installed, 0 to remove and 0 not upgraded.

root@a2da3616efd0:/proc# apt-get install net-tools
#安裝net-tools軟件包
Reading package lists... Done
Building dependency tree
Reading state information... Done
The following NEW packages will be installed:
  net-tools
0 upgraded, 1 newly installed, 0 to remove and 0 not upgraded.
Setting up net-tools (1.60+git20161116.90da8a0-1) ...- 查看容器的ip地址
![Docker容器之內網獨立IP訪問]()
- 開啓Nginx服務
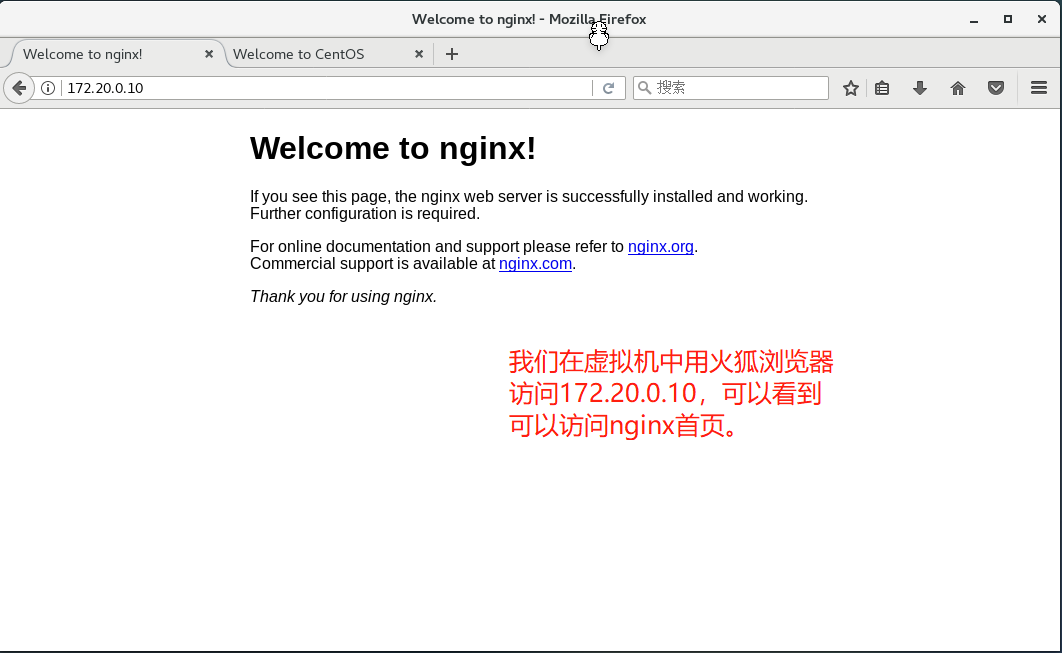
root@a2da3616efd0:~# nginx
root@a2da3616efd0:~# netstat -ntap
Active Internet connections (servers and established)
Proto Recv-Q Send-Q Local Address           Foreign Address         State       PID/Program name
tcp        0      0 0.0.0.0:80              0.0.0.0:*               LISTEN      232/nginx: master p
tcp        0      0 127.0.0.11:42541        0.0.0.0:*               LISTEN      -
#nginx服務已經開啓,系統80端口也已經打開。
我們在虛擬機環境下,用172.20.0.10測試是否能訪問nginx默認首頁。
![Docker容器之內網獨立IP訪問]()
-
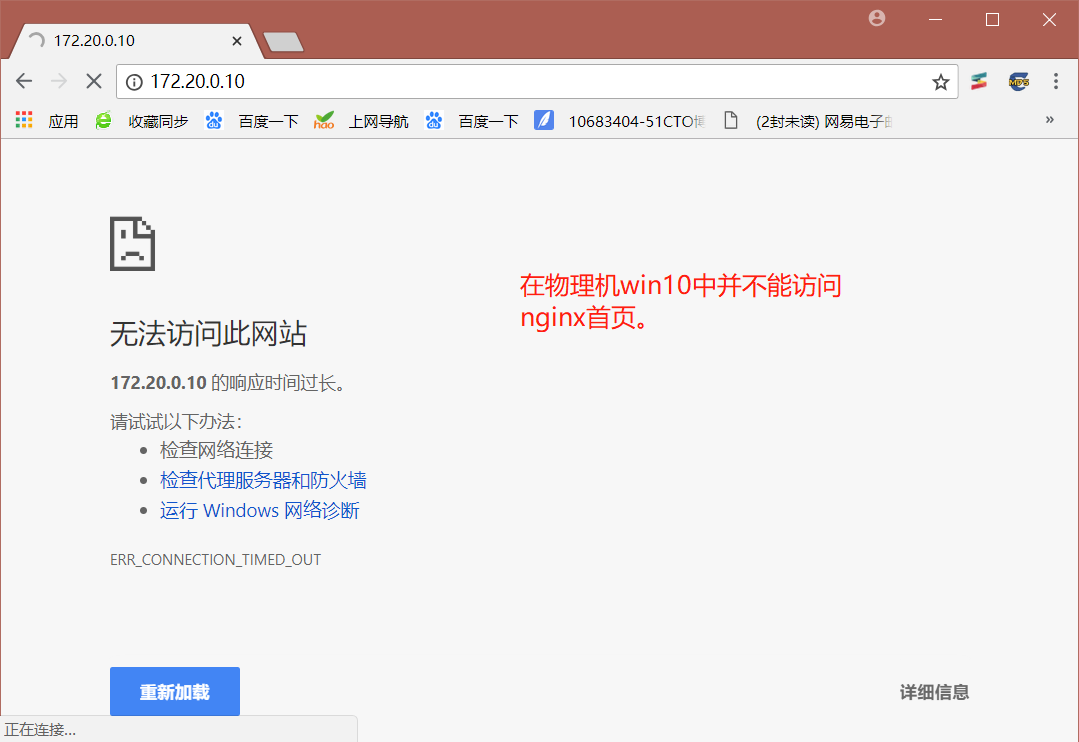
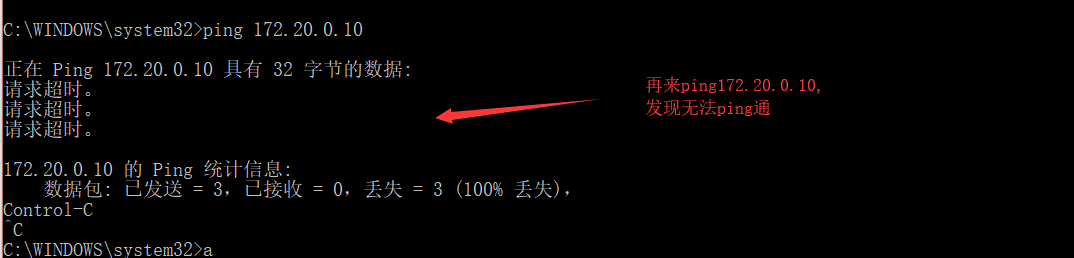
到物理機win10中訪問172.20.0.10,測試是否能訪問
![Docker容器之內網獨立IP訪問]()
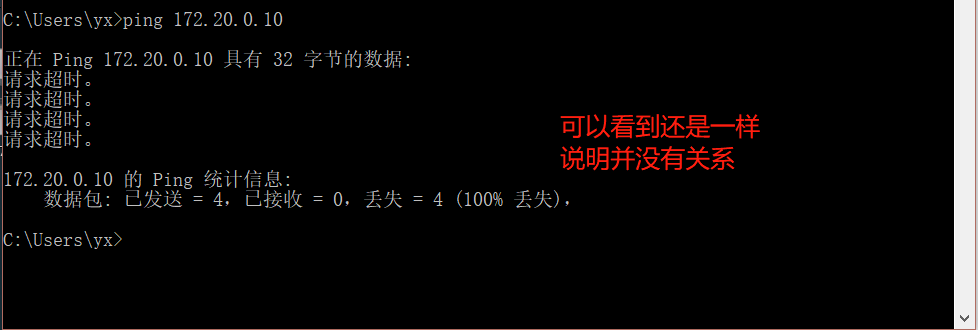
結果就是並不能訪問nginx,我們嘗試使用win10來ping172.20.0.10。![Docker容器之內網獨立IP訪問]()
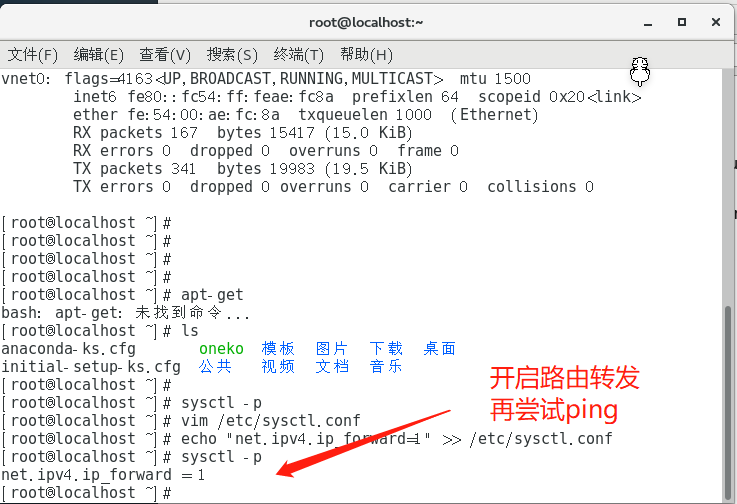
- 嘗試開啓路由轉發
![Docker容器之內網獨立IP訪問]()
![Docker容器之內網獨立IP訪問]()
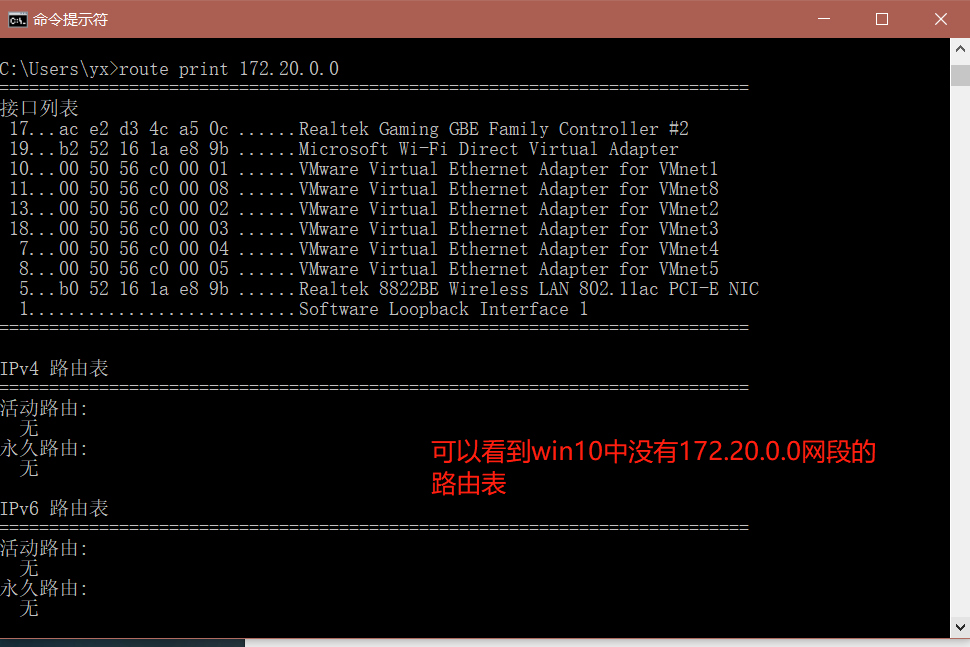
- 分別查看container和win10的路由表
![Docker容器之內網獨立IP訪問]()
![Docker容器之內網獨立IP訪問]()
![Docker容器之內網獨立IP訪問]()
![Docker容器之內網獨立IP訪問]()
-
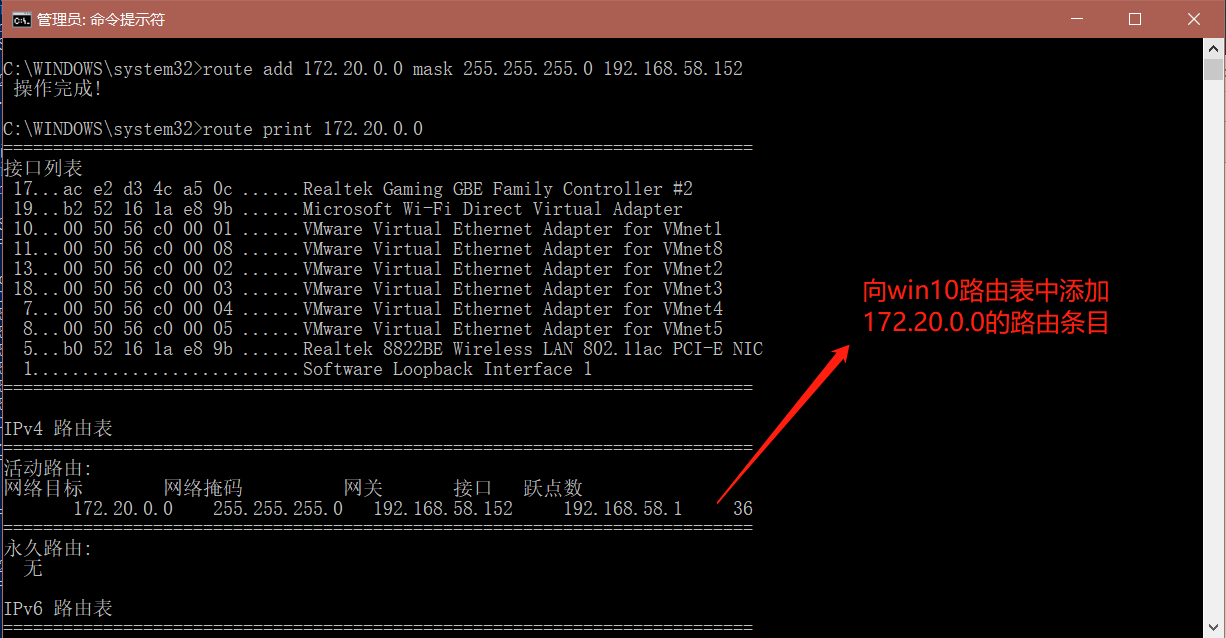
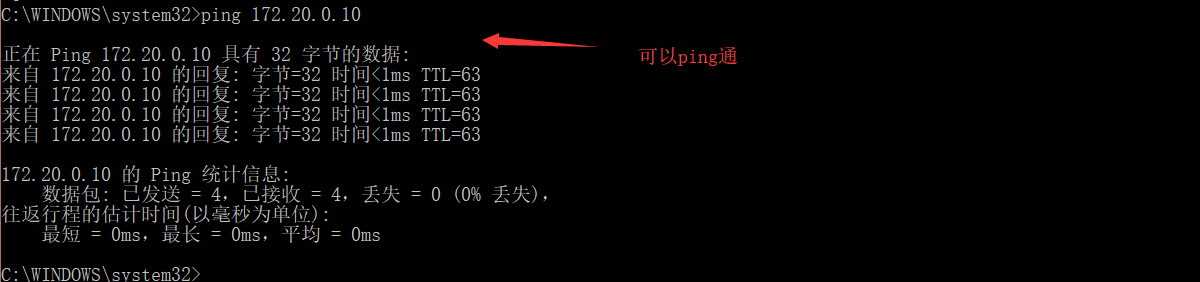
這時候我們再來在win10上訪問172.20.0.10.發現可以訪問了。
![Docker容器之內網獨立IP訪問]()
![Docker容器之內網獨立IP訪問]()
-
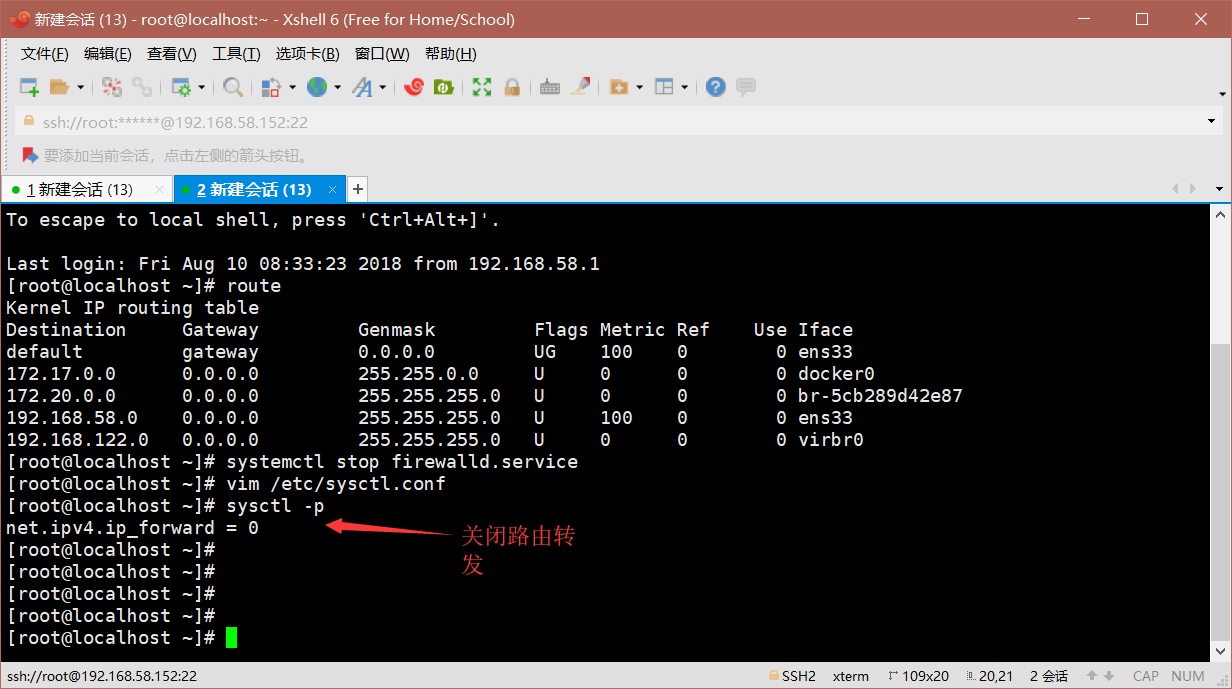
最後我們將虛擬機中的路由轉發關閉試試
![Docker容器之內網獨立IP訪問]()
![Docker容器之內網獨立IP訪問]()
- 最後總結
1、創建自定義網段
2、選一個自定義網段內的IP,開啓容器
3、開啓虛擬機的路由轉發
4、在物理機路由中添加自定義網段的路由條目,指定接口爲虛擬機的IP地址