


rsync遠程同步
rsync簡介
rsync是一個開源的快速備份工具,可以在不同的主機之間鏡像同步整個目錄樹,支持增量備份,保持鏈接和權限,且採用優化的同步算法,在傳輸前執行壓縮,因此非常適用於異地備份、鏡像服務器等應用。
在同步任務中,負責發起rsync同步操作的客戶機稱爲發起端,而負責響應來自於客戶機的rsync同步操作的服務器稱爲同步源。在同步過程中,同步源負責提供文檔的原始位置,而發起端對該位置具有讀取權限,拓撲圖如下。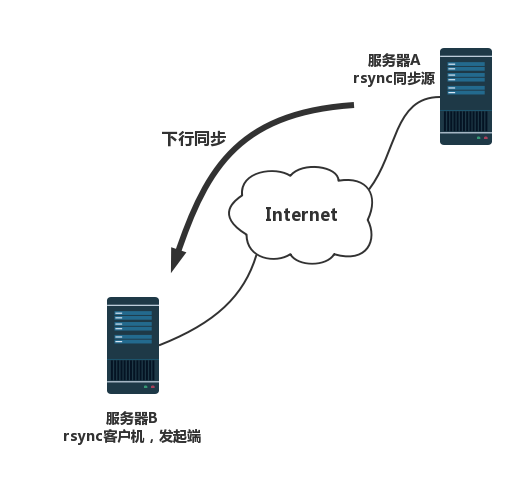
配置rsync同步源
rsync作爲同步源時以守護進程運行,爲其他客戶機提供備份源。配置rsync同步源需要建立配置文件rsyncd.conf,首先創建備份賬號,然後將rsync程序以--daemon選項運行。
配置/etrc/rsyncd.conf文件
在CentOS7中,rsync軟件包是默認安裝好的。
[root@localhost ~]# rpm -q rsync
rsync-3.1.2-4.el7.x86_64
[root@localhost ~]# vim /etc/rsyncd.conf

 uid = root          # 設置運行rsync進程的用戶
 gid = root          # 設置運行rsync進程的用戶組
 use chroot = yes    #禁錮在家目錄
 address = 192.168.58.160   #監聽地址
 port 873                    #監聽端口
 pid file = /var/run/rsyncd.pid    #存放進程PID文件位置
 log file = /var/log/rsyncd.log    #存放日誌文件位置
 hosts allow = 192.168.58.0/24    #允許訪問的客戶機地址

 [wwwroot]                         #共享模塊名稱
 path = /var/www/html              #源目錄的實際路徑
 read only = yes                   #是否爲只讀
 dont compress   = *.gz *.tgz *.zip *.z *.Z *.rpm *.deb *.bz2   #同步時不再壓縮的文件類型
 auth users = backuper             #授權賬戶
 secrets file = /etc/rsyncd_users.db    #存放賬戶信息的數據文件
基於安全性考慮,對於rsync的同步源最好僅允許以只讀方式做同步。另外,同步可以採用匿名的方式,只要將其中的auth users和secrets file配置記錄去掉就可以了。
爲備份賬戶創建數據文件
根據上一步的設置,創建賬號數據文件,添加一行用戶記錄,以冒號分隔,用戶名稱爲backuper,密碼爲abc123.由於賬號信息採用明文存放,因此應調整文件權限,避免賬號信息泄露。
[root@localhost ~]# vim /etc/rsyncd_users.db
backuper:abc123
[root@localhost ~]# chmod 600 /etc/rsyncd_users.db
[root@localhost ~]# ls -l /etc/rsyncd_users.db
-rw-------. 1 root root 16 7月  26 10:55 /etc/rsyncd_users.db
備份用戶backuper需要對源目錄/var/www/html有相應的讀取權限。實際上,由於我們這裏設置的都是root的超級管理員用戶,具有最高權限,如果你設置的uid,gid不是root,那麼需要other組具有讀取權限,這樣才能進行同步。
啓動rsync服務程序,運行參數--daemon
完成上述操作後,執行rsync --daemon命令就可以啓動rsync服務,以獨立監聽服務的方式運行。若要關閉rsync服務,可以採用kill進程的方式。
[root@localhost www]# rsync --daemon
[root@localhost www]# netstat -ntap | grep rsync
tcp        0      0 192.168.58.160:873      0.0.0.0:*               LISTEN      78877/rsync
如果要關閉rsync服務的話,可以採用kill進程的方式。
[root@localhost run]# kill $(cat /var/run/rsyncd.pid)使用rsync備份工具
有了同步源服務器之後,就可以使用rsync工具執行遠程同步了。
rsync命令的基本用法
絕大部分備份程序要求指定原始位置和目標位置,rsync也一樣。最簡單的用法類似於cp命令。例如可以將文件/etc/fstab和目錄/boot/grub同步備份到/opt目錄下。
rsync主要命令選項:
-r:遞歸模式,對子目錄以遞歸模式處理
-l:--links 保留軟鏈結
-v:--verbose 詳細模式輸出
-a:--archive 歸檔模式,表示以遞歸方式傳輸文件,並保持所有文件屬性,等於-rlptgoD
-z:--compress 對備份的文件在傳輸時進行壓縮處理
-p:--perms 保持文件權限。
-o:--owner 保持文件屬主信息。
-g:--group 保持文件屬組信息。
-D:--devices 保持設備文件信息。
-t:--times 保持文件時間信息。
-A:保持ACL屬性信息
-D:保留設備文件及其其他特殊文件
--delete:刪除目標位置有而原始位置沒有的文件
在執行遠程同步任務時,rsync命令需要指定同步源服務器中的資源位置。rsync同步源的資源表示方法爲“用戶名@主機地址::共享模塊”或者“rsync://用戶名@主機地址/共享模塊”,前者爲兩個冒號分隔形式,後者URL地址形式。例如,執行以下操作將訪問rsync同步源,並下載到本地/root/test目錄下備份。
[root@localhost ~]# rsync -avz [email protected]::wwwroot /opt/test
Password:
receiving incremental file list
created directory /opt/test
./
index.html
test1.txt
test2.txt

sent 84 bytes  received 242 bytes  93.14 bytes/sec
total size is 17  speedup is 0.05
[root@localhost ~]# ls /opt/test/
index.html  test1.txt  test2.txt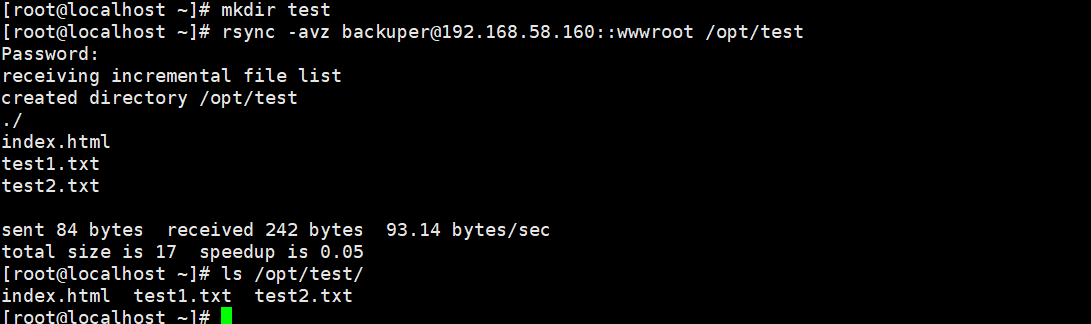
或者
[root@localhost ~]# rm -rf /opt/test/*
[root@localhost ~]# rsync -avz rsync://[email protected]/wwwroot /opt/test
Password:
receiving incremental file list
./
index.html
test1.txt
test2.txt

sent 84 bytes  received 242 bytes  93.14 bytes/sec
total size is 17  speedup is 0.05
爲了實現同步過程中不用輸入密碼,需要在本地創建一個密碼文件,保存backuper用戶的密碼,在執行同步選項時--password-file=/etc/server.pass,同時需要修改這個密碼文件的權限爲600.
[root@localhost ~]# vim /etc/server.pass
[root@localhost ~]# cat /etc/server.pass
abc123
[root@localhost ~]# chmod 600 /etc/server.pass
[root@localhost ~]# ls -l /etc/server.pass
-rw-------. 1 root root 7 7月  26 11:31 /etc/server.pass
[root@localhost ~]# rsync -avz --password-file=/etc/server.pass rsync://[email protected]/wwwroot /opt/test
receiving incremental file list
./
a.txt
b.txt
c.txt

sent 84 bytes  received 275 bytes  718.00 bytes/sec
total size is 17  speedup is 0.05
配置rsync+inotify實時同步
Linux內核中提供了inotify通知接口,用來監控文件系統的各種變化情況,如文件存取、刪除、移動、修改等。利用這一機制,可以非常方便地實現文件移動告警,增量備份,並針對目錄或者文件的變化做出響應。
將rsync工具與inotify機制相結合,可以實現觸發式備份————只要原始位置的文檔發生了變化,就立即啓動增量備份操作,否則處於靜默等待狀態,這樣就避免了按固定週期備份時存在的延遲性、週期性過密等問題。正因爲inotify通知機制由Linux內核提供,因此主要做本機監控,在觸發式備份中應用時更適合上行同步。
調整inotify內核參數
vim /etc/sysctl.conf

fs.inotify.max_queued_events = 16384     #監控事件隊列
fs.inotify.max_user_instances = 1024     #最多監控實例
fs.inotify.max_user_watches = 1048576    #每個實例最多監控文件數

[root@localhost html]# sysctl -p
fs.inotify.max_queued_events = 16384
fs.inotify.max_user_instances = 1024
fs.inotify.max_user_watches = 1048576
安裝inotify-tools
使用inotify機制需要安裝inotify-tools,以便提供inotifywait和inotifywatch輔助工具程序,用來監控和彙總改動情況。
[root@localhost ~]# tar xf inotify-tools-3.14.tar.gz -C /opt/
[root@localhost ~]# cd /opt/inotify-tools-3.14/
[root@localhost inotify-tools-3.14]# ./configure
[root@localhost inotify-tools-3.14]# make && make install
安裝結束後,以監控/var/www/html爲例,可以限制性inotifywait命令,然後在另外一個終端想/var/www/html目錄中添加、移動文件,跟蹤屏幕輸出結果。其中-e用來指定監控哪些事件,選項-m表示持續監控,-r表示遞歸整個目錄,-q簡化輸出信息。
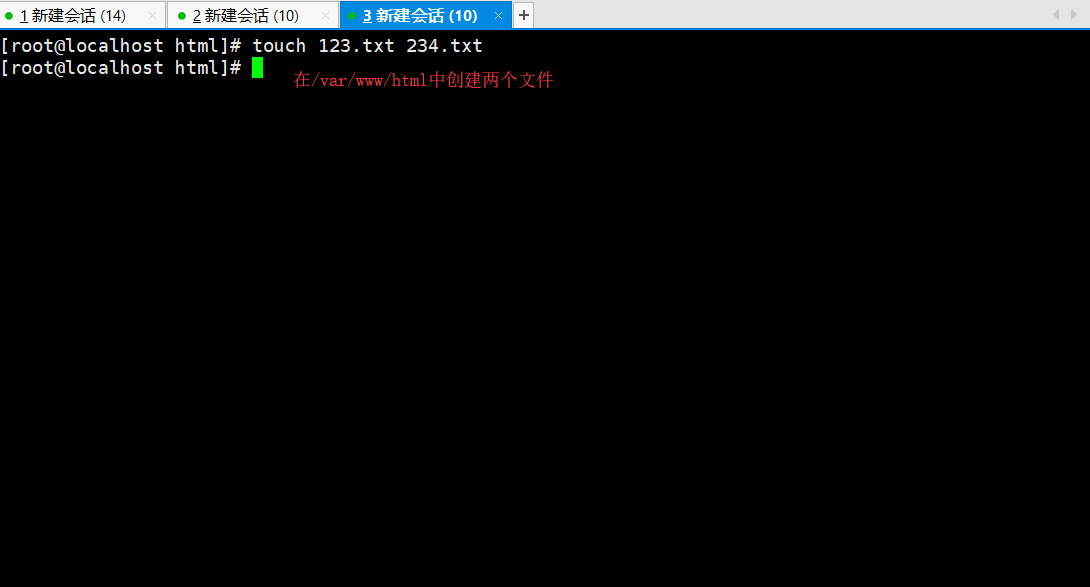
[root@localhost inotify-tools-3.14]# inotifywait -mrq -e modify,create,move,delete /var/www/html/在另外一個終端向目錄中添加文件,
[root@localhost ~]# cd /var/www/html/
[root@localhost html]# touch test01.txt
[root@localhost html]# touch test02.txt
[root@localhost html]#
在監控終端中會顯示變更信息
[root@localhost inotify-tools-3.14]# inotifywait -mrq -e modify,create,move,delete /var/www/html/
/var/www/html/ CREATE test01.txt
/var/www/html/ CREATE test02.txt
inotifywait可以監控modify(修改),create(創建),move(移動),delete(刪除),attrib(屬性變動)等事件,一旦變動就立即輸出結果,inotifywatch可用來收集文件系統變動情況,並在運行結束後輸出彙總的變化情況。
編寫觸發式同步腳本
使用inotifywait輸出的監控結果中,每行記錄依次包括目錄、事件、文件、據此可以識別變動情況,只要檢測到變動就執行rsync同步操作即可。
[root@localhost inotify-tools-3.14]# vim /opt/inotify_rsync.sh

#!/bin/bash
INOTIFY_CMD="inotifywait -mrq -e modify,create,attrib,move,delete /var/www/html/"
RSYNC_CMD="rsync -vazH --delete --password-file=/etc/server.pass /var/www/html/ [email protected]::wwwroot/"
$INOTIFY_CMD | while read DIRECTORY EVENT FILE
do
    if [ $(pgrep rsync | wc -l) -le 5 ] ; then
        $RSYNC_CMD
    fi
done

[root@localhost inotify-tools-3.14]# chmod +x /opt/inotify_rsync.sh
#添加執行權限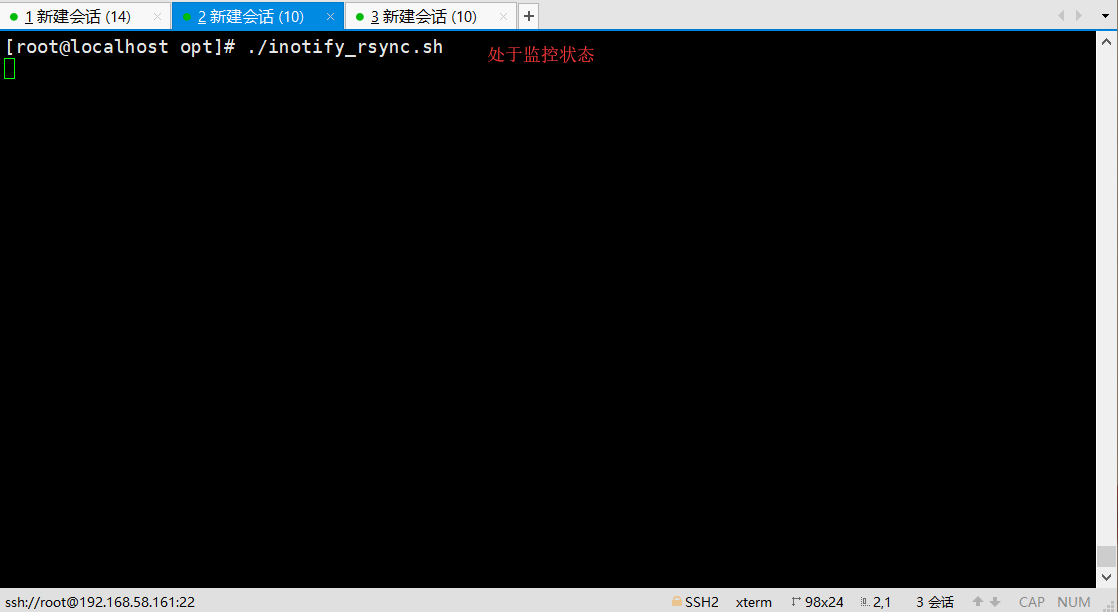
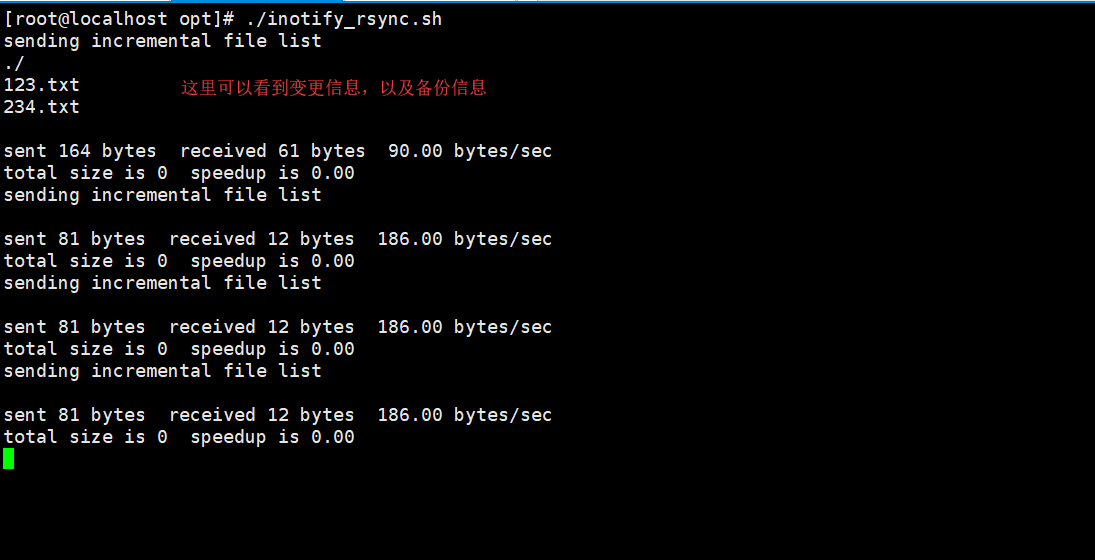

上述腳本用來檢測本機的/var/www/html目錄的變動情況,一旦有更新就觸發rsync同步操作,上傳備份至192.168.58.161(本機是192.168.58.160)的/var/www/html目錄下。