


一、pacemaker 是什麼
1.pacemaker 簡單說明
2.pacemaker 由來
二、pacemaker 特點
三、pacemaker 內部結構
1.羣集組件說明:
2.功能概述
四、centos6.x+pacemaker+corosync實現zabbix高可用
1、環境說明
五、安裝pacemaker和corosync(各個節點均要運行)
1、前提條件各個節點完成主機解析工作。
2、各個節點的時間同步
3、各個節點完成互信工作
4、關閉防火牆與SELinux
5、安裝pacemaker+corosync+pcs
六、配置corosync
1、設置變量
2、更改corosync配置文件
3.生成密鑰文件
七、安裝和配置cman
八、編輯cluster.conf
九、檢查配置文件並開機自啓
十、資源配置
十一、驗證
十二、常用命令
十三、zabbix啓動腳本
一、pacemaker 是什麼
1.pacemaker 簡單說明
pacemaker(直譯:心臟起搏器),是一個羣集資源管理器。它實現最大可用性羣集服務(亦稱資源管理)的節點和資源級故障檢測和恢復使用您的首選集羣基礎設施(OpenAIS的或Heaerbeat)提供的消息和成員能力。
它可以做乎任何規模的集羣,並配備了一個強大的依賴模型,使管理員能夠準確地表達羣集資源之間的關係(包括順序和位置)。幾乎任何可以編寫腳本,可以管理作爲心臟起搏器集羣的一部分。
我再次說明一下,pacemaker是個資源管理器,不是提供心跳信息的,因爲它似乎是一個普遍的誤解,也是值得的。pacemaker是一個延續的CRM(亦稱Heartbeat V2資源管理器),最初是爲心跳,但已經成爲獨立的項目。
2.pacemaker 由來
大家都知道,Heartbeat 到了V3版本後,拆分爲多個項目,其中pacemaker就是拆分出來的資源管理器。
Heartbeat 3.0拆分之後的組成部分:
Heartbeat:將原來的消息通信層獨立爲heartbeat項目,新的heartbeat只負責維護集羣各節點的信息以及它們之前通信;
Cluster Glue:相當於一箇中間層,它用來將heartbeat和pacemaker關聯起來,主要包含2個部分,即爲LRM和STONITH。
Resource Agent:用來控制服務啓停,監控服務狀態的腳本集合,這些腳本將被LRM調用從而實現各種資源啓動、停止、監控等等。
Pacemaker : 也就是Cluster Resource Manager (簡稱CRM),用來管理整個HA的控制中心,客戶端通過pacemaker來配置管理監控整個集羣。
二、pacemaker 特點
主機和應用程序級別的故障檢測和恢復
幾乎支持任何冗餘配置
同時支持多種集羣配置模式
配置策略處理法定人數損失(多臺機器失敗時)
支持應用啓動/關機順序
支持,必須/必須在同一臺機器上運行的應用程序
支持多種模式的應用程序(如主/從)
可以測試任何故障或羣集的羣集狀態
三、pacemaker 內部結構
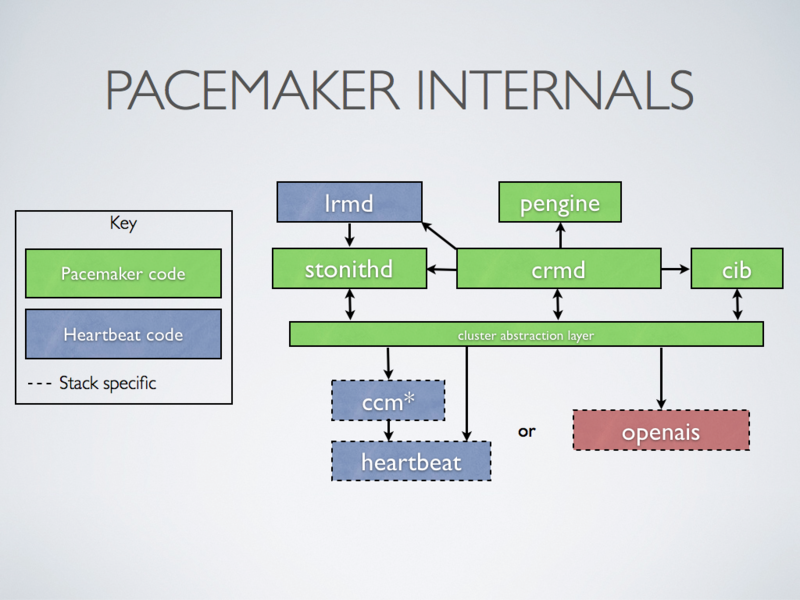
1.羣集組件說明:
stonithd:心跳系統。
lrmd:本地資源管理守護進程。它提供了一個通用的接口支持的資源類型。直接調用資源代理(腳本)。
pengine:政策引擎。根據當前狀態和配置集羣計算的下一個狀態。產生一個過渡圖,包含行動和依賴關係的列表。
CIB:羣集信息庫。包含所有羣集選項,節點,資源,他們彼此之間的關係和現狀的定義。同步更新到所有羣集節點。
CRMD:集羣資源管理守護進程。主要是消息代理的PEngine和LRM,還選舉一個領導者(DC)統籌活動(包括啓動/停止資源)的集羣。
OpenAIS:OpenAIS的消息和成員層。
Heartbeat:心跳消息層,OpenAIS的一種替代。
CCM:共識羣集成員,心跳成員層。
CMAN是紅帽RHCS套件的核心部分,CCS是CMAN集羣配置系統,配置cluster.conf,而cluster.conf其實就是openais的配置文件,通過CCS映射到openais。
2.功能概述
CIB使用XML表示集羣的集羣中的所有資源的配置和當前狀態。CIB的內容會被自動在整個集羣中同步,使用PEngine計算集羣的理想狀態,生成指令列表,然後輸送到DC(指定協調員)。Pacemaker 集羣中所有節點選舉的DC節點作爲主決策節點。如果當選DC節點宕機,它會在所有的節點上, 迅速建立一個新的DC。DC將PEngine生成的策略,傳遞給其他節點上的LRMd(本地資源管理守護程序)或CRMD通過集羣消息傳遞基礎結構。當集羣中有節點宕機,PEngine重新計算的理想策略。在某些情況下,可能有必要關閉節點,以保護共享數據或完整的資源回收。爲此,Pacemaker配備了stonithd設備。STONITH可以將其它節點“爆頭”,通常是實現與遠程電源開關。Pacemaker會將STONITH設備,配置爲資源保存在CIB中,使他們可以更容易地監測資源失敗或宕機。
四、centos6.x+pacemaker+corosync實現zabbix高可用
1、環境說明
OS:Centos 6.7 x86_64 mini
APP: Pacemaker 1.1.15
LNMP+Zabbix 3.4.1
corosync+pcs+cman
IP ADDR:vip-192.168.8.47/20
zabbix01-192.168.8.61/20
zabbix02-192.168.8.63/20
zabbixdb-192.168.8.120/20
PS:IP地址需要根據個人具體環境配置,VIP和zabbix要在同一網段。
拓撲結構

PS:接下來會直接介紹pacemaker和corosync的安裝和配置,關於zabbix+LNMP環境的部分請參考之前發表的“zabbix3.2編譯安裝”或“zabbix高可用”兩篇文章。
五、安裝pacemaker和corosync(各個節點均要運行)
1、前提條件各個節點完成主機解析工作。
vim /etc/hosts
# cat /etc/hosts
127.0.0.1 localhost localhost.localdomain localhost4 localhost4.localdomain4
::1 localhost localhost.localdomain localhost6 localhost6.localdomain6
192.168.8.61 zabbix01.okooo.cn zabbix01
192.168.8.63 zabbix02.okooo.cn zabbix02
192.168.8.120 zbxdb.okooo.cn zbxdb
2、各個節點的時間同步
ntpdate 210.72.145.44
3、各個節點完成互信工作
ssh-keygen -t rsa -f ~/.ssh/id_rsa -P ''
ssh-copy-id -i .ssh/id_rsa.pub root@zabbix01/02/db.okooo.cn
4、關閉防火牆與SELinux
# cat /etc/selinux/config
# This file controls the state of SELinux on the system.
# SELINUX= can take one of these three values:
# enforcing - SELinux security policy is enforced.
# permissive - SELinux prints warnings instead of enforcing.
# disabled - SELinux is fully disabled.
SELINUX=disabled
# SELINUXTYPE= type of policy in use. Possible values are:
# targeted - Only targeted network daemons are protected.
# strict - Full SELinux protection.
SELINUXTYPE=targeted
# /etc/init.d/iptables status
iptables: Firewall is not running.
5、安裝pacemaker+corosync+pcs
yum install -y pacemaker corosync pcs
六、配置corosync
1、設置變量
export ais_port=4000
export ais_mcast=226.94.1.1
export ais_addr=192.168.15.0
env|grep ais
2、更改corosync配置文件
cp /etc/corosync/corosync.conf.example /etc/corosync/corosync.conf
sed -i.bak“s /.* mcastaddr:。* / mcastaddr:\ $ ais_mcast / g”/etc/corosync/corosync.conf
sed -i.bak“s /.* mcastport:。* / mcastport:\ $ ais_port / g”/etc/corosync/corosync.conf
sed -i.bak“s /.* bindnetaddr:。* / bindnetaddr:\ $ ais_addr / g”/etc/corosync/corosync.confcat /etc/corosync/corosync.conf
# Please read the corosync.conf.5 manual page compatibility: whitetanktotem { version: 2 secauth: on #啓動認證 threads: 2 interface { ringnumber: 0 bindnetaddr: 192.168.15.0 #修改心跳線網段 mcastaddr: 226.94.1.1 #組播傳播心跳信息 mcastport: 4000 ttl: 1 } }logging { fileline: off to_stderr: no to_logfile: yes to_syslog: no logfile: /var/log/cluster/corosync.log #日誌位置 debug: off timestamp: on logger_subsys { subsys: AMF debug: off } }amf { mode: disabled }#啓用pacemakerservice { ver: 0 name: pacemaker }aisexec { user: root group: root }3.生成密鑰文件
七、安裝和配置cman
yum install -y cman
sed -i.sed "s/.*CMAN_QUORUM_TIMEOUT=.*/CMAN_QUORUM_TIMEOUT=0/g" /etc/sysconfig/cman
# cat /etc/sysconfig/cman
# CMAN_CLUSTER_TIMEOUT -- amount of time to wait to join a cluster
# before giving up. If CMAN_CLUSTER_TIMEOUT is positive, then we will
# wait CMAN_CLUSTER_TIMEOUT seconds before giving up and failing if
# we can't join a cluster. If CMAN_CLUSTER_TIMEOUT is zero, then we
# will wait indefinitely for a cluster join. If CMAN_CLUSTER_TIMEOUT is
# negative, do not check to see if we have joined a cluster.
#CMAN_CLUSTER_TIMEOUT=5# CMAN_QUORUM_TIMEOUT -- amount of time to wait for a quorate cluster on
# startup. Quorum is needed by many other applications, so we may as
# well wait here. If CMAN_QUORUM_TIMEOUT is zero, quorum will
# be ignored.
CMAN_QUORUM_TIMEOUT=0# CMAN_SHUTDOWN_TIMEOUT -- amount of time to wait for cman to become a
# cluster member before calling 'cman_tool' leave during shutdown.
# The default is 60 seconds
#CMAN_SHUTDOWN_TIMEOUT=6# CMAN_NOTIFYD_START - control the startup behaviour for cmannotifyd,
# the variable can take 3 values:
# yes | will always start cmannotifyd
# no | will never start cmannotifyd
# conditional (default) | will start cmannotifyd only if scriptlets
# are found in /etc/cluster/cman-notify.d
#CMAN_NOTIFYD_START=conditional# CMAN_SSHD_START -- control sshd startup behaviour,
# the variable can take 2 values:
# yes | cman will start sshd as early as possible
# no (default) | cman will not start sshd
#CMAN_SSHD_START=no# DLM_CONTROLD_OPTS -- allow extra options to be passed to dlm_controld daemon.
#DLM_CONTROLD_OPTS=""# Allow tuning of DLM kernel config.
# do NOT change unless instructed to do so.
#DLM_LKBTBL_SIZE=""
#DLM_RSBTBL_SIZE=""
#DLM_DIRTBL_SIZE=""
#DLM_TCP_PORT=""# FENCE_JOIN_TIMEOUT -- seconds to wait for fence domain join to
# complete. If the join hasn't completed in this time, fence_tool join
# exits with an error, and this script exits with an error. To wait
# indefinitely set the value to -1.
#FENCE_JOIN_TIMEOUT=20# FENCED_MEMBER_DELAY -- amount of time to delay fence_tool join to allow
# all nodes in cluster.conf to become cluster members. In seconds.
#FENCED_MEMBER_DELAY=45# FENCE_JOIN -- boolean value used to control whether or not this node
# should join the fence domain. If FENCE_JOIN is set to "no", then
# the script will not attempt to the fence domain. If FENCE_JOIN is
# set to "yes", then the script will attempt to join the fence domain.
# If FENCE_JOIN is set to any other value, the default behavior is
# to join the fence domain (equivalent to "yes").
# When setting FENCE_JOIN to "no", it is important to also set
# DLM_CONTROLD_OPTS="-f0" (at least) for correct operation.
# Please note that clusters without fencing are not
# supported by Red Hat except for MRG installations.
#FENCE_JOIN="yes"# FENCED_OPTS -- allow extra options to be passed to fence daemon.
#FENCED_OPTS=""# NETWORK_BRIDGE_SCRIPT -- script to use for xen network bridging.
# This script must exist in the /etc/xen/scripts directory.
# The default script is "network-bridge".
#NETWORK_BRIDGE_SCRIPT="network-bridge"# CLUSTERNAME -- override clustername as specified in cluster.conf
#CLUSTERNAME=""# NODENAME -- specify the nodename of this node. Default autodetected.
#NODENAME=""# CONFIG_LOADER -- select default config parser.
# This can be:
# xmlconfig - read directly from cluster.conf and use ricci as default
# config propagation method. (default)
#CONFIG_LOADER=xmlconfig# CONFIG_VALIDATION -- select default config validation behaviour.
# This can be:
# FAIL - Use a very strict checking. The config will not be loaded if there
# are any kind of warnings/errors
# WARN - Same as FAIL, but will allow the config to load (this is temporarily
# the default behaviour)
# NONE - Disable config validation. Highly discouraged
#CONFIG_VALIDATION=WARN# CMAN_LEAVE_OPTS -- allows extra options to be passed to cman_tool when leave
# operation is performed.
#CMAN_LEAVE_OPTS=""# INITLOGLEVEL -- select how verbose the init script should be.
# Possible values:
# quiet - only one line notification for start/stop operations
# terse (default) - show only required activity
# full - show everything
#INITLOGLEVEL=terse
八、編輯cluster.conf
<?xml version="1.0"?>
<cluster config_version="1" name="zabbixcluster">
<logging debug="off"/>
<clusternodes>
<clusternode name="zabbix02" nodeid="1">
<fence>
<method name="pcmk-redirect">
<device name="pcmk" port="zabbix02"/>
</method>
</fence>
</clusternode>
<clusternode name="zabbix01" nodeid="2">
<fence>
<method name="pcmk-redirect">
<device name="pcmk" port="zabbix01"/>
</method>
</fence>
</clusternode>
</clusternodes>
<fencedevices>
<fencedevice name="pcmk" agent="fence_pcmk"/>
</fencedevices>
<cman> <multicast addr="226.94.1.1"/></cman> => when running more clusters in same network change multicast address
</cluster>
九、檢查配置文件並開機自啓
ccs_config_validate
service cman start
cman_tool nodes
service pacemaker start
chkconfig cman on
chkconfig pacemaker on
十、資源配置
pcs cluster auth zabbix01 zabbix02 #節點間認證
pcs cluster start --all #啓動集羣中所有節點
pcs resource create ClusterIP IPaddr2 ip=192.168.8.47 cidr_netmask=32 op monitor interval=2s #創建一個名爲ClusterIP,類型是IPadd2,VIP是192.168.8.47/32 每隔2秒檢測一次的資源
pcs property set stonith-enabled=false #因我們沒有STONITH設備,所以我們先關閉這個屬性
pcs resource create zabbix-server lsb:zabbix_server op monitor interval=5s #創建一個名爲zabbix-server、標準是lsb、應用是zabbis_server,每隔5秒檢測一次的資源。lsb指/etc/init.d/下的啓動腳本
pcs resource group add zabbix ClusterIP zabbix-server #將ClusterIP zabbix-server資源加入到zabbix資源組中
pcs property set no-quorum-policy="ignore" #忽略法定人數不足時進行仲裁
pcs property set default-resource-stickiness="100" #資源粘性爲100
pcs constraint colocation add zabbix-server ClusterIP #資源共置
pcs constraint order ClusterIP then zabbix-server #資源限制,確保VIP和service在同一個節點上運行,而且VIP要在service之前完成。
pcs constraint location ClusterIP prefers zabbix01 #ClusterIP更喜歡在zabbix01節點上,可用於節點故障恢復
pcs constraint location zabbix-server prefers zabbix01 #zabbix-server更喜歡在zabbix01節點上,可用於故障恢復
十一、驗證
1、在zabbix01上操作停止zabbix_server 服務

PS:集羣可以保證服務的高可用
root@zabbix01:~
# pcs resource
Resource Group: zabbix
ClusterIP (ocf::heartbeat:IPaddr2): Started zabbix01
zabbix-server (lsb:zabbix_server): Started zabbix01
root@zabbix01:~
# ip a
1: lo: <LOOPBACK,UP,LOWER_UP> mtu 65536 qdisc noqueue state UNKNOWN
link/loopback 00:00:00:00:00:00 brd 00:00:00:00:00:00
inet 127.0.0.1/8 scope host lo
inet6 ::1/128 scope host
valid_lft forever preferred_lft forever
2: eth0: <BROADCAST,MULTICAST,UP,LOWER_UP> mtu 1500 qdisc pfifo_fast state UP qlen 1000
link/ether 00:50:56:bb:68:49 brd ff:ff:ff:ff:ff:ff
inet 192.168.8.61/20 brd 192.168.15.255 scope global eth0
inet 192.168.8.47/32 brd 192.168.15.255 scope global eth0
inet6 fe80::250:56ff:febb:6849/64 scope link
valid_lft forever preferred_lft forever
PS:此時VIP和資源均在zabbix01上運行
root@zabbix01:~
# ip a
1: lo: <LOOPBACK,UP,LOWER_UP> mtu 65536 qdisc noqueue state UNKNOWN
link/loopback 00:00:00:00:00:00 brd 00:00:00:00:00:00
inet 127.0.0.1/8 scope host lo
inet6 ::1/128 scope host
valid_lft forever preferred_lft forever
2: eth0: <BROADCAST,MULTICAST,UP,LOWER_UP> mtu 1500 qdisc pfifo_fast state UP qlen 1000
link/ether 00:50:56:bb:68:49 brd ff:ff:ff:ff:ff:ff
inet 192.168.8.61/20 brd 192.168.15.255 scope global eth0
inet6 fe80::250:56ff:febb:6849/64 scope link
valid_lft forever preferred_lft forever
root@zabbix01:~
# ssh zabbix02 "pcs resource"
Resource Group: zabbix
ClusterIP (ocf::heartbeat:IPaddr2): Started zabbix02
zabbix-server (lsb:zabbix_server): Started zabbix02
root@zabbix01:~
# pcs cluster start zabbix01
zabbix01: Starting Cluster...
root@zabbix01:~
# ip a
1: lo: <LOOPBACK,UP,LOWER_UP> mtu 65536 qdisc noqueue state UNKNOWN
link/loopback 00:00:00:00:00:00 brd 00:00:00:00:00:00
inet 127.0.0.1/8 scope host lo
inet6 ::1/128 scope host
valid_lft forever preferred_lft forever
2: eth0: <BROADCAST,MULTICAST,UP,LOWER_UP> mtu 1500 qdisc pfifo_fast state UP qlen 1000
link/ether 00:50:56:bb:68:49 brd ff:ff:ff:ff:ff:ff
inet 192.168.8.61/20 brd 192.168.15.255 scope global eth0
inet 192.168.8.47/32 brd 192.168.15.255 scope global eth0
inet6 fe80::250:56ff:febb:6849/64 scope link
valid_lft forever preferred_lft forever
root@zabbix01:~
# pcs resource
Resource Group: zabbix
ClusterIP (ocf::heartbeat:IPaddr2): Started zabbix01
zabbix-server (lsb:zabbix_server): Started zabbix01
PS:重啓集羣后資源和VIP均被zabbix02接管,但zabbix01恢復後資源與VIP又再次回到zabbix01.
十二、常用命令
1、查看集羣狀態
# pcs cluster status
Cluster Status:
Stack: cman
Current DC: zabbix01 (version 1.1.15-5.el6-e174ec8) - partition with quorum
Last updated: Thu Sep 21 02:13:20 2017 Last change: Wed Sep 20 09:13:10 2017 by root via cibadmin on zabbix01
2 nodes and 2 resources configured
PCSD Status:
zabbix01: Online
zabbix02: Online
2、查看配置
# pcs config show
Cluster Name: zabbixcluster
Corosync Nodes:
zabbix02 zabbix01
Pacemaker Nodes:
zabbix01 zabbix02
Resources:
Group: zabbix
Resource: ClusterIP (class=ocf provider=heartbeat type=IPaddr2)
Attributes: ip=192.168.8.47 cidr_netmask=32
Operations: start interval=0s timeout=20s (ClusterIP-start-interval-0s)
stop interval=0s timeout=20s (ClusterIP-stop-interval-0s)
monitor interval=2s (ClusterIP-monitor-interval-2s)
Resource: zabbix-server (class=lsb type=zabbix_server)
Operations: start interval=0s timeout=15 (zabbix-server-start-interval-0s)
stop interval=0s timeout=15 (zabbix-server-stop-interval-0s)
monitor interval=5s (zabbix-server-monitor-interval-5s)
Stonith Devices:
Fencing Levels:
Location Constraints:
Ordering Constraints:
Colocation Constraints:
Ticket Constraints:
Alerts:
No alerts defined
Resources Defaults:
No defaults set
Operations Defaults:
timeout: 60s
Cluster Properties:
cluster-infrastructure: cman
dc-version: 1.1.15-5.el6-e174ec8
default-resource-stickiness: 100
have-watchdog: false
last-lrm-refresh: 1505857479
no-quorum-policy: ignore
stonith-enabled: false
# pcs cluster cib
<cib crm_feature_set="3.0.10" validate-with="pacemaker-2.5" epoch="82" num_updates="182" admin_epoch="0" cib-last-written="Thu Sep 21 02:56:11 2017" update-origin="zabbix01" update-client="cibadmin" update-user="root" have-quorum="1" dc-uuid="zabbix02">
<configuration>
<crm_config>
<cluster_property_set id="cib-bootstrap-options">
<nvpair id="cib-bootstrap-options-have-watchdog" name="have-watchdog" value="false"/>
<nvpair id="cib-bootstrap-options-dc-version" name="dc-version" value="1.1.15-5.el6-e174ec8"/>
<nvpair id="cib-bootstrap-options-cluster-infrastructure" name="cluster-infrastructure" value="cman"/>
<nvpair id="cib-bootstrap-options-stonith-enabled" name="stonith-enabled" value="false"/>
<nvpair id="cib-bootstrap-options-no-quorum-policy" name="no-quorum-policy" value="ignore"/>
<nvpair id="cib-bootstrap-options-default-resource-stickiness" name="default-resource-stickiness" value="100"/>
<nvpair id="cib-bootstrap-options-last-lrm-refresh" name="last-lrm-refresh" value="1505857479"/>
</cluster_property_set>
</crm_config>
<nodes>
<node id="zabbix02" uname="zabbix02"/>
<node id="zabbix01" uname="zabbix01"/>
</nodes>
<resources>
<group id="zabbix">
<primitive class="ocf" id="ClusterIP" provider="heartbeat" type="IPaddr2">
<instance_attributes id="ClusterIP-instance_attributes">
<nvpair id="ClusterIP-instance_attributes-ip" name="ip" value="192.168.8.47"/>
<nvpair id="ClusterIP-instance_attributes-cidr_netmask" name="cidr_netmask" value="32"/>
</instance_attributes>
<operations>
<op id="ClusterIP-start-interval-0s" interval="0s" name="start" timeout="20s"/>
<op id="ClusterIP-stop-interval-0s" interval="0s" name="stop" timeout="20s"/>
<op id="ClusterIP-monitor-interval-2s" interval="2s" name="monitor"/>
</operations>
<meta_attributes id="ClusterIP-meta_attributes"/>
</primitive>
<primitive class="lsb" id="zabbix-server" type="zabbix_server">
<instance_attributes id="zabbix-server-instance_attributes"/>
<operations>
<op id="zabbix-server-start-interval-0s" interval="0s" name="start" timeout="15"/>
<op id="zabbix-server-stop-interval-0s" interval="0s" name="stop" timeout="15"/>
<op id="zabbix-server-monitor-interval-5s" interval="5s" name="monitor"/>
</operations>
<meta_attributes id="zabbix-server-meta_attributes"/>
</primitive>
</group>
</resources>
<constraints>
<rsc_colocation id="colocation-zabbix-server-ClusterIP-INFINITY" rsc="zabbix-server" score="INFINITY" with-rsc="ClusterIP"/>
<rsc_order first="ClusterIP" first-action="start" id="order-ClusterIP-zabbix-server-mandatory" then="zabbix-server" then-action="start"/>
<rsc_location id="location-ClusterIP-zabbix01-INFINITY" node="zabbix01" rsc="ClusterIP" score="INFINITY"/>
<rsc_location id="location-zabbix-server-zabbix01-INFINITY" node="zabbix01" rsc="zabbix-server" score="INFINITY"/>
</constraints>
<op_defaults>
<meta_attributes id="op_defaults-options">
<nvpair id="op_defaults-options-timeout" name="timeout" value="60s"/>
</meta_attributes>
</op_defaults>
</configuration>
<status>
<node_state id="zabbix01" uname="zabbix01" in_ccm="true" crmd="online" crm-debug-origin="do_update_resource" join="member" expected="member">
<lrm id="zabbix01">
<lrm_resources>
<lrm_resource id="zabbix-server" type="zabbix_server" class="lsb">
<lrm_rsc_op id="zabbix-server_last_0" operation_key="zabbix-server_start_0" operation="start" crm-debug-origin="do_update_resource" crm_feature_set="3.0.10" transition-key="10:56:0:76f2a258-6d10-4819-8063-54875d8f896a" transition-magic="0:0;10:56:0:76f2a258-6d10-4819-8063-54875d8f896a" on_node="zabbix01" call-id="12" rc-code="0" op-status="0" interval="0" last-run="1505940302" last-rc-change="1505940302" exec-time="44" queue-time="0" op-digest="f2317cad3d54cec5d7d7aa7d0bf35cf8"/>
<lrm_rsc_op id="zabbix-server_monitor_5000" operation_key="zabbix-server_monitor_5000" operation="monitor" crm-debug-origin="do_update_resource" crm_feature_set="3.0.10" transition-key="11:56:0:76f2a258-6d10-4819-8063-54875d8f896a" transition-magic="0:0;11:56:0:76f2a258-6d10-4819-8063-54875d8f896a" on_node="zabbix01" call-id="13" rc-code="0" op-status="0" interval="5000" last-rc-change="1505940302" exec-time="27" queue-time="1" op-digest="873ed4f07792aa8ff18f3254244675ea"/>
</lrm_resource>
<lrm_resource id="ClusterIP" type="IPaddr2" class="ocf" provider="heartbeat">
<lrm_rsc_op id="ClusterIP_last_0" operation_key="ClusterIP_start_0" operation="start" crm-debug-origin="do_update_resource" crm_feature_set="3.0.10" transition-key="7:56:0:76f2a258-6d10-4819-8063-54875d8f896a" transition-magic="0:0;7:56:0:76f2a258-6d10-4819-8063-54875d8f896a" on_node="zabbix01" call-id="10" rc-code="0" op-status="0" interval="0" last-run="1505940302" last-rc-change="1505940302" exec-time="117" queue-time="0" op-digest="31f0afcca8f5f3ffa441c421e2c65fe1"/>
<lrm_rsc_op id="ClusterIP_monitor_2000" operation_key="ClusterIP_monitor_2000" operation="monitor" crm-debug-origin="do_update_resource" crm_feature_set="3.0.10" transition-key="8:56:0:76f2a258-6d10-4819-8063-54875d8f896a" transition-magic="0:0;8:56:0:76f2a258-6d10-4819-8063-54875d8f896a" on_node="zabbix01" call-id="11" rc-code="0" op-status="0" interval="2000" last-rc-change="1505940302" exec-time="160" queue-time="0" op-digest="e05b48764ef09ebc8e21989b06afa924"/>
</lrm_resource>
</lrm_resources>
</lrm>
<transient_attributes id="zabbix01">
<instance_attributes id="status-zabbix01">
<nvpair id="status-zabbix01-shutdown" name="shutdown" value="0"/>
</instance_attributes>
</transient_attributes>
</node_state>
<node_state id="zabbix02" uname="zabbix02" crmd="online" crm-debug-origin="do_update_resource" in_ccm="true" join="member" expected="member">
<transient_attributes id="zabbix02">
<instance_attributes id="status-zabbix02">
<nvpair id="status-zabbix02-shutdown" name="shutdown" value="0"/>
</instance_attributes>
</transient_attributes>
<lrm id="zabbix02">
<lrm_resources>
<lrm_resource id="zabbix-server" type="zabbix_server" class="lsb">
<lrm_rsc_op id="zabbix-server_last_0" operation_key="zabbix-server_stop_0" operation="stop" crm-debug-origin="do_update_resource" crm_feature_set="3.0.10" transition-key="9:56:0:76f2a258-6d10-4819-8063-54875d8f896a" transition-magic="0:0;9:56:0:76f2a258-6d10-4819-8063-54875d8f896a" on_node="zabbix02" call-id="39" rc-code="0" op-status="0" interval="0" last-run="1505940302" last-rc-change="1505940302" exec-time="50" queue-time="0" op-digest="f2317cad3d54cec5d7d7aa7d0bf35cf8"/>
<lrm_rsc_op id="zabbix-server_monitor_5000" operation_key="zabbix-server_monitor_5000" operation="monitor" crm-debug-origin="build_active_RAs" crm_feature_set="3.0.10" transition-key="9:53:0:76f2a258-6d10-4819-8063-54875d8f896a" transition-magic="0:0;9:53:0:76f2a258-6d10-4819-8063-54875d8f896a" on_node="zabbix02" call-id="37" rc-code="0" op-status="0" interval="5000" last-rc-change="1505940185" exec-time="17" queue-time="0" op-digest="873ed4f07792aa8ff18f3254244675ea"/>
</lrm_resource>
<lrm_resource id="ClusterIP" type="IPaddr2" class="ocf" provider="heartbeat">
<lrm_rsc_op id="ClusterIP_last_0" operation_key="ClusterIP_stop_0" operation="stop" crm-debug-origin="do_update_resource" crm_feature_set="3.0.10" transition-key="6:56:0:76f2a258-6d10-4819-8063-54875d8f896a" transition-magic="0:0;6:56:0:76f2a258-6d10-4819-8063-54875d8f896a" on_node="zabbix02" call-id="41" rc-code="0" op-status="0" interval="0" last-run="1505940302" last-rc-change="1505940302" exec-time="93" queue-time="0" op-digest="31f0afcca8f5f3ffa441c421e2c65fe1"/>
<lrm_rsc_op id="ClusterIP_monitor_2000" operation_key="ClusterIP_monitor_2000" operation="monitor" crm-debug-origin="build_active_RAs" crm_feature_set="3.0.10" transition-key="6:53:0:76f2a258-6d10-4819-8063-54875d8f896a" transition-magic="0:0;6:53:0:76f2a258-6d10-4819-8063-54875d8f896a" on_node="zabbix02" call-id="35" rc-code="0" op-status="0" interval="2000" last-rc-change="1505940185" exec-time="118" queue-time="0" op-digest="e05b48764ef09ebc8e21989b06afa924"/>
</lrm_resource>
</lrm_resources>
</lrm>
</node_state>
</status>
</cib>
3、查看資源
# pcs resource
Resource Group: zabbix
ClusterIP (ocf::heartbeat:IPaddr2): Started zabbix01
zabbix-server (lsb:zabbix_server): Started zabbix01
4、查看資源組
#pcs resource group list
zabbix: ClusterIP zabbix-server
十三、zabbix啓動腳本
# cat /etc/init.d/zabbix_server
#!/bin/bash
#Location of zabbix binary. Change path as neccessary
DAEMON=/usr/local/zabbix/sbin/zabbix_server
NAME=`basename $DAEMON`
#Pid file of zabbix, should be matched with pid directive in nginx config file.
PIDFILE=/tmp/$NAME.pid
#this file location
SCRIPTNAME=/etc/init.d/$NAME
#only run if binary can be found
test -x $DAEMON || exit 0
RETVAL=0
start() {
echo $"Starting $NAME"
$DAEMON
RETVAL=0
}
stop() {
echo $"Graceful stopping $NAME"
[ -s "$PIDFILE" ] && kill -QUIT `cat $PIDFILE`
RETVAL=0
}
forcestop() {
echo $"Quick stopping $NAME"
[ -s "$PIDFILE" ] && kill -TERM `cat $PIDFILE`
RETVAL=$?
}
reload() {
echo $"Graceful reloading $NAME configuration"
[ -s "$PIDFILE" ] && kill -HUP `cat $PIDFILE`
RETVAL=$?
}
status() {
if [ -s $PIDFILE ]; then
echo $"$NAME is running."
RETVAL=0
else
echo $"$NAME stopped."
RETVAL=3
fi
}
# See how we were called.
case "$1" in
start)
start
;;
stop)
stop
;;
force-stop)
forcestop
;;
restart)
stop
start
;;
reload)
reload
;;
status)
status
;;
*)
echo $"Usage: $0 {start|stop|force-stop|restart|reload|status}"
exit 1
esac
exit $RETVAL
</pre>
參考資料
https://www.zabbix.org/wiki/Docs/howto/high_availability_on_Centos_6.x
https://ericsysmin.com/2016/02/18/configuring-high-availability-ha-zabbix-server-on-centos-7/