環境:三臺redhat6.5(VM虛擬機)
一、ospf協議
OSPF(Open Shortest Path First開放式最短路徑優先)是一個內部網關協議(Interior Gateway Protocol,簡稱IGP),用於在單一自治系統(autonomous system,AS)內決策路由。是對鏈路狀態路由協議的一種實現,隸屬內部網關協議(IGP),故運作於自治系統內部。
PS:這裏不過多講解ospf協議,可在網上自行查找學習
二、配置
首先下載安裝軟件包,其他yum源以及網絡配置就不再介紹了,三臺配置也是一樣的
下載地址:http://download.openpkg.org/components/cache/quagga/
本人這裏使用的版本是quagga-0.99.17.tar.gz
相關依賴包:gcc readline readline-devel
#tar zxf quagga-0.99.17.tar.gz
#yum install -y gcc readline readline-devel
#cd quagga-0.99.17            #進入目錄進行源碼編譯安裝
#./configure --enable-vtysh--enable-user=root --enable-group=root --enable-vty-group=root
# make && make install
修改配置文件:
在/etc/services文件裏面添加以下內容:
# vim /etc/services
zebrasrv    2600/tcp     # zebra service
zebra     2601/tcp     # zebra vty
ripd     2602/tcp     # RIPd vty
ripngd     2603/tcp     # RIPngd vty
ospfd     2604/tcp     # OSPFd vty
bgpd     2605/tcp     # BGPd vty
ospf6d     2606/tcp     # OSPF6d vty
ospfapi     2607/tcp     # ospfapi
isid     2608/tcp     # ISISd vty
修改quagga的配置文件:
# mkdir /usr/local/etc/sample
# mv /usr/local/etc/*.sample/usr/local/etc/sample/
# mv /usr/local/etc/bgpd.conf.sample2/usr/local/etc/sample/

# cp /usr/local/etc/sample/bgpd.conf.sample/usr/local/etc/bgpd.conf
# cp/usr/local/etc/sample/ospfd.conf.sample /usr/local/etc/ospfd.conf
# cp/usr/local/etc/sample/ospf6d.conf.sample /usr/local/etc/ospf6d.conf
# cp /usr/local/etc/sample/ripd.conf.sample/usr/local/etc/ripd.conf
# cp /usr/local/etc/sample/vtysh.conf.sample/usr/local/etc/vtysh.conf
# cp/usr/local/etc/sample/ripngd.conf.sample /usr/local/etc/ripngd.conf
# cp/usr/local/etc/sample/zebra.conf.sample /usr/local/etc/zebra.conf
修改ospfd的配置文件:
# vim /usr/local/etc/ospfd.conf
! -*- ospf -*-
!
! OSPFd sample configuration file
!
!
hostname ospfd
password zebra
enable password please-set-at-here

router ospf
 network 10.235.117.0/24 area 0                  #將網段宣告進ospf中
log stdout
三、啓動驗證
接下來啓動即可:
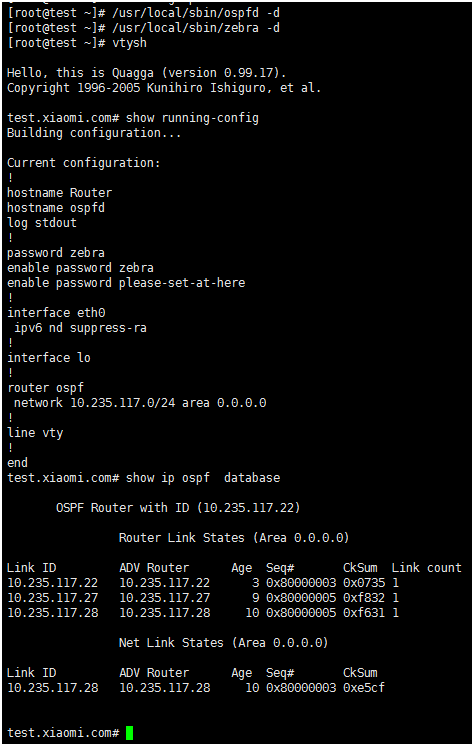
# /usr/local/sbin/ospfd -d
# /usr/local/sbin/zebra -d
# vtysh
Hello, this is Quagga (version 0.99.17).
Copyright 1996-2005 Kunihiro Ishiguro, etal.
test.xiaomi.com# show running-config
Building configuration...
Current configuration:
hostname Router
hostname ospfd
log stdout
password zebra
enable password zebra
enable password please-set-at-here
interface eth0
 ipv6nd suppress-ra
 interface lo
router ospf
 network 10.235.117.0/24 area 0.0.0.0
line vty
end
test.xiaomi.com# show ip ospf  database

      OSPF Router with ID (10.235.117.22)
                Router Link States (Area0.0.0.0)
Link ID         ADV Router      Age Seq#       CkSum  Link count
10.235.117.22   10.235.117.22      3 0x80000003 0x0735 1
10.235.117.27   10.235.117.27      9 0x80000005 0xf832 1
10.235.117.28   10.235.117.28     10 0x80000005 0xf631 1
               Net Link States (Area0.0.0.0)
Link ID         ADV Router      Age Seq#       CkSum
10.235.117.28   10.235.117.28     10 0x80000003 0xe5cf
vtysh是quagga進入模擬路由的,進去可以像正常路由器上面命令一樣去查看信息。
我這裏是啓動了三臺ospfd進程,配置都是一樣的,重複上面步驟即可,趕緊get起來吧!!!


