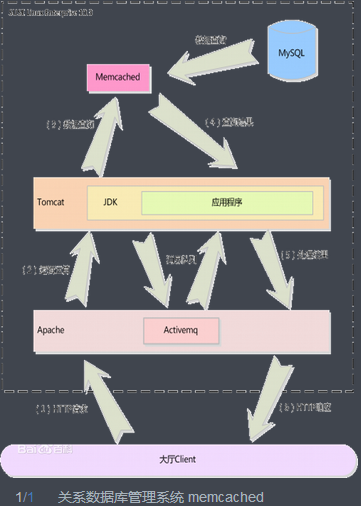
Tomcat 服務器是一個免費的開放源代碼的Web 應用服務器,屬於輕量級應用服務器,在中小型系統和併發訪問用戶不是很多的場合下被普遍使用,是開發和調試JSP 程序的首選。
Memcached 是一個高性能的分佈式內存對象緩存系統,用於動態Web應用以減輕數據庫負載。它通過在內存中緩存數據和對象來減少讀取數據庫的次數,從而提高動態、數據庫驅動網站的速度。Memcached基於一個存儲鍵/值對的hashmap。其守護進程(daemon )是用C寫的,但是客戶端可以用任何語言來編寫,並通過memcached協議與守護進程通信。
當配置正確時,Apache 爲HTML頁面服務,而Tomcat 實際上運行JSP 頁面和Servlet。另外,Tomcat和IIS等Web服務器一樣,具有處理HTML頁面的功能,另外它還是一個Servlet和JSP容器,獨立的Servlet容器是Tomcat的默認模式。不過,Tomcat處理靜態HTML的能力不如Apache服務器。
在這裏我們以nginx作爲http服務器,當發現外部的請求爲jsp格式的動態頁面請求時,Nginx服務器將請求連接至tomcat上面進行執行響應,這裏的memached作爲內存中的緩存系統在這裏進行調用,通過使用memached系統來減小服務器訪問數據庫的次數,並增加讀取速度。
這裏nginx主服務器的IP爲:172.25.9.1 主機名爲:pt1.example.com
兩個tomcat子服務器的IP爲:172.25.9.3 主機名爲:pt3.example.com
172.25.9.4 主機名爲:pt4.example.com
一、主服務器的配置:
這裏不再介紹nginx的源碼安裝以及配置,如有需要,請參照http://ptallrights.blog.51cto.com/11151122/1775242
下面直接進行配置文件nginx.conf 的修改:
http {
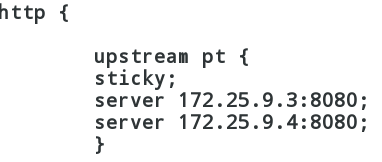
upstream pt { #指定自定義模塊名字爲pt
sticky; #使用的算法爲sticky
server 172.25.9.3:8080; #一個子服務器爲172.25.9.3,監聽的是8080端口
server 172.25.9.4:8080; #一個子服務器爲172.25.9.4,監聽的是8080端口
}
include mime.types;
default_type application/octet-stream;
sendfile on;
keepalive_timeout 65;
server {
listen 80;
server_name localhost;
location / {
root html;
index index.php index.htmlindex.htm;
}
error_page 500 502 503 504 /50x.html;
location = /50x.html {
root html;
}
location/status {
stub_status on;
access_log off;
}
location ~ \.jsp$ {
proxy_pass http://pt; #當請求是jsp格式時,調用pt這個模塊
}
location ~ \.php$ {
root html;
fastcgi_pass 127.0.0.1:9000;
fastcgi_index index.php;
fastcgi_param SCRIPT_FILENAME /scripts$fastcgi_script_name;
#fastcgi_param SCRIPT_FILENAME $document_root/$fastcgi_script_name;
include fastcgi.conf;
}
}
server {
listen 443 ssl;
server_name localhost;
ssl_certificate cert.pem;
ssl_certificate_key cert.pem;
ssl_session_cache shared:SSL:1m;
ssl_session_timeout 5m;
ssl_ciphers HIGH:!aNULL:!MD5;
ssl_prefer_server_ciphers on;
location / {
root html;
index index.html index.htm;
}
}
server{
listen 80;
server_name wwwNaN.com alias pt.com; #虛擬主機
location / {
proxy_pass http://pt;
}
}
server{
listen 80;
server_name wwwNaN1.com; #虛擬主機
location / {
root /virualhost/wwwNaN1.com;
index index.html index.htm;
}
}
}
大部分默認的參數是不需要改動的,主要修改的部分如下:
[root@pt1 conf]# nginx -t
nginx: the configuration file/usr/local/lnmp/nginx/conf/nginx.conf syntax is ok
nginx: configuration file/usr/local/lnmp/nginx/conf/nginx.conf test is successful
[root@pt1 conf]# nginx -s reload
[root@pt1 conf]# nginx
二、下面對兩臺tomcat服務器進行配置(步驟一樣):
對tomcat進行配置,步驟如下:
1、安裝jdk
sh jdk-6u26-linux-x64.bin #安裝jdk
mv jdk1.6.0_26/ /usr/local/lnmp/ #生成的jdk目錄移動至/usr/local/lnmp/
Ln -s jdk1.6.0_2 java #做一個軟連接
2、安裝tomcat服務器:
tar zxf apache-tomcat-7.0.37.tar.gz
tar zxf apache-tomcat-7.0.37.tar.gz -C/usr/local/lnmp/
ln -s apache-tomcat-7.0.37/ tomcat
3、配置環境變量
vim /etc/profile
export JAVA_HOME=/usr/local/lnmp/java
exportCLASSPATH=.:$JAVA_HOME/lib:$JAVA_HOME/jre/lib
export PATH=$PATH:$JAVA_HOME/bin
source /etc/profile
session 的序列化方案官方推薦的有 4 種:
1. java serialization
2. msm-kryo-serializer
3. msm-javolution-serializer
4. msm-xstream-serializer
其中性能最好的序列化方案是Kryo,此文中我們採用 kryo 方式
把如下軟件包放置到/usr/local/lnmp/tomcat/lib目錄中
kryo-1.03.jar
kryo-serializers-0.8.jar
memcached-2.5.jar
memcached-session-manager-1.5.1.jarmemcached-session-manager-tc7-1.5.1.jar
minlog-1.2.jar
msm-kryo-serializer-1.5.1.jar
reflectasm-0.9.jar
vim /usr/local/lnmp/tomcat/conf/context.xml
<Context>
......
<ManagerclassName="de.javakaffee.web.msm.MemcachedBackupSessionManager"
memcachedNodes="n1:172.25.9.3:11211,n2:172.25.9.4:11211"
failoverNodes="n1"
#在 node2 上此項設置爲“n2”
requestUriIgnorePattern=".*\.(ico|png|gif|jpg|css|js)$"
transcoderFactoryClass="de.javakaffee.web.msm.serializer.kryo.KryoTranscoderFactory"
/>
</Context>
tail -f logs/catalina.out #查看信息
啓動 tomcat
#/usr/local/lnmp/tomcat/bin/startup.sh #啓動tomcat服務
# /usr/local/lnmp/tomcat/bin/shutdown.sh #關閉 tomcat服務
三、安裝memcached
yum install memcached -y
/etc/init.d/memcached start
這裏只是簡單地使用memcached服務,不過多介紹具體使用。
四、測試頁面以及測試
以下爲測試頁面,保存到/usr/local/lnmp/tomcat/webapps/ROOT/test.jsp<%@page contentType="text/html; charset=GBK" %>
<%@ page import="java.util.*"%>
<html><head><title>ClusterApp Test</title></head>
<body>
Server Info:
<%
out.println(request.getLocalAddr() + ": " + request.getLocalPort()+"<br>");%>
<%
out.println("<br> ID " +session.getId()+"<br>");
String dataName =request.getParameter("dataName");
if (dataName != null &&dataName.length() > 0) {
String dataValue =request.getParameter("dataValue");
session.setAttribute(dataName, dataValue);
}
out.print("<b>Sessionlist</b>");
Enumeration e = session.getAttributeNames();
while (e.hasMoreElements()) {
String name = (String)e.nextElement();
String value =session.getAttribute(name).toString();
out.println( name + " = " +value+"<br>");
System.out.println( name + " = "+ value);
}
%>
<form action="test.jsp"method="POST">
name:<input type=text size=20name="dataName">
<br>
key:<input type=text size=20name="dataValue">
<br>
<input type=submit>
</form>
</body>
</html>
訪問http://pt1.example.com/test.jsp,不同的主機訪問時會調度到不同的 tomcat 實例上處理
來自同一主機的請求會交給同一個 tomcat 實例處理,此時你 down 掉當前正在響應的 tomcat 實
例,nginx 會自動把用戶的請求調度到另一個 tomcat 實例上,同時 session 也沒有丟掉。


