今天要給大家演示的是在RHEL6系統中安裝mysql數據庫,本次實驗是在VMware虛擬機中實現。
系統版本:2.6.32-71.el6.i686
[root@wuli ~]# uname -a
Linux wuli.redhat.com 2.6.32-71.el6.i686 #1SMP Wed Sep 1 01:26:34 EDT 2010 i686 i686 i386 GNU/Linux
數據庫版本:5.6.20
[root@wuli Downloads]# ls
MySQL-client-5.6.20-1.el6.i686.rpm MySQL-shared-compat-5.6.20-1.el6.i686.rpm
MySQL-server-5.6.20-1.el6.i686.rpm
接下來開始安裝數據庫,如果是下載的捆綁式的rpm軟件包,在解壓後會發現有好多個軟件包,在此我只安裝server和client兩個包。在此需要注意的是,在安裝之前需要安裝一個RHEL兼容包,即shared-compat包。
[root@wuli Downloads]# rpm -ivhMySQL-shared-compat-5.6.20-1.el6.i686.rpm
Preparing... ########################################### [100%]
1:MySQL-shared-compat ########################################### [100%]
默認系統裏面給安裝了mysql-libs-5.1.47-4.el6.i686軟件包,直接卸載會提示有包依賴,在安裝完shared-compat之後就可以把它卸載掉,否則會影響安裝。
[root@wuli Downloads]# rpm -e mysql-libs
創建MySQL系統管理用戶:
[root@wuli Downloads]# groupadd mysql
[root@wuli Downloads]# useradd -g mysqlmysql
[root@wuli Downloads]# passwd mysql
Changing password for user mysql.
New password:mysql(這裏密碼設置爲mysql)
BAD PASSWORD: it is too short
BAD PASSWORD: is too simple
Retype new password:mysql
passwd: all authentication tokens updatedsuccessfully.
[root@wuli Downloads]#
接下來安裝MySQL-client-5.6.20-1.el6.i686.rpm和MySQL-server-5.6.20-1.el6.i686.rpm兩個軟件包。
[root@wuli Downloads]# rpm -ivhMySQL-server-5.6.20-1.el6.i686.rpm
Preparing... ########################################### [100%]
1:MySQL-server ########################################### [100%]
[root@wuli Downloads]# rpm -ivhMySQL-client-5.6.20-1.el6.i686.rpm
Preparing... ###########################################[100%]
1:MySQL-client ########################################### [100%]
啓用MySQL服務:
[root@wuli Downloads]# service mysql start
Starting MySQL................ [ OK ]
[root@wuli Downloads]#
首先需要獲取登錄的隨機密碼,方法如下:
[root@wuli Downloads]# more/root/.mysql_secret
# The random password set for the root userat Fri Aug 8 05:18:49 2014 (local t
ime): qC1eXKeP3JTEgxzL
[root@wuli Downloads]#
使用首次獲取隨機密碼登錄MySQL數據庫,然後修改登錄密碼,方法如下:
[root@wuli Downloads]# mysql -uroot -pqC1eXKeP3JTEgxzL
Warning: Using a password on the commandline interface can be insecure.
Welcome to the MySQL monitor. Commands end with ; or \g.
Your MySQL connection id is 1
Server version: 5.6.20
Copyright (c) 2000, 2014, Oracle and/or itsaffiliates. All rights reserved.
Oracle is a registered trademark of OracleCorporation and/or its
affiliates. Other names may be trademarksof their respective
owners.
Type 'help;' or '\h' for help. Type '\c' toclear the current input statement.
mysql>
設置登錄密碼爲mysql(這裏設置爲mysql)
mysql> set password=password('mysql');
Query OK, 0 rows affected (0.07 sec)
mysql> flush privileges;
Query OK, 0 rows affected (0.00 sec)
mysql>
修改安裝目錄權限:
[root@wuli Downloads]# chown -R mysql:mysql/usr/share/mysql
[root@wuli Downloads]# chown -R mysql:mysql/var/lib/mysql
爲mysql添加環境變量:
[root@wuli ~]# vim .bash_profile
# .bash_profile
# Get the aliases and functions
if [ -f ~/.bashrc ]; then
. ~/.bashrc
fi
# User specific environment and startupprograms
PATH=$PATH:$HOME/bin
export PATH
export
exportDATADIR=/var/lib/mysql
exportMYSQL_HOME=/usr/share/mysql
停止啓動mysql:
[root@wuli ~]# mysqladmin -uroot -pshutdown
Enter password:mysql
[root@wuli ~]#
[root@wuli ~]#/usr/share/mysql/mysql.server start --user=mysql
Starting MySQL. [ OK ]
到這裏整個安裝步驟已經完成了,但是我們經常來配置或登錄mysql數據庫的時候,不可能每次都在服務器上來配置,很多情況會通過終端來登錄服務器,默認mysql服務器禁止從其他終端來登錄它。
解決方法如下:
首先登錄到數據庫
[root@wuli ~]#mysql –uroot –p
Enter password:mysql
mysql> use mysql
Reading table information for completion oftable and column names
You can turn off this feature to get aquicker startup with -A
Database changed
mysql> update user set host='%' wherehost='localhost';
Query OK, 1 row affected (0.06 sec)
Rows matched: 1 Changed: 1 Warnings: 0
mysql> flush privileges;
Query OK, 0 rows affected (0.06 sec)
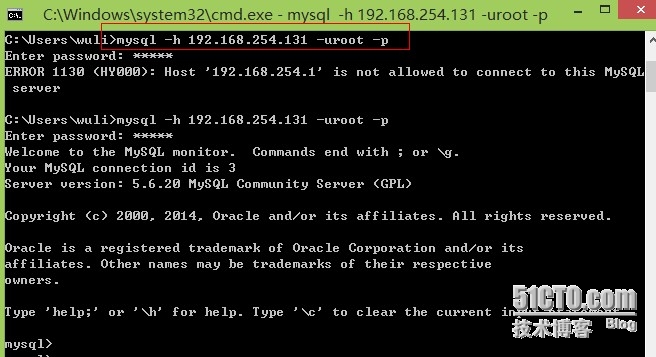
接下來我們再來通過客戶端來登錄服務器:
成功登錄。
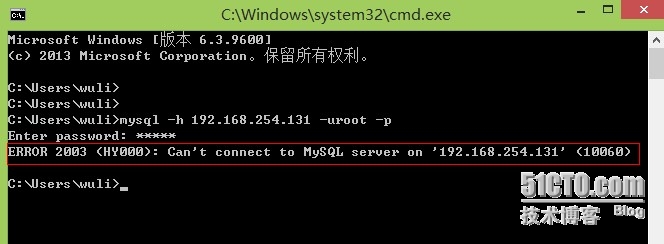
如果遇到下面提示符,原因是由於服務器開啓了防火牆導致的,解決方法:關閉防火牆即可。
我們可以查看安裝的數據庫版本:
到此,整個實驗就完成了,歡迎來到MySQL的世界^_^!


