HSRP 熱備份選擇協議
1. 實驗拓撲:
使用GNS3模擬器(版本 0.8.5)
C1連接VM1網卡 因爲模擬器pc 不支持 trasert 所以綁定真實網卡
2.實驗需求
1R3的路由器掛了 線路192.168.10.20可以自動切換到R2工作
2R2的路由器掛了 線路192.168.10.10可以自動切換到R3工作
3.實驗配置
IP規劃
sw1#conf t
sw1(config)#no ip routing
R2#conf t
R2(config)#int f0/1
R2(config-if)#ip add 192.168.10.10 255.255.255.0
R2(config-if)#no sh
R2(config-if)#int f0/0
R2(config-if)#ip add 192.168.11.1 255.255.255.0
R2(config-if)#no sh
R3#conf t
R3(config)#int f0/1
R3(config-if)#ip add 192.168.10.20 255.255.255.0
R3(config-if)#no sh
R3(config-if)#int f0/0
R3(config-if)#ip add 192.168.12.1 255.255.255.0
R3(config-if)#no sh
R1(config-if)#int f0/1
R1(config-if)#ip add 192.168.12.2 255.255.255.0
R1(config-if)#no sh
R1(config-if)#int f0/0
R1(config-if)#ip add 192.168.11.2 255.255.255.0
R1(config-if)#no sh
R1(config)#int loopback 10
R1(config-if)#ip add 1.1.1.1 255.255.255.0
exit
配置腳本
R1(config)#router rip 啓動rip選擇進程
R1(config-router)#network 1.1.1.0
R1(config-router)#network 192.168.12.0
R1(config-router)#network 192.168.11.0 直連網段
exit
R2(config)#router rip
R2(config-router)#network 192.168.11.0
R2(config-router)#network 192.168.10.0
R3(config-if)#exit
R3(config)#router rip
R3(config-router)#network 192.168.12.0
R3(config-router)#network 192.168.10.0
R3(config-router)#exit
R3(config)#int f0/1
R3(config-if)#standby 2 ip 192.168.10.1 設置虛擬網關
R3(config-if)#standby 2 priority 145 配置優先級 設置爲輔助
R3(config-if)#standby 2 preempt 配置搶先
R3(config-if)#standby 2 track fastEthernet
R2(config-router)#exit
R2(config)#int f0/1
R2(config-if)#stan
R2(config-if)#standby 2 ip 192.168.10.1
R2(config-if)#standby 2 priority 150 R2優先級比R3高所以是主 優先級 接口斷了會減10不能太大
R2(config-if)#standby 2 preempt
R2(config-if)#standby 2 track fastEthernet 0/0 100
R2(config-if)#standby 2 track fastEthernet 0/0 100 配置接口跟蹤 因爲一般上面找不到接口 接口斷了的話 所以需要設置一個接口跟蹤
4.結果驗證
要把先網斷掉
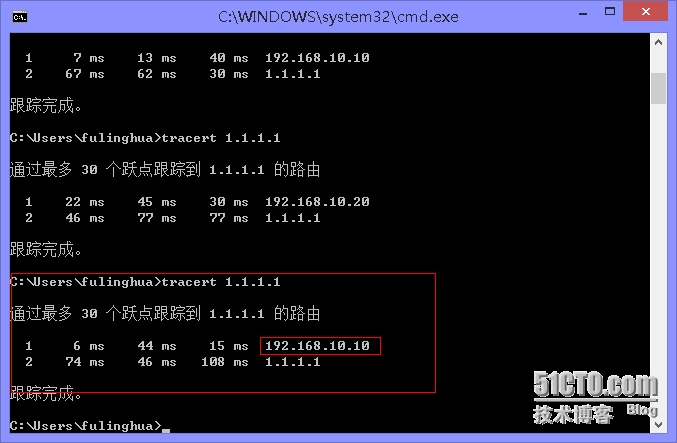
192.168.10.10是R2的 0/1口 所以 從主的那條路過去了
現在關閉R2的0/0口 和 R1的0/0口
R2(config-if)#int f0/0
R2(config-if)#sh
R1(config-router)#int f0/0
R1(config-if)#sh
開始測試
192.168.10.20是 R3的0/1口 重新獲取成功 走了備用那條路
現在再開啓接口看看能不能獲取回來
R1(config-if)#int f0/0
R1(config-if)#no sh
R2(config-if)#int f0/0
R2(config-if)#no sh
自動走主那條路了
實驗成功


