一般大型網站爲了緩解大量的併發訪問,會在web端實現負載均衡,但是這是遠遠不夠的。到了數據存儲層、數據訪問層,如果還是傳統的架構,或者只是依靠一臺服務器,大量的數據庫連接操作,會導致數據庫面臨崩潰的危險。進而造成數據丟失,後果不堪設想。所以我們會考慮如何減少數據庫的連接,一方面進行代碼的優化,採用優秀的數據緩存技術如memcached,如果資金豐厚的話,必然會想到假設服務器羣,來分擔主數據庫的壓力。今天我們就利用MySQL主從配置,實現讀寫分離,分散數據庫的壓力。這種方式,很多網站都有應用,今天只是總結學習一下。
讀寫分離的環境:
1.mysql集羣(一般是一主多從,多主多從,本文一主多從來舉例)
2.讀寫分離中間件(本文以amoeba舉例)
3.mysql客戶端程序
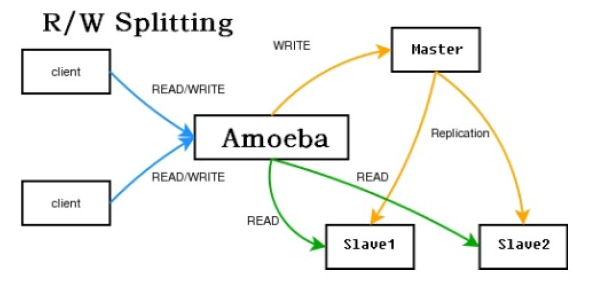
Amoeba實現讀寫分離的原理圖如下
amoeba作爲訪問數據庫的前端程序,當其接收到來自客戶端或者是應用段的sql語句對數據庫做處理的時候,將sql語句進行分類,比如sql語句中有select關鍵詞則作爲數據庫讀操作,否則作爲數據庫寫操作。Amoeba作爲數據庫和客戶端的中間件,會同時鏈接master數據庫和slave數據庫。由於一般網站讀操作遠多於寫操作,所以我們定義master數據庫做爲寫操作的數據庫,slave數據庫作爲讀操作的數據庫。這樣amoeba就會將來自於客戶端的寫操作路由到master數據庫,將讀操作路由到slava數據庫,來實現讀寫分離功能。
1.mysql主從同步環境搭建
這裏就不詳細介紹了,網上有很多,也很簡單,我們這裏是一主多從的環境。
2.amoeba配置讀寫分離
1)amoeba需要java環境的支持,首先查看一下系統裏是否安裝java環境
[root@zabbix tools]#java -version
    java version "1.8.0_101"
    Java(TM) SE Runtime Environment (build 1.8.0_101-b13)
    Java HotSpot(TM) 64-Bit Server VM (build 25.101-b13, mixed mode)
我這裏已經安裝了java環境,所以會有上面的信息,如果沒有安裝的話可以到oracle官網去下載你的系統可用的java安裝rpm包。
[root@zabbix tools]# wget  http://download.oracle.com/otn-pub/java/jdk/8u101-b13/jdk-8u101-linux-x64.rpm
[root@zabbix tools]# ls jd*
jdk-8u101-linux-x64.rpm
[root@zabbix tools]# rpm -ivh jdk-8u101-linux-x64.rpm
添加Java環境變量:
用find命令查找下Java的安裝目錄
[root@zabbix tools]#export JAVA_HOME=/usr/Java/jdk1.8.0_101
[root@zabbix tools]#export PATH=$JAVA_HOME/bin:$PATH
[root@zabbix tools]#export CLASSPATH=.:$JAVA_HOME/lib/dt.jar:$JAVA_HOME/lib/tools.jar
2)下載解壓安裝amoeba軟件包
[root@zabbix tools]# wget http://101.96.10.43/jaist.dl.sourceforge.net/project/amoeba/Amoeba%20for%20mysql/3.x/amoeba-mysql-3.0.5-RC-distribution.zip
[root@zabbix tools]#ls
amoeba-mysql-3.0.5-RC-distribution.zip
[root@zabbix tools]#mkdir -p /tmp/amoeba
[root@zabbix tools]#mkdir -p /usr/local/amoeba
[root@zabbix tools]#unzip -d /tmp/amoeba/ amoeba-mysql-3.0.5-RC-distribution.zip
[root@zabbix tools]#cp -rf /tmp/amoeba/amoeba-mysql-3.0.5-RC/* /usr/local/amoeba/
2)配置amoeba軟件
amoeba的配置文件主要在conf目錄下面,其中我們要修改的主要是amoeba.xml和dbServer.xml兩個配置文件
amoeba.xml修改以下幾部分:
<property name="ipAddress">127.0.0.1</property>     //amoeba服務監聽的IP
<property name="user">root</property>               //amoeba的管理賬號
<property name="password">root</property>           //amoeba的管理密碼
<property name="defaultPool">multiPool</property>   //amoeba的默認數據庫集羣(最好是寫操作的集羣)
<property name="writePool">master</property>        //amoeba的讀操作數據庫集羣
<property name="readPool">slave1</property>         //amoeba的寫操作數據庫集羣
dbServer.xml修改以下部分:
 <property name="port">3306</property>     //真實數據庫服務端口
 <property name="schema">test</property>   //真實數據庫上存在的database,用於健康檢測(每個真實數據庫上都存在)
 <property name="user">test111</property>  //真實數據庫上用於amoeba連接數據庫的賬號
 <property name="password">111111</property>//真實數據庫上用於amoeba連接數據庫的密碼
 <dbServer name="master"  parent="abstractServer">   //dbServer name設置爲master
       <factoryConfig>
               <!-- mysql ip -->
            <property name="ipAddress">192.168.1.11</property>//設置master的ip
        </factoryConfig>
        </dbServer>
        <dbServer name="slave1"  parent="abstractServer">//dbServer name設置爲slave1
                <factoryConfig>
                        <!-- mysql ip -->
                   <property name="ipAddress">192.168.1.12</property>//設置slave1的ip
                </factoryConfig>
        </dbServer>
<dbServer name="multiPool" virtual="true">                  //設置讀庫集羣名爲multiPool
        <poolConfig class="com.meidusa.amoeba.server.MultipleServerPool">
            <!-- Load balancing strategy: 1=ROUNDROBIN , 2=WEIGHTBASED , 3=HA-->
         <property name="loadbalance">1</property>    //設置讀庫的調度算法

              <!-- Separated by commas,such as: server1,server2,server1 -->
         <property name="poolNames">slave1</property>   //添加用於讀操作的數據庫
                </poolConfig>
</dbServer>
注意:在真實的mysql數據庫服務器上要根據上面配置的帳號密碼給amoeba服務器訪問mysql的權限
grant all on test.* to 'test1111'@'192.168.1.112' identified by '111111'; //192.168.1.112是amoeba服務器的地址
flush privileges;
3)啓動amoeba軟件
[root@zabbix ~]#/usr/local/amoeba/logs/console.log       創建amoeba的日誌文件
[root@zabbix ~]# ./usr/local/amoeba/bin/launcher
The stack size specified is too small, Specify at least 160kError: Could not create the Java Virtual Machine.
如果啓動時報以上錯誤,請修改amoeba目錄下jvm.properties文件中以下條目的Xss數值爲1024K
JVM_OPTIONS="-server -Xms256m -Xmx1024m -Xss1024k -XX:PermSize=16m -XX:MaxPermSize=96m"
重啓amoeba後正常,檢查一下(amoeba默認端口8066)
[root@zabbix amoeba-mysql-3.0.5-RC]# ss -lntup|grep 8066
tcp    LISTEN     0      128      :::8066                 :::*                   users:(("java",pid=8104,fd=66))
[root@zabbix amoeba-mysql-3.0.5-RC]#
4)連接到amoeba服務器
[root@TEST01 ~]# mysql -uroot -proot  -h 192.168.1.13 -P 8066
Welcome to the MySQL monitor.  Commands end with ; or \g.
Your MySQL connection id is 772593148
Server version: 5.1.45-mysql-amoeba-proxy-3.0.4-BETA MySQL Community Server (GPL)
Copyright (c) 2000, 2013, Oracle and/or its affiliates. All rights reserved.
Oracle is a registered trademark of Oracle Corporation and/or its
affiliates. Other names may be trademarks of their respective
owners.
Type 'help;' or '\h' for help. Type '\c' to clear the current input statement.
mysql>
從server version: 5.1.45-mysql-amoeba-proxy-3.0.4-BETA可以看出,已經正常連接到amoeba服務
讀寫分離測試
1)終止slave1服務器的主從同步
mysql> stop slave;
Query OK, 0 rows affected (0.00 sec)
2)在slave1服務器的數據庫創建一個新的db
mysql> create database read_db;
Query OK, 1 row affected (0.00 sec)
mysql> show databases;
+--------------------+
| Database           |
+--------------------+
| information_schema |
| mysql              |
| performance_schema |
| read_db            |
| test               |
+--------------------+
10 rows in set (0.00 sec)
mysql>
3)連接amoeba服務,查看數據庫
Your MySQL connection id is 772593148
Server version: 5.1.45-mysql-amoeba-proxy-3.0.4-BETA MySQL Community Server (GPL)
Copyright (c) 2000, 2013, Oracle and/or its affiliates. All rights reserved.
Oracle is a registered trademark of Oracle Corporation and/or its
affiliates. Other names may be trademarks of their respective
owners.
Type 'help;' or '\h' for help. Type '\c' to clear the current input statement.
mysql> show databases;
+--------------------+
| Database           |
+--------------------+
| information_schema |
| mysql              |
| performance_schema |
| read_db            |
| test               |
+--------------------+
10 rows in set (0.00 sec)
mysql>
可以看到read_db數據庫,amoeba讀操作是從slave1拿的數據
4)連接amoeba服務,創建一張表,並查看
mysql> use test
Database changed
mysql> creat table write_table(id int);
ERROR 1064 (42000): You have an error in your SQL syntax; check the manual that corresponds to your MySQL server version for the right syntax to use near 'creat table write_table(id int)' at line 1
mysql> create table write_table(id int);
Query OK, 0 rows affected (0.04 sec)
mysql> show tables;
Empty set (0.01 sec)
mysql>
發現沒有剛剛創建的表,可見數據沒有插入到slave1的數據庫中
在master數據庫查看,發現存在剛纔插入的表
[root@TEST01 ~]# mysql -uroot -poldboy
Welcome to the MySQL monitor.  Commands end with ; or \g.
Your MySQL connection id is 2490
Server version: 5.5.32-log MySQL Community Server (GPL)
Copyright (c) 2000, 2013, Oracle and/or its affiliates. All rights reserved.
Oracle is a registered trademark of Oracle Corporation and/or its
affiliates. Other names may be trademarks of their respective
owners.
Type 'help;' or '\h' for help. Type '\c' to clear the current input statement.
mysql> use test
Database changed
mysql> show tables;
+----------------+
| Tables_in_test |
+----------------+
| write_table    |
+----------------+
1 row in set (0.01 sec)
mysql>
以上的測試可以發現,amoeba已經將讀操作和寫操作指向不同的服務器,從而實現mysql的讀寫分離
目前主流的數據庫讀寫分離軟件,大家 有時間可以學習學習
mysql-proxy(不適合生產環境使用)
atlas(360基於mysql-proxy開發)
amoeba(不適合生產環境使用)
tddl(淘寶開發)部分開源,配置複雜
cobar(阿里基於Amoeba開發)不支持事務
dbware(只支持mysql)
mycat(社區活躍,支持大規模使用,且開源)

