源碼搭建LNMP及xcache加速
LNMP即Linux系統下Nginx+MySQL+PHP這種網站服務器架構。
Nginx是一個小巧而高效的Linux下的Web服務器軟件,與Apache相比,消耗資源更少,支持的併發連接,更高的效率,反向代理功能效率高、靜態文件處理快等,但動態頁面處理能力不如Apache等老牌軟件成熟。單獨使用Nginx處理大量動態頁面時容易產生頻繁的502錯誤。
環境:
Centos6.4 64位操作系統
libevent-2.0.16-stable.tar.gz
mysql-5.6.15-linux-glibc2.5-x86_64.tar.gz
nginx-1.0.11.tar.gz
php-5.5.8.tar.bz2
xcache-3.1.0.tar.gz
安裝前準備
關閉selinux和防火牆
安裝開發工具
Development tools
Additional Development
Server Platform Development
安裝前環境搭建及準備
[root@localhost src]# yum install pcre-devel //爲了更好的支持正則表達式
安裝libevent//這是一個事件庫。因爲nginx採用的是epoll機制,爲了讓事件觸發機制更有效,與nginx配合使用。
[root@localhost ~]# tar -zxvf /libevent- 2.0.16-stable.tar.gz -C /usr/local/src
[root@localhost ~]# cd /usr/local/src/libevent-2.0.16-stable/
[root@localhost libevent-2.0.16-stable]# ./configure --prefix=/usr/local/libeven t
[root@localhost ~]# cd /usr/local/libevent/lib/ //這是他的庫文件所在,我們要把它輸出出來
[root@localhost ~]# echo "/usr/local/libevent/lib/" >>/etc/ld.so.conf.d/libe ven t.conf
[root@localhost ~]# ldconfig //刷新一下緩存
[root@localhost ~]# ldconfig -pv |grep libevent //我們可以看到他已經生效
libevent_pthreads-2.0.so.5 (libc6,x86-64) => /usr/local/libevent/lib/libevent_pthreads-2.0.so.5
libevent_openssl-2.0.so.5 (libc6,x86-64) => /usr/local/libevent/lib/libevent_openssl-2.0.so.5
libevent_extra-2.0.so.5 (libc6,x86-64) => /usr/local/libevent/lib/libevent_extra-2.0.so.5
LNMP搭建:
安裝nginx
[root@localhost ~]# tar -zxvf nginx-1.0.11.tar.gz -C /usr/local/src
[root@localhost ~]# cd /usr/local/src/nginx-1.0.11/
[root@localhost nginx-1.0.11]# ./configure \
> --conf-path=/etc/nginx/nginx.conf \
> --error-log-path=/var/log/nginx/error.log \
> --http-log-path=/var/log/nginx/access.log \
> --pid-path=/var/run/nginx/nginx.pid \
> --lock-path=/var/lock/nginx.lock \
> --user=nginx \
> --group=nginx \
> --with-http_ssl_module \
> --with-http_flv_module \
> --with-http_stub_status_module \
> --with-http_gzip_static_module \
> --http-client-body-temp-path=/var/tmp/nginx/client/ \
> --http-proxy-temp-path=/var/tmp/nginx/proxy/ \
> --http-fastcgi-temp-path=/var/tmp/nginx/fcgi/ \
> --with-pcre //執行config
[root@localhost nginx-1.0.11]# make && make install
配置關於nginx的環境變量
[root@localhost ~]# cd /usr/local/nginx/
[root@localhost nginx]# ll
total 8
drwxr-xr-x. 2 root root 4096 Apr 10 06:22 html
drwxr-xr-x. 2 root root 4096 Apr 10 06:22 sbin
[root@localhost nginx]# vim /etc/profile
[root@localhost nginx]# . /etc/profile
[root@localhost nginx]# nginx -t //啓動nginx,進行語法檢查
nginx: the configuration file /etc/nginx/nginx.conf syntax is ok
nginx: [emerg] mkdir() "/var/tmp/nginx/client/" failed (2: No such file or directory)
nginx: configuration file /etc/nginx/nginx.conf test failed
發現有語法錯誤,解決辦法
[root@localhost nginx]# mkdir -pv /var/tmp/nginx/client/
再次進行語法檢查,正確
[root@localhost nginx]# nginx -t
nginx: the configuration file /etc/nginx/nginx.conf syntax is ok
nginx: configuration file /etc/nginx/nginx.conf test is successful
[root@localhost nginx]# nginx //啓動nginx
[root@localhost nginx]# netstat -tupln |grep 80
tcp 0 0 0.0.0.0:80 0.0.0.0:* LISTEN 10298/nginx
//nginx已經啓動起來了,並且只有nginx,沒有apache
Nginx可以成功訪問
接下來配置nginx的配置文件
[root@localhost ~]# cd /etc/nginx/
[root@localhost nginx]# ll
。。。。。。。。。。。
-rw-r--r--. 1 root root 2685 Apr 10 06:22 nginx.conf
。。。。。。。。。。。
我們需要給nginx編寫一個控制腳本
[root@localhost ~]# touch /etc/init.d/nginx
[root@localhost ~]# chmod a+x /etc/init.d/nginx
#!/bin/bash
# chkconfig: 2345 88 44
# descriptions: the nginx web server
prog=/usr/local/nginx/sbin/nginx
lockfile=/var/lock/nginx.lock
start () {
if [ -e $lockfile ];then
echo "the nginx server is startd"
else
echo -n "the nginx is starting..."
sleep 1
$prog && echo "OK" && touch $lockfile ||echo "fail"
fi
}
stop () {
if [ ! -e $lockfile ];then
echo "the nginx server is stoped"
else
echo -n "the nginx server is stopd..."
sleep 1
$prog -s stop && echo "OK" && rm -rf $lockfile || echo "fail"
fi
}
case "$1" in
start)
start
;;
stop)
stop
;;
restart)
stop
start
;;
configtest)
$prog -t
;;
*)
echo "USAGE:start|stop|restart|configtest"
;;
esac
[root@localhost ~]# service nginx restart
the nginx server is stoping...OK
the nginx is starting...OK
[root@localhost ~]# netstat -tupln |grep 80
tcp 0 0 0.0.0.0:80 0.0.0.0:* LISTEN 1654/nginx
[root@localhost ~]# chkconfig --add nginx
[root@localhost ~]# chkconfig nginx on
nginx配置完成。
安裝mysql
在安裝順序上,因爲我們要把php與mysql結合,在安裝php時我們需要指定mysql的位置,所以我們要先安裝mysql。
安裝前我們先把系統自帶的mysql***,否則安裝會出現問題
[root@localhost src]# yum remove mysql
解壓:
[root@localhost ~]# tar -zxvf mysql-5.6.15-linux-glibc2.5-x86_64.tar.gz -C /usr/local/ //這是個綠色軟件包,所以我們只需解壓在/usr/local/目錄下即可
[root@localhost local]# ln -s mysql-5.6.15-linux-glibc2.5-x86_64/ mysql //創建一個軟連接,因爲它名字太長了,不方便後期操作
[root@localhost local]# cd mysql
[root@localhost mysql]# vim INSTALL-BINARY //這是安裝mysql的介紹,我們按着執行
76 To install and use a MySQL binary distribution, the basic command
77 sequence looks like this:
78 shell> groupadd mysql
79 shell> useradd -r -g mysql mysql
80 shell> cd /usr/local
81 shell> tar zxvf /path/to/mysql-VERSION-OS.tar.gz
82 shell> ln -s full-path-to-mysql-VERSION-OS mysql
83 shell> cd mysql
84 shell> chown -R mysql .
85 shell> chgrp -R mysql .
86 shell> scripts/mysql_install_db --user=mysql
87 shell> chown -R root .
88 shell> chown -R mysql data
89 shell> bin/mysqld_safe --user=mysql &
90 # Next command is optional
91 shell> cp support-files/mysql.server /etc/init.d/mysql.server
[root@localhost mysql]# groupadd mysql
[root@localhost mysql]# useradd -r -g mysql mysql
[root@localhost mysql]# chown -R mysql .
[root@localhost mysql]# chgrp -R mysql .
[root@localhost mysql]# scripts/mysql_install_db --user=mysql //在執行這一步時出錯,解決辦法安裝libaio-devel這個庫文件 yum install libaio-devel
Installing MySQL system tables..../bin/mysqld: error while loading shared libraries: libaio.so.1: cannot open shared object file: No such file or directory
[root@localhost mysql]# chown -R root . //修改所有文件的擁有者爲root
[root@localhost mysql]# chown -R mysql data //修改data文件的擁有者爲mysql
[root@localhost mysql]# cp my.cnf /etc/ // mysql server 配置文件
[root@localhost mysql]# cp support-files/mysql.server /etc/init.d/mysqld
//產生mysql server 控制文件
[root@localhost mysql]# chmod a+x /etc/init.d/mysqld
[root@localhost mysql]# service mysqld start //啓動mysql
Starting MySQL SUCCESS!
[root@localhost mysql]# chkconfig --add mysqld
[root@localhost mysql]# chkconfig mysqld on //設置爲開機自啓動
[root@localhost mysql]# vim /etc/profile
PATH=$PATH:/usr/local/mysql/bin //添加一條命令修改環境變量注意這個環境變量添加在export之前!
[root@localhost mysql]# . /etc/profile
[root@localhost mysql]#echo "/usr/local/mysql/lib" > /etc/ld.so.conf.d/mysql.conf
//mysql庫文件的輸出
[root@localhost mysql]# ldconfig //重新加載配置文件
[root@localhost mysql]# echo "MANPATH /usr/local/mysql/man">>/etc/man.conf
//配置手冊
啓動MySQL
[root@localhost ~]# mysql
Type 'help;' or '\h' for help. Type '\c' to clear the current input statement.
mysql>
[root@localhost mysql]# mysqladmin -u root -p password '123' //給mysql數據庫設置口令
測試成功,mysql安裝完畢。
安裝php
先查詢系統中有沒有安裝php,如果有的話一定要先卸載了
[root@localhost ~]# rpm -qa |grep php
解壓
[root@localhost ~]# tar -jxvf php-5.5.8.tar.bz2 -C /usr/local/src/
[root@localhost ~]# cd /usr/local/src/php-5.5.8/
[root@localhost php-5.5.8]# ./configure \
--prefix=/usr/local/php \
--enable-fpm \ //開啓fastcgi
--enable-sockets \
--with-mysql=/usr/local/mysql \ //關聯mysql數據庫
--with-mysqli=/usr/local/mysql/bin/mysql_config \ //mysqli是mysql的高級功能
--enable-mbstring \
--enable-xml \
--with-png-dir \
--with-jpeg-dir \
--with-zlib \
--with-freetype-dir \
--with-config-file-path=/etc/php \
--with-config-file-scan-dir=/etc/php5.d
[root@localhost php-5.5.8]# make && make install
[root@localhost php-5.5.8]# mkdir /etc/php /etc/php5.d
[root@localhost php-5.5.8]# cp php.ini-development /etc/php/php.ini
[root@localhost php-5.5.8]# cd sapi/
[root@localhost sapi]# cd fpm/
[root@localhost fpm]# cp init.d.php-fpm /etc/init.d/php-fpm //php-fpm的控制文件
[root@localhost fpm]# chmod a+x /etc/init.d/php-fpm
[root@localhost fpm]# cd /usr/local/php/etc/
[root@localhost etc]# ll
total 20
-rw-r--r--. 1 root root 1152 Apr 10 18:02 pear.conf
-rw-r--r--. 1 root root 15212 Apr 10 18:02 php-fpm.conf.default //php-fpm的配置文件
[root@localhost etc]# cp php-fpm.conf.default php-fpm.conf //給它重命名爲php-fpm
[root@localhost php-5.5.8]# service php-fpm start
Starting php-fpm done
[root@localhost etc]# netstat -tupln |grep php
tcp 0 0 127.0.0.1:9000 0.0.0.0:* LISTEN 35953/php-fpm
[root@localhost php-5.5.8]# chkconfig --add php-fpm //加入開機啓動項
[root@localhost php-5.5.8]# chkconfig --list |grep fpm
php-fpm 0:off1:off2:on3:on4:on5:on6:off
php-fpm安裝成功。
接下來我們就要把nginx與php以及xcache進行結合。
修改nginx的配置文件
[root@localhost ~]# vim /etc/nginx/nginx.conf
[root@localhost ~]# service nginx restart //重啓nginx
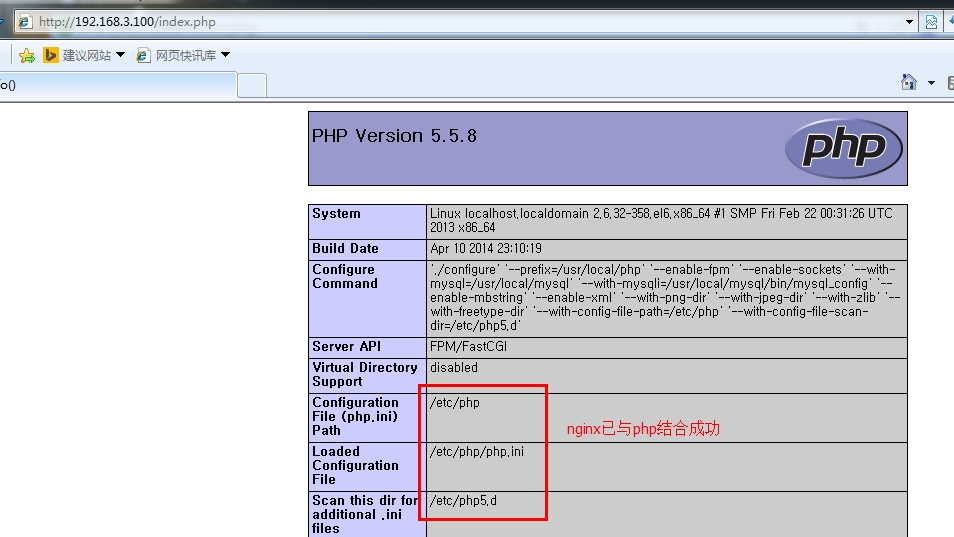
接下來我們可以測試一下nginx與php的結合
[root@localhost ~]# vim /usr/local/nginx/html/index.php //添加一個網頁
測試php與mysql的連接性
[root@localhost html]# cd /usr/local/nginx/html/
[root@localhost html]# vim index.php
連通性測性成功
LNMP環境已經構搭建完成。
我們通過xcache來對web服務器進行加速。
php是一種解釋性語言,每次訪問網站時都要重新對php解釋一次,太浪費時間。所以我們通過xcache來做對php網頁一個緩存,對其進行加速。這樣當再次訪問時就不用再進行解釋從而加快網站的訪問速度。
安裝xcache
[root@localhost ~]# cd /usr/local/src
[root@localhost ~]# tar -zxvf xcache-3.1.0.tar.gz -C /usr/local/src/xcache-3.1.0/
[root@localhost xcache-3.1.0]# vim INSTALL
Phpize---------------》這是xcache源碼中沒有configure文件,我們要通過這個phpize來生成一個這樣的文件。這個phpize是由php提供的,在/usr/local/php/bin/phpize目錄下
[root@localhost xcache-3.1.0]# /usr/local/php/bin/phpize
[root@localhost xcache-3.1.0]# ll
:::::::::::::::
-rwxr-xr-x. 1 root root 463336 Apr 11 01:28 configure //configure文件已經產生
:::::::::::::::
[root@localhost xcache-3.1.0]# ./configure --enable-xcache --with-php-config=/usr/local/php/bin/php-config
::::::::::::::
Installing shared extensions: /usr/local/php/lib/php/extensions/no-debug-non-zts-20121212/
最後一行說明了xcache的加速模塊的目錄
[root@localhost xcache-3.1.0]# cd /usr/local/php/lib/php/extensions/no-debug-non-zts-20121212/
[root@localhost no-debug-non-zts-20121212]# ll
total 2196
-rwxr-xr-x. 1 root root 1016532 Apr 10 23:15 opcache.a
-rwxr-xr-x. 1 root root 532648 Apr 10 23:15 opcache.so
-rwxr-xr-x. 1 root root 690332 Apr 11 01:32 xcache.so //xcache的加速模塊
把這個模塊拷貝到/etc/php5.d/ 目錄下
[root@localhost no-debug-non-zts-20121212]# cp xcache.so /etc/php5.d/
[root@localhost no-debug-non-zts-20121212]# cd /usr/local/src/xcache-3.1.0/
[root@localhost xcache-3.1.0]# vim INSTALL
[root@localhost xcache-3.1.0]# cp xcache.ini /etc/php5.d/
[root@localhost xcache-3.1.0]# vim /etc/php5.d/xcache.ini //這個就是xcache的配置文件了
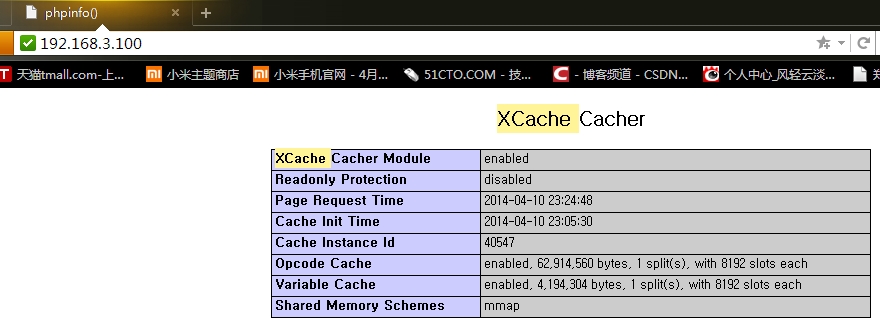
用瀏覽器訪問192.168.3.100
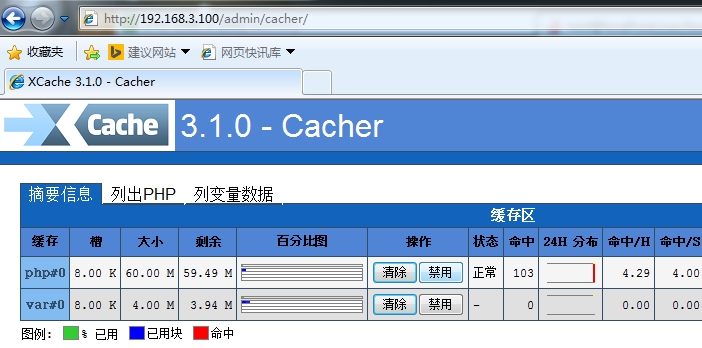
我們可以通過web界面來管理xcache
[root@localhost xcache-3.1.0]# ll htdocs/ //這個就是xcache的web界面管理的文件
[root@localhost xcache-3.1.0]# cp -r htdocs /usr/local/nginx/html/admin
[root@localhost ~]# vim /etc/php5.d/xcache.ini
生成MD5密文的兩種方法
我們得把nginx打開的默認頁面設爲index.php,否則打不開xcache的管理頁面[root@localhost admin]# vim /etc/nginx/nginx.conf
[root@localhost ~]# service php-fpm restart
[root@localhost admin]# service nginx restart


