


這篇文章主要給大家介紹了關於MySQL如何更改數據庫數據存儲目錄的相關資料,文中通過示例代碼介紹的非常詳細,對大家的學習或者工作具有一定的參考學習價值,需要的朋友們下面隨着小編來一起學習學習吧
前言
MySQL數據庫默認的數據庫文件位於/var/lib/mysql下,有時候由於存儲規劃等原因,需要更改MySQL數據庫的數據存儲目錄。下文總結整理了實踐過程的操作步驟。話不多說了,一起來看看吧
方法如下:
1:確認MySQL數據庫存儲目錄
[root@DB-Server tmp]# mysqladmin -u root -p variables | grep datadir

Enter password:

| datadir | /var/lib/mysql/
2:關閉MySQL服務
在更改MySQL的數據目錄前,必須關閉MySQL服務。
方式1:
[root@DB-Server ~]# service mysql status

MySQL running (9411)[ OK ]

[root@DB-Server ~]# service mysql stop

Shutting down MySQL..[ OK ]

[root@DB-Server ~]#

方式2:
[root@DB-Server ~]# /etc/rc.d/init.d/mysql status

MySQL running (8900)[ OK ]

[root@DB-Server ~]# /etc/rc.d/init.d/mysql stop

Shutting down MySQL..[ OK ]

[root@DB-Server ~]#
3:創建新的數據庫存儲目錄
[root@DB-Server ~]# cd /u01

[root@DB-Server u01]# mkdir mysqldata
4:移動MySQL數據目錄到新位置
[root@DB-Server ~]# mv /var/lib/mysql /u01/mysqldata/
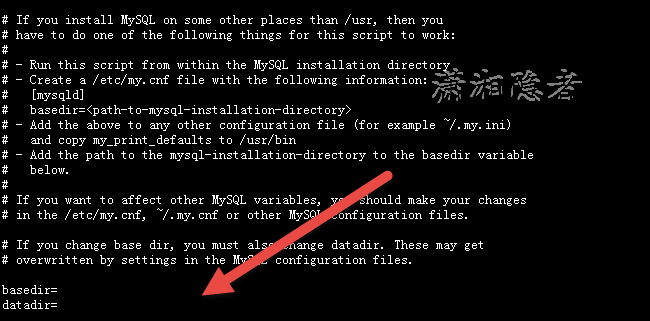
5:修改配置文件my.cnf
並不是所有版本都包含有my.cnf這個配置文件,在MySQL 5.5版本,我就找不到my.cnf這個配置文件, 而有些MySQL版本該文件位於/usr/my.cnf,如果/etc/目錄下沒有my.cnf配置文件,請到/usr/share/mysql/下找到*.cnf文件,拷貝其中一個到/etc/並改名爲my.cnf中。命令如下:
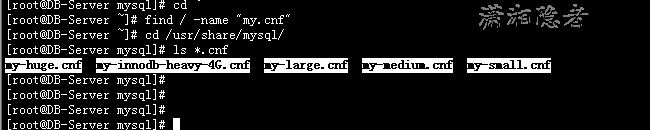
[root@DB-Server mysql]# cp /usr/share/mysql/my-medium.cnf /etc/my.cnf
編輯/etc/my.cnf文件,修改參數socket
MySQL 5.5 版本

# The following options will be passed to all MySQL clients
[client]
#password = your_password
port = 3306
socket = /u01/mysqldata/mysql/mysql.sock

# Here follows entries for some specific programs

# The MySQL server
[mysqld]
port = 3306
socket = /u01/mysqldata/mysql/mysql.sock
skip-external-locking
key_buffer_size = 16M
max_allowed_packet = 1M
table_open_cache = 64
sort_buffer_size = 512K
net_buffer_length = 8K
read_buffer_size = 256K
read_rnd_buffer_size = 512K
myisam_sort_buffer_size = 8M

6:修改啓動腳本/etc/init.d/mysql
將參數datadir修改爲datadir=/u01/mysqldata/mysql/
7:啓動MySQL服務並驗證MySQL數據庫路徑
[root@DB-Server ~]# service mysql start
Starting MySQL..[ OK ]
[root@DB-Server ~]# mysqladmin -u root -p variables | grep datadir
Enter password:
| datadir | /u01/mysqldata/mysql/
我的疑問:
1: 在修改數據庫的存儲目錄前,/var/lib/mysql/目錄下根本沒有mysql.sock文件,安裝上面配置後,就會生成mysql.sock文件。
關於mysql.sock文件,搜索了一下資料:mysql.sock是用於socket連接的文件。也就是隻有你的守護進程啓動起來這個文件才存在。但是你的mysql程序(這個程序是客戶端,服務器端是mysqld)可以選擇是否使用mysql.sock文件來連接(因爲這個方法只適合在Unix主機上面連接本地的mysqld),對於非本地的任何類型的主機。那麼這個文件是否一定需要的呢? 這個需要進一步瞭解清楚。
2:我在網上看有些網友總結的修改MySQL數據路徑,有些需要給新建的目錄的權限做一些處理,而有些有不用對目錄權限進行授權,我沒有處理,也沒有什麼問題。到底要不要對新的數據庫目錄授權呢?
3:我在MySQL_5.6.20這個版本測試時,不修改my.cnf,只修改啓動腳本/etc/init.d/mysql,也完全沒有啥問題。也沒有myssql.sock文件生成。
4: 注意如果沒有禁用selinux, 修改MySQL的數據路徑後啓動MySQL服務會遇到一些錯誤。關於這個的解釋是後臺服務都需要有對相應目錄的對應權限,而 mysql 的默認路徑/var/lib/mysql 已經添加了相應的策略,修改路徑後由於沒有相應的策略,導致後臺進程讀取文件被selinux阻止,從而出現權限錯誤。 所以要麼關閉Selinux或修改文件安全上下文。
[root@DB-Server mysql]# /etc/init.d/mysql start

Starting MySQL....The server quit without updating PID file (/u01/mysqldata/mysql//DB-Server.localdomain.pid).[FAILED]

[root@DB-Server mysql]#

[root@DB-Server mysql]# chcon -R -t mysqld_db_t /u01/mysqldata/mysql/

[root@DB-Server mysql]# /etc/init.d/mysql start

Starting MySQL.[ OK ]

[root@DB-Server mysql]#
總結
以上就是這篇文章的全部內容了,希望本文的內容對大家的學習或者工作具有一定的參考學習價值,如果有疑問大家可以留言交流,謝謝大家對神馬文庫的支持。
參考資料:
http://database.ctocio.com.cn/tips/449/7566949.shtml