


1、CGI 以及 FastCGI 介紹:
1、CGI全稱“通用網關接口”(Common Gateway Interface),用於HTTP服務器與其他服務器上的程序服務通信交流的一種工具,CGI程序須運行在網絡服務器上。
主要缺點:性能差。
2、FastCGI是一個可伸縮地、高速地在HTTP服務器和動態腳本語言間通信的接口(FastCGI接口在linux下是socket)這個socket可以是文件socket,也可以是ip socket。
主要優點:FastCGI接口方式採用C/S架構,把動態語言和HTTP服務器分離開來。
重要特點總結:
1)、FastCGI是HTTP服務器和動態腳本語言間通訊的接口或工具。
2)、FastCGI優點是把動態語言解析和HTTP服務器分離開來。
3)、Nginx、Apache、lighttpd以及多數動態語言都支持FastCGI。
4)、FastCGI接口方式採用C/S結構,分爲客戶端(HTTP服務器)和服務端(動態語言解析服務器)。
5)、PHP動態語言服務端可以啓動多個FastCGI的守護進程。
6)、http服務器通過(例:Nginx fastcgi_pass)FastCGI客戶端和動態語言FastCGI服務端通信(例:php-fpm)。
2、Nginx FastCGI的運行原理
Nginx不支持對外部動態程序的直接調用或者解析,所有的外部程序(包括PHP)必須通過FastCGI接口調用。FastCGI接口在linux下是socket,(這個socket可以是文件socket,也可以是ip socket)。爲了調用CGI程序,還需要一個FastCGI的wrapper(wrapper可以理解爲用於啓動另一個程序的程序),這個wrapper綁定在某個固定socket上,如端口或者文件socket。當nginx將CGI請求發送給這個socket的時候,通過FastCGI接口,wrapper接收到請求,然後派生出一個新的線程,這個線程調用解釋器或外部程序處理腳本並讀取返回數據;接着,wrapper再將返回的數據通過FastCGI接口,沿着固定的socker傳遞給Nginx;最後,Nginx將返回的數據發送給客戶端,這就是Nginx+FastCGI的整個運作過程。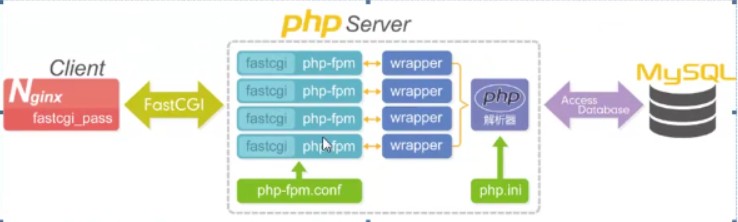
3、檢查 Nginx 和 MySQL :
[root@lnmp02 ~]# ls -ld /application/mysql/
drwxr-xr-x 13 root root 4096 Dec 22 02:03 /application/mysql/
[root@lnmp02 ~]# ls -ld /application/nginx/
drwxr-xr-x 11 root root 4096 Dec 18 22:59 /application/nginx/
[root@lnmp02 ~]# netstat -lntup|grep -E "80|3306"
tcp        0      0 0.0.0.0:3306                0.0.0.0:*                   LISTEN      1767/mysqld
tcp        0      0 0.0.0.0:80                  0.0.0.0:*                   LISTEN      2946/nginx
4、準備工作:安裝 PHP 前需要的準備環境:
檢查安裝 PHP 所需的 lib 庫:
先確認 PHP 程序會調用的一些 lib 庫是否已經安裝:
[root@lnmp02 ~]# rpm -qa zlib-devel libxml2-devel libjpeg-devel libjpeg-turbo-devel libiconv-devel
zlib-devel-1.2.3-29.el6.x86_64
[root@lnmp02 ~]# rpm -qa freetype-devel libpng-devel gd-devel libcurl-devel libxslt-devel
提示:這些 lib 庫不是必須安裝的,但是目前的企業環境下一般都需要安裝。否則 PHP 程序運行時會出現問題,例如驗證碼無法顯示等。
安裝相關的 lib 軟件包:
[root@lnmp02 ~]# yum install zlib-devel libxml2-devel libjpeg-devel libjpeg-turbo-devel libiconv-devel -y
[root@lnmp02 ~]# yum install freetype-devel libpng-devel gd-devel libcurl-devel libxslt-devel -y
安裝後的結果如下:
[root@lnmp02 ~]# rpm -qa zlib-devel libxml2-devel libjpeg-devel libjpeg-turbo-devel libiconv-devel
libjpeg-turbo-devel-1.2.1-3.el6_5.x86_64
zlib-devel-1.2.3-29.el6.x86_64
libxml2-devel-2.7.6-21.el6_8.1.x86_64
提示:缺少了  libiconv-devel  包【默認的 yum 源沒有此包】
[root@lnmp02 ~]# rpm -qa freetype-devel libpng-devel gd-devel libcurl-devel libxslt-devel
libpng-devel-1.2.49-2.el6_7.x86_64
freetype-devel-2.3.11-17.el6.x86_64
gd-devel-2.0.35-11.el6.x86_64
libcurl-devel-7.19.7-53.el6_9.x86_64
libxslt-devel-1.1.26-2.el6_3.1.x86_64
提示:通過編輯 /etc/yum.conf,把 keepcache 改爲等於 1 ,可以把每次yum安裝包保存下來,不改此處默認安裝後將會刪除包。
[root@lnmp02 ~]# cat /etc/yum.conf
[main]
cachedir=/var/cache/yum/$basearch/$releasever    #  修改爲 1 後默認存放 yum 包的路徑。
keepcache=0   #  此處默認是 0 (安裝後刪除)
安裝 yum 無法安裝的 libiconv 庫:
mkdir -p /home/oldboy/tools
cd  /home/oldboy/tools
wget http://ftp.gnu.org/pub/gnu/libiconv/libiconv-1.14.tar.gz
echo $?
tar zxf libiconv-1.14.tar.gz
cd libiconv-1.14
./configure --prefix=/usr/local/libiconv
make
make install
cd ../
提示:複製多行命令,一次執行即可。
安裝 libmcrypt 庫:
配置 epel 第三方 yum 源:[root@lnmp02 tools]# wget -O /etc/yum.repos.d/epel.repo http://mirrors.aliyun.com/repo/epel-6.repo
安裝對應的 libmcrypt-devel 包並查看:
[root@lnmp02 tools]# yum install libmcrypt-devel -y
[root@lnmp02 tools]# rpm -qa libmcrypt-devel
libmcrypt-devel-2.5.8-9.el6.x86_64
安裝 mhash 加密擴展庫:
[root@lnmp02 tools]# yum install mhash mhash-devel -y   #  需要提前安裝 epel 第三方 yum 源。
[root@lnmp02 tools]# rpm -qa mhash mhash-devel      #  查看結果如下。
mhash-devel-0.9.9.9-3.el6.x86_64
mhash-0.9.9.9-3.el6.x86_64
安裝 mcrypt 加密擴展庫:
[root@lnmp02 tools]# yum install mcrypt -y     #  需要提前安裝 epel 第三方 yum 源。
[root@lnmp02 tools]# rpm -qa mcrypt      #  查看結果如下。
mcrypt-2.6.8-10.el6.x86_64
5、開始安裝 PHP 服務:【php-5.3.27】
[root@lnmp02 ~]# cd /home/oldboy/tools
[root@lnmp02 tools]# rz -y
[root@lnmp02 tools]# ll
total 202672
 .....................省略若干...................
-rw-r--r--  1 root root  15008639 Dec 25  2017 php-5.3.27.tar.gz
[root@lnmp02 tools]# tar xf php-5.3.27.tar.gz
配置 PHP 軟件:
[root@lnmp02 php-5.3.27]#./configure \
--prefix=/application/php5.3.27 \
--with-mysql=/application/mysql \
--with-iconv-dir=/usr/local/libiconv \
--with-freetype-dir \
--with-jpeg-dir \
--with-png-dir \
--with-zlib \
--with-libxml-dir=/usr \
--enable-xml \
--disable-rpath \
--enable-safe-mode \
--enable-bcmath \
--enable-shmop \
--enable-sysvsem \
--enable-inline-optimization \
--with-curl \
--with-curlwrappers \
--enable-mbregex \
--enable-fpm \
--enable-mbstring \
--with-mcrypt \
--with-gd \
--enable-gd-native-ttf \
--with-openssl \
--with-mhash \
--enable-pcntl \
--enable-sockets \
--with-xmlrpc \
--enable-zip \
--enable-soap \
--enable-short-tags \
--enable-zend-multibyte \
--enable-static \
--with-xsl \
--with-fpm-user=nginx \
--with-fpm-group=nginx \
--enable-ftp
提示:出現 :Thank you for using PHP. 表示配置成功,正確輸出。
[root@lnmp02 php-5.3.27]# ln -s /application/mysql/lib/libmysqlclient.so.18 /usr/lib64/
[root@lnmp02 php-5.3.27]# touch ext/phar/phar.phar
[root@lnmp02 php-5.3.27]# make
提示: 以下內容是正確的提示:
Build complete.
Don't forget to run 'make test'.
安裝 PHP 生成文件到系統:
[root@lnmp02 php-5.3.27]# make install      #  下面是正確的提示[ 表示安裝成功 ] 。
/home/oldboy/tools/php-5.3.27/build/shtool install -c ext/phar/phar.phar /application/php5.3.27/bin
ln -s -f /application/php5.3.27/bin/phar.phar /application/php5.3.27/bin/phar
Installing PDO headers:          /application/php5.3.27/include/php/ext/pdo/
配置 PHP 引擎配置文件 php.ini :
① 設置軟鏈接方便訪問:
[root@lnmp02 php-5.3.27]# ln -s /application/php5.3.27/ /application/php
[root@lnmp02 php-5.3.27]# ls -l /application/php
lrwxrwxrwx 1 root root 23 Dec 23 16:45 /application/php -> /application/php5.3.27/
② 查看 PHP 配置默認模板文件:
[root@lnmp02 php-5.3.27]# pwd
/home/oldboy/tools/php-5.3.27
[root@lnmp02 php-5.3.27]# ls -l php.ini*
-rw-r--r-- 1 101 101 69606 Jul 11  2013 php.ini-development     #  開發環境的配置文件。
-rw-r--r-- 1 101 101 69627 Jul 11  2013 php.ini-production     #  生產環境的配置文件。
[root@lnmp02 php-5.3.27]# diff php.ini*
521c521
< error_reporting = E_ALL | E_STRICT
 > error_reporting = E_ALL & ~E_DEPRECATED
538c538
< display_errors = On
> display_errors = Off
549c549
< display_startup_errors = On
> display_startup_errors = Off
.....................省略若干........................
提示:從對比結果可以看出,開發環境更多的是開啓日誌、調試信息,而生產環境都是關閉狀態。
③ 拷貝 PHP 配置文件到 PHP 默認目錄,並改名爲 php.ini :
[root@lnmp02 php-5.3.27]# cp php.ini-production /application/php/lib/php.ini
[root@lnmp02 php-5.3.27]# ls -l /application/php/lib/php.ini
-rw-r--r-- 1 root root 69627 Dec 23 17:20 /application/php/lib/php.ini
提示:優化 PHP 解析就編輯該配置文件,對該文件的優化說明:待講解。
配置 PHP 服務(FastCGI 方式)的配置文件 php-fpm.conf :
[root@lnmp02 php-5.3.27]# cd /application/php/etc/   #  該配置文件的默認路徑。
[root@lnmp02 etc]# ll
total 28
-rw-r--r-- 1 root root  1232 Dec 23 16:33 pear.conf
-rw-r--r-- 1 root root 21683 Dec 23 16:33 php-fpm.conf.default
[root@lnmp02 etc]# cp php-fpm.conf.default php-fpm.conf     #  備份並改名爲系統默認識別的配置文件。
[root@lnmp02 etc]# ll
total 52
-rw-r--r-- 1 root root  1232 Dec 23 16:33 pear.conf
-rw-r--r-- 1 root root 21683 Dec 23 17:30 php-fpm.conf    #  配置文件。
-rw-r--r-- 1 root root 21683 Dec 23 16:33 php-fpm.conf.default
啓動 PHP 服務(FastCGI 方式):
[root@lnmp02 etc]# /application/php/sbin/php-fpm     #  啓動 PHP 的命令。
[root@lnmp02 etc]# ps -ef|grep php-fpm    #  查看進程(一個主進程,多個子進程)。
root     128462      1  0 17:47 ?        00:00:00 php-fpm: master process (/application/php5.3.27/etc/php-fpm.conf)
nginx    128463 128462  0 17:47 ?        00:00:00 php-fpm: pool www
nginx    128464 128462  0 17:47 ?        00:00:00 php-fpm: pool www
root     128466  12526  0 17:48 pts/1    00:00:00 grep php-fpm
[root@lnmp02 etc]# lsof -i :9000     #  默認 9000 端口提供服務。
COMMAND    PID  USER   FD   TYPE DEVICE SIZE/OFF NODE NAME
php-fpm 128462  root    7u  IPv4 115538      0t0  TCP localhost:cslistener (LISTEN)
php-fpm 128463 nginx    0u  IPv4 115538      0t0  TCP localhost:cslistener (LISTEN)
php-fpm 128464 nginx    0u  IPv4 115538      0t0  TCP localhost:cslistener (LISTEN)
6、nginx與PHP連接配置與測試:
[root@lnmp02 blog]# cat /application/nginx/conf/extra/blog.conf
    server {
        listen       80;
        server_name  blog.etiantian.org;
        location / {
                        root   html/blog;
            index  index.html index.htm;
        }
                location ~ .*\.(php|php5)?$ {
                        root   html/blog;
                        fastcgi_pass 127.0.0.1:9000;
                        fastcgi_index index.php;
                        include fastcgi.conf;
                }
            access_log logs/access_blog.log main;
    }
在/application/nginx/html/blog裏寫入PHP腳本:
[root@lnmp02 blog]# cat phpinfo.php
<?php
phpinfo();
?>
然後在網頁上查blog.etiantian.org/phpinfo.php
7、PHP與mysql連接測試:
在/application/nginx/html/blog裏寫入PHP腳本:
[root@lnmp02 blog]# cat test_mysql.php
<?php
        $link_id=mysql_connect('localhost','root','123456') or mysql_error();
        if($link_id){
                    echo "mysql successful by oldboy !";
        }else{
                echo mysql_error();
        }
?>
8、部署 blog 程序服務:
1、開源博客程序 WordPress 介紹:
WordPress 是一套利用 PHP 語言和 MySQL 數據庫開發的開源免費的 blog (博客,網站)程序,用戶可以在支持 PHP 環境和 MySQL 數據庫的服務器上建立 blog 站點。它的功能非常強大,擁有衆多插件,易於擴充功能。目前 WordPress 已經成爲搭建 blog 平臺的主流,很多發佈平臺都是根據 WordPress 二次開發的。想擁有自己的 blog,購買域名及空間,搭建 LNMP 環境,部署 WordPress 程序後就可以實現了。
2、WordPress 博客程序的搭建準備:
① 登錄 MySQL 數據庫、創建一個專用數據庫 WordPress 用於存放 blog 數據:
[root@lnmp02 blog]# mysql -uroot -p
mysql> create database wordpress;
Query OK, 1 row affected (0.04 sec)
mysql> show databases;
+--------------------+
| Database           |
+--------------------+
| information_schema |
| mysql              |
| performance_schema |
| wordpress          |
+--------------------+
② 創建一個專用的 WordPress blog 管理用戶:
mysql> grant all on wordpress.* to wordpress@'localhost' identified by '123456';
Query OK, 0 rows affected (0.09 sec)
提示:當數據庫和 PHP 服務不在一臺機器上,可以執行如下命令授權:
# grant all on wordpress.* to wordpress@'mysql-server-IP’' identified by '123456';
mysql> flush privileges;     #  刷新權限。
Query OK, 0 rows affected (0.06 sec)
mysql> show grants for wordpress@'localhost';   #  查看用戶對應的權限。
+------------------------------------------------------------------------------------------------------------------+
| Grants for wordpress@localhost                                                                                   |
+------------------------------------------------------------------------------------------------------------------+
| GRANT USAGE ON *.* TO 'wordpress'@'localhost' IDENTIFIED BY PASSWORD '*6BB4837EB74329105EE4568DDA7DC67ED2CA2AD9' |
| GRANT ALL PRIVILEGES ON `wordpress`.* TO 'wordpress'@'localhost'                                                 |
+------------------------------------------------------------------------------------------------------------------+
2 rows in set (0.00 sec)
mysql> select user,host from mysql.user;    #  查看數據庫裏創建的 wordpress 用戶。
+-----------+-----------+
| user      | host      |
+-----------+-----------+
| root      | 127.0.0.1 |
| root      | localhost |
| wordpress | localhost |     #  只允許本機通過 wordpress 用戶訪問數據庫(特指 blog 庫)。
+-----------+-----------+
3 rows in set (0.00 sec)
③ Nginx 及 PHP 環境配置準備:
[root@lnmp02 blog]# pwd
/application/nginx/html/blog
[root@lnmp02 ~]# rz -y
[root@lnmp02 blog]# ll
total 9896
-rw-r--r-- 1 root root 10130710 Dec 26  2017 wordpress-4.9.1-zh_CN.tar.gz
[root@lnmp02 blog]# tar xf wordpress-4.9.1-zh_CN.tar.gz
[root@lnmp02 blog]# ll
total 9900
drwxr-xr-x 5 nobody nfsnobody     4096 Nov 30 20:20 wordpress
-rw-r--r-- 1 root   root      10130710 Dec 26  2017 wordpress-4.9.1-zh_CN.tar.gz
[root@lnmp02 blog]# /bin/mv wordpress-4.9.1-zh_CN.tar.gz  /home/oldboy/tools   #  移走包備份。
[root@lnmp02 blog]# ll
total 4
drwxr-xr-x 5 nobody nfsnobody 4096 Nov 30 20:20 wordpress
[root@lnmp02 blog]# mv wordpress/* .    #  把上面 wordpress 目錄內容移動到當前 blog 根目錄。
[root@lnmp02 blog]# ls -l    #  完整的 blog 程序內容。
total 192
-rw-r--r--  1 nobody nfsnobody   418 Sep 25  2013 index.php
-rw-r--r--  1 nobody nfsnobody 19935 Jan  3  2017 license.txt
-rw-r--r--  1 nobody nfsnobody  7001 Nov 30 20:20 readme.html
drwxr-xr-x  2 nobody nfsnobody  4096 Dec 25 08:33 wordpress
-rw-r--r--  1 nobody nfsnobody  5434 Sep 23 20:21 wp-activate.php
drwxr-xr-x  9 nobody nfsnobody  4096 Nov 30 20:20 wp-admin
-rw-r--r--  1 nobody nfsnobody   364 Dec 19  2015 wp-blog-header.php
-rw-r--r--  1 nobody nfsnobody  1627 Aug 29  2016 wp-comments-post.php
-rw-r--r--  1 nobody nfsnobody  2930 Nov 30 20:20 wp-config-sample.php
drwxr-xr-x  5 nobody nfsnobody  4096 Nov 30 20:20 wp-content
-rw-r--r--  1 nobody nfsnobody  3669 Aug 20 12:37 wp-cron.php
drwxr-xr-x 18 nobody nfsnobody 12288 Nov 30 20:20 wp-includes
-rw-r--r--  1 nobody nfsnobody  2422 Nov 21  2016 wp-links-opml.php
-rw-r--r--  1 nobody nfsnobody  3306 Aug 22 19:52 wp-load.php
-rw-r--r--  1 nobody nfsnobody 36583 Oct 13 10:10 wp-login.php
-rw-r--r--  1 nobody nfsnobody  8048 Jan 11  2017 wp-mail.php
-rw-r--r--  1 nobody nfsnobody 16246 Oct  4 08:20 wp-settings.php
-rw-r--r--  1 nobody nfsnobody 30071 Oct 19 01:36 wp-signup.php
-rw-r--r--  1 nobody nfsnobody  4620 Oct 24 06:12 wp-trackback.php
-rw-r--r--  1 nobody nfsnobody  3065 Sep  1  2016 xmlrpc.php
[root@lnmp02 blog]# rm -fr wordpress/   #  刪掉沒用的目錄(已被掏空)。
[root@lnmp02 html]# ls -ld blog/
drwxr-xr-x 5 root root 4096 Dec 25 08:46 blog/   #   blog 站點目錄需要授權 Nginx 和 PHP 訪問。
[root@lnmp02 html]# chown -R nginx.nginx blog/   #  此授權方法不是特別安全。★★★★★
[root@lnmp02 html]# ls -ld blog/
drwxr-xr-x 5 nginx nginx 4096 Dec 25 08:46 blog/
[root@lnmp02 html]# cd blog/
[root@lnmp02 blog]# ll     #  blog 程序所有內容屬主屬組都改爲 nginx 了。
total 188
-rw-r--r--  1 nginx nginx   418 Sep 25  2013 index.php
-rw-r--r--  1 nginx nginx 19935 Jan  3  2017 license.txt
...............................省略若干行.......................................
-rw-r--r--  1 nginx nginx  4620 Oct 24 06:12 wp-trackback.php
-rw-r--r--  1 nginx nginx  3065 Sep  1  2016 xmlrpc.php
PHP 服務控制權限防止***安全方案詳解:
權限體系示意圖:
[root@lnmp02 blog]# pwd
/application/nginx/html/blog
[root@lnmp02 blog]# cd ../
[root@lnmp02 html]# chown -R root.root blog/     #  先把 站點目錄的權限都給 root 。
[root@lnmp02 html]# find ./blog/ -type f|xargs chmod 644   #  所有的文件權限都給 644。
[root@lnmp02 html]# find ./blog/ -type d|xargs chmod 755   #  所有的目錄權限都給 755。
[root@lnmp02 html]# mkdir blog/wp-content/uploads   #  創建上傳目錄。
提示:如果不知道上傳目錄是什麼,就上傳一個文件,系統會自動生成上傳目錄。
[root@lnmp02 html]# chown -R nginx.nginx blog/wp-content/uploads  # 授權該目錄爲 nginx 。
選擇前文配置好的支持 LNMP 的 blog 域名對應的虛擬主機:
[root@lnmp02 conf]# cd /application/nginx/conf/extra/
[root@lnmp02 extra]# ll
total 16
-rw-r--r-- 1 root root 332 Dec 21 14:58 bbs.conf
-rw-r--r-- 1 root root 524 Dec 25 05:14 blog.conf
-rw-r--r-- 1 root root 168 Dec 21 00:52 status.conf
-rw-r--r-- 1 root root 463 Dec 21 16:01 www.conf
[root@lnmp02 extra]# vi blog.conf
[root@lnmp02 extra]# cat blog.conf
    server {
        listen       80;
        server_name  blog.etiantian.org;
        root   html/blog;
        location / {
            index index.php  index.html index.htm;    #  補充一個首頁文件 index.php 。
        }
        location ~ .*\.(php|php5)?$ {
            root html/blog;
            fastcgi_pass  127.0.0.1:9000;
            fastcgi_index  index.php;
            include fastcgi.conf;
        }
        # access_log  logs/access_blog.log  main;
        access_log  logs/access_blog.log  main gzip buffer=32k flush=5s;
        # access_log off;
    }
[root@lnmp02 extra]# ../../sbin/nginx -t   #  檢查語法。
[root@lnmp02 extra]# ../../sbin/nginx -s reload    #  重新加載。
開始安裝 blog 博客程序:
① 在瀏覽器訪問 blog.eitantian.org。【提前做好 hosts 或 DNS 解析】
② 單擊上圖 "現在就開始" 按鈕,在出現的頁面填入如下內容:
③ 單擊結尾 "提交" 按鈕繼續:
④ 拷貝滾動條內容,手動創建上圖提示的 wp-config.php 文件:
[root@lnmp02 blog]# vi wp-config.php
[root@lnmp02 blog]# ll wp-config.php
-rw-r--r-- 1 root root 3114 Dec 25 10:17 wp-config.php
[root@lnmp02 blog]# mysql -uroot -p123456   #  登錄數據庫。
mysql> use wordpress   #  切到 wordpress 庫。
Database changed
mysql> show tables;      #  查看數據表【無】。
Empty set (0.00 sec)
⑤ 點擊上圖 "開始安裝" 按鈕:【初始安裝,生成表】
查看數據庫,生成很多數據表:
mysql> show tables;
+-----------------------+
| Tables_in_wordpress   |
+-----------------------+
| ol_commentmeta        |
| ol_comments           |
| ol_links              |
| ol_options            |
| ol_postmeta           |
| ol_posts              |
| ol_term_relationships |
| ol_term_taxonomy      |
| ol_termmeta           |
| ol_terms              |
| ol_usermeta           |
| ol_users              |
+-----------------------+
12 rows in set (0.00 sec)
mysql> select * from ol_users;   #  查看 user 表,有一些用戶信息 [ 略 ] 。
⑥ 到如下界面表示安裝成功,點擊登錄:
輸入用戶及密碼,如下所示:
⑦ 下圖爲登錄後臺後的界面,左邊是管理菜單:
⑧ 開始寫文章:[ 過程略 ]
⑨ 查看上傳目錄:
[root@lnmp02 blog]# ll wp-content/uploads/2017/12/
total 60
-rw-r--r-- 1 nginx nginx  4388 Dec 25 10:50  來自地球最帥的男人-科比-100x100.jpg
-rw-r--r-- 1 nginx nginx  7797 Dec 25 10:50  來自地球最帥的男人-科比-150x150.jpg
-rw-r--r-- 1 nginx nginx 15237 Dec 25 10:50 來自地球最帥的男人-科比-300x187.jpg
-rw-r--r-- 1 nginx nginx 26339 Dec 25 10:50 來自地球最帥的男人-科比.jpg
爲博客程序配置實現 URL 僞靜態:
實現此功能,首先要在 WordPress 後臺依次單擊設置--->固定鏈接--->自定義結構,然後輸入下面的代碼,並保存更改:/archives/%post_id%.html 如下圖所示:
接着,在 nginx 的 blog 配置文件 server 容器中添加下面代碼:
[root@lnmp02 extra]# vi blog.conf
[root@lnmp02 extra]# cat blog.conf
    server {
        listen       80;
        server_name  blog.etiantian.org;
        root   html/blog;
        location / {
            index index.php  index.html index.htm;
        if  ( -f $request_filename/index.html ) {
             rewrite (.*) $1/index.html break;
        }
        if  ( -f $request_filename/index.php ) {
             rewrite (.*) $1/index.php;
        }
        if  ( !-f $request_filename) {
             rewrite (.*) /index.php;
        }
        }
        location ~ .*\.(php|php5)?$ {
            root html/blog;
            fastcgi_pass  127.0.0.1:9000;
            fastcgi_index  index.php;
            include fastcgi.conf;
        }
        # access_log  logs/access_blog.log  main;
        access_log  logs/access_blog.log  main gzip buffer=32k flush=5s;
        # access_log off;
    }
然後檢查語法,重新加載 Nginx 服務,操作如下:
[root@lnmp02 extra]# /application/nginx/sbin/nginx -t
nginx: the configuration file /application/nginx-1.6.3/conf/nginx.conf syntax is ok
nginx: configuration file /application/nginx-1.6.3/conf/nginx.conf test is successful
[root@lnmp02 extra]# /application/nginx/sbin/nginx -s reload
最後,實現通過瀏覽器訪問博客僞靜態頁面:
登陸數據庫查看該博客在後臺數據庫的信息:
[root@lnmp02 extra]# mysql -uroot -p123456   #  登錄數據庫。
mysql> use wordpress;    #  切到博客數據庫 WordPress 庫。
Database changed
mysql> show tables;    #  展示所有數據表。
mysql> select * from ol_posts\G   # 查看 ol_posts 表,內容略。
9、部署bbs(機器:lnmp服務器和獨立的mysql服務器)
首先在mysql裏建立bbs庫,然後授權。
 mysql> create database bbs;
Query OK, 1 row affected (0.00 sec)

mysql> show databases;
+--------------------+
| Database           |
+--------------------+
| information_schema |
| bbs                |
| mysql              |
| performance_schema |
| wordpress          |
+--------------------+
5 rows in set (0.00 sec)

mysql> grant all on bbs.* to bbs@'192.168.153.%' identified by '123456';
Query OK, 0 rows affected (0.00 sec)

mysql> flush privileges;
Query OK, 0 rows affected (0.00 sec)

mysql> select user,host from mysql.user;
+-----------+---------------+
| user      | host          |
+-----------+---------------+
| root      | 127.0.0.1     |
| bbs       | 192.168.153.% |
| wordpress | 192.168.153.% |
| root      | localhost     |
+-----------+---------------+
4 rows in set (0.00 sec)
然後在lnmp服務器上配置bbs文件。
[root@lnmp02 bbs]# cat /application/nginx/conf/extra/bbs.conf
        server {
                listen       80;
                server_name  bbs.etiantian.org;
                location / {
                    root   html/bbs;
                    index  index.php index.html index.htm;
            }
                location ~ .*\.(php|php5)?$ {
                        root   html/bbs;
                        fastcgi_pass 127.0.0.1:9000;
                        fastcgi_index index.php;
                        include fastcgi.conf;
            }
                access_log logs/access_bbs.log main;
        }
然後再網頁上輸入Discuz下載bbs
[root@lnmp02 bbs]# wget http://download.comsenz.com/DiscuzX/3.2/Discuz_X3.2_SC_UTF8.zip
[root@lnmp02 bbs]# unzip Discuz_X3.2_SC_UTF8.zip
[root@lnmp02 bbs]# ll
總用量 12212
-rw-r--r--  1 root root 12486773 9月  13 11:08 Discuz_X3.2_SC_UTF8.zip
-rw-r--r--  1 root root       18 12月 19 06:23 index.html
drwxr-xr-x  2 root root     4096 12月 29 09:16 readme
drwxr-xr-x 12 root root     4096 12月 29 09:16 upload
drwxr-xr-x  4 root root     4096 12月 29 09:16 utility
[root@lnmp02 bbs]# rm -fr readme/ utility/
[root@lnmp02 bbs]# rm -f index.html
[root@lnmp02 bbs]# mv Discuz_X3.2_SC_UTF8.zip /home/oldboy/tools/
[root@lnmp02 bbs]# mv upload/* .
授權:[root@lnmp02 html]# chown -R nginx.nginx bbs/
安全的話:[root@lnmp02 bbs]# chown -R nginx.nginx config/data/uc_*
安裝完成後,再把mysql裏bbs用戶的權限改小。(安全)
mysql> drop user bbs@'192.168.153.%';
Query OK, 0 rows affected (0.00 sec)

mysql> select user,host from mysql.user;
+-----------+---------------+
| user      | host          |
+-----------+---------------+
| root      | 127.0.0.1     |
| wordpress | 192.168.153.% |
| root      | localhost     |
+-----------+---------------+
3 rows in set (0.00 sec)

mysql> grant insert,delete,update,select,drop on bbs.* to bbs@'192.168.153.%' identified by '123456';
Query OK, 0 rows affected (0.00 sec)

mysql> flush privileges;
Query OK, 0 rows affected (0.00 sec)安裝完成後,找到一下這個頁面,安全起見,刪除安裝過的程序:[root@lnmp02 bbs]# rm -fr install/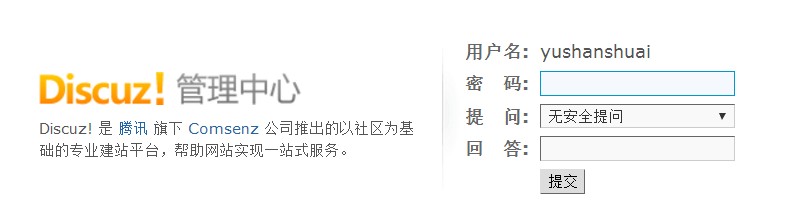
設置bbs僞靜態:
首先找到
然後在下面的頁面上全打上勾,提交。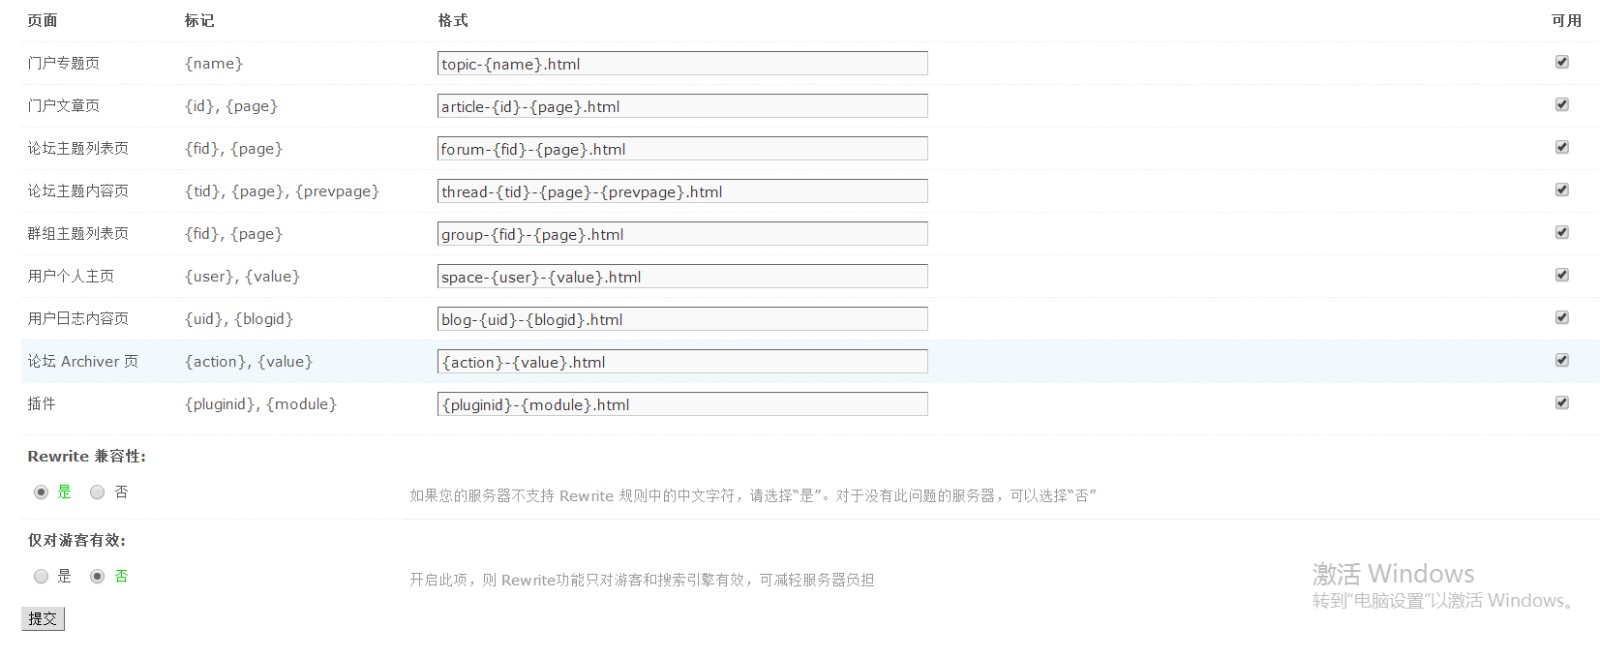
然後在頁面右上角找到以下頁面,進去找nginx的配置。
最後將這些配置放到bbs配置文件裏:
[root@lnmp02 extra]# cat bbs.conf
        server {
                listen       80;
                server_name  bbs.etiantian.org;
                location / {
                    root   html/bbs;
                    index  index.php index.html index.htm;
                        rewrite ^([^\.]*)/topic-(.+)\.html$ $1/portal.php?mod=topic&topic=$2 last;
                        rewrite ^([^\.]*)/article-([0-9]+)-([0-9]+)\.html$ $1/portal.php?mod=view&aid=$2&page=$3 last;
                        rewrite ^([^\.]*)/forum-(\w+)-([0-9]+)\.html$ $1/forum.php?mod=forumdisplay&fid=$2&page=$3 last;
                        rewrite ^([^\.]*)/thread-([0-9]+)-([0-9]+)-([0-9]+)\.html$ $1/forum.php?mod=viewthread&tid=$2&extra=page%3D$4&page=$3 last;
                        rewrite ^([^\.]*)/group-([0-9]+)-([0-9]+)\.html$ $1/forum.php?mod=group&fid=$2&page=$3 last;
                        rewrite ^([^\.]*)/space-(username|uid)-(.+)\.html$ $1/home.php?mod=space&$2=$3 last;
                        rewrite ^([^\.]*)/blog-([0-9]+)-([0-9]+)\.html$ $1/home.php?mod=space&uid=$2&do=blog&id=$3 last;
                        rewrite ^([^\.]*)/(fid|tid)-([0-9]+)\.html$ $1/index.php?action=$2&value=$3 last;
                        rewrite ^([^\.]*)/([a-z]+[a-z0-9_]*)-([a-z0-9_\-]+)\.html$ $1/plugin.php?id=$2:$3 last;
                        if (!-e $request_filename) {
                                        return 404;
                        }
            }
                location ~ .*\.(php|php5)?$ {
                        root   html/bbs;
                        fastcgi_pass 127.0.0.1:9000;
                        fastcgi_index index.php;
                        include fastcgi.conf;
            }
                access_log logs/access_bbs.log main;
        }