


LAMP平臺概述
LAMP架構是目前成熟的企業網站應用模式之一,指的是協同工作的一整套系統和相關軟件,能夠提供動態Web站點服務及其應用開發環境。LAMP是一個縮寫詞,具體包括Linux操作系統、Apache網站服務器、MySQL數據庫服務器、PHP(或Perl、Python)網頁編程語言
LAMP平臺的構成組件
Linux操作系統:作爲LAMP架構的基礎,提供用於支撐Web站點的d操作系統,能夠與其他三個組件提供更好的穩定性、兼容性(AMP組件也支持Windows、UNIX等操作系統)
1、Apache網站服務器:作爲LAMP架構的前端,是一款功能強大、穩定性好的Web服務器程序,該服務器直接面向用戶提供網站訪問,發送網
頁、圖片等文件內容。
2、MySQL數據庫服務器:作爲LAMP架構的後端,是一款流行的開源關係數據庫系統。在企業網站、業務系統等應用中,各種賬戶信息、產品信息、客戶資料、業務數據等可以存儲到MySQL數據庫,其它程序可以通過MySQL語句來查詢、更改這些信息。
3、PHP、Perl、Python網頁編程語言:作爲三種開發動態網頁的編程語言,負責解釋動態網頁文件,並提供Web應用程序的開發和運行環境。其中PHP是一種被廣泛應用的開放源代碼的多用途腳本語言,它可以嵌入到HTML中,尤其適合於Web應用開發。
LAMP平臺的應用優勢
1、成本低廉:構成組件都是開放源代碼的軟件,可以自由獲得和免費使用,在技術上和許可證方面沒有太嚴格的限制,大大降低企業成本。
2、可定製:擁有大量的額外組件和可擴展功能的模塊,能夠滿足大部分企業應用的定製需求,甚至可以自行開發、添加新的功能。
3、方便易用:PHP、Perl等屬於解釋性語言,開發的各種Web程序不需要編譯,方便進行移植使用。整套的網站項目程序,通常只要複製到網站目錄下,就可以直接訪問。
4、易於開發:基於LAMP平臺的動態網站中,頁面代碼簡潔,與HTML標記語言的結合度非常好,即使是非專業的程序員也能夠輕鬆讀懂乃至修改網頁代碼。
5、安全和穩定:得益於開源的優勢,大量的程序員在關注並持續改進LAMP平臺的各個組件,發現的問題能夠很快得到解決。LAMP架構已經經歷了數十年的長期驗證,在安全性和穩定性方面表現得非常優秀。構建LAMP時,各組件的安裝順序依次爲Linux、Apache、MySQL、PHP,其中Apache和MySQL的安裝並沒有嚴格的順序,而PHP環境的安裝一般放到最後,負責溝通Web服務器和數據庫系統以協同工作。
實驗環境
系統版本:CentOS Linux release 7.3.1611 (Core)x64
MySQL版本:MySQL5.7.24
Apache版本:Apache/2.4.6 (yum安裝)
Nginx版本:Nginx1.14.0
PHP版本:PHP 7.0.32
關閉防火牆並禁止開機自啓
systemctl stop firewalld.service
systemctl disable firewalld
關閉selinux
sed -i 's/SELINUX=enforcing/SELINUX=disabled/g' /etc/sysconfig/selinux
重啓 reboot
實驗架構
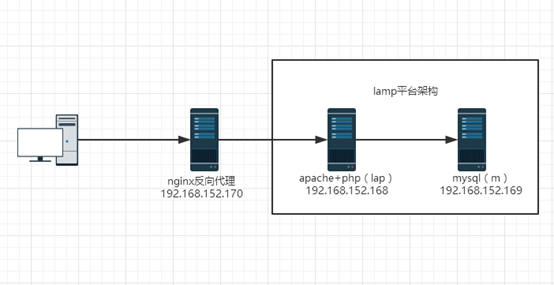
注:如果服務器資源緊張nginx和apache可以在同一臺服務器部署,但是爲了安全個人建議分開部署!
安裝反向代理nginx
1、修改主機名
vi /etc/hostname
nginx.wfy.com
2、域名綁定IP
vi /etc/hosts
注:如果不確定是否修改成功,可以reboot重啓驗證!
3、安裝nginx依賴環境包
yum install gcc-c++ pcre pcre-devel zlib zlib-devel openssl openssl-devel
4、安裝nginx
1)官網下載nginx1.14.0壓縮包
wget https://nginx.org/download/nginx-1.14.0.tar.gz
2)解壓nginx
tar xf nginx-1.14.0.tar.gz
3)進入解壓目錄
cd nginx-1.14.0
4)編譯nginx
//默認編譯
. /configure
//自定義編譯選項
. /configure \
--user=nginx \
--group=nginx \
--prefix=/usr/local/nginx \
--conf-path=/usr/local/nginx/conf/nginx.conf \
--pid-path=/usr/local/nginx/conf/nginx.pid \
--lock-path=/var/lock/nginx.lock \
--error-log-path=/var/log/nginx/error.log \
--http-log-path=/var/log/nginx/access.log \
--with-http_gzip_static_module \
--http-client-body-temp-path=/var/temp/nginx/client \
--http-proxy-temp-path=/var/temp/nginx/proxy \
--http-fastcgi-temp-path=/var/temp/nginx/fastcgi \
--http-uwsgi-temp-path=/var/temp/nginx/uwsgi \
--http-scgi-temp-path=/var/temp/nginx/scgi
--with-http_ssl_module注:以上爲默認編譯方式和具體指定的編譯方式,任選以上這兩種之一即可。--with-http_ssl_module這個選項是https的重要模塊必須安裝。
//本文編譯方式
./configure
--prefix=/usr/local/nginx
--with-http_stub_status_module
--with-http_ssl_module

注:以上--with-http_ssl_module這個模塊是https的關鍵可以根據業務需求使用https協議或者http協議。我這裏使用默認http協議!
5)安裝nginx
make && make install
5、啓動nginx
1)編輯nginx啓動腳本
vi /etc/init.d/nginx
#! /bin/bash
#chkconfig: - 85 15
PATH=/usr/local/nginx
NAME=nginx
DAEMON=$PATH/sbin/$NAME
CONFIGFILE=$PATH/conf/$NAME.conf
PIDFILE=$PATH/logs/$NAME.pid
SCRIPTNAME=/etc/init.d/$NAME
set -e
[ -x "$DAEMON" ] || exit 0
do_start() {
$DAEMON -c $CONFIGFILE || echo -e "\033[32m nginx already running \033[0m"
}
do_stop() {
$DAEMON -s stop || echo -e "\033[31m nginx not running \033[0m"
}
do_reload() {
$DAEMON -s reload || echo -e "\033[31m nginx can't reload \033[0m"
}
case "$1" in
start)
echo -e "\033[32m $NAME running \033[0m"
do_start
;;
stop)
echo -e "\033[31m $NAME stoping \033[0m"
do_stop
;;
reload|graceful)
echo -e "\033[32m $NAME configuration...\033[0m"
do_reload
;;
restart)
echo -e "\033[32m Restarting : $NAME \033[0m"
do_stop
do_start
;;
*)
echo "Usage: $SCRIPTNAME {start|stop|reload|restart}" >&2
exit 3
;;
esac
exit 0
注:切記編輯完啓動腳本以後一定要給予執行權限,不然啓動無效!
2)設置啓動文件執行權限
chmod +x /etc/init.d/nginx
3)啓動nginx
//設置開機自啓
chkconfig nginx on
//啓動nginx
/etc/init.d/nginx start
//重啓nginx
/etc/init.d/nginx restart
//查看nginx服務啓動狀態
chkconfig --list
//查看nginx服務是否開啓
netstat -antupl | grep nginx
6、環境變量
1)編輯nginx環境變量
vi /etc/profile
export PATH=$PATH:/usr/local/nginx/sbin
2)環境變量生效
source /etc/profile
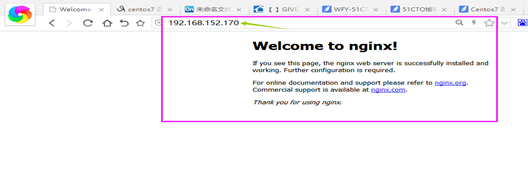
7、訪問測試
8、配置nginx反向代理
1)備份nginx配置文件
cp /usr/local/nginx/conf/nginx.conf /usr/local/nginx/conf/nginx.conf.backup
2)修改配置文件
vi /usr/local/nginx/conf/nginx.conf
#設置低權限用戶,爲了安全而設置的
user nobody;
#工作衍生進程數一般不大於cpu核數
worker_processes 2;
#設置錯誤文件存放路徑
error_log logs/error.log;
error_log logs/error.log notice;
error_log logs/error.log info;
#設置pid存放路徑(pid是控制系統中重要文件)
pid logs/nginx.pid;
#設置最大連接數
events{
worker_connections 1024;
}
http{
#主要是用於設置一組可以在proxy_pass和fastcgi_pass指令中使用額代理服務器,默認負載均衡方式爲輪詢
upstream tomcat {
#設置同一個cookie的兩次/多次請求,請求的是同一臺服務器
ip_hash;
#weight權重,默認1,權重越大訪問概率越大,backup備用服務器,服務器全部崩潰後啓動
server 192.168.152.168:80 weight=5;
#server localhost:8080 weight=5 backup;
}#開啓gzip壓縮,開啓後,訪問網頁會自動壓縮
gzip on;#指定服務器的名稱和參數
server {
listen 80;
server_name localhost;#設置字符 #charset koi8-r; #location / 指用根目錄做負載均衡 location / { proxy_pass http://tomcat; proxy_redirect default; #設置代理 proxy_set_header Host $host; proxy_set_header X-Real-IP $remote_addr; }}
}
注:nginx反向代理本身就和nginx負載均衡是一回事,設置方式有兩種,一種是直接寫負載均衡,但是後端只掛一個服務器即可,如果是兩個服務器那就是通過反向代理實現負載均衡;另一種註釋負載均衡功能,直接寫location來做代理即可!
安裝apache+php
1、修改主機名
vi /etc/hostname
apache.wfy.com
2、域名綁定IP
vi /etc/hosts
3、安裝apache
1)安裝apache依賴包
yum -y install mod_ssl openssl httpd
注:默認使用http協議,防止升級https協議,提前將mod_ssl模塊安裝!
2)啓動apache
systemctl start httpd
3)設置開機啓動
systemctl enable httpd
4、安裝php
1)查看yum源列表
yum list | grep epel-release
2)安裝elep源
yum install epel-release.noarch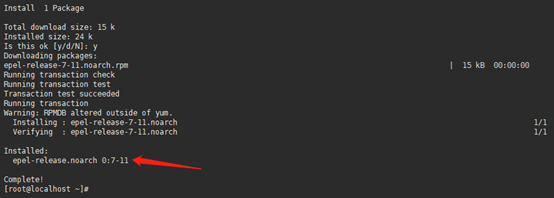
3)安裝php依賴包
yum install gcc-c++ libxml2 libxml2-devel openssl openssl-devel bzip2 bzip2-devel libcurl libcurl-devel libjpeg libjpeg-devel libpng libpng-devel freetype freetype-devel gmp gmp-devel libmcrypt libmcrypt-devel readline readline-devel libxslt libxslt-devel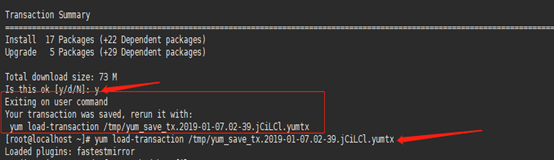
注:如果在安裝依賴時如上圖停止是因爲yum源需要更新,所以在線源直接更新安裝yum源即可!命令爲:yum load-transaction /tmp/yum_save_tx.2019-01-07.02-39.jCiLCl.yumtx更新完成後,重新安裝一遍php依賴包,如下截圖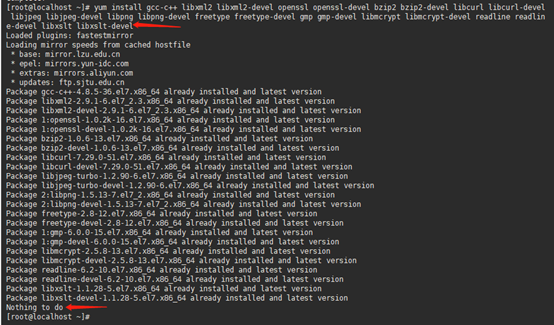
4)安裝php新版本rpm源
rpm -Uvh https://mirror.webtatic.com/yum/el7/epel-release.rpm
rpm -Uvh https://mirror.webtatic.com/yum/el7/webtatic-release.rpm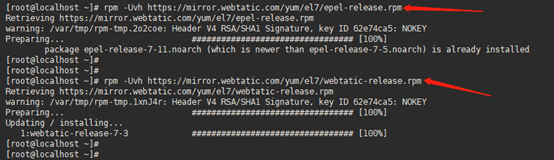
5)查看php版本安裝包文件
yum search php7
6)安裝php
yum install php70w.x86_64 php70w-common php70w-fpm php70w-opcache php70w-gd php70w-mbstring php70w-pecl-redis php70w-pecl-memcached php70w-devel php70w-mysql
注:防止後期擴展服務,所以將一般常用模塊都安裝上!
7)查看php版本
php –v
8)編輯php測試文件
vi /var/www/html/index.php
<?php
phpinfo();
?>
9)重啓httpd服務
systemctl restart httpd
10)測試
訪問地址:http://192.168.152.170/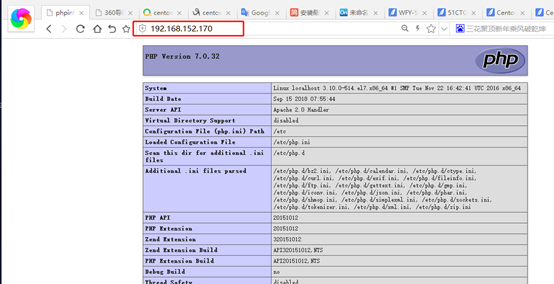
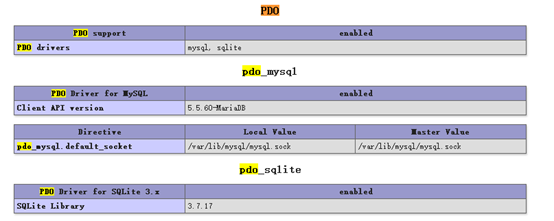
注:以上截圖pdo模塊主要針對於php!
安裝MySQL5.7數據庫
注:這裏就不多說了,太簡單了,不會的可以自行百度或者看我的上一篇文章如何在Centos7下安裝MySQL5.7或者Centos7二進制安裝MySQL5.7
測試PHP與MySQL數據庫交互
1、MySQL數據庫服務器
1)創建test數據庫
create database test character set utf8;
2)創建test數據庫用戶
grant all privileges on test.* TO 'test'@'%' identified by 'Wangfeiyu@12' WITH GRANT OPTION;
3)刷新數據庫
flush privileges;
4)設置test數據庫允許遠程登錄
update user set host = '%' where user = 'test';
5)創建一個use表
create table test.use(number int(100),primary key(number),user_name char(10) not null, user_pass char(12) default '');
6)向表中添加數據
insert into test.use values('1','2','3');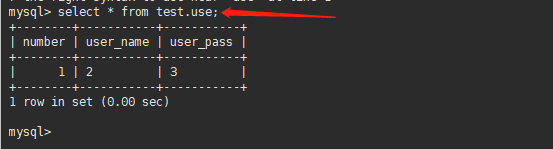
2、apache+php交互服務器
1)新建測試文件
vi /var/www/html/index.php
<?php
$mysql_conf = array(
'host' => '192.168.152.169:3306',
'db' => 'test',
'db_user' => 'test',
'db_pwd' => 'Wangfeiyu@12',
);
try {
$PDO = new PDO('mysql:host=192.168.152.169;port=3306;dbname=test', 'test', 'Wangfeiyu@12');
$result = $PDO->query('select * from test.use');
$row = $result->fetch(PDO::FETCH_ASSOC);
print_r($row);
$PDO = null;
} catch (PDOException $e) {
die('Connection failed: ' . $e->getMessage());
}
?>
注:保存文件退出並重啓httpd!
2)重啓httpd服務
systemctl restart httpd
3)訪問測試
訪問地址:http://192.168.152.168/
注:以上截圖說明apache+php交互沒有問題!
3、測試反向代理
訪問地址:http://192.168.152.170/
注:以上截圖說明反向代理也沒有問題,也就是說完整的部署了nginx+lamp環境!