


1.flume不同Source、Sink的配置文件編寫
(1)Source---spool
監聽是一個目錄,這個目錄不能有子目錄,監控的是這個目錄下的文件。採集完成,這個目錄下的文件會加上後綴(.COMPLETED)
配置文件:
#Name the components on this agent
#這裏的a1指的是agent的名字,可以自定義,但注意:同一個節點下的agent的名字不能相同
#定義的是sources、sinks、channels的別名
a1.sources = r1
a1.sinks = k1
a1.channels = c1

#指定source的類型和相關的參數
a1.sources.r1.type = spooldir
a1.sources.r1.spoolDir = /home/hadoop/flumedata

#設定channel
a1.channels.c1.type = memory

#設定sink
a1.sinks.k1.type = logger

#Bind the source and sink to the channel
#設置sources的通道
a1.sources.r1.channels = c1
#設置sink的通道
a1.sinks.k1.channel = c1
(2)Source---netcat
一個NetCat Source用來監聽一個指定端口,並將接收到的數據的每一行轉換爲一個事件。
數據源: netcat(監控tcp協議)
Channel:內存
數據目的地:控制檯
配置文件
#指定代理
a1.sources = r1
a1.channels = c1
a1.sinks = k1

#指定sources
a1.sources.r1.channels = c1
#指定source的類型
a1.sources.r1.type = netcat
#指定需要監控的主機
a1.sources.r1.bind = 192.168.191.130
#指定需要監控的端口
a1.sources.r1.port = 3212

#指定channel
a1.channels.c1.type = memory

#sinks  寫出數據 logger
a1.sinks.k1.channel=c1
a1.sinks.k1.type=logger
(3)Source---avro
監聽AVRO端口來接受來自外部AVRO客戶端的事件流。利用Avro Source可以實現多級流動、扇出流、扇入流等效果。另外也可以接受通過flume提供的Avro客戶端發送的日誌信息。
數據源: avro
Channel:內存
數據目的地:控制檯
配置文件
#指定代理
a1.sources = r1
a1.channels = c1
a1.sinks = k1

#指定sources
a1.sources.r1 channels. = c1
#指定source的類型
a1.sources.r1.type = avro
#指定需要監控的主機名
a1.sources.r1.bind = hadoop03
#指定需要監控的端口
a1.sources.r1.port = 3212

#指定channel
a1.channels.c1.type = memory

#指定sink
a1.sinks.k1.channel = c1
a1.sinks.k1.type = logger
(4)採集日誌文件到hdfs
source ====exec (一個Linux命令: tail -f)
channel====memory
sink====hdfs
注意:如果集羣是高可用的集羣,需要將core-site.xml 和hdfs-site.xml 放入flume的conf中。
配置文件:
a1.sources = r1
a1.channels = c1
a1.sinks = k1

#指定sources
a1.sources.r1.channels = c1
#指定source的類型
a1.sources.r1.type = exec
#指定exec的command
a1.sources.r1.command = tail -F /home/hadoop/flumedata/zy.log

#指定channel
a1.channels.c1.type = memory

#指定sink 寫入hdfs
a1.sinks.k1.channel = c1
a1.sinks.k1.type = hdfs
#指定hdfs上生成的文件的路徑年-月-日,時_分
a1.sinks.k1.hdfs.path = /flume/%y-%m-%d/%H_%M
#開啓滾動
a1.sinks.k1.hdfs.round = true
#設定滾動的時間(設定目錄的滾動)
a1.sinks.k1.hdfs.roundValue = 24
#時間的單位
a1.sinks.k1.hdfs.roundUnit = hour
#設定文件的滾動
#當前文件滾動的時間間隔(單位是:秒)
a1.sinks.k1.hdfs.rollInterval = 10
#設定文件滾動的大小(文件多大,滾動一次)
a1.sinks.k1.hdfs.rollSize = 1024
#設定文件滾動的條數(多少條滾動一次)
a1.sinks.k1.hdfs.rollCount = 10
#指定時間來源(true表示指定使用本地時間)
a1.sinks.k1.hdfs.useLocalTimeStamp = true
#設定存儲在hdfs上的文件類型,(DataStream,文本)
a1.sinks.k1.hdfs.fileType = DataStream
#加文件前綴
a1.sinks.k1.hdfs.filePrefix = zzy
#加文件後綴
a1.sinks.k1.hdfs.fileSuffix = .log
2.flume典型的使用場景
(1)多代理流
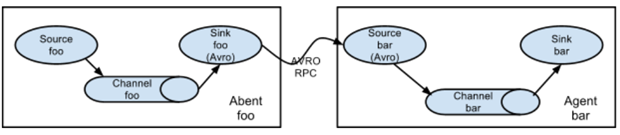
從第一臺機器的flume agent傳送到第二臺機器的flume agent。
例:
規劃:
hadoop02:tail-avro.properties
使用 exec “tail -F /home/hadoop/testlog/welog.log”獲取採集數據
使用 avro sink 數據都下一個 agent
hadoop03:avro-hdfs.properties
使用 avro 接收採集數據
使用 hdfs sink 數據到目的地
配置文件
#tail-avro.properties
a1.sources = r1
a1.sinks = k1
a1.channels = c1
#Describe/configure the source
a1.sources.r1.type = exec
a1.sources.r1.command = tail -F /home/hadoop/testlog/date.log
a1.sources.r1.channels = c1
#Describe the sink
a1.sinks.k1.type = avro
a1.sinks.k1.channel = c1
a1.sinks.k1.hostname = hadoop02
a1.sinks.k1.port = 4141
a1.sinks.k1.batch-size = 2
#Use a channel which buffers events in memory
a1.channels.c1.type = memory
a1.channels.c1.capacity = 1000
a1.channels.c1.transactionCapacity = 100
#Bind the source and sink to the channel
a1.sources.r1.channels = c1
a1.sinks.k1.channel = c1
#avro-hdfs.properties
a1.sources = r1
a1.sinks = k1
a1.channels = c1
#Describe/configure the source
a1.sources.r1.type = avro
a1.sources.r1.channels = c1
a1.sources.r1.bind = 0.0.0.0
a1.sources.r1.port = 4141
#Describe k1
a1.sinks.k1.type = hdfs
a1.sinks.k1.hdfs.path =hdfs://myha01/testlog/flume-event/%y-%m-%d/%H-%M
a1.sinks.k1.hdfs.filePrefix = date_
a1.sinks.k1.hdfs.maxOpenFiles = 5000
a1.sinks.k1.hdfs.batchSize= 100
a1.sinks.k1.hdfs.fileType = DataStream
a1.sinks.k1.hdfs.writeFormat =Text
a1.sinks.k1.hdfs.rollSize = 102400
a1.sinks.k1.hdfs.rollCount = 1000000
a1.sinks.k1.hdfs.rollInterval = 60
a1.sinks.k1.hdfs.round = true
a1.sinks.k1.hdfs.roundValue = 10
a1.sinks.k1.hdfs.roundUnit = minute
a1.sinks.k1.hdfs.useLocalTimeStamp = true
#Use a channel which buffers events in memory
a1.channels.c1.type = memory
a1.channels.c1.capacity = 1000
a1.channels.c1.transactionCapacity = 100
#Bind the source and sink to the channel
a1.sources.r1.channels = c1
a1.sinks.k1.channel = c1(2)多路複用採集
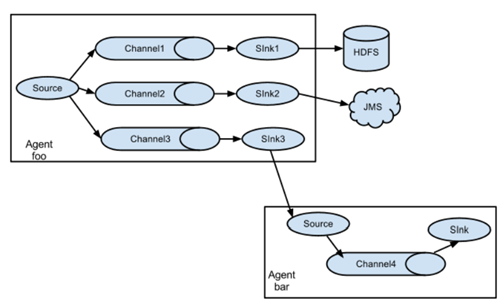
在一份agent中有多個channel和多個sink,然後多個sink輸出到不同的文件或者文件系統中。
規劃:
Hadoop02:(tail-hdfsandlogger.properties)
使用 exec “tail -F /home/hadoop/testlog/datalog.log”獲取採集數據
使用 sink1 將數據 存儲hdfs
使用 sink2 將數據都存儲 控制檯
配置文件
#tail-hdfsandlogger.properties
#2個channel和2個sink的配置文件
#Name the components on this agent
a1.sources = s1
a1.sinks = k1 k2
a1.channels = c1 c2

#Describe/configure tail -F source1
a1.sources.s1.type = exec
a1.sources.s1.command = tail -F /home/hadoop/logs/catalina.out
#指定source進行扇出到多個channnel的規則
a1.sources.s1.selector.type = replicating
a1.sources.s1.channels = c1 c2

#Use a channel which buffers events in memory
#指定channel c1
a1.channels.c1.type = memory
#指定channel c2
a1.channels.c2.type = memory

#Describe the sink
#指定k1的設置
a1.sinks.k1.type = hdfs
a1.sinks.k1.hdfs.path=hdfs://myha01/flume_log/%y-%m-%d/%H-%M
a1.sinks.k1.hdfs.filePrefix = events
a1.sinks.k1.hdfs.maxOpenFiles = 5000
a1.sinks.k1.hdfs.batchSize= 100
a1.sinks.k1.hdfs.fileType = DataStream
a1.sinks.k1.hdfs.writeFormat =Text
a1.sinks.k1.hdfs.rollSize = 102400
a1.sinks.k1.hdfs.rollCount = 1000000
a1.sinks.k1.hdfs.rollInterval = 60
a1.sinks.k1.hdfs.round = true
a1.sinks.k1.hdfs.roundValue = 10
a1.sinks.k1.hdfs.roundUnit = minute
a1.sinks.k1.hdfs.useLocalTimeStamp = true
a1.sinks.k1.channel = c1
#指定k2的
a1.sinks.k2.type = logger
a1.sinks.k2.channel = c2
(3)高可用部署採集
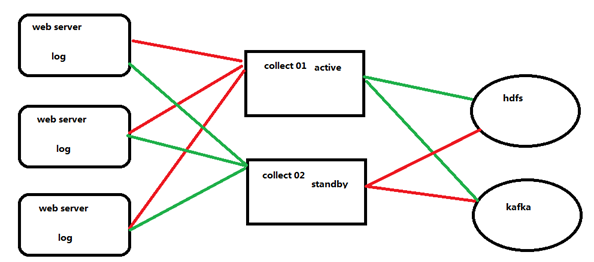
首先在三個web服務器中收集數據,然後交給collect,此處的collect是高可用的,首先collect01是主,所有收集到的數據發送給他,collect02只是出於熱備狀態不接受數據,當collect01宕機的時候,collect02頂替,然後接受數據,最終將數據發送給hdfs或者kafka。
agent和collecotr的部署
Agent1、Agent2數據分別流入到Collector1和Collector2中,Flume NG 本 身提供了 Failover 機制,可以自動切換和恢復。再由Collector1和Collector2將數據輸出到hdfs中。
示意圖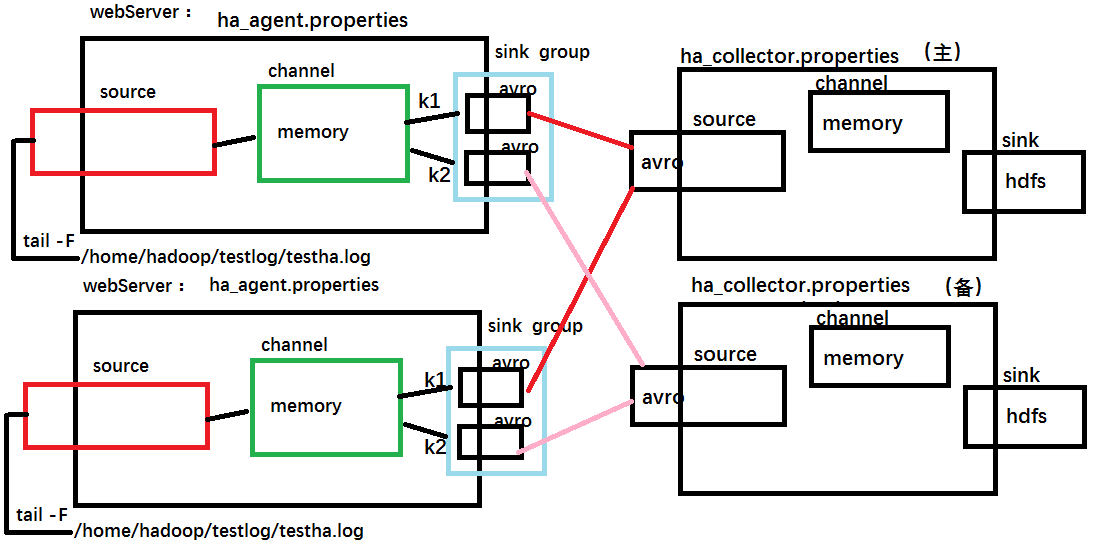
配置文件:
#ha_agent.properties
#agent name: agent1
agent1.channels = c1
agent1.sources = r1

agent1.sinks = k1 k2
#set gruop
agent1.sinkgroups = g1

#set channel
agent1.channels.c1.type = memory
agent1.channels.c1.capacity = 1000
agent1.channels.c1.transactionCapacity = 100

agent1.sources.r1.channels = c1
agent1.sources.r1.type = exec
agent1.sources.r1.command = tail -F /home/hadoop/testlog/testha.log
agent1.sources.r1.interceptors = i1 i2
agent1.sources.r1.interceptors.i1.type = static
agent1.sources.r1.interceptors.i1.key = Type
agent1.sources.r1.interceptors.i1.value = LOGIN
agent1.sources.r1.interceptors.i2.type = timestamp

#set sink1
agent1.sinks.k1.channel = c1
agent1.sinks.k1.type = avro
agent1.sinks.k1.hostname = hadoop02
agent1.sinks.k1.port = 52020
#set sink2
agent1.sinks.k2.channel = c1
agent1.sinks.k2.type = avro
agent1.sinks.k2.hostname = hadoop03
agent1.sinks.k2.port = 52020
#set sink group
agent1.sinkgroups.g1.sinks = k1 k2
#set failover
agent1.sinkgroups.g1.processor.type = failover
agent1.sinkgroups.g1.processor.priority.k1 = 10
agent1.sinkgroups.g1.processor.priority.k2 = 1
agent1.sinkgroups.g1.processor.maxpenalty = 10000
#ha_collector.properties
#set agent name
a1.sources = r1
a1.channels = c1
a1.sinks = k1
#set channel
a1.channels.c1.type = memory
a1.channels.c1.capacity = 1000
a1.channels.c1.transactionCapacity = 100
#other node,nna to nns
a1.sources.r1.type = avro
##當前主機爲什麼,就修改成什麼主機名
a1.sources.r1.bind = hadoop03
a1.sources.r1.port = 52020
a1.sources.r1.interceptors = i1
a1.sources.r1.interceptors.i1.type = static
a1.sources.r1.interceptors.i1.key = Collector
##當前主機爲什麼,就修改成什麼主機名
a1.sources.r1.interceptors.i1.value = hadoop03
a1.sources.r1.channels = c1
#set sink to hdfs
a1.sinks.k1.type=hdfs
a1.sinks.k1.hdfs.path= hdfs://myha01/flume_ha/loghdfs
a1.sinks.k1.hdfs.fileType=DataStream
a1.sinks.k1.hdfs.writeFormat=TEXT
a1.sinks.k1.hdfs.rollInterval=10
a1.sinks.k1.channel=c1
a1.sinks.k1.hdfs.filePrefix=%Y-%m-%d最後啓動:
#先啓動 hadoop02 和 hadoop03 上的 collector 角色:
bin/flume-ng agent -c conf -f agentconf/ha_collector.properties -n a1 - Dflume.root.logger=INFO,console
#然後啓動 hadoop01,hadoop02 上的 agent 角色:
bin/flume-ng agent -c conf -f agentconf/ha_agent.properties -n agent1 - Dflume.root.logger=INFO,console