


在Python語言中,有一個微信接口模塊itchat,可以用來實現微信的一些功能,本主題專門使用itchat來實現一些應用:
掌握iChat的API結構;
應用iChat的API實現用戶需求;
前提:安裝iChat模塊
> pip install itchat
安裝過程截圖:
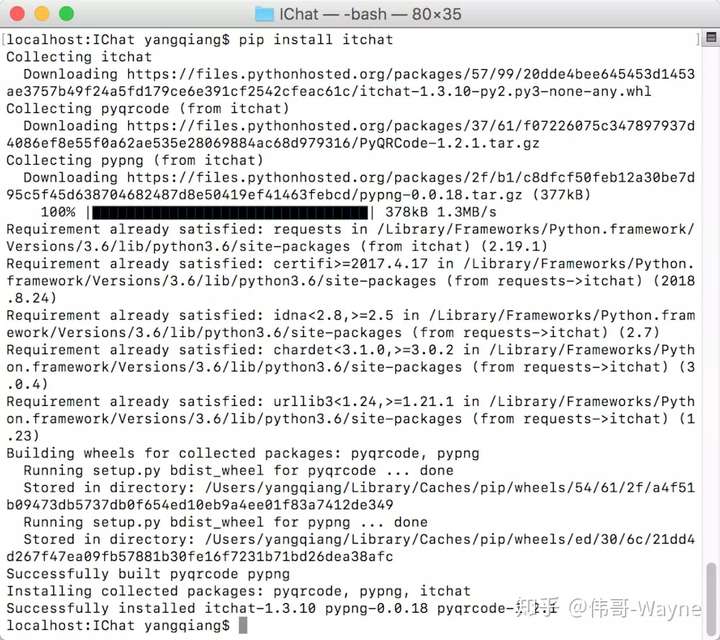
Python3.6版本下,itchat模塊安裝過程
一、itchat的API結構
使用dir函數可以獲取itchat中的API信息;
代碼:
import  itchat
  print(dir(itchat))
上述代碼在python交互編程模式下,與ipython中都可以使用。
獲取的API信息如下(從ipython中拷貝的):
['Core', 'VERSION', '__builtins__', '__cached__', '__doc__', '__file__', '__loader__', '__name__', '__package__', '__path__', '__spec__', '__version__', 'add_friend', 'add_member_into_chatroom', 'auto_login', 'check_login', 'components', 'config', 'configured_reply', 'content', 'core', 'create_chatroom', 'delete_member_from_chatroom', 'dump_login_status', 'get_QR', 'get_QRuuid', 'get_chatrooms', 'get_contact', 'get_friends', 'get_head_img', 'get_mps', 'get_msg', 'instanceList', 'load_login_status', 'log', 'login', 'logout', 'msg_register', 'new_instance', 'originInstance', 'returnvalues', 'revoke', 'run', 'search_chatrooms', 'search_friends', 'search_mps', 'send', 'send_file', 'send_image', 'send_msg', 'send_raw_msg', 'send_video', 'set_alias', 'set_chatroom_name', 'set_logging', 'set_pinned', 'show_mobile_login', 'start_receiving', 'storage', 'update_chatroom', 'update_friend', 'upload_file', 'utils', 'web_init']
根據字面意思,大致也知道上述函數的作用,具體的使用可以使用help函數獲取。代碼如下:
help(itchat.login)
或者
help('itchat.login')獲取的幫助結果如下:
Help on method login in module itchat.components.login:
login(enableCmdQR=False, picDir=None, qrCallback=None, loginCallback=None, exitCallback=None) method of itchat.core.Core instance

幫助輸出截圖
二、itchat的使用
1. 登錄/登出
(1)登錄函數
def login(self, enableCmdQR=False, picDir=None, qrCallback=None, loginCallback =None, exitCallback=None):log in like web wechat does
    for log in
        - a QR code will be downloaded and opened
        - then scanning status is logged, it paused for you confirm
        - finally it logged in and show your nickName
    for options
        - enableCmdQR: show qrcode in command line
            - integers can be used to fit strange char length
        - picDir: place for storing qrcode
        - qrCallback: method that should accept uuid, status, qrcode
        - loginCallback: callback after successfully logged in
                    - if not set, screen is cleared and qrcode is deleted
        - exitCallback: callback after logged out
                    - it contains calling of logout
    for usage
        ..code::python

            import itchat
            itchat.login()

    it is defined in components/login.py
    and of course every single move in login can be called outside
             you may scan source code to see how
        - and modified according to your own demand
使用代碼
#coding=utf-8import itchatitchat.login()
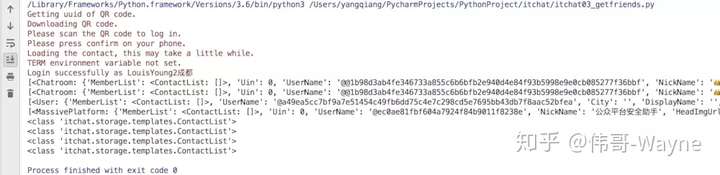
login函數執行過程中會產生一個二維碼圖片,more存放在login運行的當前工作目錄,並且使用工具打開。
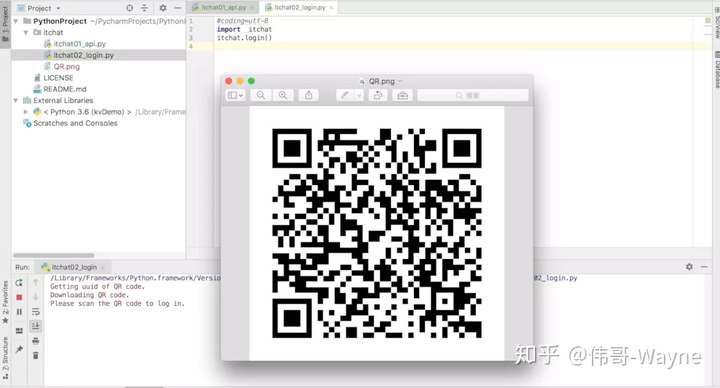
login登錄運行過程
在用戶使用手機掃描登錄前,login處於阻塞狀態;等掃描登錄完成,會提示登錄成功。登錄成功後的輸出:
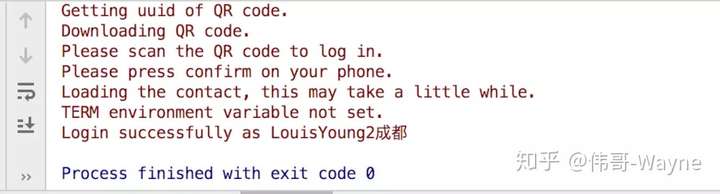
登錄成功後的輸出截圖
通過設置qrCallback與loginCallback可以控制登錄過程,比如使用定製二維碼顯示,以及登錄成功後的一些定製處理。qrCallback回調在長時間沒有登錄的情況,會被反覆調用。
同時還可以使用命令行顯示二維碼,命令行模式下qrCallback參數設置後無效,在命令行(或者控制檯)顯示二維碼注意:enableCmdQR參數可以設置爲True或者False,也可以是整數,整數也是True,但可以指定二維碼顯示的寬度,某些平臺下控制檯一個字符佔用2個字符,可以設置爲2,這樣二維碼顯示纔會正常,否則顯示不是太正常。
代碼:
#命令行模式itchat.login(enableCmdQR=2,loginCallback=login_cb)
效果:
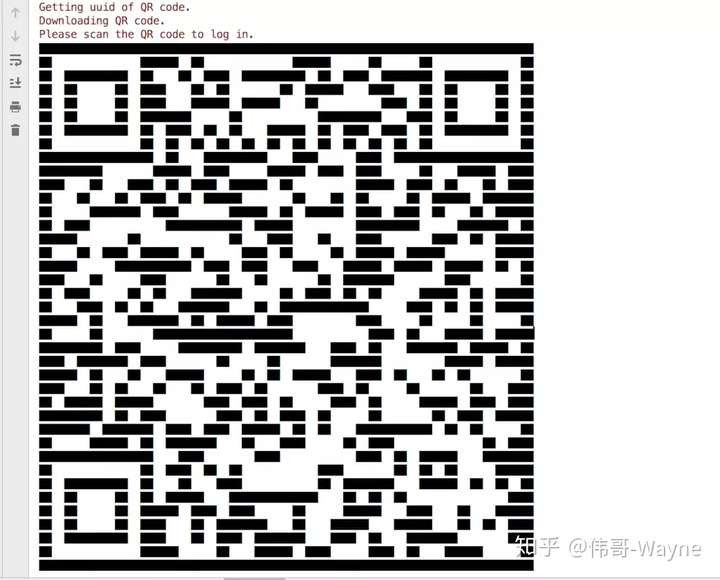
命令行二維碼
可以將enableCmdQR賦值爲負值改變命令行二維碼的背景與前景色。
還有一個auto_login函數也可以實現自動登錄,該函數的聲明如下:馬哥教育官網-專業Linux雲計算培訓、Python人工智能培訓機構
auto_login(hotReload=False, statusStorageDir='itchat.pkl', enableCmdQR=False, picDir=None, qrCallback=None, loginCallback=None, exitCallback=None)
第一個參數是掉線後,短時間內登錄,不掃描二維碼。
(2)登出函數
def logout(self):
        ''' logout            if core is now alive                logout will tell wechat backstage to logout            and core gets ready for another login            it is defined in components/login.py        '''
        raise NotImplementedError()
(3)登錄狀態檢測
def check_login(self, uuid=None):
        ''' check login status
            for options:
                - uuid: if uuid is not set, latest uuid you fetched will be used
            for return values:
                - a string will be returned
                - for meaning of return values
                    - 200: log in successfully
                    - 201: waiting for press confirm
                    - 408: uuid timed out
                    - 0  : unknown error
            for processing:
                - syncUrl and fileUrl is set
                - BaseRequest is set
            blocks until reaches any of above status
            it is defined in components/login.py
        '''
如果uuid參數爲None,默認是最後一次登錄的uuid。
2. 信息獲取
與操作文件系統一樣,登錄後,就是微信信息獲取,主要是好友信息,羣信息,公衆號信息等。
好友、羣聊、公衆號信息提供常見的操作函數:
#函數類型說明1 get_XXX 獲取2 update_XXX 更新3 search_XXX 搜索4 add_XXX 添加5 delete_XXX 刪除6 set_XXX 修改
下面我們僅僅列出get_XXXX相關的函數聲明。
(1)get_contact獲取羣聊信息
get_contact與get_chatrooms作用一樣。
def get_contact(self, update=False):
    ''' fetch part of contact        for part            - all the massive platforms and friends are fetched            - if update, only starred chatrooms are fetched        for options            - update: if not set, local value will be returned        for results            - chatroomList will be returned        it is defined in components/contact.py    '''
    raise NotImplementedError()
(2)get_friends獲取好友
def get_friends(self, update=False):
    ''' fetch friends list        for options            - update: if not set, local value will be returned        for results            - a list of friends' info dicts will be returned        it is defined in components/contact.py    '''
    raise NotImplementedError()
(3)get_chatrooms獲取羣聊
def get_chatrooms(self, update=False, contactOnly=False):
    ''' fetch chatrooms list        for options            - update: if not set, local value will be returned            - contactOnly: if set, only starred chatrooms will be returned        for results            - a list of chatrooms' info dicts will be returned        it is defined in components/contact.py    '''
    raise NotImplementedError()
(4)get_mps獲取公衆號
def get_mps(self, update=False):
    ''' fetch massive platforms list        for options            - update: if not set, local value will be returned        for results            - a list of platforms' info dicts will be returned        it is defined in components/contact.py    '''
    raise NotImplementedError()
(5)獲取好友,羣聊、公衆號的例子
#coding=utf-8
  import  itchat
  from  itchat.storage.templates import ContactList
  itchat.auto_login()
  print(itchat.get_contact())
  print(itchat.get_chatrooms())
  print(itchat.get_friends())
  print(itchat.get_mps())

  print(type(itchat.get_contact()))
  print(type(itchat.get_chatrooms()))
  print(type(itchat.get_friends()))
  print(type(itchat.get_mps()))
獲取的好友、羣聊、公衆號信息如下:
獲取的信息輸出
獲取的信息返回的都是列表,列表的類型如下:
<class 'itchat.storage.templates.ContactList'>
<class 'itchat.storage.templates.ContactList'>
<class 'itchat.storage.templates.ContactList'>
<class 'itchat.storage.templates.ContactList'>
(6)ContactList類型定義
class ContactList(list):
    ''' when a dict is append, init function will be called to format that dict '''
    def __init__(self, *args, **kwargs):
        super(ContactList, self).__init__(*args, **kwargs)
        self.__setstate__(None)
    @property
    def core(self):
        return getattr(self, '_core', lambda: fakeItchat)() or fakeItchat
    @core.setter
    def core(self, value):
        self._core = ref(value)
    def set_default_value(self, initFunction=None, contactClass=None):
        if hasattr(initFunction, '__call__'):
            self.contactInitFn = initFunction
        if hasattr(contactClass, '__call__'):
            self.contactClass = contactClass
    def append(self, value):
        contact = self.contactClass(value)
        contact.core = self.core
        if self.contactInitFn is not None:
            contact = self.contactInitFn(self, contact) or contact
        super(ContactList, self).append(contact)
    def __deepcopy__(self, memo):
        r = self.__class__([copy.deepcopy(v) for v in self])
        r.contactInitFn = self.contactInitFn
        r.contactClass = self.contactClass
        r.core = self.core
        return r
    def __getstate__(self):
        return 1
    def __setstate__(self, state):
        self.contactInitFn = None
        self.contactClass = User
    def __str__(self):
        return '[%s]' % ', '.join([repr(v) for v in self])
    def __repr__(self):
        return '<%s: %s>' % (self.__class__.__name__.split('.')[-1],
            self.__str__())
ContactList繼承是是內置列表類型list。
3. 好友、羣聊、公衆號信息處理
(1)好友、羣聊、公衆號信息結構定義
實際上上面代碼返回的列表中元素類型是不同的,下面可以使用代碼輸出:
#coding=utf-8import  itchat
from  itchat.storage.templates import ContactList
itchat.auto_login()list_contact=itchat.get_contact()list_chatrooms=itchat.get_chatrooms()list_friends=itchat.get_friends()list_mps=itchat.get_mps()print(type( list_contact[0]))print(type( list_chatrooms[0]))print(type( list_friends[0]))print(type( list_mps[0]))
列表中類型分別是:
<class 'itchat.storage.templates.Chatroom'>
<class 'itchat.storage.templates.Chatroom'>
<class 'itchat.storage.templates.User'>
<class 'itchat.storage.templates.MassivePlatform'>
(2)Chatroom信息結構
Chatroom最上層父類是dict類型,繼承結構:
class Chatroom(AbstractUserDict)
class AbstractUserDict(AttributeDict)
class AttributeDict(dict)
根據字典的特點,信息的索引主要靠key,獲取其key如下:
import itchatfrom itchat.storage.templates import Chatroomfrom itchat.storage.templates import Userfrom itchat.storage.templates import MassivePlatformitchat.auto_login()list_contact=itchat.get_contact()list_chatrooms=itchat.get_chatrooms()list_friends=itchat.get_friends()list_mps=itchat.get_mps()print(list_contact[0].keys())print(list_chatrooms[0].keys())print(list_friends[0].keys())print(list_mps[0].keys())
字典keys如下:
dict_keys(['MemberList', 'Uin', 'UserName', 'NickName', 'HeadImgUrl', 'ContactFlag', 'MemberCount', 'RemarkName', 'HideInputBarFlag', 'Sex', 'Signature', 'VerifyFlag', 'OwnerUin', 'PYInitial', 'PYQuanPin', 'RemarkPYInitial', 'RemarkPYQuanPin', 'StarFriend', 'AppAccountFlag', 'Statues', 'AttrStatus', 'Province', 'City', 'Alias', 'SnsFlag', 'UniFriend', 'DisplayName', 'ChatRoomId', 'KeyWord', 'EncryChatRoomId', 'IsOwner', 'IsAdmin', 'Self'])
(3)User信息結構
User與Chatroom基本上一樣。
class User(AbstractUserDict)
class AbstractUserDict(AttributeDict)
class AttributeDict(dict)
User是字典key如下:
dict_keys(['MemberList', 'UserName', 'City', 'DisplayName', 'PYQuanPin', 'RemarkPYInitial', 'Province', 'KeyWord', 'RemarkName', 'PYInitial', 'EncryChatRoomId', 'Alias', 'Signature', 'NickName', 'RemarkPYQuanPin', 'HeadImgUrl', 'UniFriend', 'Sex', 'AppAccountFlag', 'VerifyFlag', 'ChatRoomId', 'HideInputBarFlag', 'AttrStatus', 'SnsFlag', 'MemberCount', 'OwnerUin', 'ContactFlag', 'Uin', 'StarFriend', 'Statues', 'WebWxPluginSwitch', 'HeadImgFlag'])
(4)MassivePlatform信息結構
MassivePlatform與Chatroom基本上一樣。
class MassivePlatform(AbstractUserDict)
class AbstractUserDict(AttributeDict)
class AttributeDict(dict)
MassivePlatform是字典key如下:
dict_keys(['MemberList', 'Uin', 'UserName', 'NickName', 'HeadImgUrl', 'ContactFlag', 'MemberCount', 'RemarkName', 'HideInputBarFlag', 'Sex', 'Signature', 'VerifyFlag', 'OwnerUin', 'PYInitial', 'PYQuanPin', 'RemarkPYInitial', 'RemarkPYQuanPin', 'StarFriend', 'AppAccountFlag', 'Statues', 'AttrStatus', 'Province', 'City', 'Alias', 'SnsFlag', 'UniFriend', 'DisplayName', 'ChatRoomId', 'KeyWord', 'EncryChatRoomId', 'IsOwner'])
下面是用戶信息的獲取:
#coding=utf-8import  itchatitchat.auto_login()list_friends=itchat.get_friends()one_user=list_friends[0]for key in one_user:
    print(key,":",one_user[key])
下面是獲取的的部分用戶信息:
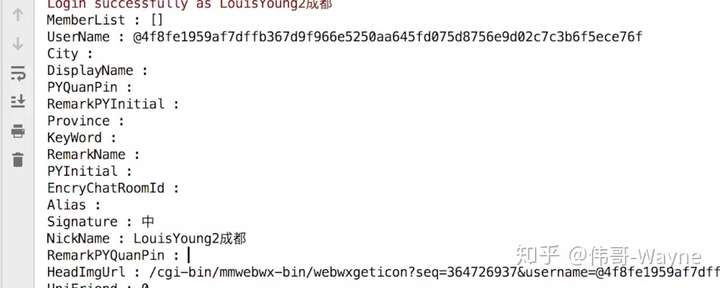
微信用戶本人信息
4. 用戶信息接收
接收消息採用的是類似事件處理的註冊方式,一單某個函數註冊以後(註冊時函數需要與某個消息類型關聯),當接收到相應類型的消息,該函數就調用。
(1)消息註冊的方式
消息的註冊,使用的是python的裝飾器技術,裝飾器的定義如下:
def msg_register(self, msgType, isFriendChat=False, isGroupChat=False, isMpChat=False):
參數說明:
msgType: 指定該方法用於處理的消息類型
isFriendChar: 處理好友消息
isGroupChat: 處理羣消息
isMpChat: 處理公衆號消息
(2)消息的類型
其中msgType的值支持如下集中:
消息類型類型說明TEXT 文本PICTURE 圖片FRIENDS 好友CARD 名片MAP 位置SHARING 共享RECORDING 語音=VOICEATTACHMENT 附件VIDEO 視頻VIOCE 音頻= RECORDINGNOTE 消息撤回SYSTEM 系統
上述消息類型的定義如下:
TEXT = 'Text'MAP = 'Map'CARD = 'Card'NOTE = 'Note'SHARING = 'Sharing'PICTURE = 'Picture'RECORDING = VOICE = 'Recording'ATTACHMENT = 'Attachment'VIDEO = 'Video'FRIENDS = 'Friends'SYSTEM = 'System'
提示:在itchat的安裝庫文件content.py中定義。使用的時候,需要import itchat.content,省事的import方式:
from itchat.content import *
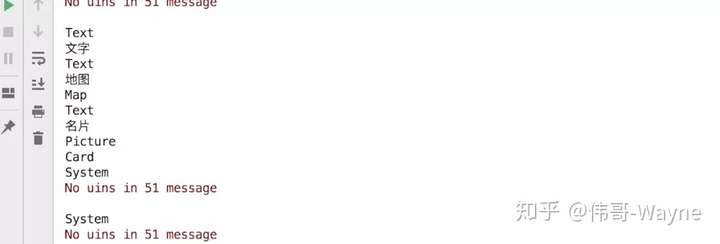
下面是一段接收所有類型的信息的代碼:
#coding=utf-8import  itchatfrom itchat.content import *@itchat.msg_register(msgType=INCOME_MSG,isFriendChat=True,isGroupChat=True,isMpChat=True)def recv_msg(msg):
    print(msg);#登錄itchat.auto_login()#運行itchat.run(debug=True)#退出登錄itchat.logout()
獲得消息顯示如下:

獲取沒有經過分析的聊天信息
5. 用戶信息類型與處理
通過註冊消息處理函數,實現異步回調的方式來接收聊天信息,傳遞過來的消息類型是:
class 'itchat.storage.messagequeue.Message'
Message類與上面User本質也是一個字典類型,繼承結構如下:
Message-> AttributeDict->dict
class Message(AttributeDict):class AttributeDict(dict):
不同類型的信息,其字典keys是不同的,就是內容有差別:
dict_keys(['MsgId', 'FromUserName', 'ToUserName', 'MsgType', 'Content', 'Status', 'ImgStatus', 'CreateTime', 'VoiceLength', 'PlayLength', 'FileName', 'FileSize', 'MediaId', 'Url', 'AppMsgType', 'StatusNotifyCode', 'StatusNotifyUserName', 'RecommendInfo', 'ForwardFlag', 'AppInfo', 'HasProductId', 'Ticket', 'ImgHeight', 'ImgWidth', 'SubMsgType', 'NewMsgId', 'OriContent', 'EncryFileName', 'User', 'Type', 'Text', 'SystemInfo'])
dict_keys(['Type', 'Text', 'SystemInfo', 'FromUserName', 'ToUserName', 'User'])
下面是一個專門接收好友文本信息的代碼:
#coding=utf-8import  itchatfrom itchat.content import *@itchat.msg_register(msgType=INCOME_MSG,isFriendChat=True,isGroupChat=False,isMpChat=False)def recv_msg(msg):
    print(msg['Type'])
    if msg['Type'] == TEXT :
        print(msg['Text'])#登錄itchat.auto_login()#運行itchat.run(debug=True)#退出登錄itchat.logout()
接收到信息如下:
簡單的用戶聊天信息接收,可以根據需要做更加複雜的處理
6. 用戶信息發送
發送用戶消息,有兩種方式:
(1)原生消息發送
def send_raw_msg(self, msgType, content, toUserName):
    ''' many messages are sent in a common way        for demo            .. code:: python                @itchat.msg_register(itchat.content.CARD)                def reply(msg):                    itchat.send_raw_msg(msg['MsgType'], msg['Content'], msg['FromUserName'])        there are some little tricks here, you may discover them yourself        but remember they are tricks        it is defined in components/messages.py    '''def send(self, msg, toUserName=None, mediaId=None):
    ''' wrapped function for all the sending functions        for options            - msg: message starts with different string indicates different type                - list of type string: ['@fil@', '@img@', '@msg@', '@vid@']                - they are for file, image, plain text, video                - if none of them matches, it will be sent like plain text            - toUserName: 'UserName' key of friend dict            - mediaId: if set, uploading will not be repeated        it is defined in components/messages.py    '''
    raise NotImplementedError()
(2)快捷發送函數
#發送文本
  def send_msg(self, msg='Test Message', toUserName=None)
#發送文件
  def send_file(self, fileDir, toUserName=None, mediaId=None)
#發送圖像
  def send_image(self, fileDir, toUserName=None, mediaId=None)
#發送視頻
  def send_video(self, fileDir=None, toUserName=None, mediaId=None):
下面簡單的展示一個發動短信的例子(其他視頻,語音基本上類似)。
#coding=utf-8import  itchatimport  time#登錄itchat.auto_login()#根據暱稱找用戶user=itchat.search_friends(nickName='趙德柱')[0]#每隔5秒給用戶發一個短信for i in range(10):
    itchat.send_msg(msg="辣雞短信,不必理會!",toUserName=user['UserName'])
    time.sleep(5)#退出登錄itchat.logout()
上面代碼可以改成個人好友信息測試。
來源: