環境:
一臺服務器:192.168.80.100
關閉防火牆及SElinux
systemctl stop firewalld
setenforce 0
安裝memcached服務器:
yum install lrz* -y
上傳源碼包和插件包
memcached包與依賴包
memcached-1.5.9.tar.gz
libevent-2.1.8-stable.tar.gz
解壓包
tar xf memcached-1.5.6.tar.gz -C /opt/
tar xf libevent-2.1.8-stable.tar.gz -C /opt/
編譯環境
yum install gcc gcc-c++ make -y
安裝與編譯
cd /opt/libevent-2.1.8-stable
./configure --prefix=/usr/local/libevent //依賴包的安裝目錄
make && make install //編譯並安裝
安裝memcached:
cd /opt/memcached-1.5.6
定製
./configure \
--prefix=/usr/local/memcached \
--with-libevent=/usr/local/libevent/
編譯安裝
make && make install
軟連接/usr/local/libevent/lib/libevent-2.1.so.6.0.2
ln -s /usr/local/libevent/lib/libevent-2.1.so.6.0.2 /usr/lib64/libevent-2.1.so.6
因爲需要libvent-2.1so.6.0.2庫
運行Memcached服務
cd /usr/local/memcached/bin/
./memcached -d -m 32m -p 11211 -u root //以守護進程的方式分配32MB內存指定端口指定用戶賬號位root運行Memcached服務
以上選項說明如下:
-p:使用的tcp端口,默認爲11211
-m:最大內存大小,默認爲64M
-vv:以very vrebose模式啓動,將調試信息和錯誤輸出到控制檯
-d:作爲守護進程的後臺運行
-c:最大運行的併發連接數,默認是1024,一般按照服務器的負載量來設置
-P:設置保存Memcached的pid文件
-l:監聽的服務器IP地址,若有多個地址
-u:運行Memcached的用戶,默認不能用root啓動,若使用需要-u來指定root用戶
設置Memcached 服務腳本:
vi /etc/init.d/memcached
#!/bin/bash
#chkconfig: 35 99 20
#description: memcached Service Control Script
PROG="/usr/local/memcached/bin/memcached"
case "$1" in
start)
$PROG -d -m 32 -p 11211 -u root
;;
stop)
pkill -9 memcached &> /dev/null
;;
restart)
$0 stop
$0 start
;;
*)
echo "Usage: $0 {start|stop|restart}"
exit 1
esac
exit 0
授權
chmod +x /etc/init.d/memcached
//添加運行權限
添加到service管理器
chkconfig --add memcached
啓動memcached
service memcached start
查看是否啓動:
netstat -anpt | grep memcached
telnet連接
安裝telnet:
yum install -y telnet
連接登錄:
telnet 127.0.0.1 11211
不進行壓縮和序列化標識 數據過期時間爲永不過期 標識號是5就需要輸入5位數。:
set userid 0 0 5
輸入數據以 . 結束:
123456
獲取數據:
get userid
顯示狀態信息:
stats
退出:
quit
鍵值對語法如下:
command <key> <flags> <expiration time> <bytes>
<value>memcached修改命令參數
參數 用法
key key用於查找緩存值
flags 可以包括鍵值對的整型參數,客戶機使用它存儲關於鍵值對的額外信息
expiration time 在緩存中保存鍵值對的時間長度(以秒爲單位,0 表示永遠)
bytes 在緩存中存儲的字節點
value 存儲的值(始終位於第二行)memcached基本操作命令
1.set
set命令用於向緩存添加新的鍵值對,如果已經存在,則之前的值將被替換,響應STORED2.add
當緩存中不存在鍵時,add命令纔會向緩存中添加一個鍵值對,如果緩存中已經存在該鍵,則之前的值將仍將保持不變,並返回響應NOT_STORED3.append user 0 0 4 //鍵值後追加4個字節
4.prepend username 0 0 2 //鍵值前追加2個字節
5.replace
僅當鍵已經存在時,replace命令纔會替換緩存中的鍵,如果緩存中不存在該鍵,則返回響應NOT_STORED6.get
用於檢索與之前添加的鍵值對相關的值7.delete
用於刪除memcached中的任何現有值,將使用一個鍵調用delete,如果該鍵存在於緩存中,則刪除該值。如果不存在,則返回一條NOT_FOUND消息。8.stats
轉儲所連接的 memcached 實例的當前統計數據。9.flush_all
僅用於清理緩存中的所有名稱/值對。如果需要將緩存重置到乾淨的狀態,則 flush_all 能提供很大的用處。10.quit //退出
例子:
set mykey 0 60 11
hello world
get mykeyappend mykey 0 60 1
a
get mykeyprepend mykey 0 60 3
higet mykey
delete mykey
以上安裝memcached完成
1,安裝 apache
yum install httpd httpd-devel -y
2.設置httpd服務開機啓動
systemctl enable httpd
3.啓動httpd服務
systemctl start httpd
4.查看端口監聽情況
netstat -tunlp | grep httpd
6.安裝mysql數據庫
yum install mariadb mariadb-server mariadb-libs mariadb-devel -y
7.查看軟件包情況
rpm -qa | grep mariadb
8.設置開機自啓動
systemctl enable mariadb
9.啓動mysql服務
systemctl start mariadb
10.查看端口監聽情況
netstat -tunlp | grep mysql
11.數據庫安全設置
mysql_secure_installation
按enter 然後輸入y 然後輸入密碼 依次 按 y+y+n+y
12.登錄mysql數據庫測試
mysql -u root -p
13.安裝php
yum -y install php php-devel
14.查看已安裝php相關軟件包
rpm -ql php
15.將php和mysql作關聯
yum install php-mysql
16.查看
rpm -ql php-mysql
17.安裝常用的php模塊
yum install -y php-gd php-ldap php-odbc php-pear php-xml php-xmlrpc php-mbstring php-snmp php-soap curl curl-devel php-bcmath
有得需要網上下載
18.創建php測試頁面
cd /var/www/html
vim index.php
    <?php
phpinfo();
?>
19.重啓httpd服務
systemctl restart httpd
20.客戶端測試php
客戶端訪問http://192.168.80.100/index.php
21.客戶端安裝Memcache的PHP擴展功能
安裝autoconf軟件包
yum install autoconf -y
解壓
tar xf memcache-2.2.7.tgz -C /opt/
增加php模塊
cd /opt/memcache-2.2.7
/usr/bin/phpize
配置
./configure \
--enable-memcache \
--with-php-config=/usr/bin/php-config

編譯及安裝
make && make install
22.編輯php.ini
vi /etc/php.ini
732行,新增以下命令
extension_dir = "/usr/lib64/php/modules/"
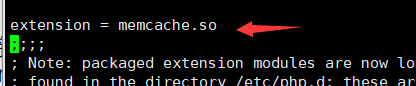
864行,新增以下命令
extension = memcache.so

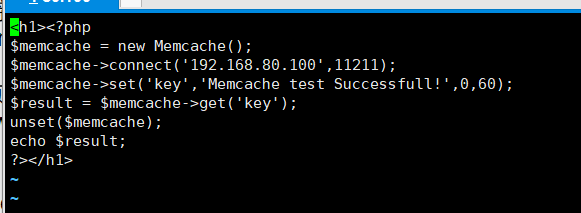
23.編寫測試頁面,測試memcached工作是否正常
vi /var/www/html/index.php
<?php
$memcache = new Memcache();
$memcache->connect('192.168.80.100',11211);
$memcache->set('key','Memcache test Successfull!',0,60);
$result = $memcache->get('key');
unset($memcache);
echo $result;
?>
24.重啓httpd服務
service httpd restart
25.客戶端進行訪問測試是否成功 ,http://192.168.80.100/
結果圖