


三臺服務器作此實驗,信息如下:
IP 機器名稱 操作系統版本 數據庫版本
192.168.88.11 node1 Centos7.5_64 mariadb10
192.168.88.12 node2 Centos7.5_64 mariadb10
192.168.88.13 node3 Centos7.5_64 mariadb10
一、Mariadb10 Galera 初始化準備
1、初始化環境(三臺機器上都操作)
A)安裝相關的環境包:yum -y install vim wget lrzsz ntpdate
B)同步時間:ntpdate -u times.aliyun.com
C)修改各自主機名:(在每個機器上設置好)
第一臺機器:hostname node1 && echo ‘node1’> /etc/hostname 退出後重新登錄就可以了
第二臺機器:hostname node2 && echo ‘node2’> /etc/hostname 退出後重新登錄就可以了
第三臺機器:hostname node3 && echo ‘node3’> /etc/hostname 退出後重新登錄就可以了
D)vim /etc/hosts文件,加入以下內容:
192.168.88.11 node1
192.168.88.12 node2
192.168.88.13 node3
E)增加mariadb 10版本源
vim /etc/yum.repos.d/mariadb.repo
[mariadb]
name = MariaDB
baseurl = https://mirrors.ustc.edu.cn/mariadb/yum/10.1/centos7-amd64/
gpgkey=https://mirrors.ustc.edu.cn/mariadb/yum/RPM-GPG-KEY-MariaDB
pgcheck=0
說明:由於從maradb官方網站下載很慢,此處以國內鏡像爲源
F)安裝MariaDB和Galera
yum -y install MariaDB-server MariaDB-client MariaDB-devel galera
G)MariaDB 10安裝後初始化配置
systemctl start mysql
mysql_secure_installation
mysql -u root -p --登錄數據後進進行授權
MariaDB [(none)]> GRANT ALL PRIVILEGES ON . TO 'root'@'%' IDENTIFIED BY 'password' WITH GRANT OPTION;
MariaDB [(none)]> FLUSH PRIVILEGES;
MariaDB [(none)]> exit
授權完成後把數據庫服務停掉
systemctl stop mysql
二、在各個結點上進行Cluster的安裝配置
A)on node1
編輯/etc/my.conf.d/server.conf
vim /etc/my.conf.d/server.conf 在 [galera]下面加入以下內容
wsrep_on=ON
wsrep_provider=/usr/lib64/galera/libgalera_smm.so
wsrep_cluster_address="gcomm://192.168.88.12,192.168.88.13"
wsrep_node_name=node1
binlog_format=row
default_storage_engine=InnoDB
innodb_autoinc_lock_mode=2
bind-address=0.0.0.0
wsrep_cluster_name="MariaDB_Cluster"
wsrep_node_address=192.168.88.11
wsrep_sst_method=rsync
wsrep_slave_threads=1
innodb_flush_log_at_trx_commit=2
innodb_buffer_pool_size=1024M
wsrep_sst_auth=root:password
B)on node2
編輯/etc/my.conf.d/server.conf
vim /etc/my.conf.d/server.conf 在 [galera]下面加入以下內容
wsrep_on=ON
wsrep_provider=/usr/lib64/galera/libgalera_smm.so
wsrep_cluster_address="gcomm://192.168.88.11,192.168.88.13"
wsrep_node_name=node2
binlog_format=row
default_storage_engine=InnoDB
innodb_autoinc_lock_mode=2
bind-address=0.0.0.0
wsrep_cluster_name="MariaDB_Cluster"
wsrep_node_address=192.168.88.12
wsrep_sst_method=rsync
wsrep_slave_threads=1
innodb_flush_log_at_trx_commit=2
innodb_buffer_pool_size=1024M
wsrep_sst_auth=root:password
C)on node3
編輯/etc/my.conf.d/server.conf
vim /etc/my.conf.d/server.conf 在 [galera]下面加入以下內容
wsrep_on=ON
wsrep_provider=/usr/lib64/galera/libgalera_smm.so
wsrep_cluster_address="gcomm://192.168.88.11,192.168.88.12"
wsrep_node_name=node3
binlog_format=row
default_storage_engine=InnoDB
innodb_autoinc_lock_mode=2
bind-address=0.0.0.0
wsrep_cluster_name="MariaDB_Cluster"
wsrep_node_address=192.168.88.13
wsrep_sst_method=rsync
wsrep_slave_threads=1
innodb_flush_log_at_trx_commit=2
innodb_buffer_pool_size=1024M
wsrep_sst_auth=root:password
三、在各個結點上啓動Cluster
A)在node1上啓動Cluster: /usr/sbin/mysqld --wsrep-new-cluster --user=root
B)在node2上啓動Cluster: /etc/init.d/mysql start
B)在node3上啓動Cluster: /etc/init.d/mysql start
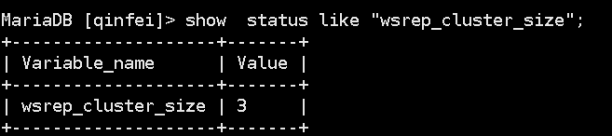
四、在各個結點上登錄Cluster進行驗證
任意結點登錄數據庫,得到以下結果說明Cluster成功
五、問題蒐集
遇見的問題1: 備點加入集羣一直失敗
原因:在生產環境中必須打開防火牆,但是我只開放了 4567 和 針對指定ip開放3306 端口,導致加入集羣失敗,需要開放 3306, 4444, 4567, 4568 四個端口纔可以正常啓動
遇見的問題2 :遇到以下提示
2019-02-20 13:59:56 140697295214848 [ERROR] WSREP: It may not be safe to bootstrap the cluster from this node. It was not the last one to leave the cluster and may not contain all the updates. To force cluster bootstrap with this node, edit the grastate.dat file manually and set safe_to_bootstrap to 1 .
2019-02-20 13:59:56 140697295214848 [ERROR] WSREP: wsrep::connect(gcomm://192.168.8811,192.168.88.13) failed: 7
2019-02-20 3:59:56 140697295214848 [ERROR] Aborting
解決方案: 按照建議方式修改 vi /var/lib/mysql/grastate.dat
safe_to_bootstrap: 1
可以正常啓動。
六、優缺點:引用自http://blog.sina.com.cn/s/blog_548c8a830102vrgw.htm0l
下篇文章寫MySQL使用ProxySQL實現讀寫分離,以上是在項目文檔基礎上的個人總結,都是直接可以上手用的哈,當然IP地址全部更換爲內網IP。