


項目中敏感配置信息一般需要進行加密處理,比如數據庫密碼,Spring Boot內置不提供加密支持,不能加密配置文件信息,在官方文檔中提供了自定義Environment和Spring Cloud Vault兩種解決方案。使用jasypt-spring-boot是另一種方案。
Spring Cloud Vault爲HashiCorp Vault的客戶端,支持訪問HashiCorp Vault內存儲的數據,避免了在Spring Boot程序中存儲敏感數據。
本文詳細介紹了jasypt-spring-boot、Spring Cloud Vault和HashiCorp Vault的使用。
自定義Environment
- 自己實現加解密的方法,在配置文件中使用密文,比如:
spring:
  datasource:
    password: a3Ehaf0f/S1Rt6JfOGfQ+w==
jwt:
secret: a3Ehaf0f/S1Rt6JfOGfQ+w==- 實現EnvironmentPostProcessor,在其中執行解密操作,簡單示例如下:
package org.itrunner.heroes.config;

import org.springframework.boot.SpringApplication;
import org.springframework.boot.env.EnvironmentPostProcessor;
import org.springframework.boot.env.OriginTrackedMapPropertySource;
import org.springframework.boot.env.YamlPropertySourceLoader;
import org.springframework.core.env.ConfigurableEnvironment;
import org.springframework.core.env.MapPropertySource;
import org.springframework.core.env.PropertySource;
import org.springframework.core.io.ClassPathResource;
import org.springframework.core.io.Resource;

import java.io.IOException;
import java.util.Map;

public class DecryptedEnvironmentPostProcessor implements EnvironmentPostProcessor {

    private final YamlPropertySourceLoader loader = new YamlPropertySourceLoader();

    @Override
    public void postProcessEnvironment(ConfigurableEnvironment environment, SpringApplication application) {
        Resource path = new ClassPathResource("config.yml");
        PropertySource<Map<String, Object>> propertySource = loadYaml(path);
        environment.getPropertySources().addLast(propertySource);
    }

    private PropertySource<Map<String, Object>> loadYaml(Resource path) {
        if (!path.exists()) {
            throw new IllegalArgumentException("Resource " + path + " does not exist");
        }
        try {
            OriginTrackedMapPropertySource propertySource = (OriginTrackedMapPropertySource) loader.load("custom-resource", path).get(0);
            return new DecryptedMapPropertySource(propertySource);
        } catch (IOException ex) {
            throw new IllegalStateException("Failed to load yaml configuration from " + path, ex);
        }
    }

    private static class DecryptedMapPropertySource extends MapPropertySource {
        public DecryptedMapPropertySource(OriginTrackedMapPropertySource propertySource) {
            super(propertySource.getName(), propertySource.getSource());
        }

        @Override
        public Object getProperty(String name) {
            Object value = super.getProperty(name);
            if (value instanceof CharSequence) {
                            // 執行解密,返回明文
                return "DecryptedValue";
            }
            return value;
        }
    }

}
自定義的EnvironmentPostProcessor需在META-INF/spring.factories內註冊:
org.springframework.boot.env.EnvironmentPostProcessor=org.itrunner.heroes.config.DecryptedEnvironmentPostProcessorJasypt Spring Boot
集成jasypt-spring-boot
有三種方式集成jasypt-spring-boot:
- 項目中如使用了@SpringBootApplication或@EnableAutoConfiguration,簡單地添加jasypt-spring-boot-starter到classpath將在整個Spring環境中啓用加密屬性
<dependency>
    <groupId>com.github.ulisesbocchio</groupId>
    <artifactId>jasypt-spring-boot-starter</artifactId>
    <version>2.1.0</version>
</dependency>- 添加jasypt-spring-boot到classpath,添加@EnableEncryptableProperties到main Configuration class將在整個Spring環境中啓用加密屬性
<dependency>
    <groupId>com.github.ulisesbocchio</groupId>
    <artifactId>jasypt-spring-boot</artifactId>
    <version>2.1.0</version>
</dependency>
@Configuration
@EnableEncryptableProperties
public class MyApplication {
...
}- 添加jasypt-spring-boot到classpath,使用@EncrytablePropertySource聲明加密的屬性或YAML文件
@Configuration
@EncryptablePropertySource(name = "EncryptedProperties", value = "classpath:encrypted.properties")
public class MyApplication {
    ...
}
或者使用@EncryptablePropertySources:
@Configuration
@EncryptablePropertySources({@EncryptablePropertySource("classpath:encrypted.properties"),
        @EncryptablePropertySource("file:/path/to/encrypted2.properties")})
public class MyApplication {
    ....
}
加密配置
| Key | Required | Default Value |
|---|---|---|
| jasypt.encryptor.password | True | - |
| jasypt.encryptor.algorithm | False | PBEWithMD5AndDES |
| jasypt.encryptor.bean | False | jasyptStringEncryptor |
| jasypt.encryptor.keyObtentionIterations | False | 1000 |
| jasypt.encryptor.poolSize | False | 1 |
| jasypt.encryptor.providerName | False | null |
| jasypt.encryptor.saltGeneratorClassname | False | org.jasypt.salt.RandomSaltGenerator |
| jasypt.encryptor.stringOutputType | False | base64 |
| jasypt.encryptor.proxyPropertySources | False | false |
| jasypt.encryptor.property.prefix | False | ENC( |
| jasypt.encryptor.property.suffix | False | ) |
默認,加密算法爲PBEWithMD5AndDES,加解密bean name爲jasyptStringEncryptor,加密的數據需使用ENC()包裹。
所有這些屬性都可在配置文件中聲明,但加密密碼不應存儲在配置文件中,而應使用系統屬性、命令行參數傳入,只要名稱爲jasypt.encryptor.password即可:
java -jar jasypt-spring-boot-demo.jar --jasypt.encryptor.password=password
或
java -Djasypt.encryptor.password=password -jar jasypt-spring-boot-demo.jar
也可在application.properties 或 application.yml中使用環境變量:
jasypt.encryptor.password=${JASYPT_ENCRYPTOR_PASSWORD:}配置文件示例:
spring:
  jpa:
    database-platform: org.hibernate.dialect.PostgreSQLDialect
    hibernate:
      ddl-auto: update
    properties:
      hibernate:
        default_schema: heroes
        format_sql: true
        jdbc:
          lob:
            non_contextual_creation: true
    show-sql: true
  datasource:
    platform: postgresql
    driver-class-name: org.postgresql.Driver
    url: jdbc:postgresql://localhost:5432/postgres
    username: hero
    password: ENC(a3Ehaf0f/S1Rt6JfOGfQ+w==)
    initialization-mode: never
jasypt:
  encryptor:
    algorithm: PBEWithMD5AndDES
    password: 1qefhQH7mRR4LADVettR
    stringOutputType: base64
    property:
      prefix: ENC(
      suffix: )
生成加密數據
使用CLI工具JasyptPBEStringEncryptionCLI生成加密數據,如下:
java -cp jasypt-1.9.2.jar org.jasypt.intf.cli.JasyptPBEStringEncryptionCLI input="inputdata" password=secretkey algorithm=PBEWithMD5AndDES執行後,輸出如下:
----ENVIRONMENT-----------------

Runtime: Oracle Corporation Java HotSpot(TM) 64-Bit Server VM 25.191-b12

----ARGUMENTS-------------------

algorithm: PBEWithMD5AndDES
input: hero
password: 1qefhQH7mRR4LADVettR

----OUTPUT----------------------

a3Ehaf0f/S1Rt6JfOGfQ+w==
生成後,使用ENC(密文)替換明文數據即可。
HashiCorp Vault
HashiCorp Vault提供集中管理機密(Secret)和保護敏感數據的服務,可通過UI、CLI或HTTP API訪問。HashiCorp Vault使用GO語言編寫。
初識HashiCorp Vault
- 安裝HashiCorp Vault
根據您的系統下載HashiCorp Vault,然後解壓zip包,其中爲一可執行文件。
以linux系統爲例:
$ unzip vault_1.0.2_linux_amd64.zip
$ sudo chown root:root vault
$ sudo chmod 755 vault
$ sudo mv vault /usr/local/bin/
$ vault --version
幫助
直接運行vault可查看支持的命令:
$ vault
Usage: vault <command> [args]

Common commands:
    read        Read data and retrieves secrets
    write       Write data, configuration, and secrets
    delete      Delete secrets and configuration
    list        List data or secrets
    login       Authenticate locally
    agent       Start a Vault agent
    server      Start a Vault server
    status      Print seal and HA status
    unwrap      Unwrap a wrapped secret

Other commands:
    audit          Interact with audit devices
    auth           Interact with auth methods
    kv             Interact with Vault's Key-Value storage
    lease          Interact with leases
    namespace      Interact with namespaces
    operator       Perform operator-specific tasks
    path-help      Retrieve API help for paths
    plugin         Interact with Vault plugins and catalog
    policy         Interact with policies
    secrets        Interact with secrets engines
    ssh            Initiate an SSH session
    token          Interact with tokens
運行 vault [command] [subcommand] -h可查看命令支持的參數。
path-help 查看系統、Secret引擎、認證方法等路徑支持的配置,在實際應用中經常用到。比如:
$ vault path-help sys/
$ vault path-help database/
$ vault path-help database/roles
$ vault path-help aws/
$ vault path-help auth/token/
$ vault path-help auth/aws/
說明:要啓用相應功能才能查看路徑。
自動完成
linux下,Vault支持命令自動完成功能,安裝後輸入vault [tab]會顯示命令提示,需執行以下命令安裝:
$ vault -autocomplete-install
$ exec $SHELL
安裝後將在~/.bashrc內添加如下內容:
complete -C /usr/local/bin/vault vaultdev模式啓動Vault
以dev模式啓動不需任何配置,數據保存在內存中。
$ vault server -dev控制檯輸出如下內容:
==> Vault server configuration:

             Api Address: http://127.0.0.1:8200
                     Cgo: disabled
         Cluster Address: https://127.0.0.1:8201
              Listener 1: tcp (addr: "127.0.0.1:8200", cluster address: "127.0.0.1:8201", max_request_duration: "1m30s", max_request_size: "33554432", tls: "disabled")
               Log Level: (not set)
                   Mlock: supported: true, enabled: false
                 Storage: inmem
                 Version: Vault v1.0.1
             Version Sha: 08df121c8b9adcc2b8fd55fc8506c3f9714c7e61

WARNING! dev mode is enabled! In this mode, Vault runs entirely in-memory
and starts unsealed with a single unseal key. The root token is already
authenticated to the CLI, so you can immediately begin using Vault.

You may need to set the following environment variable:

    $ export VAULT_ADDR='http://127.0.0.1:8200'

The unseal key and root token are displayed below in case you want to
seal/unseal the Vault or re-authenticate.

Unseal Key: xSahEjtRQMMwbyBW6+rIzE2RRJ4d8X7BmAyPsSk63yE=
Root Token: s.5bnclu8POKx2WCxETB4u8RqF

Development mode should NOT be used in production installations!
其中,Unseal Key、Root Token要保存下來。以dev模式啓動Vault其狀態是unseal的,不需要使用Unseal Key解封服務器。訪問Vault需要使用Root Token。建議將Vault服務器地址保存到環境變量VAULT_ADDR中,否則使用命令行訪問vault時需要指定-address參數。
查看Vault Server狀態:
$ vault status -address=http://127.0.0.1:8200說明:-address默認爲https://127.0.0.1:8200
- 登錄Vault
從瀏覽器登錄Vault,在地址欄輸入http://localhost:8200 :
在Token文本框內輸入“Root Token”,進入Vault主界面: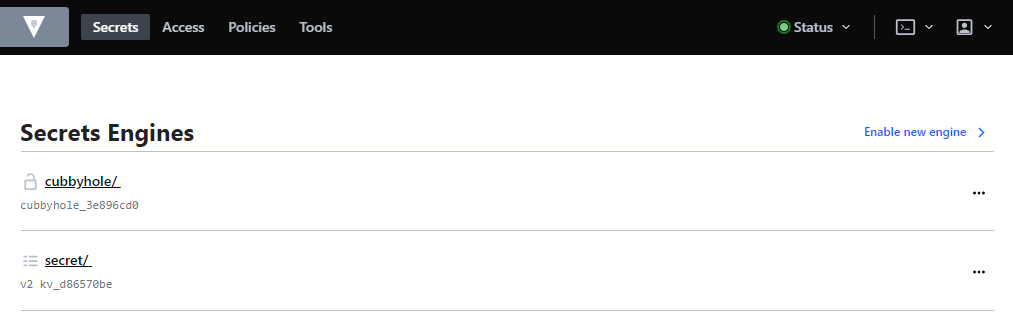
從命令行登錄Vault:
$ vault login -method=token -address=http://127.0.0.1:8200
Token (will be hidden):
Success! You are now authenticated. The token information displayed below
is already stored in the token helper. You do NOT need to run "vault login"
again. Future Vault requests will automatically use this token.

Key                  Value
---                  -----
token                s.1Pv48heTmZhXjm0bBd84Muef
token_accessor       3gfMlTXFPHX3ehMQzkJUrk3o
token_duration       ∞
token_renewable      false
token_policies       ["root"]
identity_policies    []
policies ["root"]- 認證方法
Vault支持多種登錄認證方式,默認啓用了token方式。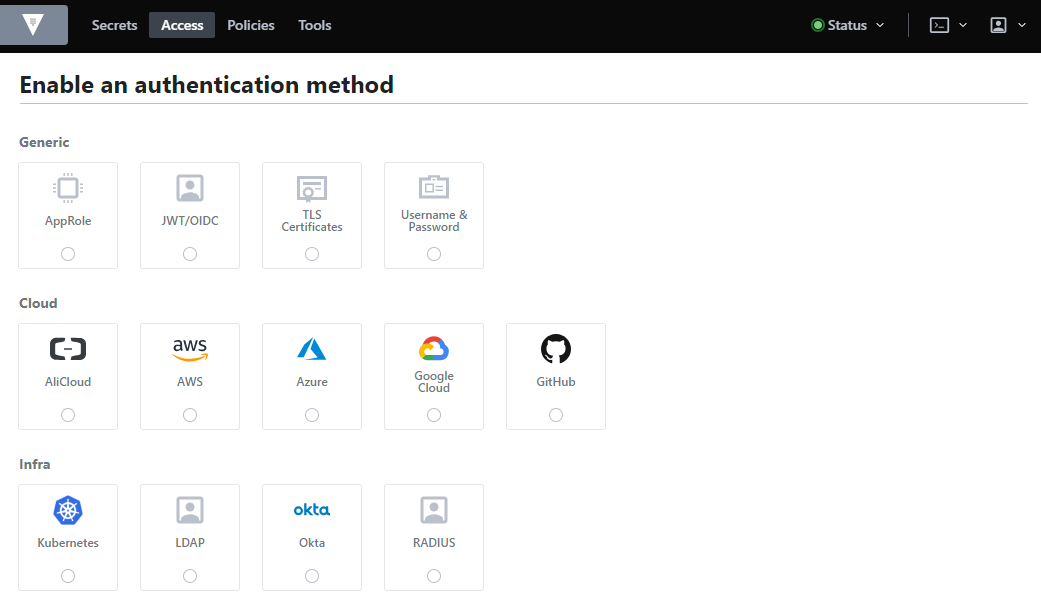
從命令行查看啓用的認證方法:
$ vault auth list
Path      Type     Accessor               Description
----      ----     --------               -----------
token/ token auth_token_cd421269 token based credentials- Secret引擎
Vault支持多種Secret引擎,一些引擎只是存儲和讀取數據,如kv;一些引擎連接到其他服務並根據需要生成動態憑據,如AWS、database;一些引擎提供加密服務(如transit)、證書生成(如pki)等。默認啓用了kv(Key-Value)和cubbyhole引擎。
從命令行查看啓用的Secret引擎:
$ vault secrets list
Path          Type         Accessor              Description
----          ----         --------              -----------
cubbyhole/    cubbyhole    cubbyhole_835f8a75    per-token private secret storage
identity/     identity     identity_0ba84c63     identity store
secret/       kv           kv_9558dfb7           key/value secret storage
sys/          system       system_5f7114e7       system endpoints used for control, policy and debugging
我們在kv引擎secret下創建一secret供後面測試使用,如下: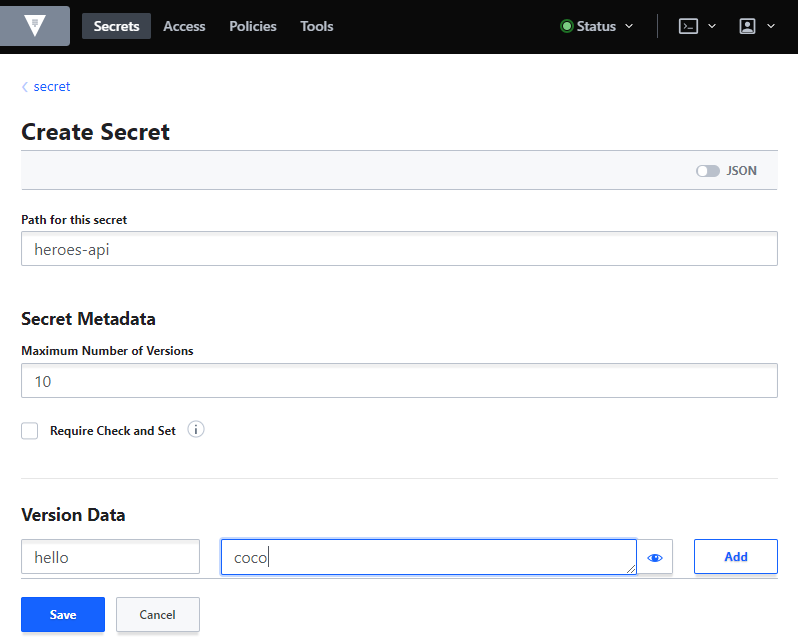
也可以使用命令行:
$ vault kv put secret/heroes-api hello=coco查詢secret:
$ vault kv get secret/heroes-api部署HashiCorp Vault
之前使用dev模式啓動Vault,接下來說明真實環境如何配置。
- 配置Vault
以非dev模式啓動Vault必須提供至少一個配置文件,下面創建配置文件vault.hcl:
$ sudo mkdir --parents /etc/vault.d
$ sudo touch /etc/vault.d/vault.hcl
$ sudo chown --recursive ec2-user:ec2-user /etc/vault.d
$ sudo chmod 640 /etc/vault.d/vault.hcl
配置文件支持HCL (HashiCorp Configuration Language)和JSON格式,vault.hcl內容如下:
ui = true

storage "file" {
  path = "/usr/vault/data"
}

listener "tcp" {
  address     = "0.0.0.0:8200"
  tls_cert_file = "/etc/vault.d/cert.pem"
  tls_key_file  = "/etc/vault.d/privkey.pem"
}

api_addr = "https://10.188.12.119:8200"
參數:
- ui 是否啓用UI,默認爲false
- storage 物理存儲方式,支持以下的類型:azure、cassandra、cockroachdb、consul、couchdb、dynamodb、etcd、file、foundationdb、spanner、gcs、inmem、manta、mssql、mysql、postgresql、s3、swift、zookeeper
- listener 監聽器,可以配置一個或多個
- api_addr 在集羣環境中使用,指定向集羣中的其他vault服務器公佈的URL,以供客戶端重定向。也可以通過環境變量VAULT_API_ADDR設定
生成自簽名證書:
$ openssl genrsa -out privkey.pem
$ openssl req -x509 -new -key privkey.pem -out cert.pem -days 365 -subj /C=CN/ST=Beijing/L=Beijing/CN=vault.itrunner.org/OU=itrunner/O=itrunner/[email protected]
使用自簽名證書時需要配置環境變量VAULT_CACERT:
$ export VAULT_CACERT='/etc/vault.d/cert.pem'Spring Cloud Vault通過HTTPS協議訪問Vault時需配置客戶端證書,執行以下命令將cert.pem導入到keystore中:
$ keytool -importcert -keystore keystore.jks -file cert.pem -noprompt -storepass changeit -alias heroes- 測試啓動Vault
啓動前先授權vault使用mlock syscall:
$ sudo setcap cap_ipc_lock=+ep /usr/local/bin/vault否則會顯示如下錯誤:
Error initializing core: Failed to lock memory: cannot allocate memory

This usually means that the mlock syscall is not available.
Vault uses mlock to prevent memory from being swapped to
disk. This requires root privileges as well as a machine
that supports mlock. Please enable mlock on your system or
disable Vault from using it. To disable Vault from using it,
set the `disable_mlock` configuration option in your configuration
file.
啓動Vault:
$ vault server -config=/etc/vault.d/vault.hcl- 配置Vault服務
kill掉上面的vault進程,配置vault爲系統服務。
創建vault.service:
$ sudo touch /etc/systemd/system/vault.service內容如下:
[Unit]
Description="HashiCorp Vault - A tool for managing secrets"
Documentation=https://www.vaultproject.io/docs/
Requires=network-online.target
After=network-online.target
ConditionFileNotEmpty=/etc/vault.d/vault.hcl

[Service]
User=ec2-user
Group=ec2-user
SecureBits=keep-caps
AmbientCapabilities=CAP_IPC_LOCK
Capabilities=CAP_IPC_LOCK+ep
CapabilityBoundingSet=CAP_SYSLOG CAP_IPC_LOCK
ExecStart=/usr/local/bin/vault server -config=/etc/vault.d/vault.hcl
ExecReload=/bin/kill --signal HUP $MAINPID
KillMode=process
KillSignal=SIGINT
Restart=on-failure
RestartSec=5
TimeoutStopSec=30
StartLimitIntervalSec=60
StartLimitBurst=3

[Install]
WantedBy=multi-user.target
啓動Vault:
$ sudo systemctl enable vault
$ sudo systemctl start vault
$ sudo systemctl status vault- 初始化Vault
首次啓動vault後需要執行初始化操作。
$ vault operator init初始化後生成加密key、unseal key、Initial Root Token,這些數據要保存到安全的地方。
Unseal Key 1: 1OlGbwCZ/y4IeULDGWdi1x3I4weOil8sWanlZ5M3gUN8
Unseal Key 2: LwILr0IuyKLwpooN8d7C6mQPr/AuzqzMq20RhKQlw8gR
Unseal Key 3: OMr0B1n4ugZErUWzwsoA3rFZw3v3nsJM5oQWocgr9SYo
Unseal Key 4: a1m2Wbz+tlv1e7cTsidXKa1Yt/DTbzaFJlza2s/khUau
Unseal Key 5: ZuL66Av5SOH9gYLii2VHec6CcWUktXk99qabWfcSAF9H

Initial Root Token: s.1Pv48heTmZhXjm0bBd84Muef

Vault initialized with 5 key shares and a key threshold of 3. Please securely
distribute the key shares printed above. When the Vault is re-sealed,
restarted, or stopped, you must supply at least 3 of these keys to unseal it
before it can start servicing requests.

Vault does not store the generated master key. Without at least 3 key to
reconstruct the master key, Vault will remain permanently sealed!

It is possible to generate new unseal keys, provided you have a quorum of
existing unseal keys shares. See "vault operator rekey" for more information.- Seal/Unseal
初始化後Vault Server處於封印狀態,因不知如何解密存儲的數據,所以不能讀取。初始化輸出的內容中“Vault initialized with 5 key shares and a key threshold of 3”,意味着爲了解封需要5個key中的3個,執行解封命令如下:
$ vault operator unseal選取3個key,執行3次上面的命令直到Sealed狀態爲false:
Unseal Key (will be hidden):
Key             Value
---             -----
Seal Type       shamir
Initialized     true
Sealed          false
Total Shares    5
Threshold       3
Version         1.0.1
Cluster Name    vault-cluster-654a8704
Cluster ID      91e5ea90-1a78-45c8-36f6-99a0ba7b5eec
HA Enabled false- 登錄Vault
使用Initial Root Token登錄Vault:
$ vault login s.1Pv48heTmZhXjm0bBd84Muef登錄成功後,輸出如下結果:
Success! You are now authenticated. The token information displayed below
is already stored in the token helper. You do NOT need to run "vault login"
again. Future Vault requests will automatically use this token.

Key                  Value
---                  -----
token                s.1Pv48heTmZhXjm0bBd84Muef
token_accessor       3gfMlTXFPHX3ehMQzkJUrk3o
token_duration       ∞
token_renewable      false
token_policies       ["root"]
identity_policies    []
policies             ["root"]
root用戶可以重新封印Vault:
$ vault operator sealVault支持集羣部署,更多內容請查閱官方文檔。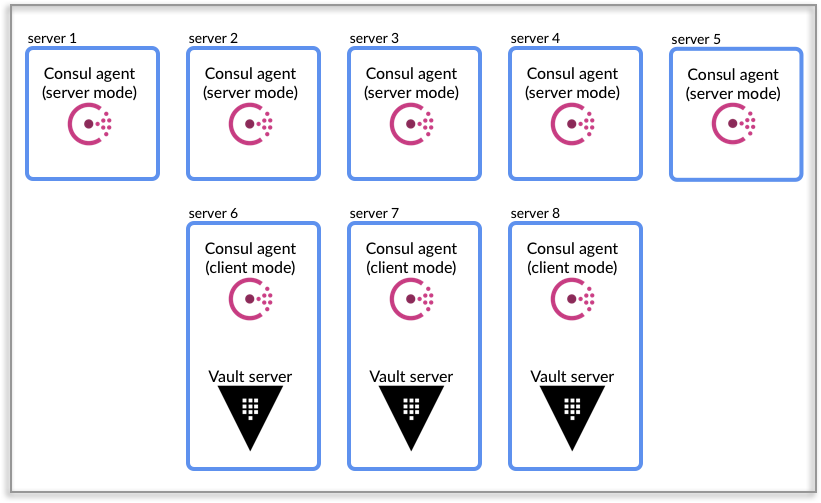
Token和Policy管理
Root Token具有最高權限,最佳實踐不應存儲Root Token,僅在必要時使用vault operator generate-root命令生成,用畢撤銷token。
撤銷token
$ vault token revoke -self生成Root Token
- 初始化Root Token,生成one-time password (OTP)、Nonce
$ vault operator generate-root -init
A One-Time-Password has been generated for you and is shown in the OTP field.
You will need this value to decode the resulting root token, so keep it safe.
Nonce         94e81220-dc59-16c5-1f08-180551cfa158
Started       true
Progress      0/3
Complete      false
OTP           kVpqIjLf7BZQgNUbEBAuQPikRk
OTP Length 26- 生成Root Token
$ vault operator generate-root
Operation nonce: 94e81220-dc59-16c5-1f08-180551cfa158
Unseal Key (will be hidden):
Nonce       94e81220-dc59-16c5-1f08-180551cfa158
Started     true
Progress    1/3
Complete    false
需要輸入3次Unseal Key,成功後將輸出Encoded Token:
Encoded Token GHhHHBovfg9dEQAiASNhFiEFMT0DOjw+Gx4- 解碼Token
$ vault operator generate-root -decode=GHhHHBovfg9dEQAiASNhFiEFMT0DOjw+Gx4 -otp=kVpqIjLf7BZQgNUbEBAuQPikRk創建Token,設定有效時間,不指定policy
$ vault token create -ttl 10m
Key                  Value
---                  -----
token                s.8DibgV8wlTJq3ygtcfK4ne2K
token_accessor       NuElYtSnxF51JXli3LC6XKHM
token_duration       10m
token_renewable      true
token_policies       ["root"]
identity_policies    []
policies             ["root"]
新token爲當前使用token的子token,權限繼承自當前使用的token。
過期後可renew token:
vault token renew s.8DibgV8wlTJq3ygtcfK4ne2K創建Token,指定Policy
Policy有如下幾種權限:
# This section grants all access on "secret/*". Further restrictions can be
# applied to this broad policy, as shown below.
path "secret/*" {
  capabilities = ["create", "read", "update", "delete", "list"]
}

# Even though we allowed secret/*, this line explicitly denies
# secret/super-secret. This takes precedence.
path "secret/super-secret" {
  capabilities = ["deny"]
}
創建策略文件,僅允許讀取路徑secret/heroes-api:
$ vi heroes-policy.hcl內容如下:
path "secret/heroes-api" {
  capabilities = ["read"]
}
上傳策略:
$ vault policy write heroes heroes-policy.hcl使用新策略創建Token:
$ vault token create -policy=heroes
Key                  Value
---                  -----
token                s.1bJDHR7VuSaHfquqmoQREioA
token_accessor       FGufmiTSqWcEaiZAg9nuLkvx
token_duration       768h
token_renewable      true
token_policies       ["default" "heroes"]
identity_policies    []
policies             ["default" "heroes"]
默認duration爲768h,policy爲"default" "heroes"。
使用新token登錄,查看secret:
$ vault login s.1bJDHR7VuSaHfquqmoQREioA
$ vault kv get secret/heroes-api
AWS Secret引擎
使用AWS Secret引擎,每次訪問創建新的AWS用戶和登錄憑證(訪問密鑰),Vault並不存儲憑證。
- 啓用AWS Secret引擎
$ vault secrets enable aws
Success! Enabled the aws secrets engine at: aws/- 配置AWS賬戶
$ vault write aws/config/root access_key=VKIAJBRHKH6EVTTNXDHA secret_key=vCtSM8ZUEQ3mOFVlYPBQkf2sO6F/W7a5TVzrl3Oj region=cn-north-1
Success! Data written to: aws/config/root
說明,可使用vault path-help命令查看路徑配置:
$ vault path-help aws/- 創建Role
配置Vault創建的AWS用戶的角色:
$ vault write aws/roles/my-role \
        credential_type=iam_user \
        policy_document=-<<EOF
{
  "Version": "2012-10-17",
  "Statement": [
    {
      "Sid": "Stmt1426528957000",
      "Effect": "Allow",
      "Action": [
        "ec2:*"
      ],
      "Resource": [
        "*"
      ]
    }
  ]
}
EOF
Success! Data written to: aws/roles/my-role- 生成密鑰
$ vault read aws/creds/my-role
Key                Value
---                -----
lease_id           aws/creds/my-role/0bce0782-32aa-25ec-f61d-c026ff22106e
lease_duration     768h
lease_renewable    true
access_key         VKIAJBRHKH6EVTTNXDHA
secret_key         vCtSM8ZUEQ3mOFVlYPBQkf2sO6F/W7a5TVzrl3Oj
security_token     <nil>
成功執行以上命令後可通過AWS IAM控制檯查看新創建的用戶。
- renew和revoke
可使用lease_id來執行renew、revoke操作,執行revoke後將刪除AWS用戶:
$ vault lease revoke aws/creds/my-role/0bce0782-32aa-25ec-f61d-c026ff22106Database Secret引擎
使用Database Secret引擎可動態創建數據庫用戶並授權。目前支持的數據庫有Cassandra、HANA、MongoDB、MSSQL、MySQL/MariaDB、PostgreSQL、Oracle。
- 啓用Database Secret引擎
$ vault secrets enable database- 配置數據庫插件和連接URL
$ vault write database/config/my-postgresql-database plugin_name=postgresql-database-plugin allowed_roles="my-role" \
connection_url="postgresql://{{username}}:{{password}}@localhost:5432?sslmode=disable" \
username="postgres" password="postgres"
參數:
plugin_name 插件名稱,使用postgresql數據庫
allowed_roles 允許使用的vault角色
用戶名、密碼要使用模板。
可執行以下命令查看參數說明:
$ vault path-help database/config/my-postgresql-database- 創建角色
角色用來定義創建數據庫用戶和授權的腳本:
$ vault write database/roles/my-role db_name=my-postgresql-database \
  creation_statements="CREATE ROLE \"{{name}}\" WITH LOGIN PASSWORD '{{password}}' VALID UNTIL '{{expiration}}'; \
    GRANT SELECT ON ALL TABLES IN SCHEMA public TO \"{{name}}\";" \
  default_ttl="1h" max_ttl="24h"
Success! Data written to: database/roles/my-role
{{name}}和{{password}}將動態生成。
- 創建數據庫用戶
$ vault read database/creds/my-role
Key                Value
---                -----
lease_id           database/creds/my-role/789xpa9Rg3vVosLDMaTJKDnT
lease_duration     1h
lease_renewable    true
password           A1a-PLaakX5RdWS5Wb7t
username           v-root-my-role-4sXjeClqaYXQF10lms8F-1547715152
AWS認證
AWS認證方法提供了一種自動索取Vault token的機制,支持EC2和IAM兩種方式。
EC2認證,AWS被視爲受信任的第三方,使用唯一代表每個ec2實例的加密簽名動態元數據信息進行身份驗證,僅適用於EC2實例。
IAM認證,使用AWS IAM憑據簽名的AWS請求進行身份驗證,IAM憑據可來自IAM User、IAM Role,適用於EC2實例、Lambda函數及其他提供AWS憑據的環境。推薦使用IAM認證。
- 啓用AWS認證
$ vault auth enable aws- 配置AWS賬戶和終端節點
根據您使用的AWS區域選擇終端節點,AWS區域和終端節點。
$ vault write auth/aws/config/client access_key=VKIAJBRHKH6EVTTNXDHA secret_key=vCtSM8ZUEQ3mOFVlYPBQkf2sO6F/W7a5TVzrl3Oj \
endpoint=https://ec2.cn-north-1.amazonaws.com.cn iam_endpoint=https://iam.cn-north-1.amazonaws.com.cn \
sts_endpoint=https://sts.cn-north-1.amazonaws.com.cn \
iam_server_id_header_value=vault.itrunner.org- 配置角色策略
角色配置中至少含有一種約束條件。
EC2認證
$ vault write auth/aws/role/dev-role auth_type=ec2 bound_ami_id=ami-04f306762a9e9a056 policies=heroes max_ttl=768hIAM User認證
$ vault write auth/aws/role/dev-role-iam-user auth_type=iam bound_iam_principal_arn=arn:aws-cn:iam::123456789012:user/test policies=heroes max_ttl=768h登錄時僅需提供User訪問密鑰。
IAM Role認證
下例適用於EC2實例,inferred_entity_type爲ec2_instance,認證的EC2需要授予IAM角色並符合約束條件。
$ vault write auth/aws/role/dev-role-iam auth_type=iam inferred_entity_type=ec2_instance inferred_aws_region=cn-north-1 bound_ami_id=ami-04f306762a9e9a056 bound_iam_principal_arn=arn:aws-cn:iam::123456789012:role/MyRole policies=heroes max_ttl=768h- EC2認證登錄
EC2認證需要驗證簽名,需要配置region的公有證書。
中國(北京)地區的 AWS 公有證書如下:
-----BEGIN CERTIFICATE-----
MIIDNjCCAh4CCQD3yZ1w1AVkTzANBgkqhkiG9w0BAQsFADBcMQswCQYDVQQGEwJV
UzEZMBcGA1UECBMQV2FzaGluZ3RvbiBTdGF0ZTEQMA4GA1UEBxMHU2VhdHRsZTEg
MB4GA1UEChMXQW1hem9uIFdlYiBTZXJ2aWNlcyBMTEMwIBcNMTUwNTEzMDk1OTE1
WhgPMjE5NDEwMTYwOTU5MTVaMFwxCzAJBgNVBAYTAlVTMRkwFwYDVQQIExBXYXNo
aW5ndG9uIFN0YXRlMRAwDgYDVQQHEwdTZWF0dGxlMSAwHgYDVQQKExdBbWF6b24g
V2ViIFNlcnZpY2VzIExMQzCCASIwDQYJKoZIhvcNAQEBBQADggEPADCCAQoCggEB
AMWk9vyppSmDU3AxZ2Cy2bvKeK3F1UqNpMuyeriizi+NTsZ8tQqtNloaQcqhto/l
gsw9+QSnEJeYWnmivJWOBdn9CyDpN7cpHVmeGgNJL2fvImWyWe2f2Kq/BL9l7N7C
P2ZT52/sH9orlck1n2zO8xPi7MItgPHQwu3OxsGQsAdWucdxjHGtdchulpo1uJ31
jsTAPKZ3p1/sxPXBBAgBMatPHhRBqhwHO/Twm4J3GmTLWN7oVDds4W3bPKQfnw3r
vtBj/SM4/IgQ3xJslFcl90TZbQbgxIi88R/gWTbs7GsyT2PzstU30yLdJhKfdZKz
/aIzraHvoDTWFaOdy0+OOaECAwEAATANBgkqhkiG9w0BAQsFAAOCAQEAdSzN2+0E
V1BfR3DPWJHWRf1b7zl+1X/ZseW2hYE5r6YxrLv+1VPf/L5I6kB7GEtqhZUqteY7
zAceoLrVu/7OynRyfQetJVGichaaxLNM3lcr6kcxOowb+WQQ84cwrB3keykH4gRX
KHB2rlWSxta+2panSEO1JX2q5jhcFP90rDOtZjlpYv57N/Z9iQ+dvQPJnChdq3BK
5pZlnIDnVVxqRike7BFy8tKyPj7HzoPEF5mh9Kfnn1YoSVu+61lMVv/qRjnyKfS9
c96nE98sYFj0ZVBzXw8Sq4Gh8FiVmFHbQp1peGC19idOUqxPxWsasWxQXO0azYsP
9RyWLHKxH1dMuA==
-----END CERTIFICATE-----
將其保存在文件AWSpubkey中,然後執行下面命令導入證書:
$ vault write auth/aws/config/certificate/cn-cert aws_public_cert="$(cat AWSpubkey)"說明:cn-cert爲證書名稱。
首次EC2認證時執行如下命令:
$ vault write auth/aws/login role=dev-role \
pkcs7="$(curl -s http://169.254.169.254/latest/dynamic/instance-identity/pkcs7 | tr -d '\n')"
輸出如下結果:
Key                            Value
---                            -----
token                          s.zVo29eIEkbdtpitFc3r5bjc3
token_accessor                 v1ZFeHEQyWidnCiLNLHs5lA7
token_duration                 768h
token_renewable                true
token_policies                 ["default" "heroes"]
identity_policies              []
policies                       ["default" "heroes"]
token_meta_account_id          123456789012
token_meta_ami_id              ami-03dc01372eae510e2
token_meta_instance_id         i-015f7488c627dff71
token_meta_nonce               dba47cd8-06ad-9de0-7fee-34b977409bc4
token_meta_region              cn-north-1
token_meta_role                dev-role
token_meta_role_tag_max_ttl    0s
其中包含token、token_meta_nonce等,token權限爲["default" "heroes"]。
再次登錄時需要提供nonce:
$ vault write auth/aws/login role=dev-role \
pkcs7="$(curl -s http://169.254.169.254/latest/dynamic/instance-identity/pkcs7 | tr -d '\n')" \
nonce=dba47cd8-06ad-9de0-7fee-34b977409bc4- IAM認證登錄
IAM認證,Vault使用了AWS GO SDK,需要指定AWS Region:
$ export AWS_REGION=cn-north-1也可以設置環境變量AWS_SDK_LOAD_CONFIG爲true,這樣可以從.aws文件夾讀取配置:
$ export AWS_SDK_LOAD_CONFIG=true執行IAM User認證:
$ vault login -method=aws header_value=vault.itrunner.org role=dev-role-iam-user aws_access_key_id=ASIAIOSFODNN7EXAMPLE aws_secret_access_key=wJalrXUtnFEMI/K7MDENG/bPxRfiCYEXAMPLEKEY訪問密鑰可以在命令行提供,也可以從.aws文件夾讀取。輸出如下結果:
Success! You are now authenticated. The token information displayed below
is already stored in the token helper. You do NOT need to run "vault login"
again. Future Vault requests will automatically use this token.

Key                                Value
---                                -----
token                              s.zVo29eIEkbdtpitFc3r5bjc3
token_accessor                     v1ZFeHEQyWidnCiLNLHs5lA7
token_duration                     768h
token_renewable                    true
token_policies                     ["default" "heroes"]
identity_policies                  []
policies                           ["default" "heroes"]
token_meta_inferred_aws_region     n/a
token_meta_inferred_entity_id      n/a
token_meta_inferred_entity_type    n/a
token_meta_account_id              123456789012
token_meta_auth_type               iam
token_meta_canonical_arn           arn:aws-cn:iam::123456789012:user/test
token_meta_client_arn              arn:aws-cn:iam::123456789012:user/test
token_meta_client_user_id          AROAPQVNYAPQTLNZVYUL9
執行IAM Role認證:
$ vault login -method=aws header_value=vault.itrunner.org role=dev-role-iam輸出如下結果:
Success! You are now authenticated. The token information displayed below
is already stored in the token helper. You do NOT need to run "vault login"
again. Future Vault requests will automatically use this token.

Key                                Value
---                                -----
token                              s.zVo29eIEkbdtpitFc3r5bjc3
token_accessor                     v1ZFeHEQyWidnCiLNLHs5lA7
token_duration                     768h
token_renewable                    true
token_policies                     ["default" "heroes"]
identity_policies                  []
policies                           ["default" "heroes"]
token_meta_inferred_aws_region     cn-north-1
token_meta_inferred_entity_id      i-0744e18eb21c22cc1
token_meta_inferred_entity_type    ec2_instance
token_meta_account_id              123456789012
token_meta_auth_type               iam
token_meta_canonical_arn           arn:aws-cn:iam::123456789012:role/MyRole
token_meta_client_arn              arn:aws-cn:sts::123456789012:assumed-role/MyRole/i-0744e18eb21c22cc1
token_meta_client_user_id          AROAPQVNYAPQTLNZVYUL9
若未指定AWS Region,會輸出如下錯誤:
Error authenticating: Error making API request.

URL: PUT https://vault.itrunner.org:8200/v1/auth/aws/login
Code: 400. Errors:

* error making upstream request: received error code 403 from STS: <ErrorResponse xmlns="https://sts.amazonaws.com/doc/2011-06-15/">
  <Error>
    <Type>Sender</Type>
    <Code>SignatureDoesNotMatch</Code>
    <Message>Credential should be scoped to a valid region, not 'us-east-1'. </Message>
  </Error>
  <RequestId>82c67acf-2e8e-11e9-a251-03d652cb82bc</RequestId>
</ErrorResponse>
Spring Cloud Vault
快速開始
- POM配置
在POM中配置Spring Cloud Vault依賴:
<dependencyManagement>
    <dependencies>
        <dependency>
            <groupId>org.springframework.cloud</groupId>
            <artifactId>spring-cloud-vault-dependencies</artifactId>
            <version>2.1.0.RELEASE</version>
            <scope>import</scope>
            <type>pom</type>
        </dependency>
    </dependencies>
</dependencyManagement>

<dependencies>
    <dependency>
        <groupId>org.springframework.cloud</groupId>
        <artifactId>spring-cloud-starter-vault-config</artifactId>
    </dependency>
</dependencies>- bootstrap配置
Spring Cloud Vault配置支持bootstrap.properties、bootstrap.yml兩種格式。在項目resources目錄下創建bootstrap.yml文件,內容如下:
spring:
  application:
    name: heroes-api
  cloud:
    vault:
      application-name: heroes-api
      host: vault.itrunner.org
      port: 8200
      scheme: https
      authentication: TOKEN
      token: s.1Rkb4yNR5WYawHLcdpYxzrox
      connection-timeout: 5000
      read-timeout: 15000
      config:
        order: -10
      ssl:
        trust-store: classpath:keystore.jks
        trust-store-password: changeit
      kv:
        enabled: true
        backend: secret
        profile-separator: /
        default-context: application
        application-name: heroes-api
參數含義:
authentication: TOKEN 設置認證方式,Spring Cloud Vault支持的認證方式有:TOKEN, APPID, APPROLE, AWS_EC2, AWS_IAM, AZURE_MSI, CERT, CUBBYHOLE, GCP_GCE, GCP_IAM, KUBERNETES
kv.enabled: true 訪問kv引擎數據
kv.backend: secret 設置secret的路徑
Spring Cloud Vault從以下路徑查找secret屬性數據:
/secret/{application}/{profile}
/secret/{application}
/secret/{default-context}/{profile}
/secret/{default-context}
application名字由以下配置屬性決定:
spring.cloud.vault.kv.application-name
spring.cloud.vault.application-name
spring.application.name
使用https協議時需配置trust-store。
- 訪問在HashiCorp Vault中存儲的值
訪問方式與讀取Spring Boot配置文件屬性相同,以下代碼則會讀取/secret/heroes-api/hello值:
@Value("${hello}")
String name;
AWS Secret後端
從HashiCorp Vault AWS Secret引擎獲取憑證,需增加spring-cloud-vault-config-aws依賴:
<dependencies>
    <dependency>
        <groupId>org.springframework.cloud</groupId>
        <artifactId>spring-cloud-vault-config-aws</artifactId>
        <version>2.1.0.RELEASE</version>
    </dependency>
</dependencies>
增加如下配置啓用AWS後端:
spring.cloud.vault:
      aws:
        enabled: true
        role: my-role
        backend: aws
        access-key-property: cloud.aws.credentials.accessKey
        secret-key-property: cloud.aws.credentials.secretKey
參數:
role AWS Secret引擎中的角色名稱
access-key-property 存儲AWS access key的屬性名稱
secret-key-property 存儲AWS secret key的屬性名稱
代碼中讀取生成用戶憑證:
@Value("${cloud.aws.credentials.accessKey}")
String accessKey;

@Value("${cloud.aws.credentials.secretKey}")
String secretKey;
每次讀取創建AWS用戶和訪問密鑰。
Database Secret後端
爲利用Vault Database Secret引擎動態創建數據庫憑證需添加spring-cloud-vault-config-databases依賴:
<dependencies>
    <dependency>
        <groupId>org.springframework.cloud</groupId>
        <artifactId>spring-cloud-vault-config-databases</artifactId>
        <version>2.1.0.RELEASE</version>
    </dependency>
</dependencies>
增加如下配置啓用Database後端:
spring.cloud.vault:
    database:
        enabled: true
        role: my-role
        backend: database
        username-property: spring.datasource.username
        password-property: spring.datasource.password
參數:
role Database Secret引擎中的角色名稱
username-property 存儲數據庫用戶名的屬性名稱
password-property 存儲數據庫密碼的屬性名稱
用戶名密碼保存在spring.datasource.username和spring.datasource.password內,datasource中無需再配置。
AWS認證
AWS EC2認證
首先修改heroes-policy.hcl,如下:
path "secret/heroes-api" {
  capabilities = ["read"]
}
path "secret/data/heroes-api" {
  capabilities = ["create", "read", "update", "delete", "list"]
}
path "secret/data/application" {
  capabilities = ["create", "read", "update", "delete", "list"]
}
path "secret/application" {
  capabilities = ["read"]
}
重新寫入policy:
$ vault policy write heroes heroes-policy.hcl配置bootstrap.yml:
spring:
  application:
    name: heroes-api
  cloud:
    vault:
      application-name: heroes-api
      host: vault.itrunner.org
      port: 8200
      scheme: https
      authentication: AWS_EC2
      connection-timeout: 5000
      read-timeout: 15000
      config:
        order: 10
      ssl:
        trust-store: classpath:keystore.jks
        trust-store-password: changeit
      kv:
        enabled: true
        backend: secret
        profile-separator: /
        default-context: application
        application-name: heroes-api
      aws-ec2:
        role: dev-role
        aws-ec2-path: aws
        identity-document: http://169.254.169.254/latest/dynamic/instance-identity/pkcs7
        nonce: 0bcf5e01-9c32-168e-49a0-5cb717e60a3f
參數說明:
authentication: AWS_EC2 啓用AWS_EC2認證
aws-ec2.aws-ec2-path Spring Cloud Vault默認路徑爲aws-ec2,HashiCorp Vault默認路徑爲aws,兩者要一致
待續
參考文檔
HashiCorp Vault
Learn about secrets management and data protection with HashiCorp Vault
Vault Documentation
GitHub - HashiCorp Vault
Spring Cloud Vault
spring-cloud-vault-config-samples
AWS Instance Metadata and User Data
AWS SDK for Go Developer Guide