


理論部分
一:GlusterFS概述
1.1:Glusterfs簡介
GlusterFS是Scale-Out存儲解決方案Gluster的核心,它是一個開源的分佈式文件系統,具有強大的橫向擴展能力,通過擴展能夠支持數PB存儲容量和處理數千客戶端。GlusterFS藉助TCP/IP或InfiniBandRDMA網絡將物理分佈的存儲資源聚集在一起,使用單一全局命名空間來管理數據。
1.2:Glusterfs特點
1:擴展性和高性能
GlusterFS利用雙重特性來提供幾TB至數PB的高擴展存儲解決方案。Scale-Out架構允許通過簡單地增加資源來提高存儲容量和性能,磁盤、計算和I/O資源都可以獨立增加,支持10GbE和InfiniBand等高速網絡互聯。Gluster彈性哈希(ElasticHash)解除了GlusterFS對元數據服務器的需求,消除了單點故障和性能瓶頸,真正實現了並行化數據訪問。
2:高可用性
GlusterFS可以對文件進行自動複製,如鏡像或多次複製,從而確保數據總是可以訪問,甚至是在硬件故障的情況下也能正常訪問。自我修復功能能夠把數據恢復到正確的狀態,而且修復是以增量的方式在後臺執行,幾乎不會產生性能負載。GlusterFS沒有設計自己的私有數據文件格式,而是採用操作系統中主流標準的磁盤文件系統(如EXT3、ZFS)來存儲文件,因此數據可以使用各種標準工具進行復制和訪問。
3:彈性卷管理
數據儲存在邏輯卷中,邏輯卷可以從虛擬化的物理存儲池進行獨立邏輯劃分而得到。存儲服務器可以在線進行增加和移除,不會導致應用中斷。邏輯卷可以在所有配置服務器中增長和縮減,可以在不同服務器遷移進行容量均衡,或者增加和移除系統,這些操作都可在線進行。文件系統配置更改也可以實時在線進行並應用,從而可以適應工作負載條件變化或在線性能調優。
4:全局統一命名空間
全局統一命名空間將所有的存儲資源聚集成一個單一的虛擬存儲池,對用戶和應用屏蔽了物理存儲信息。存儲可以根據生產環境中的需要進行彈性擴展或收縮,在多節點場景中,全局同意明明還可以給予不同節點做負載均衡,大大提高存取效率。
1.3:術語簡介
GlusterFS:是一個開源的分佈式文件系統。
Brick:GFS中的存儲單元,通過是一個受信存儲池中的服務器的一個導出目錄。可以通過主機名和目錄名來標識,如'SERVER:EXPORT'
Client:掛載了GFS卷的設備
FUSE:Filesystem Userspace是一個可加載的內核模塊,其支持非特權用戶創建自己的文件系統而不需要修改內核代碼。通過在用戶空間運行文件系統的代碼通過FUSE代碼與內核進行橋接。
Node:一個擁有若干brick的設備
Volume:一組bricks的邏輯集合
Metadata:元數據,關於數據的數據,用於描述文件、目錄等的信息。
VFS:內核空間對用戶空間提供的訪問磁盤的接口
二:GFS的工作原理
2.1:GFS的工作流程
(1)客戶端或應用程序通過GFS的掛載點訪問數據
(2)Linux系統內核通過VFS API收到請求並處理
(3)VFS將數據遞交給FUSE內核文件系統,並向系統註冊一個實際的文件系統FUSE,而FUSE文件系統則是將數據通過/dev。Fuse設備文件遞交給了GFS的client段。可以將FUSE文件系統理解爲一個代理。
(4)GFS client收到數據後,client根據配置文件對數據進行處理
(5)經過GFS client處理後,通過網絡將數據傳遞至遠端的GFS Server,並且將數據寫入服務器存儲設備。
2.2:彈性HASH算法
GlusterFS目前使用Davies-Meyer算法計算文件名hash值,獲得一個32位整數。Davies-Meyer算法具有非常好的hash分佈性,計算效率很高,假設邏輯卷中的存儲單元Brick有N個,則32位整數空間被平均劃分爲N個連續子空間,每個空間分別映射到一個存儲單元Brick,計算得到的32位hash值就會被投射到一個存儲單元Brick。
三:GlusterFS的卷類型
3.1:卷的類型
1:基本卷:
(1) distribute volume:分佈式卷
文件通過hash算法分佈到所有brick server上,這種卷是glusterfs的基礎和最大特點;實只是擴大的磁盤空間,如果有一個磁盤壞了,對應的數據也丟失,文件級RAID 0,不具有容錯能力。
(2) stripe volume:條帶卷
類似RAID0,文件分成數據塊以Round Robin方式分佈到brick server上,併發粒度是數據塊,支持超大文件,大文件性能高;
(3) replica volume:複製卷
文件同步複製到多個brick上,文件級RAID 1,具有容錯能力,寫性能下降,讀性能提升。
2:複合卷:
(4) distribute stripe volume:分佈式條帶卷
brickserver數量是條帶數的倍數,兼具distribute和stripe卷的特點;
(5) distribute replica volume:分佈式複製卷
brickserver數量是鏡像數的倍數,兼具distribute和replica卷的特點,可以在2個或多個節點之間複製數據。
(6) stripe replica volume:條帶複製卷
類似RAID 10
同時具有條帶卷和複製卷的特點
(7) distribute stripe replicavolume:分佈式條帶複製卷
三種基本卷的複合卷
通常用於類Map Reduce應用
實驗部分
一:GlusterFS部署
1.1:部署羣集環境
實驗top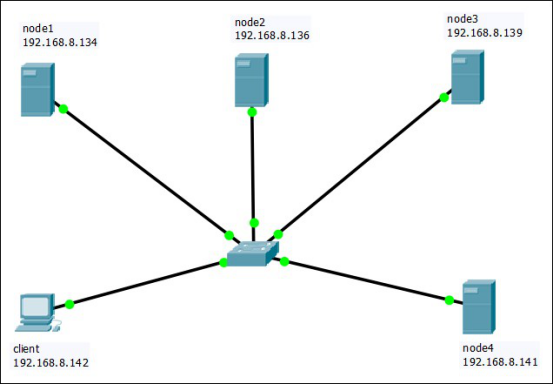
1:準備環境(以node1爲例,其他節點步驟略,請自行配置)
(1)按照表中所示,爲node節點添加相應數量和大小的磁盤,並重啓系統
(2)爲所有節點的新磁盤分區
用fdisk命令爲每個磁盤分區,分區步驟略
[root@localhost ~]# fdisk /dev/sdb
[root@localhost ~]# fdisk /dev/sdc
[root@localhost ~]# fdisk /dev/sdd
[root@localhost ~]# fdisk /dev/sde
(2)爲每個節點的每個磁盤格式化
[root@localhost ~]# mkfs -t ext4 /dev/sdb1
[root@localhost ~]# mkfs -t ext4 /dev/sdc1
[root@localhost ~]# mkfs -t ext4 /dev/sdd1
[root@localhost ~]# mkfs -t ext4 /dev/sde1
(3)創建掛載點
[root@localhost ~]# mkdir /b3
[root@localhost ~]# mkdir /c4
[root@localhost ~]# mkdir /d5
[root@localhost ~]# mkdir /e6
(4)掛載磁盤
[root@localhost ~]# mount /dev/sdb1 /b3
[root@localhost ~]# mount /dev/sdc1 /c4
[root@localhost ~]# mount /dev/sdd1 /d5
[root@localhost ~]# mount /dev/sde1 /e6
(5)修改fstab文件,使掛載永久生效
[root@localhost ~]# vi /etc/fstab
在末尾添加
/dev/sdb1 /b3 ext4 defaults 0 0
/dev/sdc1 /c4 ext4 defaults 0 0
/dev/sdd1 /d5 ext4 defaults 0 0
/dev/sde1 /e6 ext4 defaults 0 0
2:在所有節點上關閉防火牆和selinux
[root@localhost ~]# systemctl stop firewalld
[root@localhost ~]# setenforce 0
3:在所有節點上修改hosts文件
[root@localhost ~]# vi /etc/hosts
192.168.8.134 node1
192.168.8.136 node2
192.168.8.139 node3
192.168.8.141 node4
4:在所有節點安裝軟件
(1)配置yum倉庫
將GFS所需的rpm倉庫的gfsrepo目錄拷貝到linux系統的/opt下,並修改倉庫文件
[root@localhost ~]# vi /etc/yum.repos.d/CentOS-Media.repo
[c7-media]
name=CentOS-$releasever - Media
baseurl=file:///media/cdrom/
gpgcheck=1
enabled=1
gpgkey=file:///etc/pki/rpm-gpg/RPM-GPG-KEY-CentOS-7
[gfsrepo]
name=GFS
baseurl=file:///opt/gfsrepo
gpgcheck=0
enabled=1
[root@localhost ~]# yum clean all
(2)在所有節點上安裝gfs
[root@localhost ~]# yum -y install glusterfs glusterfs-server glusterfs-fuse glusterfs-rdma
5:在所有節點上啓動GFS
[root@localhost ~]# systemctl start glusterd.service
[root@localhost ~]# systemctl enable glusterd.service
6:添加節點(只在node1節點上)
[root@localhost ~]# gluster peer probe node1
peer probe: success. Probe on localhost not needed
[root@localhost ~]# gluster peer probe node2
peer probe: success.
[root@localhost ~]# gluster peer probe node3
peer probe: success.
[root@localhost ~]# gluster peer probe node4
peer probe: success.
7:在每個節點上查看狀態
[root@localhost ~]# gluster peer status
Number of Peers: 3
Hostname: node2
Uuid: 469be571-b52a-4a89-a30a-c3a770753b0e
State: Peer in Cluster (Connected)
Hostname: node3
Uuid: 24742939-afc6-4243-a8a8-1aa57a336128
State: Peer in Cluster (Connected)
Hostname: node4
Uuid: dbc703a3-1e22-42cd-bedf-da3541bce983
State: Peer in Cluster (Connected)
1.2:創建卷
1:創建分佈式卷(在node1上)
[root@localhost ~]# gluster volume create dis-volume node1:/e6 node2:/e6 force
[root@localhost ~]# gluster volume info dis-volume
Volume Name: dis-volume
Type: Distribute
Volume ID: 40946bd8-cc79-406a-be3c-5c03dd2a207e
Status: Created
Snapshot Count: 0
Number of Bricks: 2
Transport-type: tcp
Bricks:
Brick1: node1:/e6
Brick2: node2:/e6
Options Reconfigured:
transport.address-family: inet
nfs.disable: on
[root@localhost ~]# gluster volume start dis-volume
2:創建條帶卷
[root@localhost ~]# gluster volume create stripe-volume stripe 2 node1:/d5 node2:/d5 force
[root@localhost ~]# gluster volume info stripe-volume
Volume Name: stripe-volume
Type: Stripe
Volume ID: d8e335d5-47d5-484f-804b-bb36ed522bf6
Status: Created
Snapshot Count: 0
Number of Bricks: 1 x 2 = 2
Transport-type: tcp
Bricks:
Brick1: node1:/d5
Brick2: node2:/d5
Options Reconfigured:
transport.address-family: inet
nfs.disable: on
[root@localhost ~]# gluster volume start stripe-volume
3:創建複製卷
[root@localhost ~]# gluster volume create rep-volume replica 2 node3:/d5 node4:/d5 force
[root@localhost ~]# gluster volume info rep-volume
Volume Name: rep-volume
Type: Replicate
Volume ID: b5d1afda-ab03-47a7-82b9-2786648a9b3a
Status: Created
Snapshot Count: 0
Number of Bricks: 1 x 2 = 2
Transport-type: tcp
Bricks:
Brick1: node3:/d5
Brick2: node4:/d5
Options Reconfigured:
transport.address-family: inet
nfs.disable: on
[root@localhost ~]# gluster volume start rep-volume
4:創建分佈式條帶卷
[root@localhost ~]# gluster volume create dis-stripe stripe 2 node1:/b3 node2:/b3 node3:/b3 node4:/b3 force
[root@localhost ~]# gluster volume info dis-stripe
Volume Name: dis-stripe
Type: Distributed-Stripe
Volume ID: ff516167-7840-485a-8d3a-1630bd4d174d
Status: Created
Snapshot Count: 0
Number of Bricks: 2 x 2 = 4
Transport-type: tcp
Bricks:
Brick1: node1:/b3
Brick2: node2:/b3
Brick3: node3:/b3
Brick4: node4:/b3
Options Reconfigured:
transport.address-family: inet
nfs.disable: on
[root@localhost ~]# gluster volume start dis-stripe
5:創建分佈式複製卷
[root@localhost ~]# gluster volume create dis-rep replica 2 node1:/c4 node2:/c4 node3:/c4 node4:/c4 force
[root@localhost ~]# gluster volume info dis-rep
Volume Name: dis-rep
Type: Distributed-Replicate
Volume ID: 197055f7-37d8-419f-bb22-9f05c7e1a032
Status: Created
Snapshot Count: 0
Number of Bricks: 2 x 2 = 4
Transport-type: tcp
Bricks:
Brick1: node1:/c4
Brick2: node2:/c4
Brick3: node3:/c4
Brick4: node4:/c4
Options Reconfigured:
transport.address-family: inet
nfs.disable: on
[root@localhost ~]# gluster volume start dis-rep
1.3:部署GFS客戶端
1:安裝客戶端軟件
[root@localhost ~]# systemctl stop firewalld
[root@localhost ~]# setenforce 0
[root@localhost ~]# systemctl disable firewalld
[root@localhost ~]# yum -y install glusterfs glusterfs-fuse
2:創建掛載目錄
[root@localhost ~]# mkdir -p /test/{dis,stripe,rep,dis_and_stripe,dis_adn_rep}
[root@localhost ~]# ls /test
dis dis_and_stripe dis_rep rep stripe
3:修改hosts文件
[root@localhost ~]# vi /etc/hosts
192.168.8.134 node1
192.168.8.136 node2
192.168.8.139 node3
192.168.8.141 node4
4:掛載Gluster文件系統
[root@localhost ~]# mount -t glusterfs node1:dis-volume /test/dis
[root@localhost ~]# mount -t glusterfs node1:stripe-volume /test/stripe/
[root@localhost ~]# mount -t glusterfs node1:rep-volume /test/rep
[root@localhost ~]# mount -t glusterfs node1:dis-stripe /test/dis_and_stripe/
[root@localhost ~]# mount -t glusterfs node1:dis-rep /test/dis_and_rep/
[root@localhost ~]# df -h
文件系統 容量 已用 可用 已用% 掛載點
/dev/mapper/cl-root 95G 4.0G 91G 5% /
devtmpfs 473M 0 473M 0% /dev
tmpfs 489M 144K 489M 1% /dev/shm
tmpfs 489M 7.1M 482M 2% /run
tmpfs 489M 0 489M 0% /sys/fs/cgroup
/dev/sda1 1014M 173M 842M 18% /boot
tmpfs 98M 12K 98M 1% /run/user/0
/dev/sr0 4.1G 4.1G 0 100% /media/cdrom
node1:dis-volume 12G 49M 11G 1% /test/dis
node1:rep-volume 4.8G 21M 4.6G 1% /test/rep
node1:dis-stripe 12G 37M 11G 1% /test/dis_and_stripe
node1:dis-rep 7.8G 33M 7.3G 1% /test/dis_and_rep
node1:stripe-volume 9.6G 41M 9.1G 1% /test/stripe
5:修改fstab配置文件
[root@localhost ~]# vi /etc/fstab
在末尾添加:
node1:dis-volume /test/dis glusterfs defaules,_netdev 0 0
node1:stripe-volume /test/stripe glusterfs defaules,_netdev 0 0
node1:rep-volume /test/rep glusterfs defaules,_netdev 0 0
node1:dis-stripe /test/dis_and_stripe glusterfs defaules,_netdev 0 0
node1:dis-rep /test/dis_and_rep glusterfs defaules,_netdev 0 0
1.4:在客戶端測試Gluster文件系統
1:在卷中寫入文件
(1)創建測試文件
[root@localhost ~]# dd if=/dev/zero of=/root/demo1.log bs=1M count=43
[root@localhost ~]# dd if=/dev/zero of=/root/demo2.log bs=1M count=43
[root@localhost ~]# dd if=/dev/zero of=/root/demo3.log bs=1M count=43
[root@localhost ~]# dd if=/dev/zero of=/root/demo4.log bs=1M count=43
[root@localhost ~]# dd if=/dev/zero of=/root/demo5.log bs=1M count=43
(2)卷中寫入文件
[root@localhost ~]# cp demo /test/dis/
[root@localhost ~]# cp demo /test/stripe/
[root@localhost ~]# cp demo /test/rep/
[root@localhost ~]# cp demo /test/dis_and_stripe/
[root@localhost ~]# cp demo* /test/dis_and_rep/
2:查看文件分佈
(1)在node1和node2中查看分佈式卷文件分佈
node1:
[root@localhost ~]# ll -h /e6
總用量 173M
-rw-r--r--. 2 root root 43M 4月 17 22:06 demo1.log
-rw-r--r--. 2 root root 43M 4月 17 22:06 demo2.log
-rw-r--r--. 2 root root 43M 4月 17 22:06 demo3.log
-rw-r--r--. 2 root root 43M 4月 17 22:06 demo4.log
node2:
[root@localhost ~]# ll -h /e6
總用量 44M
-rw-r--r--. 2 root root 43M 4月 17 22:06 demo5.log
(2)在node1和node2中查看條帶卷文件分佈
node1:
[root@localhost ~]# ll -h /d5
總用量 108M
-rw-r--r--. 2 root root 22M 4月 17 22:06 demo1.log
-rw-r--r--. 2 root root 22M 4月 17 22:06 demo2.log
-rw-r--r--. 2 root root 22M 4月 17 22:06 demo3.log
-rw-r--r--. 2 root root 22M 4月 17 22:06 demo4.log
-rw-r--r--. 2 root root 22M 4月 17 22:06 demo5.log
node2:
[root@localhost ~]# ll -h /d5
總用量 108M
-rw-r--r--. 2 root root 22M 4月 17 22:06 demo1.log
-rw-r--r--. 2 root root 22M 4月 17 22:06 demo2.log
-rw-r--r--. 2 root root 22M 4月 17 22:06 demo3.log
-rw-r--r--. 2 root root 22M 4月 17 22:06 demo4.log
-rw-r--r--. 2 root root 22M 4月 17 22:06 demo5.log
(3)在node3和node4中查看複製卷文件分佈
node3:
[root@localhost ~]# ll -h /d5
總用量 216M
-rw-r--r--. 2 root root 43M 4月 17 22:06 demo1.log
-rw-r--r--. 2 root root 43M 4月 17 22:06 demo2.log
-rw-r--r--. 2 root root 43M 4月 17 22:06 demo3.log
-rw-r--r--. 2 root root 43M 4月 17 22:06 demo4.log
-rw-r--r--. 2 root root 43M 4月 17 22:06 demo5.log
node4:
[root@localhost ~]# ll -h /d5
總用量 216M
-rw-r--r--. 2 root root 43M 4月 17 22:06 demo1.log
-rw-r--r--. 2 root root 43M 4月 17 22:06 demo2.log
-rw-r--r--. 2 root root 43M 4月 17 22:06 demo3.log
-rw-r--r--. 2 root root 43M 4月 17 22:06 demo4.log
-rw-r--r--. 2 root root 43M 4月 17 22:06 demo5.log
(4)在node1、node2、node3、node4中查看分佈式條帶文件分佈
node1:
[root@localhost ~]# ll -h /b3
總用量 87M
-rw-r--r--. 2 root root 22M 4月 17 22:07 demo1.log
-rw-r--r--. 2 root root 22M 4月 17 22:07 demo2.log
-rw-r--r--. 2 root root 22M 4月 17 22:07 demo3.log
-rw-r--r--. 2 root root 22M 4月 17 22:07 demo4.log
node2:
[root@localhost ~]# ll -h /b3
總用量 87M
-rw-r--r--. 2 root root 22M 4月 17 22:07 demo1.log
-rw-r--r--. 2 root root 22M 4月 17 22:07 demo2.log
-rw-r--r--. 2 root root 22M 4月 17 22:07 demo3.log
-rw-r--r--. 2 root root 22M 4月 17 22:07 demo4.log
node3:
[root@localhost ~]# ll -h /b3
總用量 22M
-rw-r--r--. 2 root root 22M 4月 17 22:07 demo5.log
node4:
[root@localhost ~]# ll -h /b3
總用量 22M
-rw-r--r--. 2 root root 22M 4月 17 22:07 demo5.log
(5)在node1、node2、node3、node4中查看分佈式複製卷文件分佈
node1:
[root@localhost ~]# ll -h /c4
總用量 173M
-rw-r--r--. 2 root root 43M 4月 17 22:06 demo1.log
-rw-r--r--. 2 root root 43M 4月 17 22:07 demo2.log
-rw-r--r--. 2 root root 43M 4月 17 22:07 demo3.log
-rw-r--r--. 2 root root 43M 4月 17 22:07 demo4.log
node2:
[root@localhost ~]# ll -h /c4
總用量 173M
-rw-r--r--. 2 root root 43M 4月 17 22:07 demo1.log
-rw-r--r--. 2 root root 43M 4月 17 22:07 demo2.log
-rw-r--r--. 2 root root 43M 4月 17 22:07 demo3.log
-rw-r--r--. 2 root root 43M 4月 17 22:07 demo4.log
node3:
[root@localhost ~]# ll -h /c4
總用量 44M
-rw-r--r--. 2 root root 43M 4月 17 22:07 demo5.log
node4:
[root@localhost ~]# ll -h /c4
總用量 44M
-rw-r--r--. 2 root root 43M 4月 17 22:07 demo5.log
3:破壞性測試
(1)掛起node2節點,在客戶端上測試各個文件是否可以正常使用
(2)再掛起node4,在客戶端繼續測試各個文件的讀取
1.5:其他維護命令
1:查看GFS卷
[root@localhost ~]# gluster volume list
dis-rep
dis-stripe
dis-volume
rep-volume
stripe-volume
[root@localhost ~]# gluster volume info
Volume Name: dis-rep
Type: Distributed-Replicate
Volume ID: 197055f7-37d8-419f-bb22-9f05c7e1a032
Status: Started
Snapshot Count: 0
Number of Bricks: 2 x 2 = 4
Transport-type: tcp
Bricks:
Brick1: node1:/c4
Brick2: node2:/c4
Brick3: node3:/c4
Brick4: node4:/c4
Options Reconfigured:
transport.address-family: inet
nfs.disable: on
Volume Name: dis-stripe
Type: Distributed-Stripe
Volume ID: ff516167-7840-485a-8d3a-1630bd4d174d
Status: Started
Snapshot Count: 0
Number of Bricks: 2 x 2 = 4
Transport-type: tcp
Bricks:
Brick1: node1:/b3
Brick2: node2:/b3
Brick3: node3:/b3
Brick4: node4:/b3
Options Reconfigured:
transport.address-family: inet
nfs.disable: on
Volume Name: dis-volume
Type: Distribute
Volume ID: 40946bd8-cc79-406a-be3c-5c03dd2a207e
Status: Started
Snapshot Count: 0
Number of Bricks: 2
Transport-type: tcp
Bricks:
Brick1: node1:/e6
Brick2: node2:/e6
Options Reconfigured:
transport.address-family: inet
nfs.disable: on
Volume Name: rep-volume
Type: Replicate
Volume ID: b5d1afda-ab03-47a7-82b9-2786648a9b3a
Status: Started
Snapshot Count: 0
Number of Bricks: 1 x 2 = 2
Transport-type: tcp
Bricks:
Brick1: node3:/d5
Brick2: node4:/d5
Options Reconfigured:
transport.address-family: inet
nfs.disable: on
Volume Name: stripe-volume
Type: Stripe
Volume ID: d8e335d5-47d5-484f-804b-bb36ed522bf6
Status: Started
Snapshot Count: 0
Number of Bricks: 1 x 2 = 2
Transport-type: tcp
Bricks:
Brick1: node1:/d5
Brick2: node2:/d5
Options Reconfigured:
transport.address-family: inet
nfs.disable: on
[root@localhost ~]# gluster volume status
Status of volume: dis-rep
Gluster process TCP Port RDMA Port Online Pid
Brick node1:/c4 49154 0 Y 5233
Brick node2:/c4 49154 0 Y 4695
Self-heal Daemon on localhost N/A N/A Y 5253
Self-heal Daemon on node2 N/A N/A Y 4723
Task Status of Volume dis-rep
There are no active volume tasks
Status of volume: dis-stripe
Gluster process TCP Port RDMA Port Online Pid
Brick node1:/b3 49153 0 Y 5133
Brick node2:/b3 49153 0 Y 4645
Task Status of Volume dis-stripe
There are no active volume tasks
Status of volume: dis-volume
Gluster process TCP Port RDMA Port Online Pid
Brick node1:/e6 49152 0 Y 4775
Brick node2:/e6 49152 0 Y 4509
Task Status of Volume dis-volume
There are no active volume tasks
Status of volume: rep-volume
Gluster process TCP Port RDMA Port Online Pid
Self-heal Daemon on localhost N/A N/A Y 5253
Self-heal Daemon on node2 N/A N/A Y 4723
Task Status of Volume rep-volume
There are no active volume tasks
Status of volume: stripe-volume
Gluster process TCP Port RDMA Port Online Pid
Brick node1:/d5 49155 0 Y 5468
Brick node2:/d5 49155 0 Y 40580
Task Status of Volume stripe-volume
There are no active volume tasks
2:停止刪除卷
[root@localhost ~]# gluster volume stop dis-stripe
Stopping volume will make its data inaccessible. Do you want to continue? (y/n) y
volume stop: dis-stripe: success
[root@localhost ~]# gluster volume delete dis-stripe
Deleting volume will erase all information about the volume. Do you want to continue? (y/n) y
volume delete: dis-stripe: failed: Some of the peers are down
3:設置卷的訪問控制
[root@localhost ~]# gluster volume set dis-rep auth.allow 192.168.1.,10.1.1.
volume set: success