


前端的大體流程:
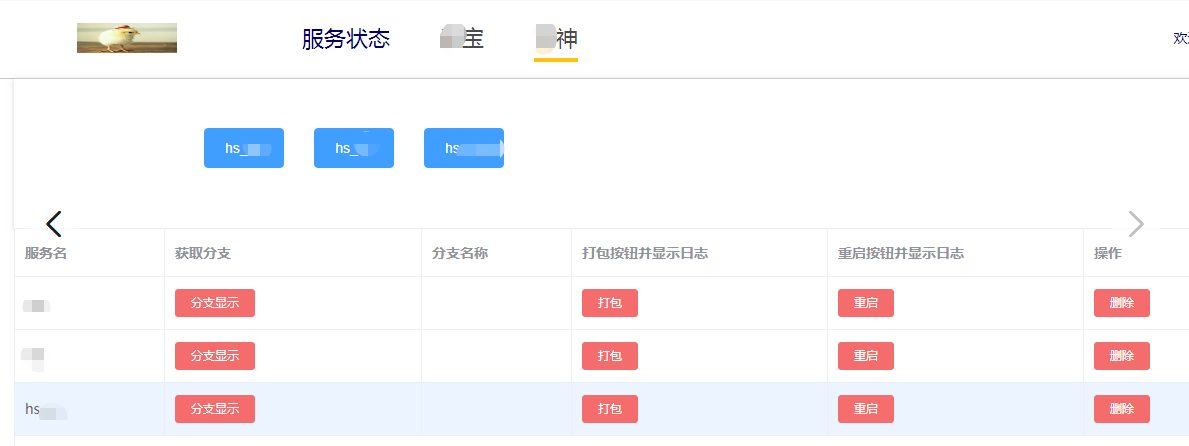
首先是Login登錄組件,當輸入用戶名和密碼之後,發送post請求到後端,然後根據返回的數據的是否正常,如果正常,將返回的token以及用戶名保存到sessionStorage中,並使用導航守衛進行跳轉到主頁面。主頁面中有默認頁面,目前沒有做,本打算默認頁面是顯示所有服務的服務狀態以及可以重啓按鈕等操作的,除了默認按鈕之外就是就是應用名(*寶和*神)。然後當點擊這兩個應用名之後,會顯示相對應的服務名,服務名下面是一個表格,這個表格是公共組件的,裏面的數據是從Vuex這個公共組件裏面獲取的,也就是當你點擊服務名的時候會將相應的服務名添加到vuex中,這樣做的好處是當你點擊*神的時候,下面的公共組件也會顯示*寶的服務名,當點擊*寶的時候也會顯示*神的服務名。
疑問:對於前端的頁面認證,我使用的是給路由中添加元數據,然後再主入口組件中使用全局守衛進行判斷這個元數據,如果滿足判斷是否已經登錄 (去seessionStorage中取值),如果沒有登錄,使用導航守衛跳轉到登錄頁面。
問題:前端已經做了登錄頁面驗證,後端是否還需要使用DRF中的登錄認證組件進行登錄頁面驗證?
先看主入口文件部分內容,導入了很多東西,可以進行全局引用:
import Vue from 'vue'
import App from './App'

import router from './router'                        #這是路由組件


// elementUI 導入
import ElementUI from 'element-ui';
import 'element-ui/lib/theme-chalk/index.css';
// 調用插件
Vue.use(ElementUI);

//引入全局的組件
import Public from './components/Public/Public'        #這是上圖中所說的公共組件

Vue.component(Public.name,Public);

//引入Vuex,進行狀態管理                                #這是Vuex,進行狀態管理
import store from './store'

//導入axios                                            #這是axios,以後再其他地方使用this.$http. 的方式引用
import * as api from './restful/api'
console.log(api)
Vue.prototype.$http=api;

//導入全局樣式
import '../static/global/global.css'
下來是路由組件:路由組件中children,字體意思是這個組件有孩子組件,這個children是前端同事幫我加的。和自己之前寫的有點差別,不過覺得這個更規範。
import Vue from 'vue'
import Router from 'vue-router'


Vue.use(Router)

import HelloWorld from '@/components/AppName/HelloWorld'
import CaiBao from '@/components/CaiBao/CaiBao'
import HeShen from '@/components/HeShen/HeShen'
import Login from '@/components/Login/Login'
import ServiceStatus  from '@/components/ServiceStatus/ServiceStatus'

export default new Router({
  linkActiveClass: "is-active",
  mode: 'history',

  routes:[


    {
      path:'/',                                             #首先是去找Login組件
      name:'login',
      component:Login
    },

    {
      path:'/heyan/detailpage',                    #登錄成功後,登錄組件中會使用導航守衛跳轉到這個
      name:'HelloWorld',
      component:HelloWorld,
        children:[
          {
            path: '/',                             #這個是我在開始時說的那個默認顯示頁面,想用python-ansible-api顯示組件相關信息,還沒做
            name: 'ServiceStatus',
            component:ServiceStatus,
          },
            {
              path:'/caibao/:userId',               #當在HelloWorld組件中點擊router-link時跳轉到這裏
              name:'caibao',
              component:CaiBao,
              meta:{
                  //如果是true,表示訪問該組件時需要登錄        #前面說的元數據
                  auth:true
              }
            },
            {
              path:'/heshen/:userId',            #和上面的一樣
              name:'heshen',
              component:HeShen,
              meta:{
                  //如果是true,表示訪問該組件時需要登錄
                  auth:true
                }
            },
        ]
    },


  ]


})
App組件中只有一行router-view,和Login組件對應,提供出口。
Login組件: loginHandler方法是點擊登錄按鈕觸發的,this.$http.userLogin(params)這個是發送axios請求,並攜帶參數,這種發送axios請求的方式之前說到的。然後根據返回的值判斷是否要健token和用戶名存放到sessionStroage,還有就是跳轉到HelloWorld組件中。
methods:{

  loginHandler(){

      let params = {
          username:this.username,
          pwd:md5(this.password),

      };
      console.log(params);
      this.$http.userLogin(params)
      .then(res=>{
          console.log(res);
          if (!res.data =="") {
              sessionStorage.setItem('access_token',res.data);
              sessionStorage.setItem('username',res.username);
              this.$router.push('/heyan/detailpage');


         }
      })
      .catch(err=>{

          console.log(err);

      })
  },

}
HelloWorld組件:根據鉤子函數,當這個組件創建的時候會發送一個get請求從而從數據庫中獲取到相應的應用名,然後根據for循環顯示到頁面中,最後使用router-link進行跳轉到路由中的children部分。需要傳遞路由參數params。
<script>
export default {

  name: 'LuffyHeader',
  data(){
    return{
      AppnameList:[],

    }
  },

  created() {

    this.getAppnameList();
    console.log(123)

  },

  methods:{
    getAppnameList(){
      this.$http.appnameList()
        .then(res=>{
            // console.log(res);
            this.AppnameList = res
        })
        .catch(err=>{
          console.log(err);
        });
    },

    }


};
</script>
helloworld組件中有兩個子組件裏面的代碼是大體相同的,只說一個CaiBao這個組件。
CaiBao組件:當進入這個組件之後首先使用鉤子函數created發送一個get請求,主要是獲取到根據應用的id獲取到相應的服務名。public是公共組件(也是表格),當點擊服務名的時候調用StorageServer方法,我將這個服務名保存到vuex中,起先我是直接保存爲數組,後來發現以後如果獲取到分支之後,分支如何和服務名建立關係,所以此處我使用let聲明瞭一個對象,對面裏面保存了服務名和分支名,起先默認是空的。除此之外爲了一個服務只保存一次,我將vuex裏面中指循環出來,並將服務名保存到一個新的數組中,然後判斷點擊的服務名是否在這個數組中,如果不在添加進去。
<template>
  <div>
    <div id="test">
      <el-row>
        <el-button class="button-style" type="primary" v-for='(server,index) in servicelist' :key="server.id" @click="StorageServer(server.title)">{{server.title}}</el-button>
      </el-row>
    </div>
    <public />
    </div>
</template>

<script>
    export default {
      name: "Caibao",
      data() {
        return {
          servicelist: [],
        }
      },
      created() {
        this.GetServiceList();
      },
      methods: {
        GetServiceList() {
          // console.log(this.$route)
          this.$http.ServiceList(this.$route.params.userId)
            .then(res => {

              this.servicelist = res;
              // console.log(this.servicelist)
            }).catch(err => {
            console.log(err)
          })

        },
        StorageServer(servername) {
              var  StoreService = [];
              let ServerNameAndBanrch = {'servername':"",'branch':null};

              this.$store.state.ServerNameAndBanrch.forEach(function (item,index) {    #這裏我使用for循環的方式將vuex值循環出來,然後將服務名追加到
                                                                                       #新的數組,如果新增的服務名不在這裏,使用dispatc提交到vuex中。
                StoreService.push(item.servername)
              });

              if(StoreService.indexOf(servername)> -1) return;
              ServerNameAndBanrch.servername = servername;
              this.$store.dispatch('addserver',ServerNameAndBanrch);
        }
    }
      }
</script>
下來時public組件,數據到放到了vuex,那應該到拿出來了吧。首先還是使用create進行方法在組件創建的時候去vuex中拿一次數據,然後我們應該實時的監聽vuex中的值,當新增了新的任務之後,我們要實時的顯示到public組件中,所以我使用watch針對vuex中這個數據屬性進行了實時的監聽,然後把新到的數據顯示到頁面中。
<script>
    export default {
      name: "Public",
      data() {
        return {

          input10:'',
            tableData: [
              /*{
              servername: 'zyp',
              branch:"master",

            },*/

            ]
        }
      },
      created() {

          if(this.$store.state.ServerNameAndBanrch.length>0){
            this.$store.state.ServerNameAndBanrch.map(item =>{
              let obj={};
              obj.servername = item.servername;
              obj.branch = item.branch;

              this.tableData.push(obj)

            })
          }
      },


      watch:{
        '$store.state.ServerNameAndBanrch':{
          handler:function () {
            this.dataVuex()
          },
          deep: true
        }

      },
      methods:{
        dataVuex(){
          console.log(this.$store.state.ServerNameAndBanrch);
          this.tableData = [];


          if(this.$store.state.ServerNameAndBanrch.length>0){
            this.$store.state.ServerNameAndBanrch.map(item =>{
              let obj={};
              obj.servername = item.servername;
              obj.branch = item.branch;
              this.tableData.push(obj)


            });
             console.log(this.tableData)
          }

        },
        /*顯示分支:將服務名傳遞到後端執行shell並返回執行結果*/
        ObtainBranch(index,servername){
          console.log('test',servername.servername)

        },
        /*刪除選項*/
        serverDelete(index,servername){
          this.$store.state.ServerNameAndBanrch.splice(index,1)
        }

      }
    }
說了很多,其實真正的功能還沒有說到,也就是上述截圖中的獲取分支,打包,還有重啓這幾個按鈕,這幾個按鈕的代碼沒有寫,但是使用的技術已經測試通過了,下面使用單獨的一篇來進行說明。
針對第一次下前端代碼的感悟:
第一次寫一定要邏輯清晰,否則就像我一樣修修改改很多次。
js中的基本操作一定要熟悉,如對數組,對象的操作。
還有就是router-view的使用,曾經自閉了很多次