


一、安裝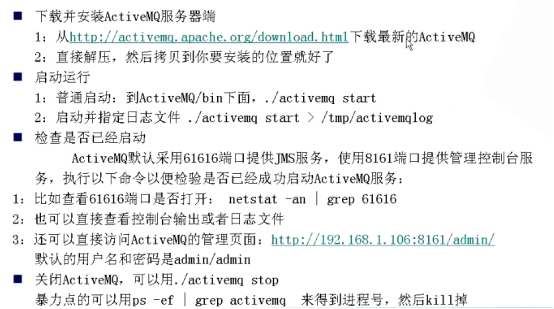
啓動之後成功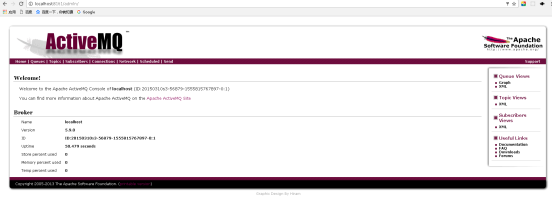
二、創建實例測試ActiveMQ
- 配置Maven所需的依賴
<dependency> <groupId>org.apache.activemq</groupId> <artifactId>activemq-all</artifactId> <version>5.9.0</version> </dependency> <dependency> <groupId>org.apache.xbean</groupId> <artifactId>xbean-spring</artifactId> <version>3.16</version> </dependency> -
消息發送
public class QueueSender {
public static void main(String[] args) throws Exception{
    //連接工廠
    ConnectionFactory connectionFactory = new ActiveMQConnectionFactory("tcp://localhost:61616");
    Connection connection = connectionFactory.createConnection();
    connection.start();

    //帶事務的session
    Session session = connection.createSession(Boolean.TRUE,Session.AUTO_ACKNOWLEDGE);
    Destination destination = session.createQueue("my-queue");
    MessageProducer producer = session.createProducer(destination);

    for (int i = 0; i < 3; i++) {
        TextMessage message = session.createTextMessage("message--"+i);
        Thread.sleep(1000);
        //通過消息生產者發出消息
        producer.send(message);
    }
    session.commit();
    session.close();
    connection.close();
}
}
運行main方法,控制檯輸出如下:

那這個消息發送到哪裏去了呢?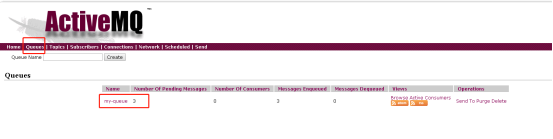
-
消息接收
public class QueueReceive {
public static void main(String[] args) throws Exception{
    //連接工廠
    ConnectionFactory connectionFactory = new ActiveMQConnectionFactory("tcp://localhost:61616");
    Connection connection = connectionFactory.createConnection();
    connection.start();

    //帶事務的session,並且自動簽收
    final Session session = connection.createSession(Boolean.TRUE,Session.AUTO_ACKNOWLEDGE);
    Destination destination = session.createQueue("my-queue");
    MessageConsumer consumer = session.createConsumer(destination);

    int i = 0;
    while (i<3){
        i++;
        TextMessage message = (TextMessage) consumer.receive();
        session.commit();
        System.out.println("收到的消息是:"+message.getText());
    }
    session.close();
    connection.close();
}
}
運行main方法
![ActiveMQ(二)——ActiveMQ的安裝和基本使用]()

此時再看服務器端會發送消息已經被接收處理了。