①:什麼是 WebSocket?
WebSocket 是一種在單個 TCP 連接上進行全雙工通信的協議
根據這個定義有兩個注意的地方:
1. 什麼是協議?
協議就是相互通信的計算機雙方必須共同遵守的一組約定。
2. WebSocket 協議和HTTP協議的區別?
1)HTTP協議基於 TCP 協議,建立鏈接必須通過三次握手才能發送信息。
2)http鏈接分爲短鏈接,長鏈接,短鏈接是每次請求都要三次握手才能發送自己的信息。即每一個request 對應一個 response。長鏈接是在一定的期限內保持鏈接。保持TCP連接不斷開。客戶端與服務器通信,必須要有客戶端發起然後服務器返回結果。客戶端是主動的,服務器是被動的。
3)WebSocket 他是爲了解決客戶端發起多個 http 請求到服務器資源瀏覽器必須要經過長時間的輪訓問題而生的,他實現了多路複用,他是全雙工通信。在 webSocket 協議下客服端和瀏覽器可以同時發送信息。
②:使用基於STOMP協議的WebSocket+Springboot實現簡易聊天室
1. 編寫配置文件
@Configuration
@EnableWebSocketMessageBroker   //通過此註解開啓 WebSocket 消息代理
public class WebSocketConfig implements WebSocketMessageBrokerConfigurer {

    @Override
    public void configureMessageBroker(MessageBrokerRegistry config) {
        //設置消息代理的前綴
        // 如果消息的前綴是 /topic 就會將消息轉發給消息代理(broker)再由消息代理轉發給所有連接的客戶端
        config.enableSimpleBroker("/topic");    //客戶端接收服務端消息的地址前綴

        //配置一個或多個前綴,通過這些前綴過濾出需要被註解方法處理的消息。
        // 例如前綴爲"/app"的 destination 可以通過 @MessageMapping 註解的方法處理,而其他 destination("/topic","/query") 將被直接交給 broker 處理
        config.setApplicationDestinationPrefixes("/app");   //客戶端給服務端發消息的地址前綴
    }

    @Override
    public void registerStompEndpoints(StompEndpointRegistry registry) {
        //定義一個前綴爲 "chat" 的endpoint,並開啓 sockJs支持。
        // sockJs 可以解決對 WebSocket 的兼容性問題,客戶端將通過這裏配置的 url 建立 WebSocket 連接
        registry.addEndpoint("/chat").withSockJS();
    }
}
2. 編寫控制器
@Controller
public class GreetingController {

    /**
     * 執行步驟:
     *  1,由 WebSocketConfig 中的配置,@MessageMapping 註解接收 "/app/hello" 路徑發來的消息
     *  2,註解方法對消息進行處理後,將消息轉發到 @SendTo 定義的路徑上
     *  3,@SendTo 定義的路徑是一個前綴爲 "/topic" 的路徑,由配置文件,此消息將被交給消息代理 broker,由 broker 進行廣播
     * @param message
     * @return
     */
    @MessageMapping("/hello")
    @SendTo("/topic/greetings")
    public Message greeting(Message message) {
        return message;
    }
}
3.html代碼
<!DOCTYPE html>
<html lang="en">
<head>
    <meta charset="UTF-8">
    <title>羣聊</title>
    <script src="/webjars/jquery/jquery.min.js"></script>
    <script src="/webjars/sockjs-client/sockjs.min.js"></script>
    <script src="/webjars/stomp-websocket/stomp.min.js"></script>
    <script src="/app.js"></script>
</head>
<body>
    <div>
        <label for="name">請輸入用戶名</label>
        <input type="text" id="name" placeholder="用戶名">
    </div>
    <div>
        <button id="connect"type="button">連接</button>
        <button id="disconnect"type="button" disabled="disabled">斷開連接</button>
    </div>
    <div id="chat" style="display: none;">
        <div>
            <label for="name">請輸入聊天內容</label>
            <input type="text" id="content" placeholder="聊天內容">
        </div>
        <button id="send" type="button">發送</button>
        <div id="greetings">
            <div id="conversation" style="display: none">羣聊進行中</div>
        </div>
    </div>
</body>
</html>
4. js文件
var stompClient = null;
//頁面顯示設置
function setConnected(connected) {
    $("#connect").prop("disabled", connected);
    $("#disconnect").prop("disabled", !connected);
    if (connected) {
        $("#conversation").show();
        $("#chat").show();
    } else {
        $("#conversation").hide();
        $("#chat").hide();
    }
    $("#greeting").html("");
}

//建立一個 WebSocket 連接,建立連接之前必須輸入用戶名
function connect() {
    if (!$("#name").val()) {
        return;
    }
    //創建一個 SockeJS 實例
    var socket = new SockJS('/chat');
    //使用stomp.over方式創建一個stompClient,完成客戶端的創建。
    stompClient = Stomp.over(socket);
    stompClient.connect({}, function (frame) {
        //進行頁面設置
        setConnected(true);
        //使用 subscribe 方法訂閱服務端發送回來的消息,並將服務端發送的消息展示出來
        stompClient.subscribe('/topic/greetings', function (greetings) {
            showGreeting(JSON.parse(greetings.body));
        })
    })
}

//斷開 WebSocket 連接
function disconnect() {
    if (stompClient != null) {
        stompClient.disconnect();
    }
    setConnected(false)
}

//發送信息
function sendName() {
    stompClient.send("/app/hello", {},
        JSON.stringify({'name': $('#name').val(), 'content': $('#content').val()}));
}

//展示信息
function showGreeting(message) {
    $('#greetings')
        .append("<div>" + message.name + ":" + message.content + "</div>")
}

$(function () {
    //建立連接
    $("#connect").click(function () {
        connect();
    });
    //斷開連接
    $("#disconnect").click(function () {
        disconnect();
    });
    //發送信息
    $("#send").click(function () {
        sendName();
    });
})
5.注意事項
1)maven 引入依賴錯誤(儘量去 maven 的中央倉庫拷貝依賴)
2)stomp 協議的引入
使用STOMP的好處在於,它完全就是一種消息隊列模式,你可以使用生產者與消費者的思想來認識它,發送消息的是生產者,接收消息的是消費者。而消費者可以通過訂閱不同的destination,來獲得不同的推送消息,不需要開發人員去管理這些訂閱與推送目的地之前的關係。 案例見spring官網就有一個簡單的spring-boot的stomp-demo,如果是基於springboot,大家可以根據spring上面的教程試着去寫一個簡單的demo。
③:換種方式實現羣發消息
控制器
    /**
     *  1. @MessageMapping("/hello") Spring提供一個 @MessageMapping 註解實現了對 WebScoket 的封裝
     *  2. SimpMessagingTemplate 是 Spring-WebSocket 內置的一個消息發送的工具
     * @param message
     * @throws Exception
     */
    @Autowired
    private SimpMessagingTemplate simpMessagingTemplate;
    @MessageMapping("/hello")
    public void  greeting(Message message) throws Exception{
        //使用這個方法進行消息的轉發發送
        simpMessagingTemplate.convertAndSend("/topic/greetings",message);
    }
④:實現點對點通信
剛剛實現的功能是羣發消息,下面看下私聊是如何實現的。點對點通信需要配置多個用戶,我們用 SpringSecurity 添加兩個用戶。
1. 添加 SpringSecurity 依賴
    <dependency>
        <groupId>org.springframework.boot</groupId>
        <artifactId>spring-boot-starter-security</artifactId>
    </dependency>
2. SpringSecurity 配置文件
@Configuration
public class WebSecurityConfig extends WebSecurityConfigurerAdapter {

    @Bean
    PasswordEncoder passwordEncoder() {
        return new BCryptPasswordEncoder();
    }

    @Override
    protected void configure(AuthenticationManagerBuilder auth) throws Exception {
        auth.inMemoryAuthentication()
                //添加兩個用戶 admin,sang,密碼設爲123。
                .withUser("admin")
                .password("$2a$10$RMuFXGQ5AtH4wOvkUqyvuecpqUSeoxZYqilXzbz50dceRsga.WYiq")
                .roles("admin")
                .and()
                .withUser("sang")
                .password("$2a$10$RMuFXGQ5AtH4wOvkUqyvuecpqUSeoxZYqilXzbz50dceRsga.WYiq")
                .roles("user");
    }

    @Override
    protected void configure(HttpSecurity http) throws Exception {
        http.authorizeRequests()
                .anyRequest().authenticated()
                .and()
                .formLogin().permitAll();
    }
}
3. 修改 WebSocket 配置文件
@Configuration
@EnableWebSocketMessageBroker   //通過此註解開啓 WebSocket 消息代理
public class WebSocketConfig implements WebSocketMessageBrokerConfigurer {

    @Override
    public void configureMessageBroker(MessageBrokerRegistry config) {

        //客戶端接收服務端消息的地址前綴
        //在羣發的基礎上,添加一個客戶端接收地址的前綴。
        config.enableSimpleBroker("/topic","/queue");

        //客戶端給服務端發消息的地址前綴
        config.setApplicationDestinationPrefixes("/app");
    }

    @Override
    public void registerStompEndpoints(StompEndpointRegistry registry) {
        //定義一個前綴爲 "chat" 的endpoint,並開啓 sockJs支持。
        // sockJs 可以解決對 WebSocket 的兼容性問題,客戶端將通過這裏配置的 url 建立 WebSocket 連接
        registry.addEndpoint("/chat").withSockJS();
    }
}
4. 修改控制器
@Controller
public class GreetingController {
@Autowired
private SimpMessagingTemplate simpMessagingTemplate;
//羣發消息使用 @SendTo 註解
@MessageMapping("/hello")
@SendTo("/topic/greetings")
public Message greeting(Message message) throws Exception{
return message;
}
//點對點發送消息使用 SimpMessagingTemplate 實現
@MessageMapping("/chat") //來自 "/app/chat" 的消息將會被此方法處理
public void chat(Principal principal, Chat chat)throws Exception{
String from = principal.getName();
chat.setFrom(from);
simpMessagingTemplate.convertAndSendToUser(chat.getTo(),"/queue/chat",chat);
}
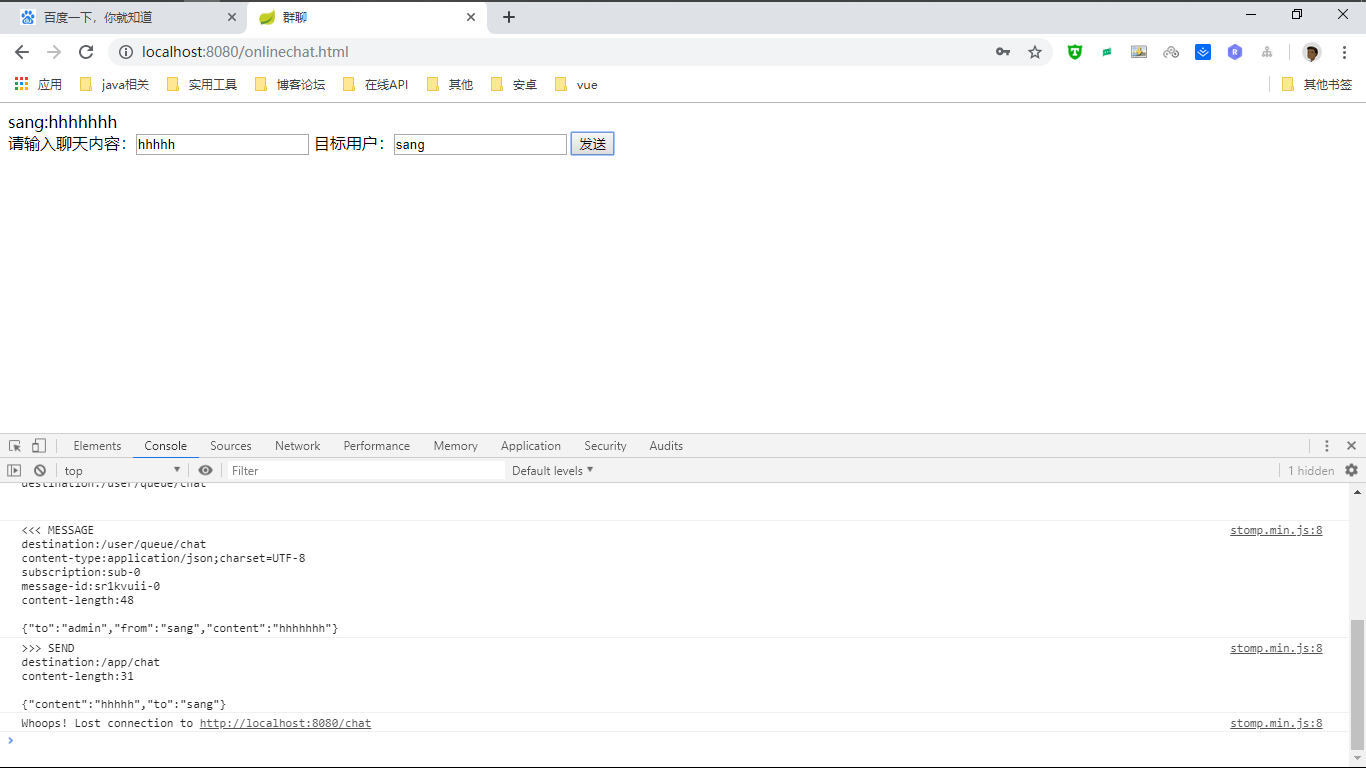
}5. onlinechat.html
<!DOCTYPE html>
<html lang="en">
<head>
    <meta charset="UTF-8">
    <title>羣聊</title>
    <script src="/webjars/jquery/jquery.min.js"></script>
    <script src="/webjars/sockjs-client/sockjs.min.js"></script>
    <script src="/webjars/stomp-websocket/stomp.min.js"></script>
    <script src="/chat.js"></script>
</head>
<body>

    <div>
        <div id="chatsContent"></div>
        <div>
            請輸入聊天內容:<input type="text" id="content" placeholder="聊天內容">
            目標用戶:<input type="text" id="to" placeholder="目標用戶">
            <button type="button" id="send">發送</button>
        </div>
    </div>

</body>
</html>
6. chat.js
var stompClient = null;

//建立一個 WebSocket 連接,建立連接之前必須輸入用戶名
function connect() {

    //創建一個 SockeJS 實例
    var socket = new SockJS('/chat');
    stompClient = Stomp.over(socket);
    stompClient.connect({}, function (frame) {
        //使用 subscribe 方法訂閱服務端發送回來的消息,並將服務端發送的消息展示出來
        stompClient.subscribe('/user/queue/chat', function (chat) {
            showGreeting(JSON.parse(chat.body));
        })
    })
}

//發送信息
function sendMsg() {
    stompClient.send("/app/chat", {},
        JSON.stringify({'content': $('#content').val(), 'to': $('#to').val()}));
}

//展示信息
function showGreeting(message) {
    $('#chatsContent')
        .append("<div>" + message.from + ":" + message.content + "</div>")
}

$(function () {
   connect();
   $('#send').click(function () {
       sendMsg();
   });
})
7. 目錄結構及演示效果
演示效果時請使用不同用戶登錄的同一瀏覽器或者不同瀏覽器演示