標準訪問控制列表
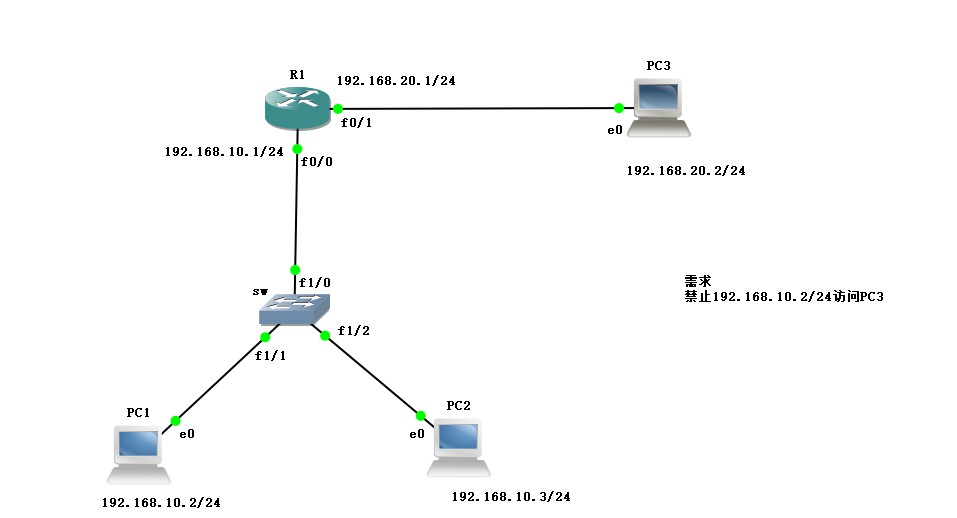
在GNS 3中拓撲實驗,配置一臺路由設備,一臺交換設備,分別連接三臺PC機,三臺PC機分別配置IP地址,並在路由設備中配置網關,如下圖所示,配置完成後配置標準訪問控制列表,禁止PC1與PC3通信,PC2與PC3正常通信。
1、首先進入交換設備進行配置
sw#conf t                             //進入全局模式
Enter configuration commands, one per line.  End with CNTL/Z.
sw(config)#no ip routing              //進入交換設備,關閉路由功能
sw(config)#int f1/0                   //進入f1/0接口
sw(config-if)#speed 100               //配置速率100
sw(config-if)#duplex full             //開啓雙工模式
2、進入路由設備,配置接口IP地址
R1#conf t                                          //進入全局模式
Enter configuration commands, one per line.  End with CNTL/Z.
R1(config)#int f0/0                                //進入f0/0接口
R1(config-if)#ip add 192.168.10.1 255.255.255.0    //添加IP地址
R1(config-if)#no shutdown                          //開啓接口
R1(config-if)#int f0/1                             //進入f0/1接口
R1(config-if)#ip add 192.168.20.1 255.255.255.0    //添加IP地址
R1(config-if)#no shutdown                          //開啓接口
R1(config-if)#exit
R1(config)#do show ip route
Codes: C - connected, S - static, R - RIP, M - mobile, B - BGP
       D - EIGRP, EX - EIGRP external, O - OSPF, IA - OSPF inter area
       N1 - OSPF NSSA external type 1, N2 - OSPF NSSA external type 2
       E1 - OSPF external type 1, E2 - OSPF external type 2
       i - IS-IS, su - IS-IS summary, L1 - IS-IS level-1, L2 - IS-IS level-2
       ia - IS-IS inter area, * - candidate default, U - per-user static route
       o - ODR, P - periodic downloaded static route

Gateway of last resort is not set

C    192.168.10.0/24 is directly connected, FastEthernet0/0
C    192.168.20.0/24 is directly connected, FastEthernet0/1
3、分別進入PC機,設置IP地址
PC1> ip 192.168.10.2 192.168.10.1
Checking for duplicate address...
PC1 : 192.168.10.2 255.255.255.0 gateway 192.168.10.1
PC2> ip 192.168.10.3 192.168.10.1
Checking for duplicate address...
PC1 : 192.168.10.3 255.255.255.0 gateway 192.168.10.1PC3> ip 192.168.20.2 192.168.20.1
Checking for duplicate address...
PC1 : 192.168.20.2 255.255.255.0 gateway 192.168.20.14、先測試PC1與PC2是否可以與PC3通信
PC1> ping 192.168.20.2
192.168.20.2 icmp_seq=1 timeout
84 bytes from 192.168.20.2 icmp_seq=2 ttl=63 time=20.913 ms
84 bytes from 192.168.20.2 icmp_seq=3 ttl=63 time=14.960 ms
84 bytes from 192.168.20.2 icmp_seq=4 ttl=63 time=17.917 ms
PC2> ping 192.168.20.2
84 bytes from 192.168.20.2 icmp_seq=1 ttl=63 time=19.021 ms
84 bytes from 192.168.20.2 icmp_seq=2 ttl=63 time=23.997 ms
84 bytes from 192.168.20.2 icmp_seq=3 ttl=63 time=21.941 ms
84 bytes from 192.168.20.2 icmp_seq=4 ttl=63 time=13.966 ms5、在路由設備中配置標準訪問控制列表,禁止PC1與PC3通信
R1(config)#access-list 1 deny 192.168.10.2 0.0.0.0
R1(config)#do show access-list
Standard IP access list 1
    10 deny   192.168.10.2
R1(config)#access-list 1 permit any
R1(config)#do show access-list
Standard IP access list 1
    10 deny   192.168.10.2
    20 permit any
R1(config-if)#ip access-group 1 in
6、測試PC1是否可以與PC3通信
PC1> ping 192.168.20.2
*192.168.10.1 icmp_seq=1 ttl=255 time=9.943 ms (ICMP type:3, code:13, Communication administratively prohibited)
*192.168.10.1 icmp_seq=2 ttl=255 time=3.990 ms (ICMP type:3, code:13, Communication administratively prohibited)
*192.168.10.1 icmp_seq=3 ttl=255 time=9.014 ms (ICMP type:3, code:13, Communication administratively prohibited)
7、測試PC2與PC3是否可以正常通信
PC2> ping 192.168.20.2
192.168.20.2 icmp_seq=1 timeout
192.168.20.2 icmp_seq=2 timeout
84 bytes from 192.168.20.2 icmp_seq=3 ttl=63 time=17.958 ms
84 bytes from 192.168.20.2 icmp_seq=4 ttl=63 time=19.981 ms
擴展訪問控制列表
實驗需求:
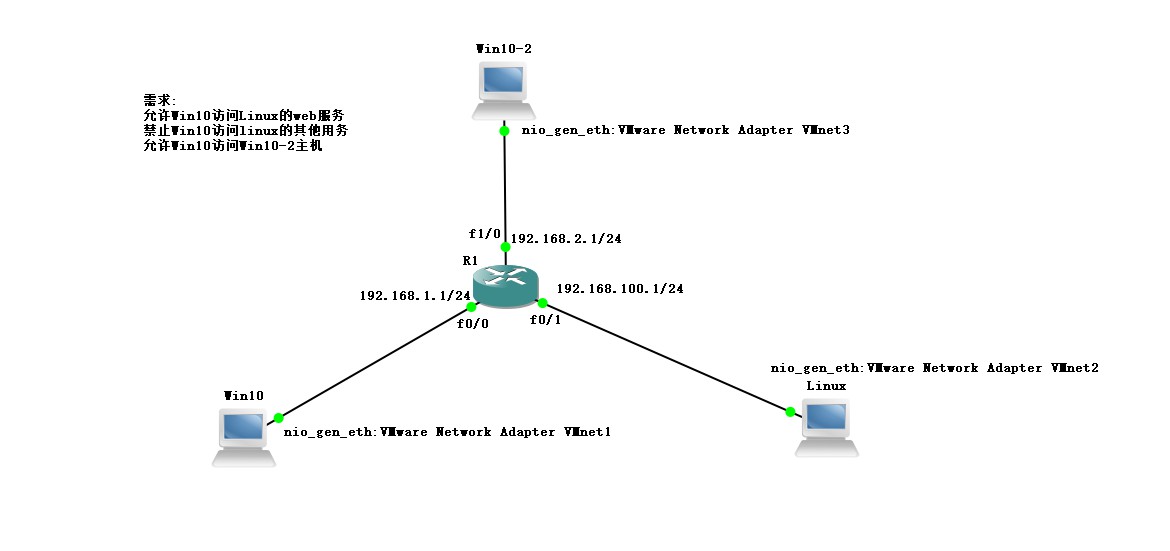
允許Win10訪問Linux的web服務
禁止Win10訪問linux的其他用務
允許Win10訪問Win10-2主機
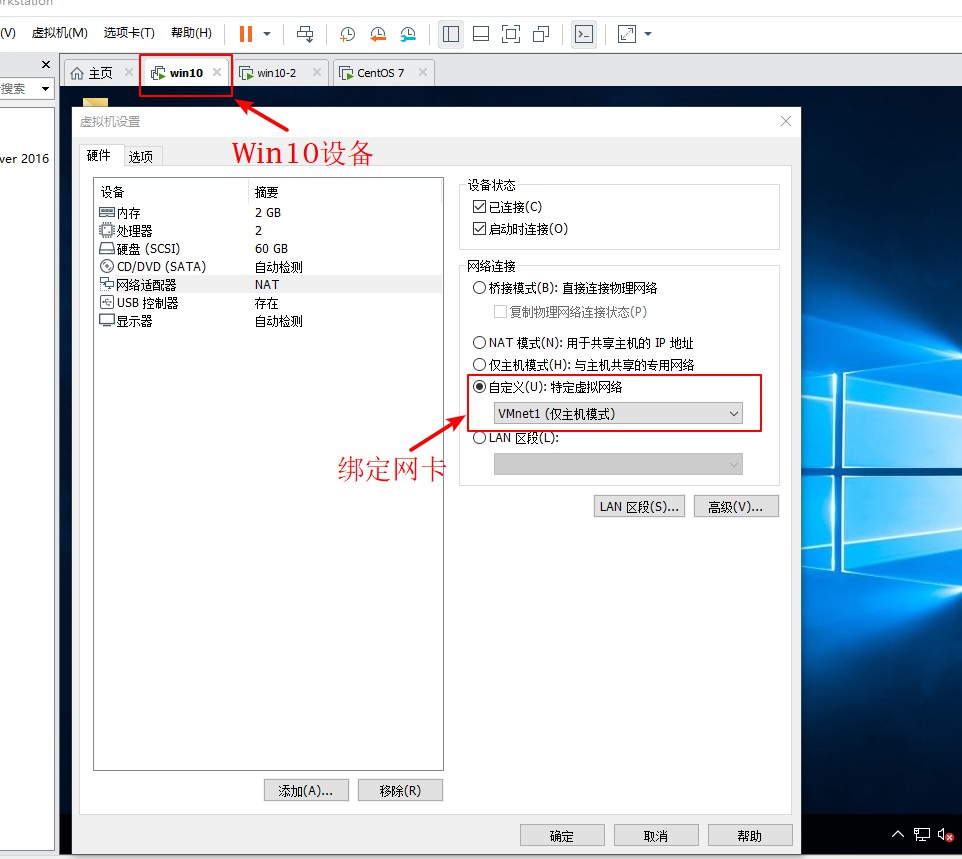
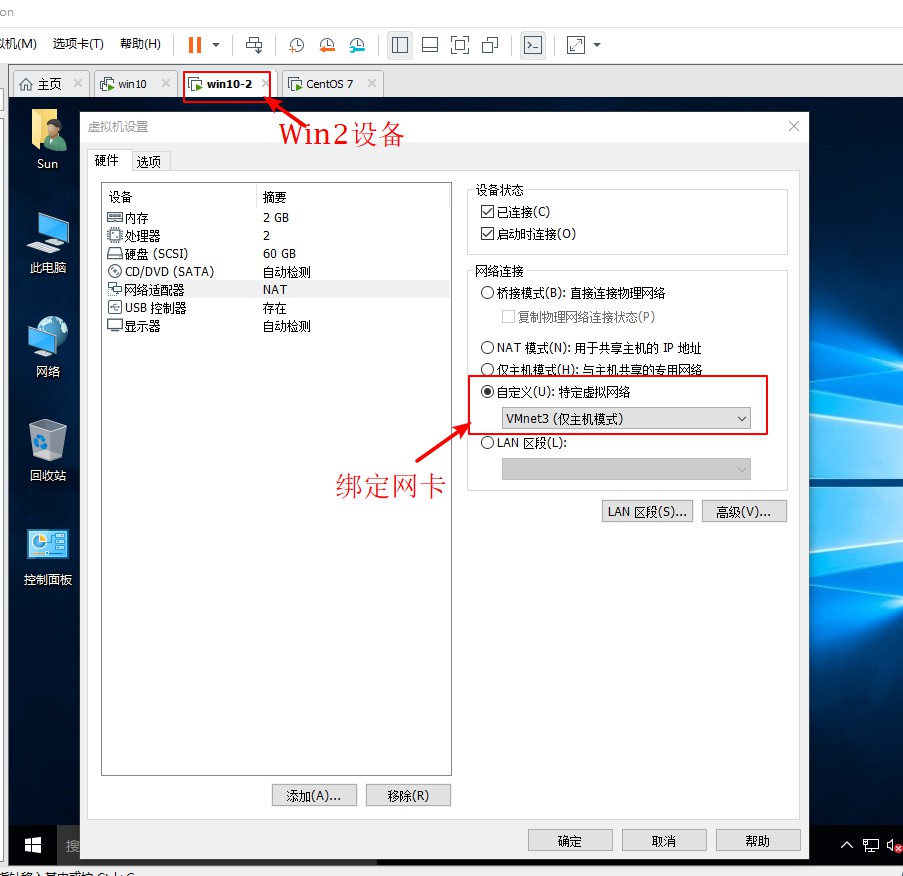
首先在GNS 3中拓撲實驗圖,配置一臺路由設備,在路由設備中添加一個網絡接口,配置三臺真實主機,一臺Linux系統,兩臺win10系統,分別連接路由設備,並在VMware中開啓主機,給三臺主機分別綁定VMnet1、VMnet2、VMnet3網卡,然後分別與路由器相連,並在路由器接口處標出將要劃分的三個網段,如圖:
 1、在Linux系統中安裝FTP與HTTP服務
[root@localhost ~]# yum install vsftpd -y
已加載插件:fastestmirror, langpacks
base                                                                  | 3.6 kB  00:00:00
extras                                                                | 2.9 kB  00:00:00
updates                                                               | 2.9 kB  00:00:00
(1/4): base/7/x86_64/group_gz                                         | 165 kB  00:00:00
...//省略部分內容...
Running transaction
  正在安裝    : vsftpd-3.0.2-25.el7.x86_64                                               1/1
  驗證中      : vsftpd-3.0.2-25.el7.x86_64                                               1/1

已安裝:
  vsftpd.x86_64 0:3.0.2-25.el7

完畢!
[root@localhost ~]# yum install httpd -y
已加載插件:fastestmirror, langpacks
Loading mirror speeds from cached hostfile
 * base: mirrors.nju.edu.cn
...//省略部分內容...
已安裝:
  httpd.x86_64 0:2.4.6-90.el7.centos

作爲依賴被安裝:
  apr.x86_64 0:1.4.8-5.el7                           apr-util.x86_64 0:1.5.2-6.el7
  httpd-tools.x86_64 0:2.4.6-90.el7.centos           mailcap.noarch 0:2.1.41-2.el7

完畢!
2、更改Linux系統中網卡信息,並在VMware中綁定VMnet2網卡並重啓虛擬機。
[root@localhost ~]# vim /etc/sysconfig/network-scripts/ifcfg-ens33
TYPE=Ethernet
PROXY_METHOD=none
BROWSER_ONLY=no
BOOTPROTO=static
DEFROUTE=yes
IPV4_FAILURE_FATAL=no
IPV6INIT=yes
IPV6_AUTOCONF=yes
IPV6_DEFROUTE=yes
IPV6_FAILURE_FATAL=no
IPV6_ADDR_GEN_MODE=stable-privacy
NAME=ens33
UUID=2ef6b862-5201-48c5-a450-23b3720ab3a0
DEVICE=ens33
ONBOOT=yes
IPADDR=192.168.100.100
NTEMASK=255.255.255.0
GATEWAY=192.168.100.1
~
~
:wq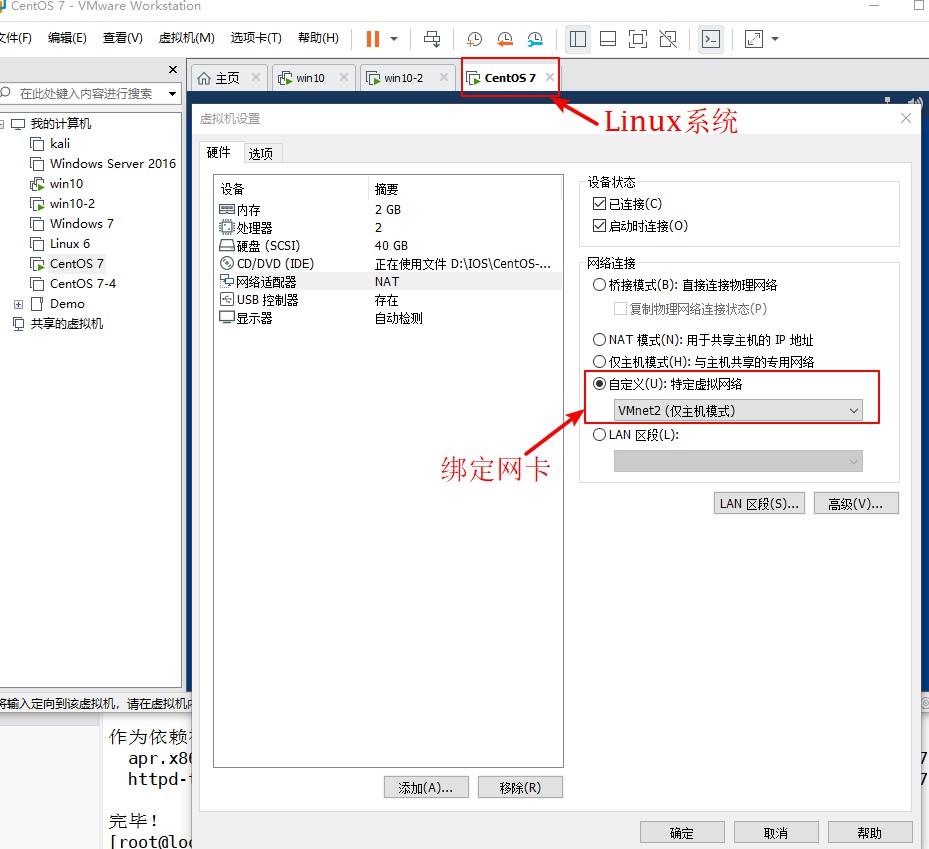
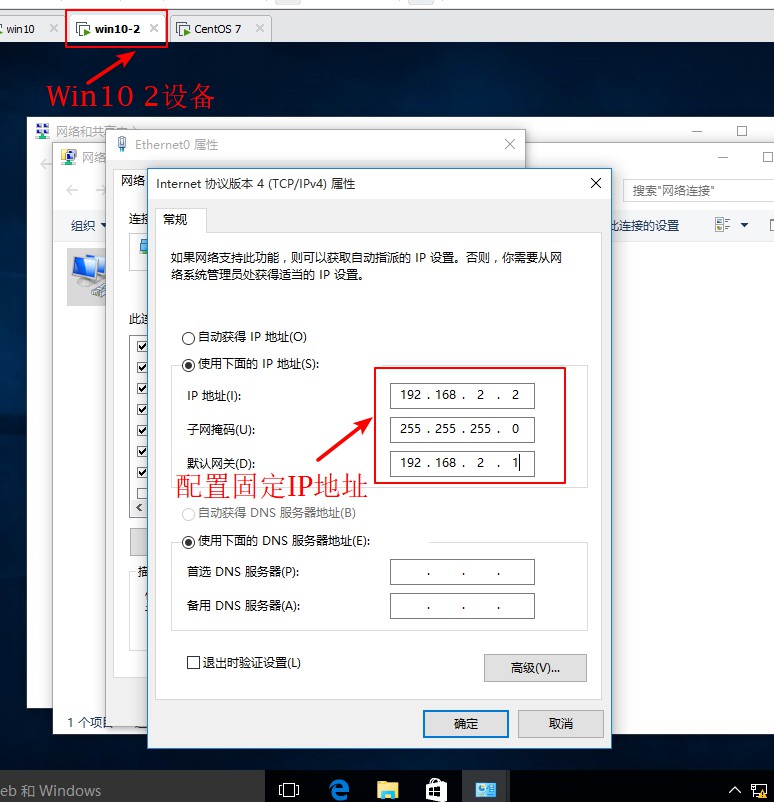
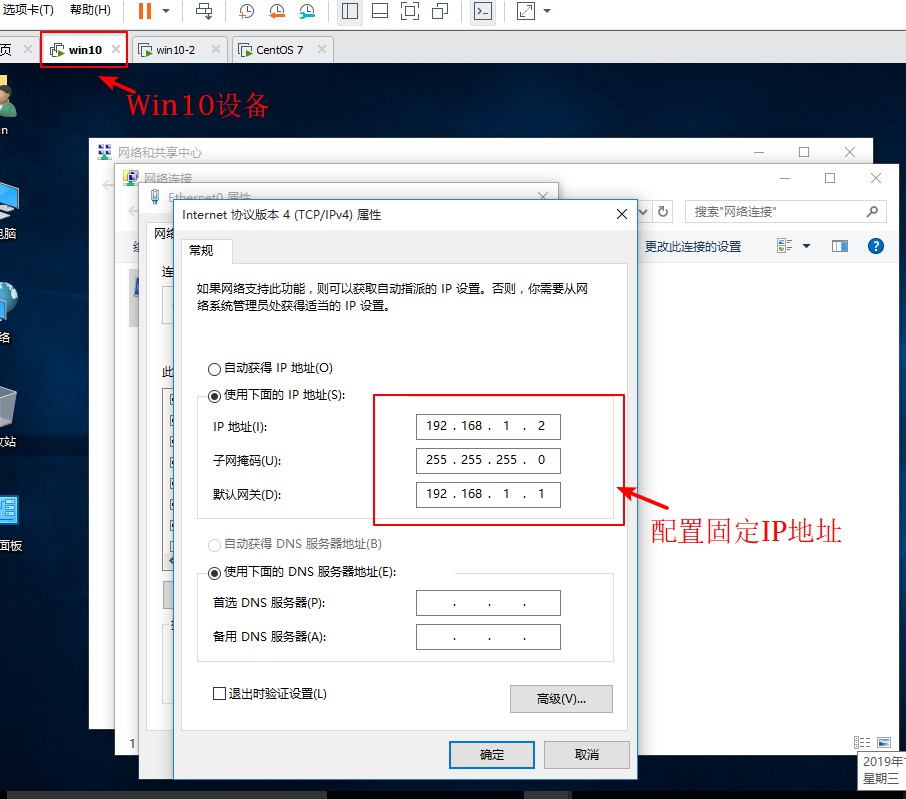
3、分別給兩臺Win10設備綁定網,然後分別配置固定IP地址,並關閉防火牆。
4、在GNS 3中開啓設備,並進路由入設備進行配置接口IP地址
R1#conf t //進入全局模式
Enter configuration commands, one per line. End with CNTL/Z.
R1(config)#int f0/0 //進入f0/0接口
R1(config-if)#ip add 192.168.1.1 255.255.255.0 //配置IP地址
R1(config-if)#no shut //開啓接口
*Mar 1 00:05:30.323: %LINK-3-UPDOWN: Interface FastEthernet0/0, changed state to up
*Mar 1 00:05:31.323: %LINEPROTO-5-UPDOWN: Line protocol on Interface FastEthernet0/0, changed state to up
R1(config-if)#int f0/1 //進入f0/1接口
R1(config-if)#ip add 192.168.100.1 255.255.255.0 //配置IP地址
R1(config-if)#no shut //開啓接口
*Mar 1 00:06:16.031: %LINK-3-UPDOWN: Interface FastEthernet0/1, changed state to up
*Mar 1 00:06:17.031: %LINEPROTO-5-UPDOWN: Line protocol on Interface FastEthernet0/1, changed state to up
R1(config-if)#int f1/0 //進入f1/0接口
R1(config-if)#ip add 192.168.2.1 255.255.255.0 //配置IP地址
R1(config-if)#no shut //開啓接口
*Mar 1 00:06:35.815: %LINK-3-UPDOWN: Interface FastEthernet1/0, changed state to up
*Mar 1 00:06:36.815: %LINEPROTO-5-UPDOWN: Line protocol on Interface FastEthernet1/0, changed state to up
R1(config-if)#do show ip route //查看路由表
Codes: C - connected, S - static, R - RIP, M - mobile, B - BGP
D - EIGRP, EX - EIGRP external, O - OSPF, IA - OSPF inter area
N1 - OSPF NSSA external type 1, N2 - OSPF NSSA external type 2
E1 - OSPF external type 1, E2 - OSPF external type 2
i - IS-IS, su - IS-IS summary, L1 - IS-IS level-1, L2 - IS-IS level-2
ia - IS-IS inter area, * - candidate default, U - per-user static route
o - ODR, P - periodic downloaded static route
Gateway of last resort is not set
C 192.168.1.0/24 is directly connected, FastEthernet0/0
C 192.168.2.0/24 is directly connected, FastEthernet1/0 //顯示網段信息
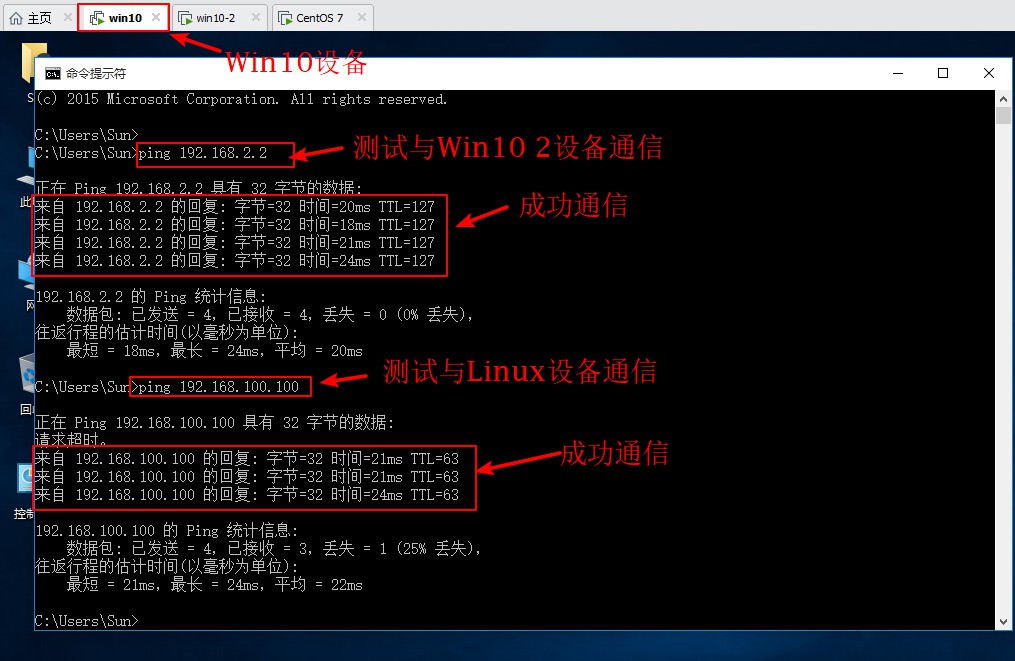
C 192.168.100.0/24 is directly connected, FastEthernet0/15、測試網絡連通性
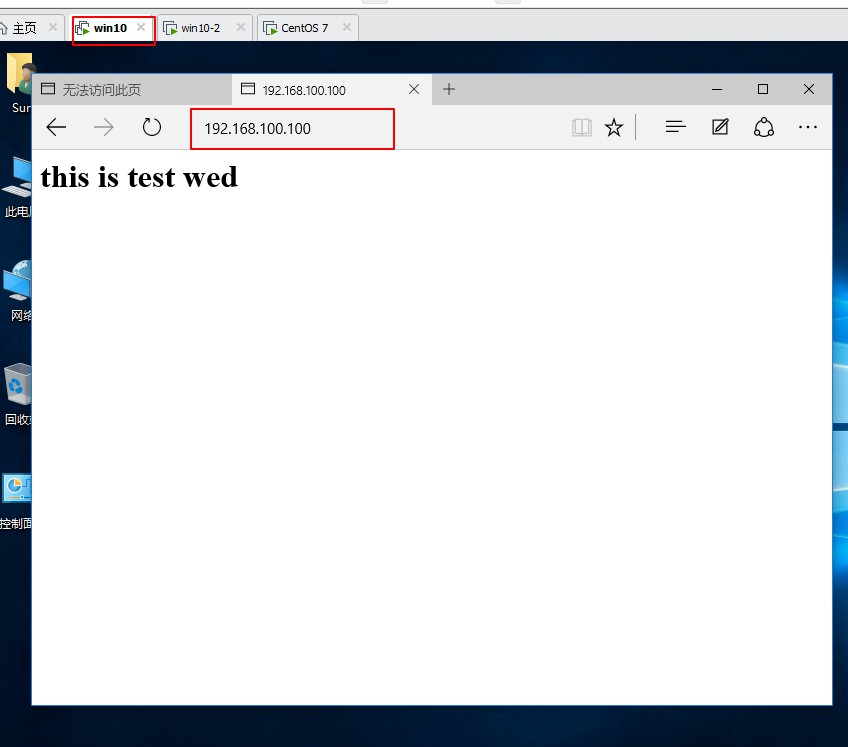
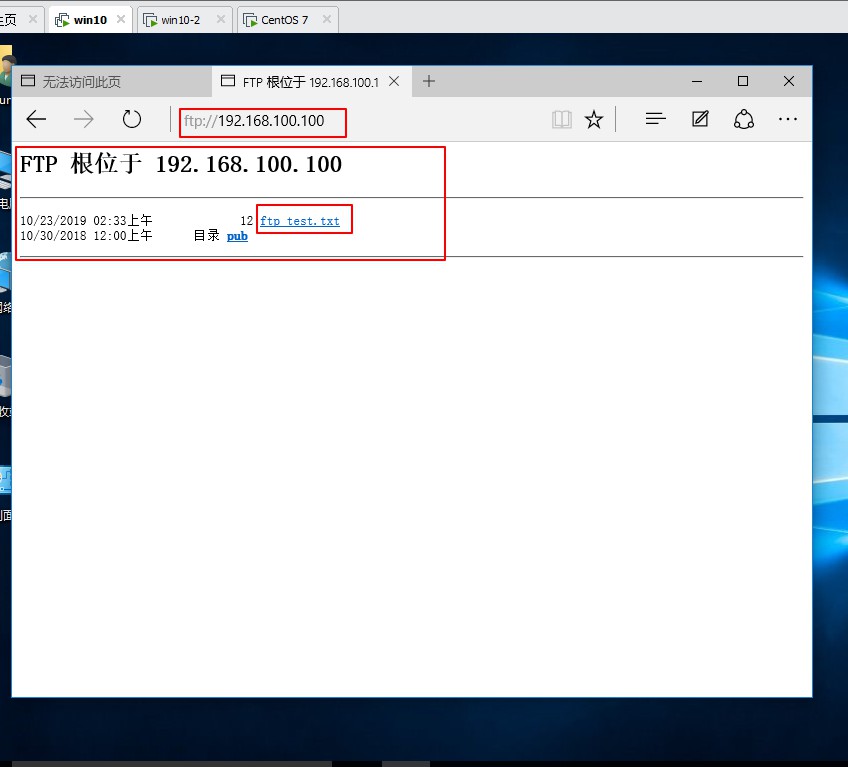
6、在Linux系統中編輯HTTP服務站點信息,並啓動服務,啓動FTP服務。
[root@localhost ~]# cd /var/www/html/ //進入站點
[root@localhost html]# vim index.html //編輯網頁
<h1>this is test wed</h1> //編輯內容
~
~
:wq //保存退出
[root@localhost html]# systemctl start httpd //啓動httpd服務
[root@localhost html]# systemctl stop firewalld.service //關閉防火情
[root@localhost html]# setenforce 0 //關閉增強性安全功能
[root@localhost html]# systemctl start vsftpd //啓動FTP服務
[root@localhost html]# netstat -ntap | egrep '(21|80)' //查看服務是否端口
tcp6 0 0 :::80 :::* LISTEN 3437/httpd
tcp6 0 0 :::21 :::* LISTEN 3766/vsftpd
[root@localhost html]# cd /var/ftp/ //進入FTP站點
[root@localhost ftp]# echo "this is ftp" > ftp_test.txt //生成txt文件
[root@localhost ftp]# ls //查看站點內容
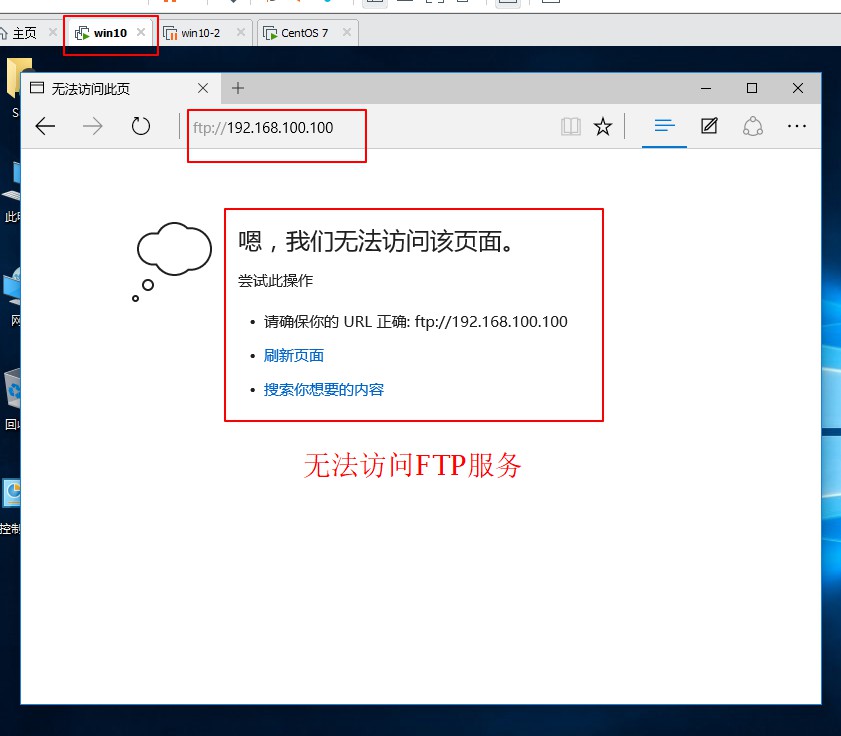
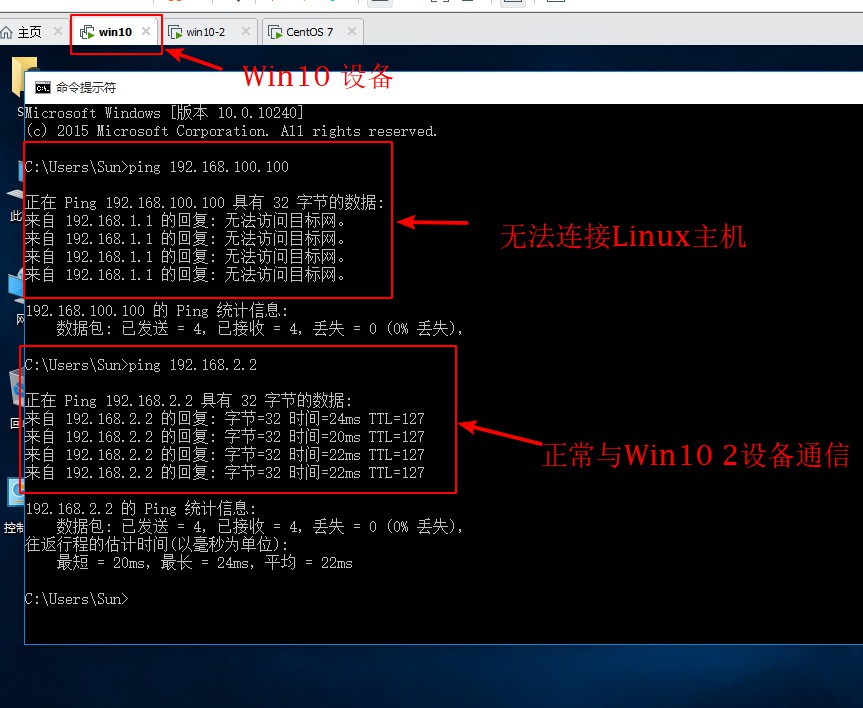
ftp_test.txt pub //顯示站點內容7、在win10設備中測試HTTP與FTP服務是否提供。
8、在GNS 3路由設備中配置ACL訪問控制條目
R1(config)#access-list 100 per               //設置win10主機允許訪問Linux系統HTTP服務
R1(config)#$ 100 permit tcp host 192.168.1.2 host 192.168.100.100 eq www
R1(config)#do show access-li                  //查看
Extended IP access list 100
    10 permit tcp host 192.168.1.2 host 192.168.100.100 eq www   //顯示列表信息
R1(config)#access-list 100 deny ip host 192.168.1.2 host 192.168.100.100  //配置拒絕訪問Linux其他服務
R1(config)#do show access-li                   //查看
Extended IP access list 100
    10 permit tcp host 192.168.1.2 host 192.168.100.100 eq www
    20 deny ip host 192.168.1.2 host 192.168.100.100                  //顯示列表信息
R1(config)#access-list 100 permit ip host 192.168.1.2 192.168.2.0 0.0.0.255
//配置win10設備允許訪問win10 2設備
R1(config)#do show access-li                 //查看
Extended IP access list 100
    10 permit tcp host 192.168.1.2 host 192.168.100.100 eq www
    20 deny ip host 192.168.1.2 host 192.168.100.100
    30 permit ip host 192.168.1.2 192.168.2.0 0.0.0.255      //顯示列表信息
R1(config)#int f0/0                 //進入接口
R1(config-if)#ip access-group 100 in    //將配置應用在接口,進入方向
9、測試配置結果