


1.虛擬專用網可以通過IPSec 虛擬專用網原理與配置理解虛擬專用網
2.IPsec 虛擬專用網故障排查
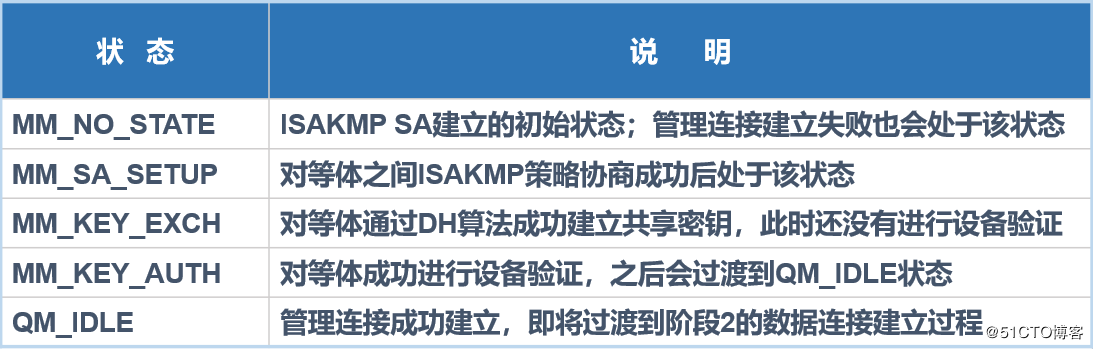
(show crypto isakmp)通過它可以瞭解管理連接所處的狀態
(debug crypto isakmp ) 通過該命令是實際工作中最常用於診斷和排查管理連接出現問題的命令
3.防火牆與路由器的區別
-
IKE協商默認是否開啓
默認情況下,IKE協商在路由器中是開啓的,而在ASA防火牆中是關閉的 -
隧道組特性引入
- 接口安全級別對於IPSec流量的影響
ASA(config)#same-security-traffic permit intra-interface
intra-interface 參數允許流量進入和離開都是同一個接口,多於L2L會話中的中心設備
4.配置案例如下:
要求:全網互通,並且pc機能夠訪問互聯網(R1)

實際上簡化圖爲:

(1)配置IP地址
R2,R3,R4和ASA-1,ASA-2,ASA-3都走一條默認 (R1就配IP)
如R2:
R2(config)#ip route 0.0.0.0 0.0.0.0 192.168.1.1
其它倆個路由器也做如上
防火牆配置如ASA-1:
ciscoasa(config)# int e0/1
ciscoasa(config-if)# nameif outside
ciscoasa(config-if)# security-level 0
ciscoasa(config)# int e0/0
ciscoasa(config-if)# nameif inside
ciscoasa(config-if)# security-level 100
ciscoasa(config)# route outside 0 0 201.0.0.2   //默認路由
其它倆個防火牆配置如這個,IP地址不同,注意不要配錯
(2)ASA1的配置:(lan1_lan2)
配置管理連接
ciscoasa(config)# crypto isakmp enable outside
ciscoasa(config)# crypto isakmp policy 1
ciscoasa(config-isakmp-policy)# authentication pre-share
ciscoasa(config-isakmp-policy)# encryption aes
ciscoasa(config-isakmp-policy)# hash md5
ciscoasa(config-isakmp-policy)# group 2
ciscoasa(config-isakmp-policy)# lifetime 10000
設置共享密鑰:
ciscoasa(config-isakmp-policy)# crypto isakmp key 2008.cn address 202.0.0.1也可
以使用另一種方法
 tunnel-group 202.0.0.1 type ipsec-l2l
  tunnel-group 202.0.0.1 ipsec-attributes
  pre-shared-key 2008.cn
配置數據連接
ciscoasa(config)#   access-list lan1_lan2 permit ip 192.168.1.0 255.255.255.0 192.168.2.0 255.255.255.0
crypto ipsec transform-set test-set esp-aes esp-md5-hmac
ciscoasa(config)# crypto map test-map 1 match address lan1_lan2
ciscoasa(config)# crypto map test-map 1 set peer 202.0.0.1   //對端的IP
ciscoasa(config)# crypto map test-map 1 set transform-set test-set
ciscoasa(config)# crypto map test-map interface outside   //應用到外接口上
在ASA-2上配置如下:
ciscoasa(config)# crypto isakmp enable outside
ciscoasa(config)# crypto isakmp policy 1
ciscoasa(config-isakmp-policy)# authentication pre-share
ciscoasa(config-isakmp-policy)# encryption aes
ciscoasa(config-isakmp-policy)# hash md5
ciscoasa(config-isakmp-policy)# group 2
ciscoasa(config-isakmp-policy)# lifetime 10000
ciscoasa(config-isakmp-policy)# crypto isakmp key 2008.cn address 201.0.0.1
配置數據連接
ciscoasa(config)# access-list lan2_lan1 permit ip 192.168.2.0 255.255.255.0 192.168.1.0 255.255.255.0
ciscoasa(config)# crypto ipsec transform-set test-set esp-aes esp-md5-hmac
ciscoasa(config)# crypto map test-map 1 match address lan2_lan1
ciscoasa(config)# crypto map test-map 1 set peer 201.0.0.1
ciscoasa(config)# crypto map  test-map 1 set transform-set test-set
ciscoasa(config)# crypto map test-map interface outside   //應用到外接口
這時lan1與lan2可以互通了
R2#ping 192.168.2.10

Type escape sequence to abort.
Sending 5, 100-byte ICMP Echos to 192.168.2.10, timeout is 2 seconds:
..!!!
Success rate is 60 percent (3/5), round-trip min/avg/max = 72/156/296 ms
開始做lan1與lan3互通
ASA-1配置如下:(稍微修改一下就可以)
ciscoasa(config)# tunnel-group 203.0.0.1 type ipsec-l2l
ciscoasa(config)# tunnel-group 203.0.0.1 ipsec-attributes
ciscoasa(config-tunnel-ipsec)# pre-shared-key 2008.cn
配置ACL
ciscoasa(config)#  access-list lan1_lan3 permit ip 192.168.1.0 255.255.255.0 192.168.3.0 255.255.255.0
ciscoasa(config)# crypto map test-map 2 match address lan1_lan3
ciscoasa(config)# crypto map test-map 2 set peer 203.0.0.1
ciscoasa(config)# crypto map test-map 2 set transform-set test-set
ASA-3配置如下:
ciscoasa(config)#crypto isakmp enable outside   //開啓IKE協商功能
ciscoasa(config)# crypto isakmp policy 1
ciscoasa(config-isakmp-policy)# authentication pre-share
ciscoasa(config-isakmp-policy)# encryption aes
ciscoasa(config-isakmp-policy)# hash md5
ciscoasa(config-isakmp-policy)# lifetime 10000
ciscoasa(config-isakmp-policy)# crypto isakmp key 2008.cn address 203.0.0.2
ciscoasa(config)# access-list lan3_lan1 permit ip 192.168.3.0 255.255.255.0 192.168.1.0 255.255.255.0
ciscoasa(config)# crypto ipsec transform-set test-set esp-aes esp-md5-hmac
ciscoasa(config)# crypto map test-map 1 match address lan3_lan1
ciscoasa(config)# crypto map test-map 1 set peer 201.0.0.1
ciscoasa(config)# crypto map test-map 1 set transform-set test-set
ciscoasa(config)# crypto map test-mao interface outside 實現lan2_lan3 虛擬專用網通信,中間經過lan1轉發
ASA1上需添加的配置:
ciscoasa(config)# same-security-traffic permit intra-interface  //允許流量進入和離開同一個接口
iscoasa(config)#access-list lan1_lan2  permit ip 192.168.3.0 255.255.255.0 192.168.2.0 255.255.255.0
iscoasa(config)#access-list lan1_lan3  permit ip 192.168.2.0 255.255.255.0 192.168.3.0 255.255.255.0
ASA2上配置:
添加ACL
ciscoasa(config)# access-list lan2_lan1 permit ip 192.168.2.0 255.255.255.0 192.168.3.0 255.255.255.0ASA3上配置:
添加ACL
ciscoasa(config)#access-list lan3_lan1 permit ip 192.168.3.0 255.255.255.0 192.168.2.0 255.255.255.0
如果需要讓公司的其他網段能訪問互聯網,需要在ASA上做PAT,並啓用nat控制,豁免虛擬專用網的流量
啓用
nat-control
ciscoasa(config)#nat (inside) 1  0  0
ciscoasa(config)#global (outside) 1 interface
ciscoasa(config)#access-list asd  permit ip 192.168.1.0 255.255.255.0 192.168.2.0 255.255.255.0
ciscoasa(config)#access-list asd  permit ip 192.168.1.0 255.255.255.0 192.168.3.0 255.255.255.0
ciscoasa(config)#nat (inside) 0 access-list asd
ASA2上配置:
ciscoasa(config)#nat (inside) 1  0  0
ciscoasa(config)#global (outside) 1 interface
ciscoasa(config)#nat (inside) 0 access-list lan2_lan1
ASA3上配置:
ciscoasa(config)#nat (inside) 1  0  0
ciscoasa(config)#global (outside) 1 interface
ciscoasa(config)#nat (inside) 0 access-list lan3_lan1
全網互通