配置Nginx隱藏版本號
在生產環境中,需要隱藏Nginx的版本號,以避免安全
漏洞的泄漏
查看方法
●使用fiddler I具在Windows客戶端查看Nginx版本號
在CentOS系統中使用“curl -I 網址”命令查看
Nginx隱藏版本號的方法
●修改配置文件法
●修改源碼法
修改配置文件法
1.Nginx的配置文件中的server_ tokens 選項的值設置爲off
[root@www conf]# vim nginx.conf
.....
server_ tokens off;
.....
[root@www conf]# nginx -t
2.重啓服務,訪問網站使用curl -I命令檢測
[root@www conf]# service nginx restart
[root@www conf]# curl -1 http://192.1 68.9.209/
HTTP/1.1200 OK
Server: nginx
3.若php配置文件中配置了fastcgi param SERVER SOFTWARE選項。則編輯php-fpm配置文件,將fastcgi param SERVER SOFTWARE對應的值修改爲
fastcgi_ param SERVER_ SOFTWARE nginx ;修改源碼法
Nginx源碼文件/usr/src/nginx-1.12.0/src/core/nginx.h包含了版本信息,可以隨意設置重新編譯安裝,隱藏版本信息
示例:
#define NGINX_ _VERSION“1.1.1” ,修改版本號爲1.1.1
#define NGINX_ VER "IIS/" ,修改軟件類型爲IIS
重啓服務,訪問網站使用curl -I命令檢測
修改Nginx用戶與組
Nginx運行時進程需要有用戶與組的支持,以實現對網站文件讀取時進行訪問控制
Nginx默認使用nobody用戶賬號與組賬號,一般也要進行修改
修改的方法
●編譯安裝時指定用戶與組
●修改配置文件指定用戶與組
修改配置文件法指定
1.新建用戶賬號,如nginx
2.修改主配置文件user選項,指定用戶賬號
3.重啓nginx服務,使配置生效
4.使用ps aux命令查看nginx的進程信息,驗證運行用戶
賬號改變效果
[root@www conf]# vi nginx.conf
user nginx nginx;
[root@www conf]# service nginx restart
[root@www conf]# ps aux lgrep nginx
root        1300340.0 0.0 20220 620? Ss 19:41 0:00 nginx: master process
/usr/local/sbin/nginx
nginx   1300350.0 0.0 20664 1512 ?S 19:41 0:00 nginx: worker process
配置Nginx網頁緩存時間
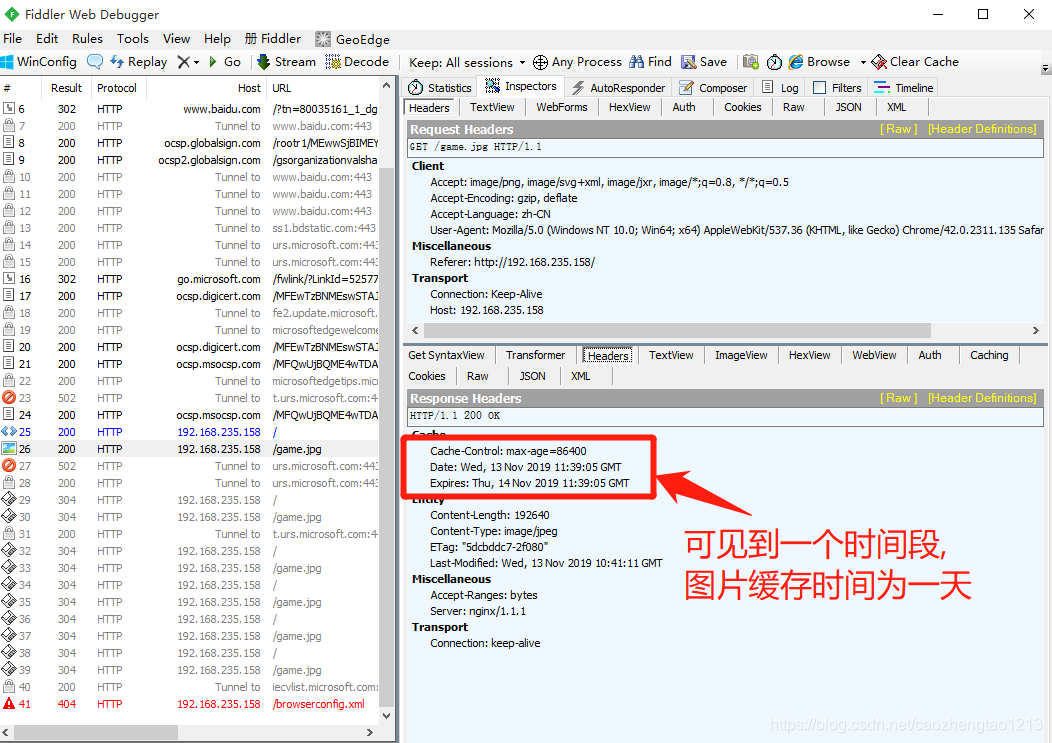
當Nginx將網頁數據返回給客戶端後,可設置緩存的時間,以方便在日後進行相同內容的請求時直接返回,避免重複請求,加快了訪問速度般針對靜態網頁設置,對動態網頁不設置緩存時間,可在Windows客戶端中使用fiddler查看網頁緩存時間
設置方法
可修改配置文件,在http段、 或者server段、 或者location段加入對特定內容的過期參數
示例
修改Nginx的配置文件,在location段加入expires參數
location ~ \.(gifjpgliepglpnglbmplico)$ {
root html;
expires 1d;
隱藏版本號實例演示
一、編譯安裝Nginx服務
第一步:遠程獲取Windows上的源碼包,並掛載到Linux上
[root@localhost ~]# smbclient -L //192.168.235.1
Enter SAMBA\root's password:
Sharename       Type      Comment
---------       ----      -------
LNMP            Disk

[root@localhost ~]# mkdir /abc
[root@localhost ~]# mount.cifs //192.168.235.1/LNMP /abc
Password for root@//192.168.235.1/LNMP:
[root@localhost ~]# ls /abc
Discuz_X3.4_SC_UTF8.zip    nginx-1.12.2.tar.gz
game.jpg                   php-7.1.10.tar.bz2
mysql-boost-5.7.20.tar.gz  php-7.1.20.tar.gz
nginx-1.12.0.tar.gz
第二步:解壓源碼包
[root@localhost ~]# cd /abc
[root@localhost abc]# tar zxvf nginx-1.12.0.tar.gz -C /opt
[root@localhost abc]# ls /opt
nginx-1.12.0  rh
第三步:下載安裝編譯組件包
[root@localhost abc]# cd /opt
[root@localhost opt]# yum install -y \
> gcc \             //C語言
> gcc-c++ \         //c++語言
> pcre-devel \      //pcre語言工具
> zlib-devel        //壓縮函數庫
第四步:創建程序用戶並配置Nginx服務相關組件
[root@localhost opt]# useradd -M -s /sbin/nologin nginx
//創建程序用戶nginx,並限定其不可登錄終端
[root@localhost opt]# cd nginx-1.12.0/
[root@localhost nginx-1.12.0]# ./configure \
//配置nginx
> --prefix=/usr/local/nginx \
//指定安裝路徑
> --user=nginx \
//指定用戶名
> --group=nginx \
//指定用戶所屬組
> --with-http_stub_status_module
//安裝狀態統計模塊
第五步:編譯與安裝Nginx
[root@localhost nginx-1.12.0]# make && make install第六步:優化Nginx服務啓動腳本,並建立命令軟連接
[root@localhost nginx-1.12.0]# ln -s /usr/local/nginx/sbin/nginx /usr/local/sbin/
//創建nginx服務命令軟鏈接到系統命令
[root@localhost nginx-1.12.0]# systemctl stop firewalld.service
//關閉防火牆
[root@localhost nginx-1.12.0]# setenforce 0
//關閉增強型安全功能
[root@localhost nginx-1.12.0]# nginx
//輸入nginx 開啓服務
[root@localhost nginx-1.12.0]# netstat -ntap | grep 80      //查看服務的80 端口,顯示已開啓
tcp        0      0 0.0.0.0:80              0.0.0.0:*               LISTEN      7520/nginx: master
第七步:systemctl管理nginx腳本
[root@localhost ~]# vim /lib/systemd/system/nginx.service      ##創建配置文件

[Unit]
Description=nginx                                            ##描述
After=network.target                                        ##描述服務類型
[Service]
Type=forking                                                    ##後臺運行形式
PIDFile=/usr/local/nginx/logs/nginx.pid            ##PID文件位置
ExecStart=/usr/local/nginx/sbin/nginx              ##啓動服務
ExecReload=/usr/bin/kill -s HUP $MAINPID    ##根據PID重載配置
ExecStop=/usr/bin/kill -s QUIT $MAINPID       ##根據PID終止進程
PrivateTmp=true
[Install]
WantedBy=multi-user.target

[root@localhost ~]# chmod 754 /lib/systemd/system/nginx.service     ##設置執行權限
[root@localhost ~]# systemctl stop nginx.service       ##關閉nginx
[root@localhost ~]# systemctl start nginx.service       ##開啓nginx
二、修改配置文件法隱藏版本號
第一步:默認情況下查看Nginx版本號
[root@localhost ~]# curl -I http://192.168.235.158      ##查看版本號
HTTP/1.1 200 OK
Server: nginx/1.12.0
##可見版本號爲1.12.0
Date: Wed, 13 Nov 2019 08:32:59 GMT
Content-Type: text/html
Content-Length: 612
Last-Modified: Wed, 06 Nov 2019 01:53:19 GMT
Connection: keep-alive
ETag: "5dc2278f-264"
Accept-Ranges: bytes
第二步:修改nginx.conf配置文件
[root@localhost ~]# vim /usr/local/nginx/conf/nginx.conf

http {
    include       mime.types;
    default_type  application/octet-stream;
    server_tokens off;
##在http協議段落中加入server_ tokens選項的值設置爲off即可
第三步:驗證Nginx版本號隱藏
[root@localhost ~]# systemctl stop nginx.service
[root@localhost ~]# systemctl start nginx.service
[root@localhost ~]# curl -I http://192.168.235.158
HTTP/1.1 200 OK
Server: nginx
##可見版本號已被隱藏
Date: Wed, 13 Nov 2019 09:18:00 GMT
Content-Type: text/html
Content-Length: 612
Last-Modified: Wed, 06 Nov 2019 01:53:19 GMT
Connection: keep-alive
ETag: "5dc2278f-264"
Accept-Ranges: bytes
三、修改配置源碼法法隱藏版本號
第一步:修改nginx.conf配置文件
[root@localhost ~]# vim /usr/local/nginx/conf/nginx.conf
...
 server_tokens on;
 ##將off替換成on
第二步:修改源碼文件nginx.h中的版本信息
[root@localhost ~]# vim /opt/nginx-1.12.0/src/core/nginx.h

#define NGINX_VERSION      "1.1.1"
##更改版本信息爲1.1.1
第三步:重新編譯Nginx
[root@localhost ~]# cd /opt/nginx-1.12.0/

[root@localhost nginx-1.12.0]# ./configure \
> --prefix=/usr/local/nginx \
> --user=nginx \
> --group=nginx \
> --with-http_stub_status_module

[root@localhost nginx-1.12.0]# make && make install
第四步:驗證Nginx版本號隱藏
[root@localhost nginx-1.12.0]# curl -I http://192.168.235.158
HTTP/1.1 200 OK
Server: nginx/1.1.1
##可見版本號已成功更改爲1.1.1
Date: Wed, 13 Nov 2019 10:20:23 GMT
Content-Type: text/html
Content-Length: 612
Last-Modified: Wed, 06 Nov 2019 01:53:19 GMT
Connection: keep-alive
ETag: "5dc2278f-264"
Accept-Ranges: bytes
網頁緩存時間實例演示
第一步:複製圖片到站點目錄
[root@localhost nginx-1.12.0]# ls /abc
Discuz_X3.4_SC_UTF8.zip    nginx-1.12.2.tar.gz
game.jpg                   php-7.1.10.tar.bz2
mysql-boost-5.7.20.tar.gz  php-7.1.20.tar.gz
nginx-1.12.0.tar.gz
[root@localhost nginx-1.12.0]# cp /abc/game.jpg /usr/local/nginx/html/
[root@localhost nginx-1.12.0]# cd /usr/local/nginx/html/
[root@localhost html]# ls
50x.html  game.jpg  index.html
第二步:修改Nginx的index.html網頁
[root@localhost html]# vim index.html

<h1>Welcome to nginx!</h1>
<img src="game.jpg"/>
##在h1標籤下添加圖片路徑
第三步:修改Nginx .conf文件
[root@localhost html]# vim /usr/local/nginx/conf/nginx.conf

user nginx nginx;
##單獨輸入此行條目,指定用戶nginx,指定組nginx

 location ~\.(gif|jepg|jpg|ico|bmp|png)$ {
            root html;
            expires 1d;
            ##上述圖片類型圖片緩存一天
        }

[root@localhost html]# systemctl stop nginx.service
[root@localhost html]# systemctl start nginx.service
第四步:打開一臺Win10虛擬機驗證
在客戶機中安裝fiddler.exe抓包軟件,並打開瀏覽器訪問192.168.235.158網頁