


Nginx動靜分離介紹
Nginx的靜態處理能力很強,但是動態處理能力不足,因此在企業中常用動靜分離技術
針對PHP的動靜分離
●靜態頁面交給Nginx處理
●動態頁面交給PHP-FPM模塊或Apache處理
在Nginx的配置中,是通過location配置段配合正則匹配實現靜態與動態頁面的不同處理方式
Nginx反向代理原理
Nginx不僅能作爲Web服務器,還具有反向代理、負載均衡和緩存的功能。Nginx通過proxy模塊實現將客戶端的請求代理至,上游服務器,此時nginx與.上游服務器的連接是通過http協議進行的。Nginx在實現反向代理功能時的最重要指令爲proxy_ _pass, 它能夠並能夠根據URI、客戶端參數或其它的處理邏輯將用戶請求調度至.上游服務器。
Nginx動靜分離實例演示
需求與架構:
根據企業需要,將配置Nginx實現動靜分離,對php頁面的請求轉發給L AMP處理,而靜態頁面交給Nginx處理,以實現動靜分離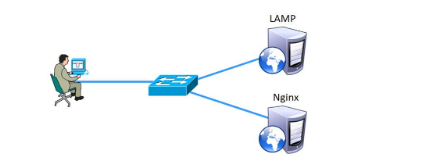
| 服務項目 | IP地址 |
|---|---|
| LAMP架構 | 192.168.235.137 |
| Nginx | 192.168.235.158 |
一、架設並配置LAMP環境
yum install httpd httpd-devel -y
##使用yum安裝架構
systemctl start httpd.service
##啓動服務
[root@localhost ~]# firewall-cmd --permanent --zone=public --add-service=http ##防火牆公共區域增加http協議
success
[root@localhost ~]# firewall-cmd --permanent --zone=public --add-service=https ##防火牆公共區域增加https協議
success
[root@localhost ~]# firewall-cmd --reload ##重載防火牆
success
[root@localhost ~]# yum install mariadb mariadb-server mariadb-libs mariadb-devel -y
##使用yum安裝MYSQL數據庫,mariadb數據庫管理系統是MYSQL數據庫的分支
[root@localhost ~]# systemctl start mariadb
##啓動數據庫
[root@localhost ~]# mysql_secure_installation ##設置數據庫
Enter current password for root (enter for none):
##此處但回車鍵
Set root password? [Y/n] y
##此處輸入y已確定設置密碼
New password:
##輸入密碼abc123
Re-enter new password:
##再次確認密碼輸入
Remove anonymous users? [Y/n] n
##輸入n以否定移除所有匿名用戶
Disallow root login remotely? [Y/n] n
##此處輸入n以否定使用root身份遠程登錄
Remove test database and access to it? [Y/n] n
##此處輸入n以否定刪除測試數據庫並訪問它
Reload privilege tables now? [Y/n] y
##此處輸入n以確定重載數據庫
[root@localhost ~]# yum -y install php
##使用yum安裝php
[root@localhost ~]# yum install php-mysql -y
##建立php和mysql關聯
[root@localhost ~]# yum install -y php-gd php-ldap php-odbc php-pear php-xml php-xmlrpc php-mbstring php-snmp php-soap curl curl-devel php-bcmath
##安裝php插件
[root@localhost ~]# cd /var/www/html
##進入站點目錄
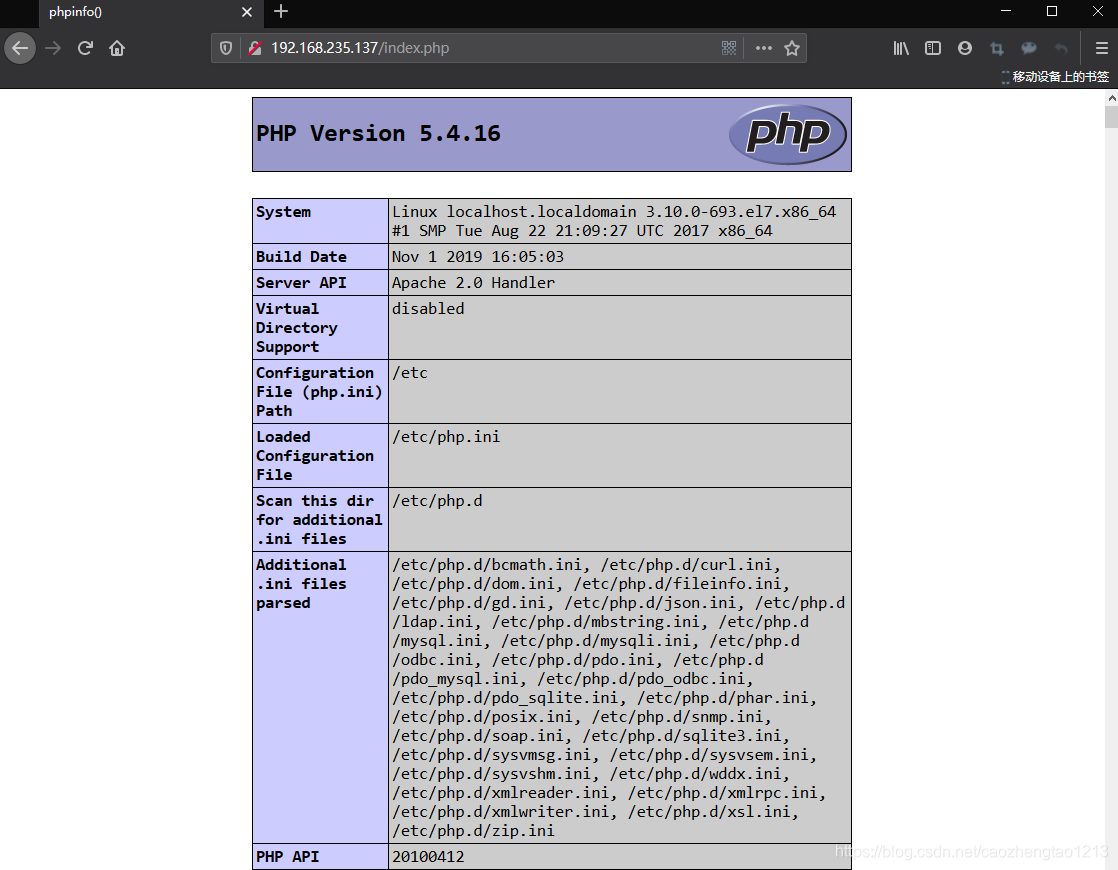
[root@localhost html]# vim index.php
##編輯php網頁
<?php
phpinfo();
?>
[root@localhost html]# systemctl restart httpd.service
##重啓服務訪問192.168.235.137/index.php的Apache網頁
[root@localhost ~]# cd /var/www/html
[root@localhost html]# vim index.php
##修改網頁輸出內容
<?php
  echo "apache web";
?>
二、安裝配置Nginx服務
第一步:在Linux上使用遠程共享獲取來自Windows共享的源碼包
[root@localhost ~]# smbclient -L //192.168.235.1/
##遠程共享訪問
Enter SAMBA\root's password:

                Sharename       Type      Comment
                ---------       ----      -------
                LNMP         Disk
[root@localhost ~]# mkdir /abc
[root@localhost ~]# mount.cifs //192.168.235.1/LNMP /abc
##掛載到/abc目錄下
第二步:編譯安裝Nginx
1,解壓源碼包到/opt目錄
[root@localhost ~]# cd /abc    ##切換到掛載點目錄
[root@localhost abc]# ls
Discuz_X3.4_SC_UTF8.zip    nginx-1.12.2.tar.gz
mysql-boost-5.7.20.tar.gz  php-7.1.10.tar.gz
[root@localhost abc]# tar zxvf nginx-1.12.2.tar.gz -C /opt   ##解壓Nginx源碼包到/opt下
[root@localhost abc]# cd /opt/    ##切換到解壓的目錄下
[root@localhost opt]# ls
nginx-1.12.2  rh
2,安裝編譯需要的環境組件包
[root@localhost opt]# yum -y install \
gcc \                                       //c語言
gcc-c++ \                               //c++語言
pcre-devel \                     //pcre語言工具
zlib-devel                       //數據壓縮函數庫
3,創建程序用戶nginx並編譯Nginx
[root@localhost opt]# useradd -M -s /sbin/nologin nginx  ##創建程序用戶,限定其
[root@localhost opt]# cd nginx-1.12.2/                 ##切換到nginx目錄下
[root@localhost nginx-1.12.2]# ./configure \         ##配置nginx
> --prefix=/usr/local/nginx \        ##安裝路徑
> --user=nginx \                         ##用戶名
> --group=nginx \                       ##用戶組
> --with-http_stub_status_module     ##訪問狀態統計模塊
4,編譯和安裝
[root@localhost nginx-1.12.2]#make && make install5,優化Nginx服務啓動腳本,並建立命令軟鏈接
[root@localhost nginx]# ln -s /usr/local/nginx/sbin/nginx /usr/local/sbin/
##創建軟連接讓系統識別nginx啓動腳本
[root@localhost nginx]# nginx -t       ##檢查配置文件的語法問題
nginx: the configuration file /usr/local/nginx/conf/nginx.conf syntax is ok
nginx: configuration file /usr/local/nginx/conf/nginx.conf test is successful
[root@localhost nginx]# nginx      ##開啓ngnix
[root@localhost nginx]# netstat -ntap | grep 80     ##查看端口,nginx已經開啓
tcp   0   0 0.0.0.0:80      0.0.0.0:*   LISTEN   39620/nginx: master
[root@localhost nginx]# systemctl stop firewalld.service    ##關閉防火牆
[root@localhost nginx]# setenforce 0
[root@localhost nginx]# nginx                         ##開啓nginx 服務
6,systemctl管理nginx腳本
[root@localhost ~]# vim /lib/systemd/system/nginx.service      ##創建配置文件

[Unit]
Description=nginx                                            ##描述
After=network.target                                        ##描述服務類型
[Service]
Type=forking                                                    ##後臺運行形式
PIDFile=/usr/local/nginx/logs/nginx.pid            ##PID文件位置
ExecStart=/usr/local/nginx/sbin/nginx              ##啓動服務
ExecReload=/usr/bin/kill -s HUP $MAINPID    ##根據PID重載配置
ExecStop=/usr/bin/kill -s QUIT $MAINPID       ##根據PID終止進程
PrivateTmp=true
[Install]
WantedBy=multi-user.target

[root@localhost ~]# chmod 754 /lib/systemd/system/nginx.service     ##設置執行權限
[root@localhost ~]# systemctl stop nginx.service       ##關閉nginx
[root@localhost ~]# systemctl start nginx.service       ##開啓
7,修改Nginx.conf配置文件
[root@localhost ~]# vim /usr/local/nginx/conf/nginx.conf

 location ~ \.php$ {
            proxy_pass   http://192.168.235.137;
            ##解除此三行的註釋,並將地址指向Nginx服務的IP地址
        }

[root@localhost ~]# systemctl stop nginx.service
##停止服務

[root@localhost ~]# systemctl start nginx.service
##啓動服務
[root@localhost ~]# systemctl stop firewalld.service
##關閉防火牆
[root@localhost ~]# setenforce 0
##關閉增強型安全功能
三、驗證動靜分離效果
第一步:訪問192.168.235.158/index.html的Nginx靜態網頁![在這裏插入圖片描述]()

第二步:訪問192.168.235.158/index.php的Nginx轉發給LAMP的動態網頁
