安裝Linux CentOS 7時 在 Install CentOS 7 上按 tab 鍵更改網卡名到 Linux 7 之前的 eth0,
在最後一行加入以下內容: net.ifnames=0 biosdevname=0
關機:
shutdown 關機
-h 關機
-c 取消關機
          shutdown -h 10   10分鐘之後關機
            取消 ctrl  +  c

            halt             關機    立刻關機
            poweroff     關機    立刻關機
重啓
shutdown -r 10
shutdown -r 0 == shutdow -r now 立刻重啓
reboot 重啓 立刻重啓
ctrl + s linux 窗口鎖定
ctrl + q 解除窗口鎖定
ctrl + l 清屏
ctrt + c 取消當前的操作
ctrl + a 把光標移動到行首
ctrl + e 把光標移動到行尾
ctrl + u 把光標所在位置到行首的內容 刪除(剪切)
ctrl + y 粘貼
ctrl + k 把光標所在位置到行尾的內容 刪除(剪切)
命令行輸入youyouceo
1、將光標移動到行首 加上註釋符號和 I am child
2、將光標移動到行尾,加上 .com.cn;
3、剪切這一行內容
4、粘貼3次
ctrl + → 向右移動一個單詞
ctrl + 向左移動一個單詞
pwd 顯示當前位置
#print working dirctory
cd : change dirtory 進入到目錄中 切換目錄
進入到 /etc/sysconfig/network-scripts 目錄
tab 自動實例命令或目錄
[root@exam ~]# cd /etc/sysconfig/network
network          network-scripts/
[root@exam ~]# cd /etc/sysconfig/network-scripts/
[root@exam network-scripts]# cd /tmp/
[root@exam tmp]# cd -
/etc/sysconfig/network-scripts
[root@exam network-scripts]#
cd - 快速回到上一次所在目錄
cd .. 進入上一級目錄
cd . 進入當前目錄
cd == cd ~ 回到家目錄
.. 當前目錄的上一級
. 當前目錄
~ 家目錄
mkdir -p 創建遞歸目錄
touch 創建文件
[root@exam ~]# cd /etc/sysconfig/network
network          network-scripts/
[root@exam ~]# cd /etc/sysconfig/network-scripts/
[root@exam network-scripts]# cd /tmp/
[root@exam tmp]# cd -
/etc/sysconfig/network-scripts
[root@exam network-scripts]# touch /exam/yoyo.txt
[root@exam network-scripts]# ls /exam/
reg.txt   sed.txt   yoyo.txt
[root@exam network-scripts]# ls /exam/
reg.txt  sed.txt  yoyo.txt
[root@exam network-scripts]# ls -l /exam/
total 8
-rw-r--r--. 1 root root 352 Nov 19 10:51 reg.txt
-rw-r--r--. 1 root root  86 Nov 19 12:29 sed.txt
-rw-r--r--. 1 root root   0 Nov 21 07:14 yoyo.txt
[root@exam network-scripts]#
練習:創建目錄 /exam/ceo/yoyo 目錄,然後創建 /exam/ceo/yoyo/youyou.txt 文件
[root@exam network-scripts]# mkdir /exam/ceo/yoyo
mkdir: cannot create directory ‘/exam/ceo/yoyo’: No such file or directory
[root@exam network-scripts]# mkdir -p /exam/ceo/yoyo
[root@exam network-scripts]# touch /exam/ceo/yoyo/youyou.txt
[root@exam network-scripts]# ll /exam/ceo/yoyo/
total 0
-rw-r--r--. 1 root root 0 Nov 21 07:19 youyou.txt
[root@exam network-scripts]#
' > '重定向符號 漏斗 先清空文件內容 然後信息追加到文件的結尾
' >> ' 追加重定向符號 漏斗 信息追加到文件的結尾
[root@exam ~]# echo youyouceo.com
youyouceo.com
[root@exam ~]# cat /exam/
ceo/      reg.txt   sed.txt   yoyo.txt
[root@exam ~]# cat /exam/yoyo.txt
[root@exam ~]# echo youyouceo >> /exam/yoyo.txt
[root@exam ~]# echo youyouceo > /exam/yoyo.txt
[root@exam ~]# echo youyouceo.com >> /exam/yoyo.txt
[root@exam ~]# cat /exam/yoyo.txt
youyouceo
youyouceo.com
[root@exam ~]# echo youyouceo > /exam/yoyo.txt
[root@exam ~]# cat /exam/yoyo.txt
youyouceo
[root@exam ~]#
向 /exam/yoyo.txt中清空原有內容並寫入 'I am studying AI.' 並顯示文件內容
[root@exam ~]# echo 'I am studying AI' > /exam/yoyo.txt
[root@exam ~]# cat /exam/yoyo.txt
I am studying AI
[root@exam ~]#
引號的中英文件區分
' ' ' ' " " " "
’ ‘ ’ ‘ “ ”
ls
[root@exam ~]#touch /etc/yoyo.txt
[root@exam ~]#ls -rt /etc/yoyo.txt
-l
-r 逆序排序
-t 按照文件的修改時間(文件內容變化)排序
cp copy 複製
-r
-a == -adr
-p 複製文件或目錄的時候保持屬性不變
[root@exam ~]#cp -r /exam/ /tmp/
-r 遞歸複製 複製目錄及目錄裏在的內容
[root@exam exam]# cp -r /exam/ /tmp/
[root@exam exam]# ls -l /tmp/
total 0
drwxr-xr-x. 3 root root 63 Nov 21 10:20 exam
drwx------. 3 root root 17 Nov 19 11:05 systemd-private-5b4a765123a64dc0bdde4683df393ad3-chronyd.service-lIq9DY
drwx------. 2 root root  6 Nov 19 10:58 vmware-root
[root@exam exam]#
複製 /etc/sysconfig 目錄和 /etc/fstab文件到 /exam 下
cp 文件 文件 文件 目錄 ...... 目標目錄
cp 從哪裏來 到哪裏去
[root@exam exam]# cp -r /etc/sysconfig/ /etc/fstab /exam/
[root@exam exam]# ll /exam/
total 20
drwxr-xr-x. 3 root root   18 Nov 21 07:18 ceo
-rw-r--r--. 1 root root  465 Nov 21 10:23 fstab
-rw-r--r--. 1 root root  352 Nov 19 10:51 reg.txt
-rw-r--r--. 1 root root   86 Nov 19 12:29 sed.txt
drwxr-xr-x. 6 root root 4096 Nov 21 10:23 sysconfig
-rw-r--r--. 1 root root   17 Nov 21 09:20 yoyo.txt
複製的時候不提示直接覆蓋
[root@exam exam]# cp /etc/hosts /exam/
[root@exam exam]# \cp /etc/hosts /exam/
mv move 移動
把 /data 目錄移動到 /tmp 下
mkdir -p /data/exam
voerwrite 覆蓋
omitting 忽略
remove regular file 普通
rm remove 刪除
-f --force 強制刪除
-r --recursive 遞歸刪除
[root@exam exam]# rm -f /exam/yoyo.txt
[root@exam exam]# ls -l /exam/
total 20
drwxr-xr-x. 3 root root   18 Nov 21 07:18 ceo
-rw-r--r--. 1 root root  465 Nov 21 10:23 fstab
-rw-r--r--. 1 root root  158 Nov 21 10:25 hosts
-rw-r--r--. 1 root root  352 Nov 19 10:51 reg.txt
-rw-r--r--. 1 root root   86 Nov 19 12:29 sed.txt
drwxr-xr-x. 6 root root 4096 Nov 21 10:23 sysconfig
刪除 /tmp/data
rm -rf /tmp/data

vim編輯器
安裝vim: yum install vim tree bash-completion -y
k=上,h=左,j=下,l=右

day08-linux目錄結構-下部
bash-completion 只能安裝這個軟件才能做命令實例操作
/etc/resolv.conf dns配置文件
配置DNS
方法1.網卡配置文件
DNS1=114.114.114.114
DNS2=8.8.8.8
方法2. /etc/resolv.conf
nameserver 114.114.114.114
nameserver 8.8.8.8
域名解析服務器
配置DNS,在網卡配置文件中進行配置,默認情況下網卡配置文件 DNS 優先於 /etc/resolv.conf
配置主機名:
/etc/hostname (CentOS 7)
/etc/sysconfig/network(CentOS6)
1、查看主機名
[root@exam exam]# hostname
exam
2、修改主機名(臨時 重啓服務器之後失效)
[root@exam exam]# hostname
AIServer
3、永久修改主機名 (永久 修改配置文件,重啓服務器後生效)
[root@exam exam]# cat /etc/hostname
exam
[root@exam exam]#vim /etc/hostname
hostnamectl set-hostname AIServer
4、 /etc/fstab file system table 文件系統掛載表 開機的時候設備與入口對應關係,開機自動掛載列表
/etc/fstab
/etc/hostname
/etc/resolv.conf
/etc/hosts
5、 /etc/rc.local 裏面的內容會在開機的時候自動運行,開機自啓動
CentOS 7 下面使用之前需要增加執行權限
chmod +x /etc/rc.d/rc/local 給這個文件加上執行權限
/etc/rc.local 在文件添加命令,開機自動執行命令
6、 /etc/inittab (centos 6) 運行級別的配置文件 runlevel (運行級別)
CentOS 6 (運行級別) CentOS 7 (target)
0 關機 poweroff.target
1 單用戶模式(root密碼忘記) rescue.target
2 多用戶模式 沒有NFS multi-usertarget
3 完全的多用戶名式 命令行模式 文本模式 multi-user.target
4 待開發 沒使用 multi-user.target
5 桌面模式 圖形化界面模式 (安裝桌面相關的軟件) graphical.target
6 重啓 reboot.target
如何查看運行級別
CentOS 6
修改 /etc/inittab
CentOS 7
查看運行級別
[root@exam exam]# systemctl get-default
multi-user.target
設置運行級別
[root@exam exam]# systemctl set-default multi-user.target
Removed symlink /etc/systemd/system/default.target.
Created symlink from /etc/systemd/system/default.target to /usr/lib/systemd/system/multi-user.target.
3級-> multi-user.target
5級-> graphical.target
-相關的命令如下
-查看當前運行的級別
runlevel
7、 /etc/profile 環境變量配置文件 別名(命令小名) **
ll == ls -l
變量
qiang 變量名字 echo $qiang 顯示變量內容 查看變量內容
qiang='i am a child' 修改變量內容
什麼是環境變量
1、大寫
2、 linux大部分地方都可以用
3、系統創建好的變量
PS1 控制命令行樣子
- /etc/bashrc 別名(命令小名)
全局生效 國法
/etc/profile **
/etc/bashrc
局部生效 家規
~/.bashrc
~/.bash_profile
9、 /etc/motd 文件中的內容會在用戶登錄系統之後顯示出來
10、 /etc/issue /etc/issue.net 文件中的內容會在用戶登陸系統之前顯示出來
[root@exam exam]# cat /etc/issue
\S
Kernel \r on an \m

[root@exam exam]# cat /etc/issue.net
\S
Kernel \r on an \m
[root@exam exam]# > /etc/issue
[root@exam exam]# cat /etc/issue
[root@exam exam]# cat << EOF > /etc/issue
> \S
> Kernel \r on an \m
> EOF
[root@exam exam]# cat /etc/issue
\S
Kernel \r on an \m
[root@exam exam]# /etc/目錄:
1. /etc/sysconfig/network-scripts/ifcfg-eth0
2.  /etc/resolv.conf
3.  /etc/hostname (C7)    /etc/sysconfig/network(C6)
4.  /etc/hosts   ip地址與域名對應關係 局域網DNS
5.  /etc/fstab    開機自動掛載
6.  /etc/rc.local  開機自動啓動裏面命令
7.  /etc/inittab (C6)  運行級別
8.  /etc/profile
9.  /etc/bashrc
10.  /etc/motd
11.  /etc/issue
Linux正面安裝軟件的方法
方法1: yum 安裝軟件解決依賴關係
yum install tree vim bash-completion -y
yum reinstall tree vim bash-completion -y 重新安裝
-y 遇到提示都選 yes
方法2: rpm 自己解決依賴關係
rpm -ivh ****.rpm
-i install
-v verbose 顯示進度
-h 人性化顯示
-qa 查詢所有
-q query 查詢
-a all
檢查軟件是否安裝成功
[root@exam exam]# rpm -qa tree
[root@exam exam]# rpm -qa  vim-enhanced  tree-conpletion
查詢軟件包的內容
rpm -ql
查詢 sed gawk 是否安裝
顯示gawk軟件所內容
小結:
vpm
-qa 檢查軟件是否安裝
-ql 顯示軟件包內容
-ivh 安裝***.rpm
day-09
Linux 優化
/var/ variable (經常變換的 變量)
/var/log/
/var/log/messages 系統默認的日誌
/var/log/secure 記錄的是用戶的登陸情況
rescue
[root@exam exam]# grep 'sshd' /var/log/secure
Nov 19 10:29:41 localhost sshd[12718]: Accepted password for root from 10.74.144.169 port 53265 ssh2
Nov 19 10:29:41 localhost sshd[12718]: pam_unix(sshd:session): session opened for user root by (uid=0)
Nov 19 10:57:58 localhost sshd[12718]: Exiting on signal 15
Nov 19 10:57:58 localhost sshd[1178]: Received signal 15; terminating.
Nov 19 10:58:11 exam sshd[1134]: Server listening on 0.0.0.0 port 22.
Nov 19 10:58:11 exam sshd[1134]: Server listening on :: port 22.
Nov 19 11:05:18 exam sshd[1190]: Server listening on 0.0.0.0 port 22.
Nov 19 11:05:18 exam sshd[1190]: Server listening on :: port 22.
Nov 19 11:05:50 exam sshd[1667]: Accepted password for root from 10.74.144.169 port 64971 ssh2
Nov 19 11:05:51 exam sshd[1667]: pam_unix(sshd:session): session opened for user root by (uid=0)
Nov 19 14:13:43 exam sshd[1667]: error: Received disconnect from 10.74.144.169 port 64971:0:
Nov 19 14:13:43 exam sshd[1667]: Disconnected from 10.74.144.169 port 64971
Nov 19 14:13:43 exam sshd[1667]: pam_unix(sshd:session): session closed for user root
Nov 20 11:10:00 exam sshd[2488]: Accepted password for root from 10.74.144.169 port 53335 ssh2
Nov 20 11:10:00 exam sshd[2488]: pam_unix(sshd:session): session opened for user root by (uid=0)
Nov 20 14:13:11 exam sshd[2488]: error: Received disconnect from 10.74.144.169 port 53335:0:
Nov 20 14:13:11 exam sshd[2488]: Disconnected from 10.74.144.169 port 53335
Nov 20 14:13:11 exam sshd[2488]: pam_unix(sshd:session): session closed for user root
Nov 21 07:10:43 exam sshd[26571]: Accepted password for root from 10.74.144.169 port 61763 ssh2
Nov 21 07:10:43 exam sshd[26571]: pam_unix(sshd:session): session opened for user root by (uid=0)
過濾 在文件中找出你要的內容
系統每隔一段時間把 /var/log/secure messages 定時切割,防止日誌過大
/proc 虛擬目錄
/proc/cpuinfo cpu信息
processor : 0 核心 第幾個核心
physical id : 0 CPU顆 第幾顆CPU
[root@exam exam]# grep 'physical id' /proc/cpuinfo
physical id : 0
physical id : 2
physical id : 4
physical id : 6
physical id : 8
physical id : 10
physical id : 12
physical id : 14
[root@exam exam]# grep processor /proc/cpuinfo
processor   : 0
processor   : 1
processor   : 2
processor   : 3
processor   : 4
processor   : 5
processor   : 6
processor   : 7
[root@exam exam]# ls cpu
ls: cannot access cpu: No such file or directory
[root@exam exam]# lscpu
Architecture:          x86_64
CPU op-mode(s):        32-bit, 64-bit
Byte Order:            Little Endian
CPU(s):                8
On-line CPU(s) list:   0-7
Thread(s) per core:    1
Core(s) per socket:    1
Socket(s):             8
NUMA node(s):          1
Vendor ID:             GenuineIntel
CPU family:            6
Model:                 63
Model name:            Intel(R) Xeon(R) CPU E5-2660 v3 @ 2.60GHz
Stepping:              2
CPU MHz:               2593.993
BogoMIPS:              5187.98
Hypervisor vendor:     VMware
Virtualization type:   full
L1d cache:             32K
L1i cache:             32K
L2 cache:              256K
L3 cache:              25600K
NUMA node0 CPU(s):     0-7
Flags:                 fpu vme de pse tsc msr pae mce cx8 apic sep mtrr pge mca cmov pat pse36 clflush dts mmx fxsr sse sse2 ss syscall nx pdpe1gb rdtscp lm constant_tsc arch_perfmon pebs bts nopl xtopology tsc_reliable nonstop_tsc aperfmperf eagerfpu pni pclmulqdq ssse3 fma cx16 pcid sse4_1 sse4_2 x2apic movbe popcnt tsc_deadline_timer aes xsave avx f16c rdrand hypervisor lahf_lm abm epb fsgsbase tsc_adjust bmi1 avx2 smep bmi2 invpcid xsaveopt dtherm ida arat pln pts
[root@exam exam]#
/proc/meminfo memory 內存信息
[root@exam exam]# cat /proc/meminfo
MemTotal:       16266744 kB
MemFree:        15781552 kB
MemAvailable:   15714816 kB
Buffers:            2108 kB
Cached:           164880 kB
[root@exam exam]# free
total used free shared buff/cache available
Mem: 16266744 231012 15781016 9040 254716 15714280
Swap: 8388604 0 8388604
[root@exam exam]# free -h
total used free shared buff/cache available
Mem: 15G 224M 15G 8.8M 248M 14G
Swap: 8.0G 0B 8.0G-h human-readable 以人性化形式顯示大小
/proc/loadavg load average 平均負載
負載: 衡量系統的繁忙程度
是否繁忙: 數字接近於系統核心總數的時候
衡量: CPU和磁盤使用情況
0.00 0.01 0.05
最近1分鐘 最近5分鐘 最近15分鐘
[root@exam exam]# w
 13:10:01 up 2 days,  2:04,  1 user,  load average: 0.00, 0.01, 0.05
USER     TTY      FROM             LOGIN@   IDLE   JCPU   PCPU WHAT
root     pts/0    10.74.144.169    07:10    1.00s  0.18s  0.16s -bash
proc/mounts 系統掛載信息
[root@exam exam]# column -t /proc/mounts
rootfs           /                 rootfs       rw                                                                             0  0
sysfs           /sys            sysfs        rw,seclabel,nosuid,nodev,noexec,relatime               0  0
proc            /proc            proc         rw,nosuid,nodev,noexec,relatime                            0  0
column -t 根據文件內容進行自動對齊
Linux 系統優化
1、你的系統是什麼版本?
[root@exam exam]# cat /etc/redhat-release
CentOS Linux release 7.5.1804 (Core)
[root@exam exam]# uname -a
Linux AIServer 3.10.0-862.el7.x86_64 #1 SMP Fri Apr 20 16:44:24 UTC 2018 x86_64 x86_64 x86_64 GNU/Linux
[root@exam exam]# uname -r
3.10.0-862.el7.x86_64
-r kernel
C7 3.10.0
C6 2.6.322、添加用戶
[root@exam exam]# useradd yoyo
[root@exam exam]# passwd yoyo
Changing password for user yoyo.
New password:
BAD PASSWORD: The password is shorter than 8 characters
Retype new password:
passwd: all authentication tokens updated successfully.
[root@exam exam]# su - yoyo
[yoyo@AIServer ~]$ whoami
yoyo
[yoyo@AIServer ~]$ echo $PS1
[\u @ \h \W] \$
當前用戶 主機名 當前所在位置 用戶提示符(root用戶的提示符是#,普通用戶的提示符是$)| 參數 | 含義 |
|---|---|
| \d | 代表日期,格式爲week day month date |
| \H | 完整的主機名稱 |
| \ h | 僅取主機的第一個名字 |
| \t | 顯示時間爲24小時格式,如HHMMSS |
| \T | 顯示時間爲12小時格式 |
| \ A | 顯示時間爲24小時格式HHMM |
| \u | 當前用戶的賬號名稱 |
| \v | BASH的版本信息 |
| \w | 完整的工作目錄名稱,家目錄會以~顯示 |
| \W | 利用basename取得工作目錄名稱,所以只會列出最後一個目錄 |
| # | 下達的第和個命令 |
| \$ | 提示字符,如果是root時,提示符爲#,普通用戶則爲¥ |
PS1 控制命令行格式 /樣子
如何修改PS1 (如何修改環境變量)
1、修改PS1 (臨時-重新登陸之後)
export PS1='[\u@\h \w]\ '
2、修改 /etc/profile
[root@AIServer ~]# tail -1 /etc/profile
export PS1='[\u@\h \w]\$ '
[root@exam exam]# tail -n1 /etc/profile
export PS1='[\u@\h \w]$ '
配置生效
[root@AIServer ~]#cd /tmp/
[root@AIServer ~]#source /etc/profile
3、yum 替你下載和安裝軟件包
***.rpm
yum源 yum下載軟件的地方 默認是隨機的
yum repolist
更新系統yum源 從隨機 改爲 阿里雲
阿里雲 ,清華雲
修改默認yum源
http://mirrors.aliyun.com 阿里雲鏈接
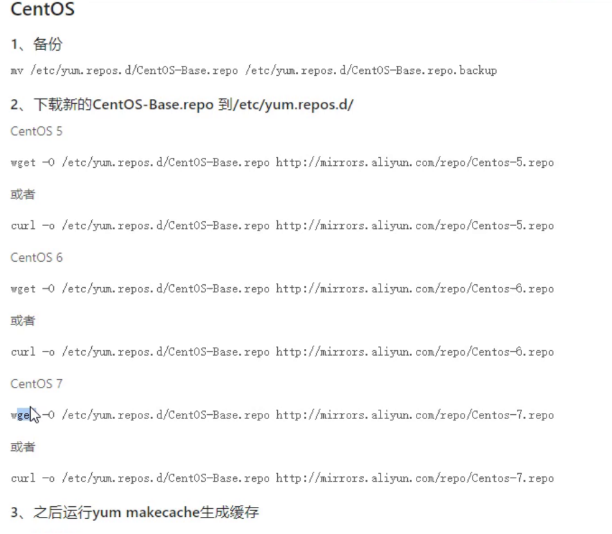
備份
mv /etc/yum.repos.d/CentOS-Base.repo /etc/yum.repos.d/CentOS-Base.repo.backup

wget -O /etc/yum.repos.d/CentOS-Base.repo http://mirrors.aliyun.com/repo/Centos-7.repo

yum makecache  生成緩存
https://mriiors.tuna.tsinghua.deu.cn 清華雲鏈接