


1、 Fastdfs介紹
Fastdfs是用c語言編寫的一個開源的輕量級分佈式文件系統,它對文件進程管理,功能包括: 文件存儲,文件同步,文件訪問(文件上傳、文件下載)等,解決了大容量存儲和負載均衡的問題,特別適合以文件爲載體的在線服務,如相冊網站,視頻網站等等
Fastdfs爲互聯網量身定製,充分考慮了冗餘備份,負載均衡,線性擴容等,並注重高可用,高性能等指標,使用fastdfs很容易搭建一套高性能的文件服務器集羣提供文件上傳、下載服務
2、Fastdfs架構
Fastdfs架構包括Tracker server和Storage server
客戶端請求Tracker server進行文件上傳、下載,通過Tracker server調度最終由 Storage server完成文件上傳和下載
Tracker server作用是負載均衡和調度,通過Tracker server在文件上傳時可以根據一些策略找到Storage server 提供文件上傳服務,可以講tracker成爲追蹤服務器或調度服務器
Storage server作爲是文件存儲,客戶端上傳的文件最終存儲在storage服務器上,Storage server 沒有實現自己的文件系統而是利用操作系統的文件系統來管理文件,可以講storage成爲存儲服務器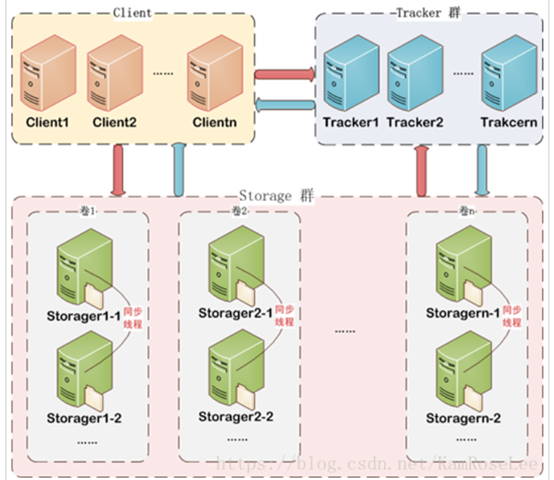
3、FastDFS 系統有三個角色:跟蹤服務器(Tracker Server)、存儲服務器(Storage Server)和客戶端(Client)。
• Tracker Server: 跟蹤服務器,主要做調度工作,起到均衡的作用;負責管理所有的 storage server和 group,每個 storage 在啓動後會連接 Tracker,告知自己所屬 group 等信息,並保持週期性心跳。
• Storage Server:存儲服務器,主要提供容量和備份服務;以 group 爲單位,每個 group 內可以有多臺 storage server,數據互爲備份。
• Client:客戶端,上傳下載數據的服務器,也就是我們自己的項目所部署在的服務器。
4、Fastdfs原理
關於模塊:跟蹤服務器和存儲節點都可以由一臺或多臺服務器構成,跟蹤服務器和存儲節點均可以隨時增加或者下線不會影響線上服務,其中跟蹤服務器中所有服務器是對 等,可以根據服務器壓力情況隨時增加或減少
5、文件上傳流程
Storage server會連接集羣中所有的Tracker server,定時向他們報告自己的狀態,包括磁盤剩餘空間、文件同步狀況、文件上傳下載次數等統計信息。
關於上傳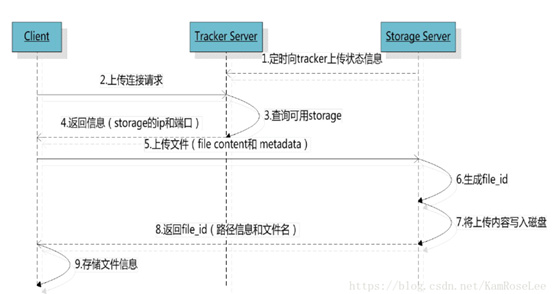 **
**
文件索引信息包括:組名,虛擬磁盤路徑,數據兩級目錄,文件名。
n 組名:文件上傳後所在的storage組名稱,在文件上傳成功後有storage服務器返回,需要客戶端自行保存。
n 虛擬磁盤路徑:*storage配置的虛擬路徑,與磁盤選項store_path對應。如果配置了store_path0則是M00,如果配置了store_path1則是M01,以此類推。
n 數據兩級目錄:storage服務器在每個虛擬磁盤路徑下創建的兩級目錄,用於存儲數據文件。
n 文件名:與文件上傳時不同。是由存儲服務器根據特定信息生成,文件名包含:源存儲服務器IP地址、文件創建時間戳、文件大小、隨機數和文件拓展名等信息。
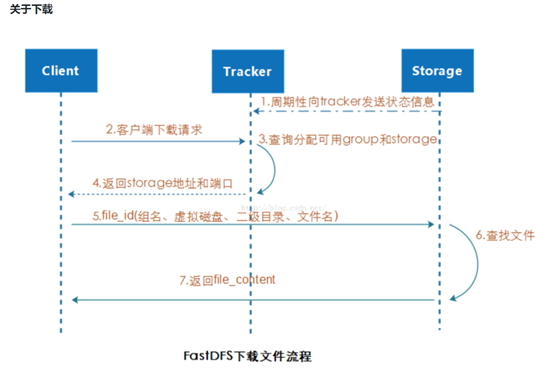
client發送download請求給某個tracker,必須帶上文件名信息,tracker從文件名中解析出文件的group、大小、創建時間等信息,然後爲該請求選擇一個storage用來服務讀請求,由於group內的文件同步時在後臺是異步的,所以有可能出現在讀的時候,文件還沒有同步到某些storage server上,爲了儘量避免訪問到這樣的storage,tracker按照如下規則選擇group內可讀的storage
文件創建時間戳-storage被同步到的時間戳 且(當前時間-文件創建時間戳)>文件同步最大時間(5分鐘),說明文件創建後,認爲經過最大同步時間後,肯定已經同步到其他storage了
6、安裝Fastdfs
192.168.1.10 nginx proxy
192.168.1.20 tracker server1
192.168.1.30 tracker server2
192.168.1.40 storage server group1
192.168.1.50 storage server group2
數據存儲位置/storage/fastdfs
一.部署安裝traker server

1.安裝編譯環境,安裝libfastcommon和fastdfs(所有節點)
Libfastcommon 包含了fastdfs運行所需的要的一些基礎庫
17 mkdir /storage/fastdfs -p (創建數據存儲位置)
20 tar zxf libfastcommon.tar.gz (解壓lib)
21 cd libfastcommon/
22 ./make.sh && ./make.sh install (編譯安裝lib)
23 cd
24 tar zxf fastdfs.tar.gz (解壓fas)
25 cd fastdfs/
26 ./make.sh && ./make.sh install (編譯安裝 fastdfs)
27 ls /etc/init.d/ 
28 cp conf/mime.types conf/http.conf /etc/fdfs/
(複製nginx拓展文件到fdfs)
2.第一臺編寫一個腳本 (方便部署traker)
vim install-fastdfs.sh
#!/bin/bash
mkdir /storage/fastdfs -p
cd /root
tar zxf libfastcommon.tar.gz
tar zxf fastdfs.tar.gz
cd /root/libfastcommon/
./make.sh && ./make.sh install
cd /root/fastdfs/
./make.sh && ./make.sh install
cd /root/fastdfs/
cp conf/mime.types conf/http.conf /etc/fdfs/
ls /etc/fdfs
#/etc/fdfs/ 配置文件路徑
3.把腳本和軟件包複製到其他四臺主機
scp root fastdfs.tar.gz libfastcommon.tar.gz install-fastdfs.sh [email protected]:/root
4.四臺執行一下腳本,查看一下腳本是否執行成功
sh install-fastdfs.sh
5.配置track(兩臺都是)
29 cd /etc/fdfs/
30 ls
31 cp tracker.conf.sample tracker.conf
32 vim tracker.conf 修改tracker配置文件
bind_addr=192.168.1.20 #監聽本機地址 8
base_path=/storage/fastdfs #這裏寫剛剛創建的數據存放的路徑 22
34 /etc/init.d/fdfs_trackerd start 啓動trackerd
35 netstat -anpt | grep 22122 
6.安裝nginx(第一臺)
36 yum -y install pcre-devel openssl-devel zlib-devel #安裝nginx依賴包
35 tar zxf nginx-1.14.0.tar.gz #解壓nginx tar包
37 cd nginx-1.14.0/
38 ./configure && make && make install #編譯安裝
二.配置storage server服務器(兩臺都是)
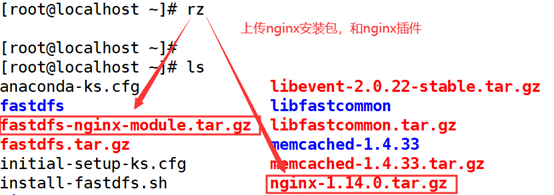
1.安裝nginx (兩臺都要)
30 yum -y install pcre-devel openssl-devel 安裝依賴包
31 tar zxf nginx-1.14.0.tar.gz 解壓nginx包
32 tar zxf fastdfs-nginx-module.tar.gz 解壓nginx拓展包
33 cd nginx-1.14.0/
36 ./configure --add-module=../fastdfs-nginx-module/src && make && make install 編譯安裝
2.配置storage
38 cd /etc/fdfs/
39 cp storage.conf.sample storage.conf
40 vim storage.conf 修改storage配置文件
group name=group1第一臺storage爲group1 第二臺storage爲group2 11
bind addr=192.168.1.40
port=23000 #默認端口,不做修改
base path=/storage/fastdfs/ #數據和日誌存放的目錄地址 41
store path0=/storage/fastdfs/ #第一個存儲目錄和basrpath路徑相同 110
tracker server=192. 168.1.20:22122 119
tracker server=192.168.1.30:22122 120
http. server port=8888 #http訪問文件的端口 末尾
3.配置nginx拓展配置文件
43 cd /fastdfs-nginx-module/src/
44 cp mod_fastdfs.conf /etc/fdfs/
45 vim /etc/fdfs/mod_fastdfs.conf
base_path=/storage/fastdfs/ #數據和日誌存放的目錄地址 10
tracker_server=192.168.1.20:22122 #40
tracker_server=192.168.1.30:22122 #41
storage_server_port=23000 44
group_name=group1 #第二臺storage組名爲group2 47
url_have_group_name = true #當group有多個的時候需要改爲true,以組名去訪問 53
store_path0=/storage/fastdfs #第一個存儲目錄和basr_path路徑相同 62
[group1] #119去註釋修改或直接添加
group_name=group1
storage_server_port=23000
store_path_count=2
store_path0=/storage/fastdfs
[group2]
group_name=group2
storage_server_port=23000
store_path_count=2
store_path0=/storage/fastdfs
****4.拷貝nginx拓展軟件的配置文件,storage的配置文件,nginx安裝包和nginx拓展包到第二臺storage主機(拷貝完之後,按照上面2,3步驟來一遍)
48 cd /etc/fdfs/
49 scp mod_fastdfs.conf storage.conf [email protected]:/etc/fdfs/
50 cd
52 scp fastdfs-nginx-module.tar.gz nginx-1.14.0.tar.gz [email protected]:/root/
5.Nginx主配置文件修改 (兩臺都改)
[root@localhost ~]# vim /usr/local/nginx/conf/nginx.conf
在原來的server上添加
server {
listen 8888;
server_name localhost;
location ~/group[0-9]/M00/ {
ngx_fastdfs_module; #nginx拓展模塊
}
}
6、啓動服務
啓動storaged server(兩臺都要啓動)
[root@localhost fdfs]# /etc/init.d/fdfs_storaged start
啓動nginx(兩臺都啓動)
[root@localhost ~]# /usr/local/nginx/sbin/nginx
在track上看一下日誌
[root@localhost fdfs]# cd /storage/fastdfs/logs/
[root@localhost logs]# cat trackerd.log
測試一下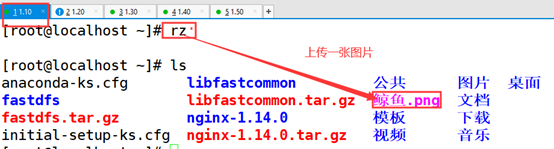
修改第一臺的client.conf.sample配置文件
[root@localhost ~]# cd /etc/fdfs/
[root@localhost fdfs]# vim client.conf.sample
base_path=/storage/fastdfs #10
tracker_server=192.168.1.20:22122 #14
tracker_server=192.168.1.30:22122 #15
上傳一張圖片到storage (第一臺)
[root@localhost ~]# fdfs_upload_file /etc/fdfs/client.conf.sample 鯨魚.png (這個id最好放在一個文件裏方便查找)
在storage上查看一下
[root@localhost data]# cd /storage/fastdfs/data/00/00
[root@localhost 00]# ls
瀏覽器訪問一下
http://192.168.1.50:8888/group2/M00/00/00/wKgBMl3cpCWAZGQIADuP0gQAyTs723.png
下載並改名剛剛傳上去的圖片
[root@localhost ~]# fdfs_download_file /etc/fdfs/client.conf.sample group2/M00/00/00/wKgBMl3coGKACR1RADuP0gQAyTs874.png xgp.png
刪除剛剛上傳的圖片
[root@localhost ~]# fdfs_delete_file /etc/fdfs/client.conf.sample group2/M00/00/00/wKgBMl3coGKACR1RADuP0gQAyTs874.png
三,配置nginx反向代理服務器 (第一臺)
在http模塊中添加
[root@localhost nginx-1.15.4]# vim /usr/local/nginx/conf/nginx.conf
upstream fdfs_group1 { #設置group1的服務器 20
server 192.168.1.40:8888 weight=1 max_fails=2 fail_timeout=30s;
}
upstream fdfs_group2 {
server 192.168.1.50:8888 weight=1 max_fails=2 fail_timeout=30s;
}
#下邊添加兩個location
location ~ /group1(/) { #48
proxy_pass http://fdfs_group1;
}
location ~ /group2(/) {
proxy_pass http://fdfs_group2;
}
啓動nginx
[root@localhost ~]# /usr/local/nginx/sbin/nginx
[root@localhost ~]# netstat -anpt | grep 80
瀏覽器查看一下,還是用剛剛那個id(需要重新上傳一下)
[root@localhost ~]# fdfs_upload_file /etc/fdfs/client.conf.sample 鯨魚.png
group2/M00/00/00/wKgBMl3cpCWAZGQIADuP0gQAyTs723.png
瀏覽器訪問:http://192.168.1.10/group2/M00/00/00/wKgBMl3cpCWAZGQIADuP0gQAyTs723.png

實驗完畢