


- Docker鏡像除了是Docker的核心之外,也是應用發佈的標準格式。一個完整的Docker鏡像可以支撐一個Docker容器的運行,在整個Docker使用過程中,進入一個已經定型的容器之後,就可以在容器裏進行操作,最常見的操作就是在容器裏安裝應用服務等,如果要把已安裝的服務進行遷移,就需要把環境及搭建的服務生成新的鏡像。
- 創建鏡像的方法有三種,分別爲“基於已有鏡像創建”,"基於本地模板創建","基於Docekr創建"。
1.基於已有鏡像創建
安裝Docker所需鏡像:鏈接: https://pan.baidu.com/s/1t0ZuEUn4UU8ApQxMRv1q0g
提取碼: bcxv[root@localhost ~]# mkdir /yumbeifen [root@localhost ~]# mv /etc/yum.repos.d/* /yumbeifen/ [root@localhost ~]# vim /etc/yum.repos.d/a.repo [Docker] name=docker baseurl=file:///media gpgcheck=0 [root@localhost ~]# eject [root@localhost ~]# mount /dev/cdrom /media/ mount: /dev/sr0 is write-protected, mounting read-only [root@localhost ~]# yum -y install docker [root@localhost ~]# systemctl start docker //啓動Docker [root@localhost ~]# systemctl enable docker //開機自啓Docker1.1所需光盤鏡像鏈接: https://pan.baidu.com/s/1JMYMlG04ZHEeLmB93kmkVQ
提取碼: mkyj[root@localhost ~]# eject [root@localhost ~]# mount /dev/cdrom /media/ [root@localhost ~]# cd /media/ [root@localhost media]# ls apache-tomcat-8.5.16.tar.gz dhcp jdk-8u91-linux-x64.tar.gz centos httpd registry.tar.gz centos6 httpd_centos ubuntu-12.04-x86_64-minimal.tar.gz [root@localhost media]# docker load < dhcp //將光盤所需文件導入本地 [root@localhost ~]# docker images //查看鏡像 REPOSITORY TAG IMAGE ID CREATED SIZE docker.io/centos latest 75835a67d134 13 months ago 200 MB docker.io/networkboot/dhcpd latest 6f98b6b9b486 19 months ago 125 MB [root@localhost ~]# docker create -it docker.io/networkboot/dhcpd /bin/bash //基於鏡像創建容器 586a78aef06b243ff95a341a6c7d0b1b5f1e87bc3a65973345cbb1a4de5c070c [root@localhost ~]# docker ps -a //查看容器 CONTAINER ID IMAGE COMMAND CREATED STATUS PORTS NAMES 586a78aef06b docker.io/networkboot/dhcpd "/entrypoint.sh /b..." 5 seconds ago Created [root@localhost ~]# docker start 586a78aef06b //啓動容器 586a78aef06b [root@localhost ~]# docker exec -it 586a78aef06b /bin/bash //進入容器touch兩個文件 root@586a78aef06b:/# touch haha hhh root@586a78aef06b:/# ls bin core entrypoint.sh haha home lib64 mnt proc run srv tmp var boot dev etc hhh lib media opt root sbin sys usr [root@localhost ~]# docker commit -m "mewdhcp" -a "wyjx" 586a78aef06b docker:mydhcp //使用dockercommit命令創建新的鏡像 sha256:657f27fc22ca4ae8d1ca766843539a42eadc9dd6b11c46313a338a943fb44cec [root@localhost ~]# docker images REPOSITORY TAG IMAGE ID CREATED SIZE docker mydhcp 657f27fc22ca 18 seconds ago 125 MB docker.io/centos latest 75835a67d134 13 months ago 200 MB docker.io/networkboot/dhcpd latest 6f98b6b9b486 19 months ago 125 MB2、基於本地模板創建
通過導入操作系統模板文件可以生成鏡像,模板可以從 OPENVZ 開源項目下載,下載地址爲:http://openvz.org/Download/template/precreated
[root@test /]# wget http://download.openvz.org/template/precreated/ubuntu-14.04-x86_64-minimal.tar.gz
# 下載一個迷你版的Ubuntu模板
[root@test /]# cat ubuntu-14.04-x86_64-minimal.tar.gz | docker import - docker:new
sha256:7457fecee0fb28ab06d935e7a9a5a040d9d6ec8931959b752f596cde76a5d647
# 將模板導入
[root@test /]# docker images |grep new              # 查看已經導入
docker                        new                 7457fecee0fb        About a minute ago   215 MB
3、基於 Dockerfile 創建
dockerfile是由一組指令組成的文件,其中每條指令對應Linux中的一條命令,docker程序將讀取dockerfile中的指令生成指定鏡像。
dockerfile結構大致分爲四個部分:基礎鏡像信息、維護者信息、鏡像操作指令和容器啓動時執行指令。dockerfile每行支持一條指令,每條指令可攜帶多個參數,支持使用“#”號開頭的註釋。
dockerfile中的配置項介紹:
[root@localhost ~]# docker tag docker:new centos7:system
#將上面下載的centos 7迷你鏡像更改下名字及標籤,以便區分
[root@localhost ~]# docker images | grep system
#確認基礎鏡像已經準備好(就是一個centos 7的迷你係統進行)
centos7                       system              c065d5c0571d        About an hour ago   435 MB
[root@localhost ~]# vim Dockerfile   #編輯一個Dockerfile文件,注意:文件名最好就是Dockerfile

FROM centos           #第一行必須指明基於的基礎鏡像(該鏡像必須存在)
MAINTAINER The centos project <[email protected]>    #維護該鏡像的用戶信息
#以下是鏡像的操作指令
RUN yum -y update
RUN yum -y install openssh-server
RUN sed -i 's/UsePAM yes/UsePAM no/g' /etc/ssh/sshd_config
RUN ssh-keygen -t dsa -f /etc/ssh/ssh_host_dsa_key
RUN ssh-keygen -t rsa -f /etc/ssh/ssh_host_rsa_key
EXPOSE 22       #開啓22端口
CMD ["/usr/sbin/sshd","-D"]     #啓動容器時執行指令
在編寫dockerfile時,有嚴格的格式需要遵循:第一行必須使用FROM指令指明所基於的鏡像名稱;之後使用MAINTAINER指令說明維護該鏡像的用戶信息;然後是鏡像操作相關指令,如RUN指令,每運行一條指令,都會給基礎鏡像添加新的一層;最後使用CMD指令來指定啓動容器時要運行的命令操作。
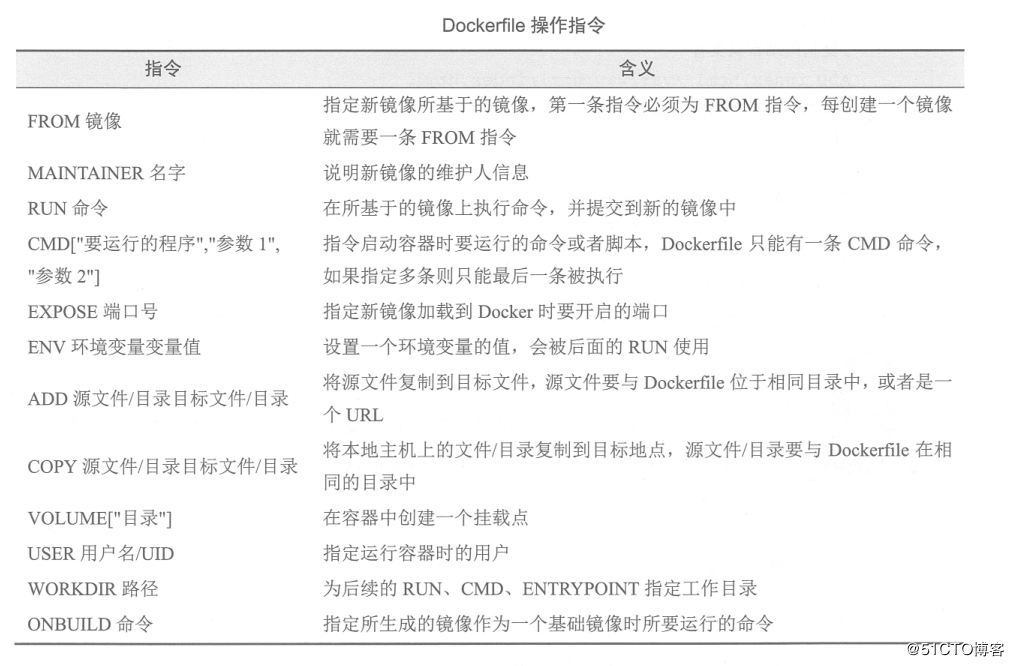
dockerfile有十幾條命令可用於構建鏡像,其中常見的指令如下:
例:使用dockerfile創建apache鏡像並在容器中運行
[root@test /]# mkdir apache                        # 創建工作目錄
[root@test /]# cd /apache/
[root@test apache]# vim Dockerfile                # 創建並編寫 Dockerfile文件
FROM    centos                               # 基於的基礎鏡像centos
MAINTAINER      the centos            # 維護該鏡像的用戶信息
RUN     yum -y update                     # 鏡像操作指令安裝 Apache 軟件包
RUN     yum -y install httpd
EXPOSE  80                                    # 開啓80端口
ADD     index.html /var/www/html/index.html               # 複製網站首頁文件
ADD     run.sh /run.sh                     # 將執行腳本複製到鏡像中
RUN     chmod 775 /run.sh
RUN     systemctl disable httpd           # 設置Apache服務不自行啓動
CMD     ["/run.sh"]                     # 啓動容器時執行腳本

[root@test apache]# vim run.sh                     # 編寫執行腳本內容
#!/bin/bash
rm -rf /run/httpd/*                           # 清理 httpd 緩存
exec /usr/sbin/apachectl -D FOREGROUND                # 啓動Apache服務
[root@test apache]# echo "www.test.com" > index.html                 # 創建測試頁面
[root@test apache]# ls
Dockerfile  index.html  run.sh
[root@test apache]# docker build -t httpd:centos .
............................               // 省略部分內容
# 注意注意注意:這條命令後面有一個“.”    代表當前路徑,否則會報錯,切記千萬不要忘記
[root@test apache]# docker run -d -p 12345:80 httpd:centos # 使用新的鏡像運行容器,-p 選項實現從本地端口12345到容器的80端口映射
0721b1641ce0651d618a393b85d34606180dd33d4795621db320865cda8f3a0a
[root@test apache]# docker ps -a # 查看容器
CONTAINER ID IMAGE COMMAND CREATED STATUS PORTS NAMES
0721b1641ce0 httpd:centos "/run.sh" 6 seconds ago Up 6 seconds 0.0.0.0:12345->80/tcp sad_mcclintock
訪問容器中的apache服務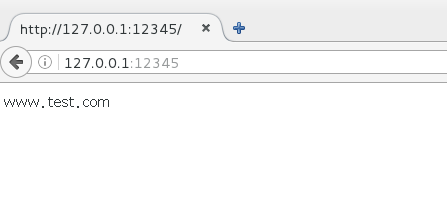
二、搭建私有庫及其使用方法
隨着創建的鏡像增多,就需要有一個保存鏡像的地方,這就是倉庫,目前有兩種倉庫:公共倉庫和私有倉庫,公司的生產環境中大多數都是保存到私有倉庫的,最簡單的還是在公共倉庫上下載鏡像,若是上傳鏡像至公共倉庫,還需要註冊並登陸,關於公共倉庫的上傳,可以參考https://blog.51cto.com/14227204/2453408
怎麼構建私有倉庫呢?可以使用registry來搭建本地私有倉庫
[root@test ~]# docker search registry               #查詢關鍵字“registry”
INDEX       NAME                                          DESCRIPTION                                     STARS     OFFICIAL   AUTOMATED
docker.io   docker.io/registry                            The Docker Registry 2.0 implementation for...   2679      [OK]
                 ..................#省略部分內容
[root@localhost ~]# docker pull docker.io/registry     #下載排名靠前的鏡像
                 ..................#省略部分內容
Status: Downloaded newer image for docker.io/registry:latest    #下載成功
[root@localhost ~]# vim /etc/sysconfig/docker
#修改docker配置文件指定私有倉庫URL,否則在自定義的私有倉庫中上傳鏡像時會報錯

# /etc/sysconfig/docker

# Modify these options if you want to change the way the docker daemon runs
OPTIONS='--selinux-enabled --insecure-registry=192.168.1.1:5000'
#更改上面一行內容,其中的IP地址是作爲私有倉庫服務器的IP地址,這裏就是本機的IP地址。
                           ..................#省略部分
#修改完畢後保存退出
[root@test ~]# systemctl restart docker      #重啓docker
使用下載好的registry鏡像啓動一個容器,默認情況下倉庫存放於容器內的/tmp/registry目錄下,使用-v選項可以將本地目錄掛載到容器內的/tmp/registry目錄下使用,這樣就不怕容器被刪除後鏡像也會隨之丟失。在本地啓動一個私有倉庫服務,監聽端口號爲5000。
注意:我本地有一個/data/registry目錄(掛載的是一個高可用的GFS文件系統,也可以使用NFS,自行選擇即可,但是建議對於重要的數據存放目錄,一定要保證容量的動態擴展以及磁盤損壞造成數據丟失的問題),將要掛載到私有倉庫容器中的/tmp/registry目錄中用於存放上傳到私有倉庫的鏡像文件。
[root@test ~]# df -hT /data/registry/             #查看我這個目錄所使用的文件系統
文件系統         類型            容量  已用  可用 已用% 掛載點
node4:dis-stripe fuse.glusterfs   80G  130M   80G    1% /data/registry
[root@test ~]# docker run -d -p 5000:5000 -v /data/registry/:/tmp/registry docker.io/registry
#啓動私有倉庫,並做端口映射到主機的5000端口,將本地的/data/registry目錄掛載到容器中的/tmp/registry目錄
#docker.io/registry是剛纔下載的私有倉庫鏡像。
a6bf726c612b826e203d6a5bc9eaba26c36195913d3ea546c2111ce290a5524d
[root@test ~]# docker tag docker.io/registry 192.168.1.1:5000/registry
#使用docker  tag命令將要上傳的鏡像docker.io/registry改一下標記,其中的IP及端口爲固定的,否則無法連接到私有倉庫
#因爲在上面運行容器時,做了端口映射,將私有倉庫的端口號映射到了宿主機的5000端
口,
#所以直接訪問宿主機的5000端口,就相當於訪問了私有倉庫。
[root@test ~]# docker images | grep 5000            #找到要上傳的鏡像
192.168.1.1:5000/registry     latest              f32a97de94e1        6 months ago        25.8 MB
[root@test ~]# docker push 192.168.1.1:5000/registry            #上傳至剛剛運行的私有倉庫
The push refers to a repository [192.168.1.1:5000/registry]
73d61bf022fd: Pushed
5bbc5831d696: Pushed
d5974ddb5a45: Pushed
f641ef7a37ad: Pushed
d9ff549177a9: Pushed
latest: digest: sha256:b1165286043f2745f45ea637873d61939bff6d9a59f76539d6228abf79f87774 size: 1363
#下面再上傳一個鏡像,進行測試。
[root@test ~]# docker images | grep mynamed            #就上傳它了
docker                        mynamed             e178f320e482        4 hours ago         323 MB
[root@test ~]# docker tag docker:mynamed 192.168.1.1:5000/named:test
#老規矩,必須改倉庫名,注意:若標籤不是默認的latest,那麼還需要在倉庫名後面接上標籤名
[root@test ~]# docker images | grep 192.168.1.1:5000/named     #確定更改成功
192.168.1.1:5000/named        test                e178f320e482        4 hours ago         323 MB
[root@test ~]# docker push 192.168.1.1:5000/named:test       #上傳至私有倉庫
The push refers to a repository [192.168.1.1:5000/named]
c756b9ec7fb0: Pushed
7d8d01394159: Pushed
72b7cd87d69b: Pushed
3be48ef75683: Pushed
9b28c58ad64b: Pushed
75e70aa52609: Pushed
dda151859818: Pushed
fbd2732ad777: Pushed
ba9de9d8475e: Pushed
test: digest: sha256:44894a684eac72a518ae5fa66bcbe4e4a9429428ef7ac6f4761022f8ac45ac5f size: 2403
至此,測試就完畢了,但是,如何證明私有倉庫使用的是本地的/data/registry這個目錄呢?以及如何查看上傳的鏡像呢?(上傳至私有倉庫的鏡像是無法使用普通的ls命令查看的)。
[root@test ~]# df -hT /data/registry/           #先查看本地/data/registry/ 掛載的文件系統
文件系統         類型            容量  已用  可用 已用% 掛載點
node4:dis-stripe fuse.glusterfs   80G  130M   80G    1% /data/registry
[root@test ~]# docker exec -it a6bf726c612b /bin/sh
#進入私有倉庫的容器中,該容器沒有/bin/bash,所以使用的是/bin/sh。
/ # df -hT /tmp/registry/   #查看發現,該目錄掛載的和宿主機掛載的文件系統是同一個,說明沒問題。
Filesystem           Type            Size      Used Available Use% Mounted on
node4:dis-stripe     fuse.glusterfs
                                    80.0G    129.4M     79.8G   0% /tmp/registry
                   ——————————————————————
#那麼如何查看上傳至私有倉庫的鏡像呢?請看下面:
[root@test ~]# curl -XGET http://192.168.1.1:5000/v2/_catalog
#查看已經上傳的鏡像,可以看到剛剛上傳的那兩個鏡像
{"repositories":["named","registry"]}
#只知道鏡像名還不夠,若要下載,還需要鏡像對應的標籤,那麼怎麼查看某個鏡像的標籤呢?
[root@test ~]# curl -XGET http://192.168.1.1:5000/v2/named/tags/list
#就這樣查看咯,上面URL路徑中的named就是鏡像名,查看的就是鏡像named對應的標籤
{"name":"named","tags":["test"]}
[root@test ~]# docker pull 192.168.1.1:5000/named:test      #將私有倉庫中的鏡像下載下來
#前面必須指定私有倉庫的訪問地址,就是上傳時的名字是什麼,下載時就是什麼,哪怕查詢的鏡像名中沒有IP地址。
Trying to pull repository 192.168.1.1:5000/named ...
sha256:44894a684eac72a518ae5fa66bcbe4e4a9429428ef7ac6f4761022f8ac45ac5f: Pulling from 192.168.1.1:5000/named
Digest: sha256:44894a684eac72a518ae5fa66bcbe4e4a9429428ef7ac6f4761022f8ac45ac5f
Status: Downloaded newer image for 192.168.1.1:5000/named:test
若需要在其他服務器上下載私有倉庫的鏡像,需要在那個其他服務器上執行以下命令,以便指定私有倉庫服務器地址:
[root@node1 ~]# echo '{ "insecure-registries":["xxx.xxx.xxx.xxx:5000"] }' > /etc/docker/daemon.json
#其中xxx.xxx.xxx.xxx:5000代表訪問私有倉庫的IP地址及端口,根據自己的服務器情況來定
[root@node1 ~]#systemctl restart docker          #重啓docker服務