


關於firewalld防火牆的直接規則、富規則等原理概述可以參考上一篇博文:Centos 7的firewalld防火牆地址僞裝和端口轉發原理
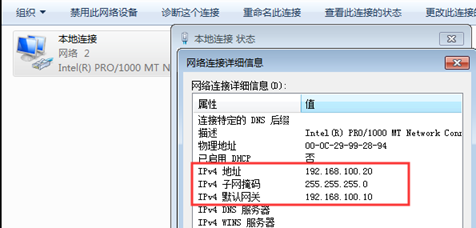
環境如下圖所示:
網關服務器和網站服務器都採用centos 7操作系統,網關服務器安裝3塊千兆網卡,分別連接Internet、企業內網、網站服務器。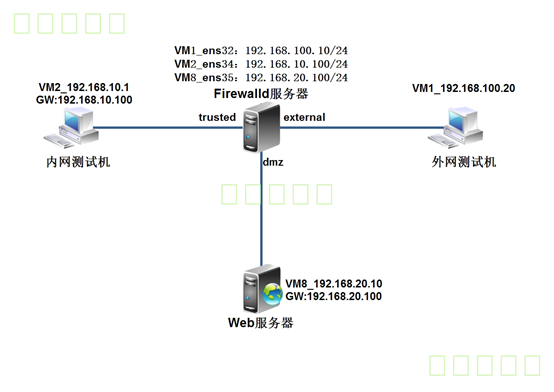
網關服務器連接互聯網卡ens32配置爲公網IP地址爲192.168.100.10,分配到firewall的external區域;連接內網網卡ens34地址爲192.168.10.100,分配到firewall的trusted區域;連接服務器網卡ens35地址爲192.168.20.100,分配到firewall的DMZ區域;
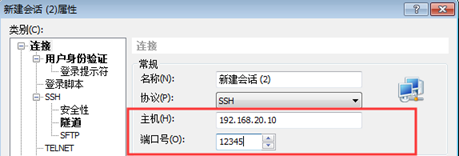
網站服務器和網關服務器都通過SSH來遠程管理,爲了安全,將SSH默認端口改爲12345;
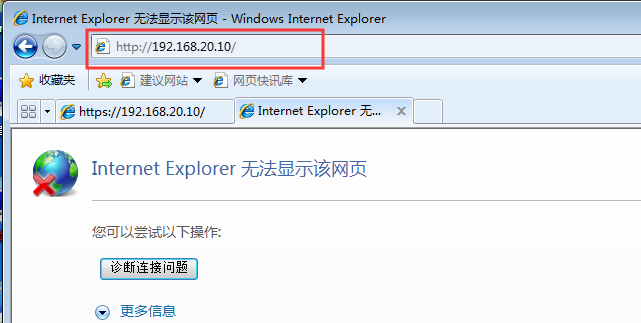
網站服務器開啓https,過濾未加密的http流量;
網站服務器拒絕ping,網關服務器拒絕來自互聯網上的ping;
內網用戶需要通過網關服務器共享上網;
- 互聯網用戶需要訪問網站服務器;
一、開始基本的環境配置
1、配置網關服務器
[root@firewalld ~]# ifconfig  <!--查看配置完成的IP地址信息-->
ens32: flags=4163<UP,BROADCAST,RUNNING,MULTICAST>  mtu 1500
        inet 192.168.100.10  netmask 255.255.255.0  broadcast 192.168.100.255
        inet6 fe80::20c:29ff:fe97:5c9f  prefixlen 64  scopeid 0x20<link>
        ether 00:0c:29:97:5c:9f  txqueuelen 1000  (Ethernet)
        RX packets 880  bytes 135724 (132.5 KiB)
        RX errors 0  dropped 0  overruns 0  frame 0
        TX packets 498  bytes 71197 (69.5 KiB)
        TX errors 0  dropped 0 overruns 0  carrier 0  collisions 0

ens34: flags=4163<UP,BROADCAST,RUNNING,MULTICAST>  mtu 1500
        inet 192.168.10.100  netmask 255.255.255.0  broadcast 192.168.10.255
        inet6 fe80::20c:29ff:fe97:5ca9  prefixlen 64  scopeid 0x20<link>
        ether 00:0c:29:97:5c:a9  txqueuelen 1000  (Ethernet)
        RX packets 37  bytes 3555 (3.4 KiB)
        RX errors 0  dropped 0  overruns 0  frame 0
        TX packets 89  bytes 14988 (14.6 KiB)
        TX errors 0  dropped 0 overruns 0  carrier 0  collisions 0

ens35: flags=4163<UP,BROADCAST,RUNNING,MULTICAST>  mtu 1500
        inet 192.168.20.100  netmask 255.255.255.0  broadcast 192.168.20.255
        inet6 fe80::20c:29ff:fe97:5cb3  prefixlen 64  scopeid 0x20<link>
        ether 00:0c:29:97:5c:b3  txqueuelen 1000  (Ethernet)
        RX packets 51  bytes 5019 (4.9 KiB)
        RX errors 0  dropped 0  overruns 0  frame 0
        TX packets 85  bytes 13888 (13.5 KiB)
        TX errors 0  dropped 0 overruns 0  carrier 0  collisions 0
2、網關服務器開啓路由轉發功能
[root@firewalld ~]# vim /etc/sysctl.conf
net.ipv4.ip_forward = 1

[root@firewalld ~]# sysctl -p
net.ipv4.ip_forward = 1
3、配置web服務器
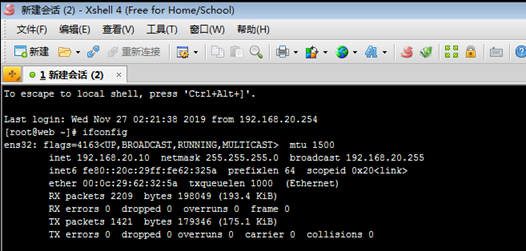
[root@web ~]# ifconfig <!--查看配置完成的IP地址信息-->
ens32: flags=4163<UP,BROADCAST,RUNNING,MULTICAST> mtu 1500
inet 192.168.20.10 netmask 255.255.255.0 broadcast 192.168.20.255
inet6 fe80::20c:29ff:fe62:325a prefixlen 64 scopeid 0x20<link>
ether 00:0c:29:62:32:5a txqueuelen 1000 (Ethernet)
RX packets 237 bytes 21594 (21.0 KiB)
RX errors 0 dropped 0 overruns 0 frame 0
TX packets 220 bytes 30673 (29.9 KiB)
TX errors 0 dropped 0 overruns 0 carrier 0 collisions 0
[root@web ~]# route -n <!--查看網關信息-->
Kernel IP routing table
Destination Gateway Genmask Flags Metric Ref Use Iface
0.0.0.0 192.168.20.100 0.0.0.0 UG 100 0 0 ens32
192.168.20.0 0.0.0.0 255.255.255.0 U 100 0 0 ens32
192.168.122.0 0.0.0.0 255.255.255.0 U 0 0 0 virbr0
[root@web ~]# yum -y install httpd mod_ssl <!--安裝httpd和mod_ssl軟件包-->
[root@web ~]# systemctl start httpd <!--啓動httpd服務-->
[root@web ~]# systemctl enable httpd <!--設置開機自動啓動-->
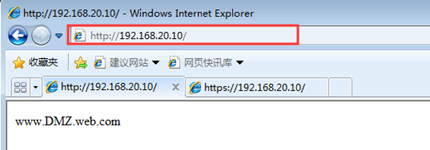
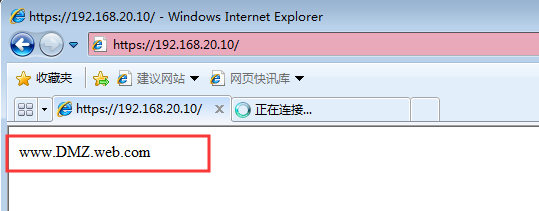
[root@web ~]# echo "www.DMZ.web.com" > /var/www/html/index.html <!--創建網站首頁測試頁-->
[root@web ~]# vim /etc/ssh/sshd_config
<!--修改SSH服務監聽的端口號(需要關閉SELinux)-->
Port 12345
[root@web ~]# systemctl restart sshd <!--重新啓動SSH服務-->4、配置內網客戶端
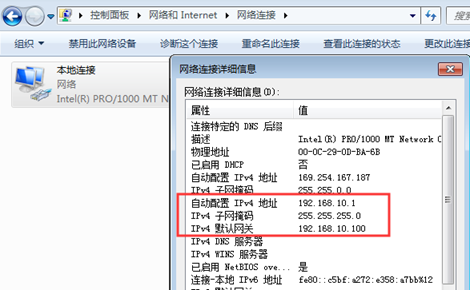
1)配置IP地址及網關
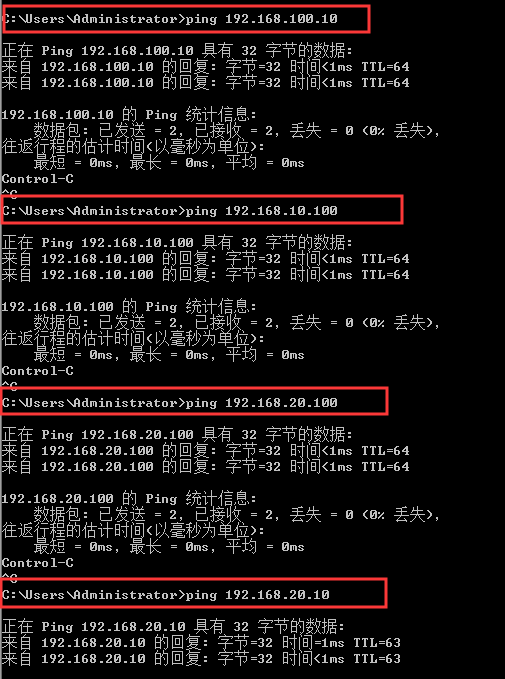
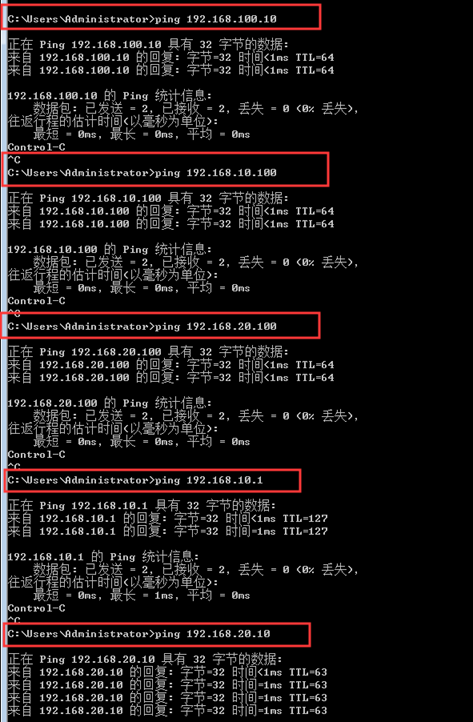
2)測試和網關服務器和網站服務器互通
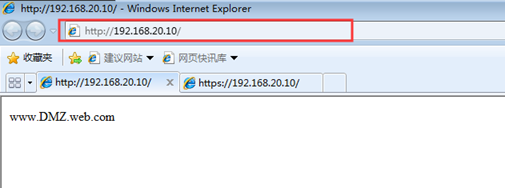
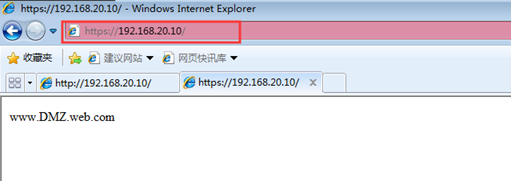
3)測試是否可以成功訪問網站服務器

5、配置外網客戶端
1) 配置IP地址及網關
2) 測試全網互通
3)測試是否成功訪問網站服務器
6、配置外網Centos客戶端
1)修改名字
[root@Centos04~]# hostnamectl set-hostname WAN_Web
[root@ Centos04 ~]# bash
2)配置IP地址及網關,重啓網卡服務
[root@wan_web ~]# systemctl restart network
3)查看配置完成的IP地址
[root@wan_web ~]# ifconfig
ens32: flags=4163<UP,BROADCAST,RUNNING,MULTICAST>  mtu 1500
        inet 192.168.100.30  netmask 255.255.255.0  broadcast 192.168.100.255
        inet6 fe80::20c:29ff:fe16:c54b  prefixlen 64  scopeid 0x20<link>
        ether 00:0c:29:16:c5:4b  txqueuelen 1000  (Ethernet)
        RX packets 37  bytes 4898 (4.7 KiB)
        RX errors 0  dropped 0  overruns 0  frame 0
        TX packets 84  bytes 13483 (13.1 KiB)
        TX errors 0  dropped 0 overruns 0  carrier 0  collisions 0
4)查看網關信息
[root@wan_web ~]# route -n
Kernel IP routing table
Destination     Gateway         Genmask         Flags Metric Ref    Use Iface
0.0.0.0         192.168.100.10  0.0.0.0         UG    100    0        0 ens32
192.168.100.0   0.0.0.0         255.255.255.0   U     100    0        0 ens32
二、在網站服務器上配置firewalld防火牆
[root@web ~]# systemctl start firewalld    <!--啓動防火牆服務-->
[root@web ~]# systemctl enable firewalld <!--設置開機自動啓動->
1、設置默認區域爲dmz區域
[root@web ~]# firewall-cmd --set-default-zone=dmz
success
2、爲dmz區域打開https服務並添加tcp的12345端口
[root@web ~]# firewall-cmd --zone=dmz --add-service=https --permanent
success
[root@web ~]# firewall-cmd --zone=dmz --add-port=12345/tcp --permanent
success
3、禁止ping
[root@web ~]# firewall-cmd --add-icmp-block=echo-request --zone=dmz --permanent
success
[root@web ~]# firewall-cmd --add-icmp-block=echo-reply --zone=dmz --permanent
success
4、將預定義SSH服務移除
[root@web ~]# firewall-cmd --zone=dmz --remove-service=ssh --permanent
success
5、重新加載firewalld配置,並查看之前的配置
[root@web ~]# firewall-cmd --reload
success
[root@web ~]# firewall-cmd --list-all
dmz (active)
  target: default
  icmp-block-inversion: no
  interfaces: ens32
  sources:
  services: https
  ports: 12345/tcp
  protocols:
  masquerade: no
  forward-ports:
  source-ports:
  icmp-blocks: echo-request echo-reply
  rich rules:
三、在網關服務器上配置firewalld防火牆
1、啓動防火牆服務,設置開機自動啓動
[root@firewalld ~]# systemctl start firewalld
[root@firewalld ~]# systemctl enable firewalld
2、將網卡添加至指定區域
[root@firewalld ~]# firewall-cmd --set-default-zone=external<!--設置默認區域爲external-->
success
[root@firewalld ~]# firewall-cmd --change-interface=ens34 --zone=trusted    <!--將ens34添加至trusted區域-->
The interface is under control of NetworkManager, setting zone to 'trusted'.
success
[root@firewalld ~]# firewall-cmd --change-interface=ens35 --zone=dmz       <!--將ens35添加至dmz區域-->
The interface is under control of NetworkManager, setting zone to 'dmz'.
success
3、查看配置,並將配置保存到文件中,成爲永久配置
[root@firewalld ~]# firewall-cmd --get-active-zones
dmz
  interfaces: ens35
external
  interfaces: ens32
trusted
  interfaces: ens34
[root@firewalld ~]# firewall-cmd --runtime-to-permanent  <!--將當前配置保存到文件中-->
success
4、在企業內網測試機上訪問網站服務器,會發現https可以成功訪問,而http訪問不了
5、配置external區域添加tcp的12345端口
[root@firewalld ~]# firewall-cmd --zone=external --add-port=12345/tcp --permanent success6、配置external區域移除SSH服務
[root@firewalld ~]# firewall-cmd --zone=external --remove-service=ssh --permanent success7、配置external區域禁止ping
[root@firewalld ~]# firewall-cmd --zone=external --add-icmp-block=echo-request --permanent
success
[root@firewalld ~]# firewall-cmd --zone=external --add-icmp-block=echo-reply --permanent
success
8、重新加載防火牆配置,查看之前配置
[root@firewalld ~]# firewall-cmd --reload
success
[root@firewalld ~]# firewall-cmd --list-all
external (active)
  target: default
  icmp-block-inversion: no
  interfaces: ens32
  sources:
  services:
  ports: 12345/tcp
  protocols:
  masquerade: yes
  forward-ports:
  source-ports:
  icmp-blocks: echo-request echo-reply
  rich rules:
以下開始測試ssh連接:
9、在互聯網測試機通過SSH連接網關服務器的外部接口地址的12345端口
[root@wan_web ~]# ssh -p 12345 [email protected]
The authenticity of host '[192.168.100.10]:12345 ([192.168.100.10]:12345)' can't be established.
ECDSA key fingerprint is SHA256:PUueT9fU9QbsyNB5NC5hbSXzaWxxQavBxXmfoknXl4I.
ECDSA key fingerprint is MD5:6d:f7:95:0e:51:1a:d8:9e:7b:b6:3f:58:51:51:4b:3b.
Are you sure you want to continue connecting (yes/no)? yes
Warning: Permanently added '[192.168.100.10]:12345' (ECDSA) to the list of known hosts.
[email protected]'s password:
Last login: Wed Nov 27 02:27:01 2019 from 192.168.100.20
[root@firewalld ~]# ls
anaconda-ks.cfg  initial-setup-ks.cfg
10、使用內網測試機SSH登錄web網站服務器的12345端口
以下測試ping命令:
11、測試網站服務器拒絕ping
[root@firewalld ~]# ping 192.168.10.20
PING 192.168.10.20 (192.168.10.20) 56(84) bytes of data.
From 192.168.10.100 icmp_seq=1 Destination Host Unreachable
From 192.168.10.100 icmp_seq=2 Destination Host Unreachable
From 192.168.10.100 icmp_seq=3 Destination Host Unreachable
12、測試網關服務器拒絕來自公網ping
[root@wan_web ~]# ping 192.168.100.10
PING 192.168.100.10 (192.168.100.10) 56(84) bytes of data.
From 192.168.100.10 icmp_seq=1 Destination Host Prohibited
From 192.168.100.10 icmp_seq=2 Destination Host Prohibited
From 192.168.100.10 icmp_seq=3 Destination Host Prohibited
[root@wan_web ~]# ping 192.168.10.20
PING 192.168.10.20 (192.168.10.20) 56(84) bytes of data.
From 192.168.100.10 icmp_seq=1 Destination Host Unreachable
From 192.168.100.10 icmp_seq=2 Destination Host Unreachable
From 192.168.100.10 icmp_seq=3 Destination Host Unreachable四、配置IP僞裝與端口轉發
1、在外網測試機上搭建web服務,用於測試
[root@wan_web ~]# yum -y install httpd mod_ssl
[root@wan_web ~]# systemctl start httpd
[root@wan_web ~]# systemctl enable httpd
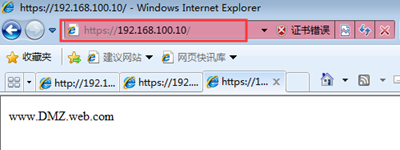
[root@wan_web ~]# echo "WAN_Web.com" > /var/www/html/index.html2、在內部測試機和dmz的網站服務區都可以訪問外網的網站(若訪問不了,則可能是公網測試機的防火牆配置問題,可先將公網測試機的防火牆關閉,或放行相關服務的流量即可)
[root@web ~]# curl http://192.168.100.30
WAN_Web.com
3、查看網關服務器的external區域是否開啓了地址僞裝
[root@firewalld ~]# firewall-cmd --list-all --zone=external
external (active)
  target: default
  icmp-block-inversion: no
  interfaces: ens32
  sources:
  services:
  ports: 12345/tcp
  protocols:
  masquerade: yes   <!--地址僞裝已啓用-->
  forward-ports:
  source-ports:
  icmp-blocks: echo-request echo-reply
  rich rules:
4、只爲源地址192.168.10.0/24網段的地址開啓地址IP僞裝
在網關服務器上關閉external默認的地址僞裝,添加富規則,要求external區域內,源地址爲192.168.10.0/24網段的地址開啓地址IP僞裝
[root@firewalld ~]# firewall-cmd --remove-masquerade --zone=external
success
[root@firewalld ~]# firewall-cmd --zone=external --add-rich-rule='rule family=ipv4 source address=192.168.10.0/24 masquerade'
success
在dmz區域的網站服務器上測試,發現無法訪問外網網站,但是內網測試機可以
[root@web ~]# curl http://192.168.100.30
curl: (7) Failed connect to 192.168.100.30:80; 沒有到主機的路由
5、配置端口轉發實現互聯網用戶可以訪問內部web服務器
1)在網關服務器下做如下配置
[root@firewalld ~]# firewall-cmd --zone=external --add-forward-port=port=443:proto=tcp:toaddr=192.168.20.10
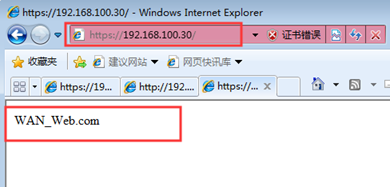
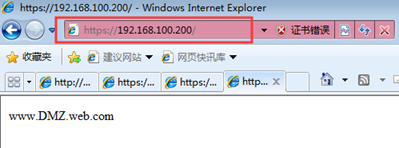
success2)在互聯網測試機上可以成功訪問內網的web服務器
五、 最後來一個使用富規則實現端口轉發
上述配置完成後,現在公司申請了一個新的公網ip地址192.168.100.200,那麼就需要重新做端口轉發了
1、將新申請的公網地址192.168.100.200配置在網關服務器的外網接口ens33上,作爲第二個IP地址
[root@firewalld ~]# vim /etc/sysconfig/network-scripts/ifcfg-ens32
TYPE=Ethernet
PROXY_METHOD=none
BROWSER_ONLY=no
BOOTPROTO=static
DEFROUTE=yes
NAME=ens32
DEVICE=ens32
ONBOOT=yes
IPADDR=192.168.100.10   <!--複製此行粘貼到下面-->
NATEMASK=255.255.255.0
ZONE=external
PREFIX=24        <!--複製此行粘貼到下面-->
IPADDR1=192.168.100.200
     <!--修改爲IPADD1,IP地址修改爲100.200-->
IPV4_FAILURE_FATAL=no
PREFIX1=24           <!--修改爲PREFIX1-->
IPV6INIT=no
UUID=152beb06-47c5-c5e8-95a9-385590654382
[root@firewalld ~]# systemctl restart network  <!--重啓網卡服務-->
[root@firewalld ~]# ip add     <!--查看IP地址是否配置成功-->
1: lo: <LOOPBACK,UP,LOWER_UP> mtu 65536 qdisc noqueue state UNKNOWN qlen 1
    link/loopback 00:00:00:00:00:00 brd 00:00:00:00:00:00
    inet 127.0.0.1/8 scope host lo
       valid_lft forever preferred_lft forever
    inet6 ::1/128 scope host
       valid_lft forever preferred_lft forever
2: ens32: <BROADCAST,MULTICAST,UP,LOWER_UP> mtu 1500 qdisc pfifo_fast state UP qlen 1000
    link/ether 00:0c:29:97:5c:9f brd ff:ff:ff:ff:ff:ff
    inet 192.168.100.10/24 brd 192.168.100.255 scope global ens32
       valid_lft forever preferred_lft forever
    inet 192.168.100.200/24 brd 192.168.100.255 scope global secondary ens32
       valid_lft forever preferred_lft forever
    inet6 fe80::20c:29ff:fe97:5c9f/64 scope link
       valid_lft forever preferred_lft forever
2、使用富規則配置端口轉發
[root@firewalld ~]# firewall-cmd --zone=external --add-rich-rule='rule family=ipv4 destination address=192.168.100.200/32 forward-port port=443 protocol=tcp to-addr=192.168.20.10'
success
3、在互聯網測試機上訪問測試結果
—————— 本文至此結束,感謝閱讀 ——————