


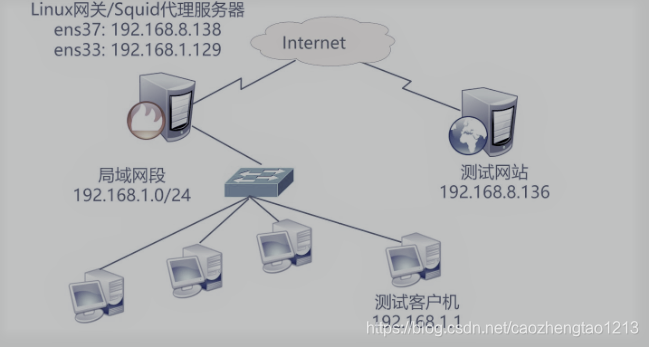
實驗原理圖
第一步:配置squid代理服務器
#遠程共享並掛載源碼包
[root@squid ~]# smbclient -L //192.168.142.1
[root@squid ~]# mount.cifs //192.168.142.1/squid /mnt

#解壓源碼包
[root@squid ~]# cd /mnt
[root@squid mnt]# tar zxvf squid-3.4.6.tar.gz -C /opt

#安裝編譯環境
[root@squid mnt]# yum install gcc gcc-c++ make -y

#切入源碼包目錄
[root@squid mnt]# cd /opt/squid-3.4.6/

#配置configure組件項
[root@squid squid-3.4.6]# ./configure --prefix=/usr/local/squid \
>--sysconfdir=/etc \
>--enable-arp-acl \
>--enable-linux-netfilter \
>--enable-linux-tproxy \
>--enable-async-io=100 \
>--enable-err-language="Simplify_Chinese" \
>--enable-underscore \
>--enable-poll \
>--enable-gnuregex

#編譯與安裝
[root@squid squid-3.4.6]# make && make install

#建立服務命令軟鏈接到系統中,便於管理
[root@squid squid-3.4.6]# ln -s /usr/local/squid/sbin/* /usr/local/sbin

#添加程序用戶
[root@squid squid-3.4.6]# useradd -M -s /sbin/nologin squid

#修改服務目錄的屬主和屬組
[root@squid squid-3.4.6]# chown -R squid.squid /usr/local/squid/var

#修改squid.conf配置文件
[root@squid squid-3.4.6]# vim /etc/squid.conf

http_port 3128
#在3128端口條目下追加以下條目
#指定緩存功能所使用的內存空間大小,建議設爲物理內存的1/4
cache_mem 64 MB

#允許用戶下載最大文件大小
reply_body_max_size 10 MB

#允許保存到緩存空間的站點對象大小
maximum_object_size 4096 KB
#添加程序用戶
cache_effective_user squid

#添加用戶組
cache_effective_group squid

#檢查配置文件語法
[root@squid squid-3.4.6]# squid -k parse

#初始化緩存目錄
[root@squid squid-3.4.6]# squid -z

#啓動服務
[root@squid squid-3.4.6]# squid

#查看服務端口狀態
[root@squid squid-3.4.6]# netstat -ntap | grep squid
tcp6       0      0 :::3128                 :::*                    LISTEN      31862/(squid-1)

#切換啓動進程目錄
[root@squid squid-3.4.6]# cd /etc/init.d

#創建啓動腳本
[root@squid init.d]# vim squid
#!/bin/bash
#chkconfig: 2345 90 25
PID="/usr/local/squid/var/run/squid.pid"
CONF="/etc/squid.conf"
CMD="/usr/local/squid/sbin/squid"

case "$1" in
start)
        netstat -ntap | grep squid &> /dev/null
        if [ $? -eq 0 ]
        then
         echo "squid is running"
         else
         echo "正在啓動 squid...."
         $CMD
        fi
        ;;
stop)
        $CMD -k kill &> /dev/null
        rm -rf $PID &> /dev/null
        ;;
status)
        [ -f $PID ] &> /dev/null
         if [ $? -eq 0 ]
                then
                 netstat -ntap | grep squid
                else
                 echo "squid is not running"
        fi
        ;;
restart)
        $0 stop &> /dev/null
        echo "正在關閉 squid..."
        $0 start &> /dev/null
        echo "正在啓動 squid..."
        ;;
reload)
        $CMD -k reconfigure
        ;;
check)
        $CMD -k parse
        ;;
*)
        echo "用法:$0{start|stop|reload|status|check|restart}"
        ;;
esac

#授予腳本執行權限
[root@squid init.d]# chmod +x squid

#添加腳本到service管理器
[root@squid init.d]# chkconfig --add squid

#添加服務開機自啓動
[root@squid init.d]# chkconfig --level 35 squid on

#使用腳本可管理squid服務
[root@squid init.d]# service squid stop
[root@squid init.d]# service squid start
正在啓動 squid....
[root@squid init.d]# netstat -ntap | grep squid
tcp6       0      0 :::3128                 :::*                    LISTEN      48115/(squid-1)

#清除防火牆所有規則
[root@squid init.d]# iptables -F

#關閉增強型安全功能
[root@squid init.d]# setenforce 0

#設着防火策略,用以放通3128端口
[root@squid init.d]# iptables -I INPUT -p tcp --dport 3128 -j ACCEPT
第二步:配置Web網站服務器
[root@web ~]# systemctl stop firewalld.service
[root@web ~]# setenforce 0
[root@web ~]# yum install httpd -y
[root@web ~]# systemctl start httpd
第三步:使用客戶端訪問網頁
使用瀏覽訪問192.168.142.139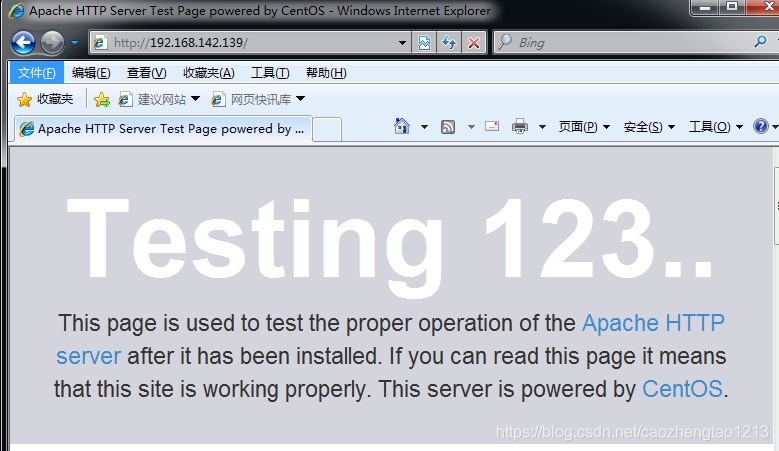
第四步:配置客戶端使用代理服務器,驗證代理服務
1.打開瀏覽器的工菜單,選擇"Internet選項"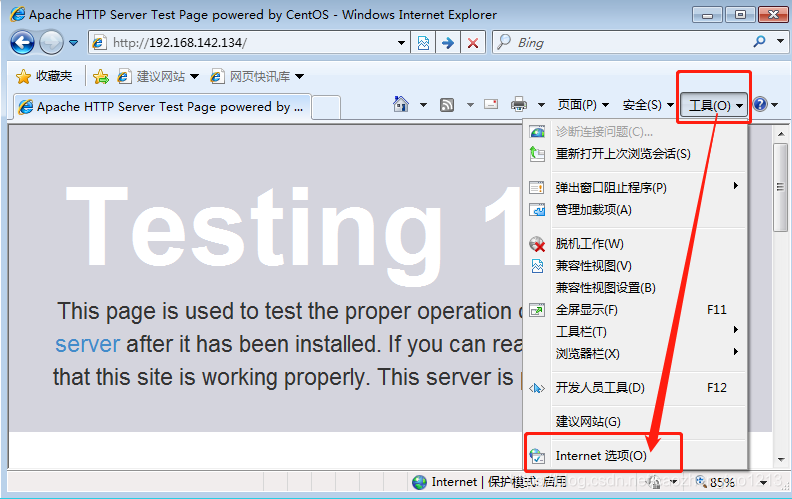 2.選擇"局域網設置",選中"爲LAN使用代理服務器""並指定服務器地址和端口
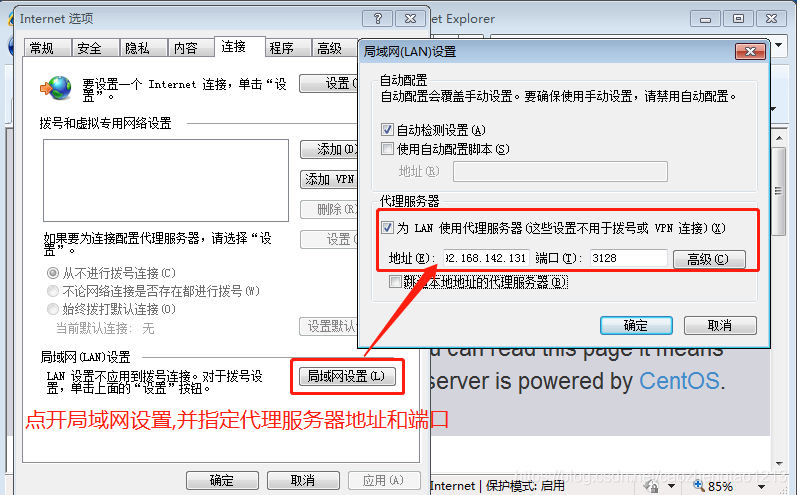
3.再次訪問192.168.142.139
5.回到web服務端查看服務日誌,可見來訪記錄是代理服務器的地址
[root@web ~]# vim /etc/httpd/logs/access_log
192.168.142.131 - - [04/Dec/2019:19:04:28 +0800] "GET /noindex/css/fonts/ExtraBold/OpenSans-ExtraBold.eot? HTTP/1.1" 404 248 "http://192.168.142.139/" "Mozilla/4.0 (compatible; MSIE 8.0; Windows NT 6.1; WOW64; Trident/4.0; SLCC2; .NET CLR 2.0.50727; .NET CLR 3.5.30729; .NET CLR 3.0.30729; Media Center PC 6.0)"
由此可見傳統代理是使用代理服務器的地址進行訪問web服務的,適用於Internet,當需名卻指定服務端!
以上是Squid傳統代理服務,下面我們來配置透明代理服務
設置透明代理
第一步:配置代理服務器網卡
1.修改ens33 網卡信息
[root@squid ~]# vim /etc/sysconfig/network-scripts/ifcfg-ens33
#修改dhcp爲static
BOOTPROTO=static

#末行追加IP地址、子網掩碼和網關
IPADDR=192.168.100.1
NETMASK=255.255.255.0

[root@squid ~]# service network restart
Restarting network (via systemctl):                        [  確定  ]
2.添加第二塊網卡,並修改ens36 網卡信息
[root@squid ~]# cd /etc/sysconfig/network-scripts/
[root@squid network-scripts]# cp -p ifcfg-ens33 ifcfg-ens36
[root@squid network-scripts]# vim ifcfg-ens36
#將33替換成36,並刪除UUID條目
IPADDR=12.0.0.1
NETMASK=255.255.255.0

[root@squid network-scripts]# service network restart
Restarting network (via systemctl):                        [  確定  ]
3.添加轉發數據包功能,將服務器用作網關
[root@squid network-scripts]# echo "1" >/proc/sys/net/ipv4/ip_forward4.設置防火牆策略
#放通80端口,並重定向到3128代理端口
[root@squid network-scripts]# iptables -t nat -I PREROUTING -i ens33 -s 192.168.100.0/24 -p tcp --dport 80 -j REDIRECT --to 3128

##放通https的443端口,並重定向到3128代理端口
[root@squid network-scripts]# iptables -t nat -I PREROUTING -i ens33 -s 192.168.100.0/24 -p tcp --dport 443 -j REDIRECT --to 3128
5.修改squid.conf配置文件
[root@squid ~]# vim /etc/squid.conf
#將原3128端口條目替換成以下條目,用以支持透明模式
http_port 192.168.100.1:3128 transparent
6.重載代理服務
[root@squid network-scripts]# service squid reload第二步:Web服務器網卡信息
[root@web ~]# vim /etc/sysconfig/network-scripts/ifcfg-ens33

#修改dhcp爲static
BOOTPROTO=static

#末行追加IP地址、子網掩碼和網關
IPADDR=12.0.0.12
NETMASK=255.255.255.0
GATEWAY=12.0.0.1

[root@web ~]# service network restart
Restarting network (via systemctl):                        [  確定  ]
第三步:使用客戶機訪問
1.修改地址
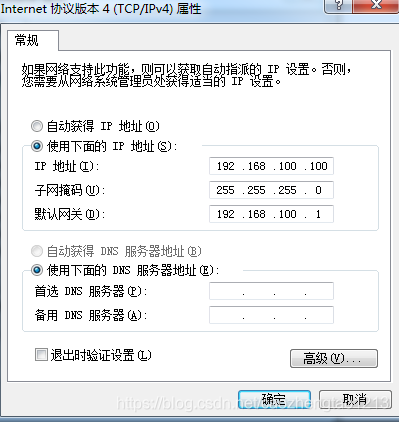
2.取消之前設定的代理服務選項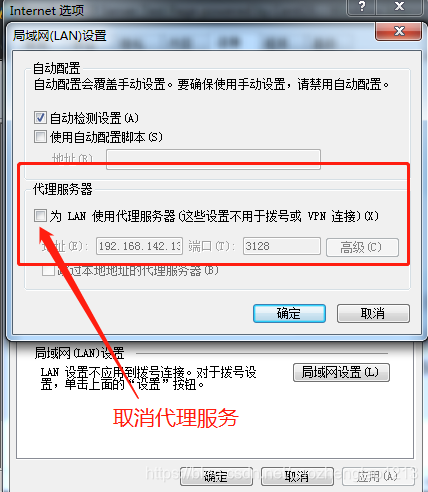
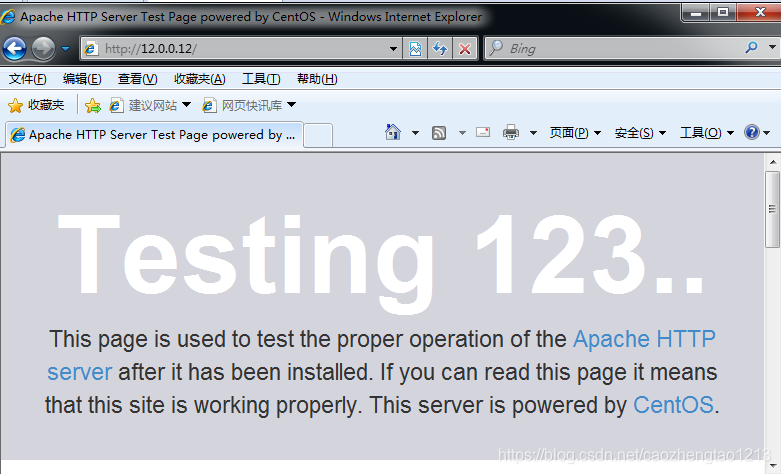
3.使用瀏覽器訪問12.0.0.12
4.回到web服務端查看服務日誌,可見來訪記錄是外網卡的地址
12.0.0.1 - - [04/Dec/2019:22:41:39 +0800] "GET /noindex/css/fonts/ExtraBold/OpenSans-ExtraBold.eot? HTTP/1.1" 404 248 "http://12.0.0.12/" "Mozilla/4.0 (compatible; MSIE 8.0; Windows NT 6.1; WOW64; Trident/4.0; SLCC2; .NET CLR 2.0.50727; .NET CLR 3.5.30729; .NET CLR 3.0.30729; Media Center PC 6.0)"由此可見,透明代理是使用外網卡的地址進行訪問web服務的,通過媒人路由和防火牆策略將Web訪問從定向給代理服務器處理!