


使用FLEX的HttpService與ASP.NET進行動態交互之一(轉載)
轉自:http://www.cnblogs.com/chu888chu888/archive/2008/07/10/1239760.html
現在RIA技術可以說在互聯網上是風風火火,adobe公司有FLEX,微軟有銀光。現在可以說是個有個的好處,不過做爲互聯網上最爲風行的FLASH,我想它的支持率是大家有目共睹的,銀光雖好,不過也得需要個一二年的成熟期哪。
以前我在cnblogs上搜過是否有FLEX的文章,找到的比較少,記得好像是大部分都是採用了WEBSERVICE或者是WCF來實現的,關於HTTPService實現的方法就比較少了,也許各位大俠比較喜歡用webserivce吧。
首先我先介紹一下什麼是httpservice,flex中的httpservice通信方式,說白了就是採用get與post方法進行數據傳送,和我們平時用的表單提交沒有什麼不同。httpservice對象位於mx.rpc.http包中,它主要用來發送http形式的get或post請求.對POST與GET的區別我就不說了,我想大部分都是明白的,這種方式最大的好處就是通用性高,不管它是PHP、ASP、JSP或者是我心愛的ASP.NET都可以對FLEX提交過來的數據進行處理與回遞。
在FLEX程序中,想要使用httpservice對象很方便,格式如下:
<mx:HttpService id="userRegForm" url="useradd.aspx" method="get|post">
以上是最簡單的寫法,還有一種就是用XML來寫,請看下文:
1: <mx:HTTPService showBusyCursor="true"
2: id="getuser" result=""
3: url="http://localhost:6666/Default.aspx">
4: <mx:request>
5: <username>
6:
7: </username>
8: <userpassword>
9:
10: </userpassword>
11: </mx:request>
12: </mx:HTTPService>
這裏面有許多的屬性可能大家不是很清楚,我來一一給大家解釋:
ShowBusyCursor屬性是指在提交請求時,是否顯示忙碌的狀態
id比較好理解它就是這個httpservice請求的標示
result是指請求之後的回調方法,主要是發送請求之後,需要得到一個結果
URl是發送的地址
<mx:request>中主要發着一些請求參數,相信大家也能看得懂。
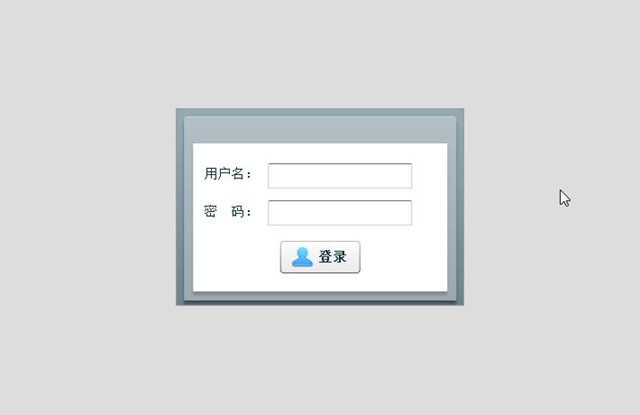
當我們有了這些基礎之後,我們就可以來編寫一個最簡單的FLEX交互程序了,首先打FLEX,先做一個界面,界面的樣式如下圖:
具體的代碼:
1: <?xml version="1.0" encoding="utf-8"?>
   2:  <mx:Application xmlns:mx="http://www.adobe.com/2006/mxml" layout="absolute"

width="320" height="219">
3: <mx:HTTPService showBusyCursor="true"
4: id="getuser" result="getuserproc();"
5: url="http://localhost:6666/Default.aspx">
6: <mx:request>
7: <username>
8: {this.txtUserName.text}
9: </username>
10: <userpassword>
11: {this.txtUserPassWord.text}
12: </userpassword>
13: </mx:request>
14: </mx:HTTPService>
15: <mx:Script>
16: <![CDATA[
17: import mx.controls.Alert;
18:
19: public function getuserproc():void
20: {
21: var returnValue:String=getuser.lastResult.Result.chu888;
22: if(returnValue=="ok")
23: {
24: Alert.show("您成功的登錄了","提示信息",Alert.OK,this,null,null,Alert.YES);
25: }
26: else
27: {
28: Alert.show("您的登錄失敗了","提示信息",Alert.OK,this,null,null,Alert.YES);
29: }
30: }
31: ]]>
32: </mx:Script>
33: <mx:Panel id="UserRegPanel" x="9.15" y="9.05" width="302"
34: height="204" layout="absolute">
35: <mx:Label x="10" y="22" text="用戶名:" id="lblUserName"
36: enabled="true" fontSize="15"/>
37: <mx:Label x="10" y="64" text="密 碼:" id="lblUserPassWord"
38: enabled="true" fontSize="15"/>
39: <mx:TextInput x="83" y="22" fontSize="15" id="txtUserName"/>
40: <mx:TextInput x="83" y="63" fontSize="15" id="txtUserPassWord"/>
41: <mx:Button x="96.45" y="108" label="登錄" width="89" height="36"
42: fontSize="15" enabled="true" click="getuser.send()">
43: <mx:icon>@Embed(source='../libs/001_54.png')</mx:icon>
44: </mx:Button>
45:
46: </mx:Panel>
47: </mx:Application>
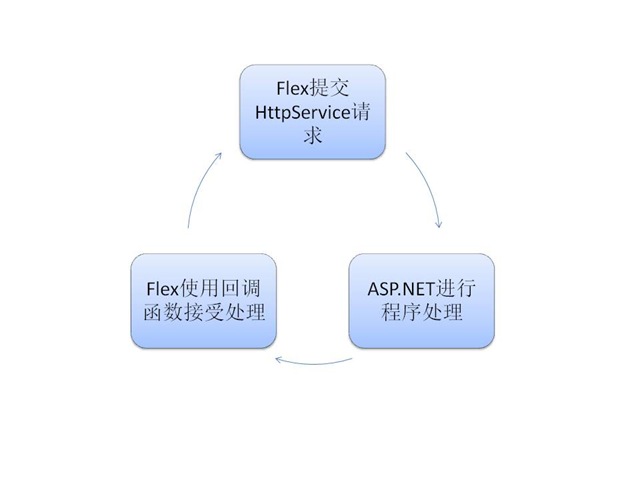
流程處理:
之後哪,我們新建一個Default.aspx的頁面,頁面內容很簡單,代碼如下:
1: namespace WebApplication4
2: {
3: public partial class _Default : System.Web.UI.Page
4: {
5: protected void Page_Load(object sender, EventArgs e)
6: {
7: if (Request.QueryString["username"].Equals("chu888"))
8: {
9: Response.Write("<Result>");
10: Response.Write("<chu888>ok</chu888>");
11: Response.Write("</Result>");
12: }
13: else
14: {
15: Response.Write("<Result>");
16: Response.Write("<chu888>error</chu888>");
17: Response.Write("</Result>");
18: }
19: }
20: }
21: }
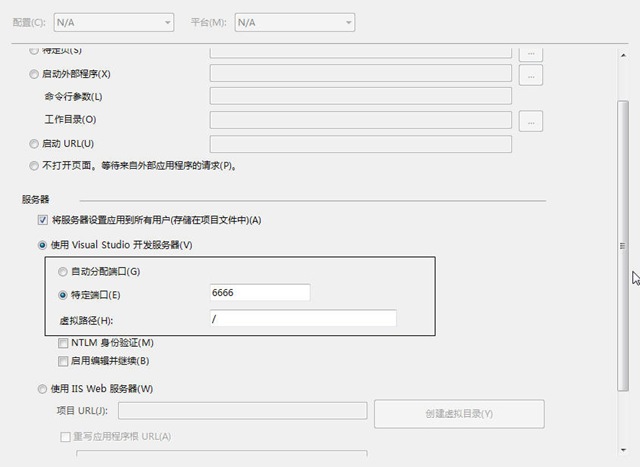
之後哪,將Flex的內容發佈,附加到ASP.NET的程序即可,這裏面有一個地方,需要大家注意的就是,由於每一次ASP.NET的文件服務器產生
的端口是不一樣的,你需要將端口固定,要不然你的程序會出現找不到程序的。