一、前提步驟
1、安裝gitlab
yum -y install policycoreutils openssh-server openssh-clients postfix
wget https://mirrors.tuna.tsinghua.edu.cn/gitlab-ce/yum/el6/gitlab-ce-8.17.0-ce.0.el6.x86_64.rpm
rpm -ivh gitlab-ce-8.17.0-ce.0.el6.x86_64.rpm
vi /etc/gitlab/gitlab.rb
修改爲本機IP external_url 'http://10.120.52.22'
gitlab-ctl reconfigure
gitlab-ctl restart
gitlab-ctl status 查詢狀態
訪問地址:http://10.120.52.22
2、安裝jenkins 持續集成
wget https://mirrors.tuna.tsinghua.edu.cn/jenkins/war/2.90/jenkins.war
啓動jenkins
java -jar jenkins.war &
二、思路
以Python flask web開發環境爲背景, 通過git提交代碼到gitlab後,再用jenkins遠程到gitlab構建代碼發佈到測試服務器上
三、gitlab配置
1、登錄gitlab上面,創建project:flask-demo
2、在菜單欄上 SSH Keys 中,添加開發環境IP的ssh-key
3、登錄開發環境IP,克隆git地址
# git clone [email protected]:UserCenter/flask-demo.git
# cd flask-demo 創建測試文件web.py
4、上傳更新代碼
git status
git add .
git commit -m "new file web.py"
git push origin master
四、jenkins 配置
1、登錄http://10.120.52.42:8080/ 控制檯
2、在系統管理-管理插件,安裝SSH2 Easy Plugin 插件後重啓
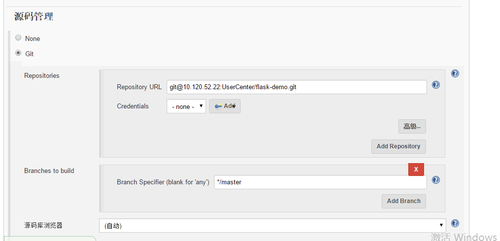
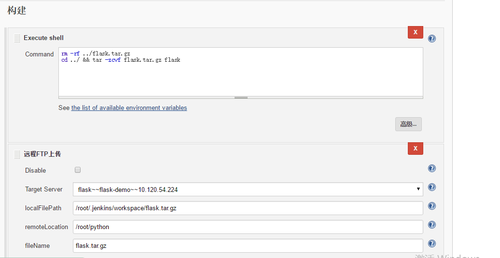
3、創建project項目 flask demo ,添加gitlab地址,遠程服務器IP等信息,如下截圖
4、系統管理-系統配置
5、在project中構建代碼,驗證遠程服務是否更新
其他
1、忘記gitlab 賬號密碼處理方法:
gitlab-rails console production
Loading production environment (Rails 4.1.1)
irb(main):001:0> user = User.where(id:1).first
irb(main):002:0> user.password='66668888'
irb(main):003:0> user.save!
2、gitlab數據遷移
查看gitlab版本的命令:
gitlab-rake gitlab:env:info
2. 備份原a服務器上的的數據
gitlab-rake gitlab:backup:create RAILS_ENV=production
PS: 備份後的文件一般是位於/var/opt/gitlab/backups下, 自動生成文件名文件名如1481529483_gitlab_backup.tar
3. 將步驟2生成的tar文件拷貝到b服務器上相應的backups目錄下
可以利用scp進行直接拷貝.
scp username@src_ip:/var/opt/gitlab/backups/1481529483_gitlab_backup.tar /var/opt/gitlab/backups
PS: username爲原服務器的用戶名,src_ip原服務器IP地址
4. 在b服務器恢復數據
gitlab-rake gitlab:backup:restore RAILS_ENV=production BACKUP=1481529483
PS:BACKUP的時間點必須與原服務器備份後的文件名一致


