


Nginx安裝配置及調優
一、安裝Nginx
1.安裝環境
[root@proxy ~]# yum –y install gcc pcre-devel openssl-devel
2.創建一個用戶啓動nginx
[root@proxy ~]# useradd –s /sbin/nologin nginx
3.安裝(不用的裝模塊不裝)
[root@proxy nginx-1.12.2]# ./configure
--prefix=/usr/local/nginx
--user=nginx
--group=nginx
--with-http_ssl_module
--with-stream
--with-http_stub_status_module
--prefix //指定安裝路徑
--user //指定用戶
--group //指定組
--with-http_ssl_module //開啓SSL加密功能
--with-stream //開啓反向代理功能
--with-http_stub_status_module //開啓status狀態頁面
4.編譯並安裝
[root@proxy nginx-1.12.2]# make && make install
5.放入PATH變量方便使用
[root@proxy ~]# ln -s /usr/local/nginx/sbin/nginx /sbin/
二、升級或者更改Nginx模塊
1.編譯新的Nginx
[root@proxy nginx-1.12.2]# ./configure
--prefix=/usr/local/nginx
--user=nginx
--group=nginx
--with-http_ssl_module
[root@proxy nginx-1.12.2]# make
2.拷貝新版本
[root@proxy nginx-1.12.2]# cp objs/nginx /usr/local/nginx/sbin/
3.升級後測試
[root@proxy nginx-1.12.2]# make upgrade
nginx: the configuration file /usr/local/nginx/conf/nginx.conf syntax is ok
nginx: configuration file /usr/local/nginx/conf/nginx.conf test is successful
4.查看版本
[root@proxy ~]# /usr/local/nginx/sbin/nginx -v
三、將Nginx加入systemd管理開機自啓
1.編寫nginx.service文件
[root@proxy systemd]# vim /usr/lib/systemd/system/nginx.service
[Unit]                                      #服務的說明
Description=nginx                   #描述服務
After=network.target              #在network服務後啓動
Wants=php-fpm.service         #如果不要求php可不加
[Service] Type=forking #是後臺運行的形式 ExecStart=/usr/local/nginx/sbin/nginx #指定啓動nginx的命令的腳本 ExecReload=/usr/local/nginx/sbin/nginx -s reload ExecStop=/usr/local/nginx/sbin/nginx -s stop PrivateTmp=true #給服務分配獨立的臨時空間[Install] WantedBy=multi-user.target #默認
2.管理命令
[root@proxy ~]# systemctl start / stop / restart / enable nginx
四、配置文件
1.設置頁面密碼登錄
1 ) 修改配置文件
[root@proxy ~]# vim /usr/local/nginx/conf/nginx.conf
```.. ..
server {
listen 80;
server_name localhost;
auth_basic "Input Password:"; #認證提示符
auth_basic_user_file "/usr/local/nginx/pass"; #認證密碼文件
location / {
root html;
index index.html index.htm;
}
}
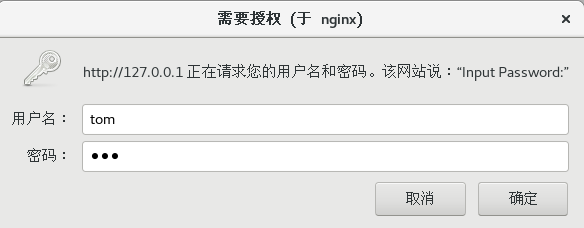
2 )生成密碼文件,創建用戶tom及密碼
[root@proxy ~]# yum -y install httpd-tools
//創建密碼文件
[root@proxy ~]# htpasswd -c /usr/local/nginx/pass tomNew password: Re-type new password: Adding password for user tom//追加用戶,不使用-c選項
[root@proxy ~]# htpasswd /usr/local/nginx/pass jerry (不要 -c)New password: Re-type new password: Adding password for user jerry[root@proxy ~]# cat /usr/local/nginx/pass
3 )重啓驗證
[root@nginx nginx-1.12.2]# firefox 127.0.0.1
2.配置SSL虛擬主機
1)生成私鑰與證書
[root@proxy ~]# cd /usr/local/nginx/conf
//生成私鑰
[root@proxy ~]# openssl genrsa > cert.key
//生成證書
[root@proxy ~]# openssl req -new -x509 -key cert.key > cert.pemCountry Name: CN //您所在國家的ISO標準代號,中國爲CN State or Province Name:guandong //您單位所在地省/自治區/直轄市 Locality Name:guangzhou //您單位所在地的市/縣/區 Organization Name: Test //您單位/機構/企業合法的名稱 Organizational Unit Name: Test //部門名稱 Common Name: www.test.com //通用名,例如:www.itrus.com.cn。此項必須與您訪問提供SSL服務的服務器時所應用的域名完全匹配。 Email Address: //您的郵件地址,不必輸入,直接回車跳過
2 ) 修改Nginx配置文件(最後),設置加密網站的虛擬主機
[root@proxy ~]# vim /usr/local/nginx/conf/nginx.conf
… …
server {
listen       443 ssl;                                 #端口
server_name            www.cc.com;         #訪問的域名
ssl_certificate      cert.pem;                   #公鑰
ssl_certificate_key  cert.key;                 #私鑰
ssl_session_cache    shared:SSL:1m;
ssl_session_timeout  5m;
ssl_ciphers  HIGH:!aNULL:!MD5;
ssl_prefer_server_ciphers  on;
location / {
root   html;
index  index.html index.htm;
}
}
3)設置域名解析並訪問測試
[root@proxy ~]# echo -e "192.168.4.13\twww.cc.com" > /etc/hosts
[root@proxy ~]# firefox https://www.cc.com
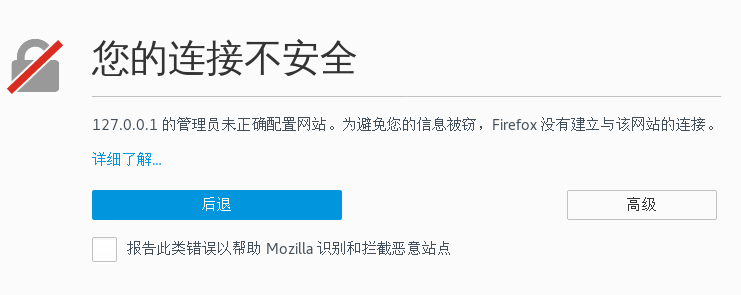
(成功)
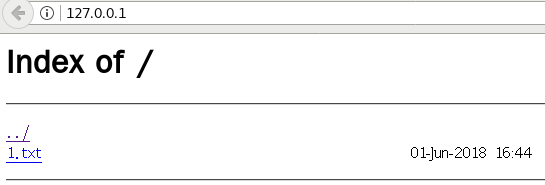
3.配置沒網頁也能打開頁面
1)修改配置文件
[root@proxy ~]# vim /usr/local/nginx/conf/nginx.conf
server {
listen       80;
server_name  localhost;
location /  {
root   test;                                      #訪問的nginx根路徑
index   index.html index.htm;          #可以不寫
autoindex on;
autoindex_exact_size off;
autoindex_localtime on;
proxy_set_header X-Real-IP $remote_addr;
proxy_set_header REMOTE-HOST $remote_addr;
proxy_set_header X-Forwarded-For $proxy_add_x_forwarded_for;
}
}
2 ) 創建測試的文件目錄
[root@nginx nginx]# mkdir /usr/local/nginx/test
[root@nginx nginx]# touch /usr/local/nginx/test/1.txt
3 )重啓服務驗證
4.地址重寫
1 )訪問a.html重定向到b.html
[root@proxy ~]# vim /usr/local/nginx/conf/nginx.conf
.. ..
server {
listen       80;
server_name  localhost;
location / {
root   html;
index  index.html index.htm;
rewrite /a.html  /b.html;
}}
2 )訪問本機地址的請求重定向至www.baidu.com
[root@proxy ~]# vim /usr/local/nginx/conf/nginx.conf
.. ..
server {
listen       80;
server_name  localhost;
rewrite ^/ http://www.baidu.com/;
#rewrite ^/(.*) http://www.baidu.cn/$1;          重定向至www.baidu.com/下相同的頁面
location / {
root   html;
index  index.html index.htm;
}}
3 ) 實現curl和火狐訪問相同鏈接返回的頁面不同
[root@proxy ~]# vim /usr/local/nginx/conf/nginx.conf
server {
listen       80;
server_name  localhost;
location / {
root   html;
index  index.html index.htm;
if ($http_user_agent ~\* firefox) { rewrite ^(.*)$ /firefox/$1 break; }            #識別客戶端firefox瀏覽器(#加*不區分大小寫)
#if ($http_user_agent ~* firefox) { rewrite .* /firefox/index.html break; }
}
#last        不再讀其他rewrite
#break      不再讀其他語句,結束請求
#redirect   臨時重定向
#permament  永久重定向
5.部署後端web服務器
[root@proxy ~]# vim /usr/local/nginx/conf/nginx.conf
.. ..
http {
.. ..
upstream webserver {               #設置一個webserver的池
#ip_hash;                 #設置相同客戶端訪問相同Web服務器
server 192.168.2.100 weight=1 max_fails=2 fail_timeout=10;
server 192.168.2.200 weight=2 max_fails=2 fail_timeout=10;
}
#max_fails=允許失敗的次數
#fail_timeout=失敗後多少秒不連接
#weight=訪問比例
6.實現TCP/UDP調度器功能(with-stream模塊)
[root@proxy ~]# vim /usr/local/nginx/conf/nginx.conf
stream {
upstream backend {
server 192.168.2.100:22;            #後端SSH服務器的IP和端口
server 192.168.2.200:22;
}
server {
listen 12345;                               #Nginx監聽的端口
proxy_connect_timeout 1s;          #超時時間
proxy_timeout 3s;                             #限制無操作斷開
proxy_pass backend;
}
}
http {
.. ..
}
五、Nginx調優
1.屏蔽Nginx版本信息
1 )修改配置文件
[root@proxy ~]# vim /usr/local/nginx/conf/nginx.conf
stream {
.. ..
http {
server_tokens off;                    //不顯示nginx版本號信息
.. ..
}
2)測試頁面(修改前)
[root@nginx nginx-1.12.2]# curl -I 127.0.0.1
HTTP/1.1 200 OK
Server: nginx/1.12.2
Date: Fri, 01 Jun 2018 11:39:31 GMT
Content-Type: text/html
Content-Length: 612
Last-Modified: Thu, 31 May 2018 09:49:05 GMT
Connection: keep-alive
ETag: "5b0fc511-264"
Accept-Ranges: bytes
(修改後)
HTTP/1.1 200 OK
Server: nginx
Date: Fri, 01 Jun 2018 11:39:31 GMT
Content-Type: text/html
Content-Length: 612
Last-Modified: Thu, 31 May 2018 09:49:05 GMT
Connection: keep-alive
ETag: "5b0fc511-264"
Accept-Ranges: bytes
3)隱藏使用的軟件爲nginx(修改源碼包安裝文件)
[root@svr5 nginx-1.12]# vim +48 /nginx-1.12/src/http/ngx_http_header_filter_module.c
static u_char ngx_http_server_string[] = "Server: nginx" CRLF;
static u_char ngx_http_server_full_string[] = "Server: " NGINX_VER CRLF;
static u_char ngx_http_server_build_string[] = "Server: " NGINX_VER_BUILD CRLF;
//下面是我們修改後的效果:
static u_char ngx_http_server_string[] = "Server: Jacob" CRLF;
static u_char ngx_http_server_full_string[] = "Server: Jacob" CRLF;
static u_char ngx_http_server_build_string[] = "Server: Jacob" CRLF;
4 )修改完成後,再去編譯安裝Nignx,版本信息將不再顯示爲Nginx,而是Jacob
2.增加Nginx增加併發量
1 )修改Nginx配置文件,增加併發量
[root@proxy ~]# vim /usr/local/nginx/conf/nginx.conf
.. ..
worker_processes  2;                 #與CPU核心數量一致
events {
worker_connections 65535;        #每個worker最大併發連接數
use epoll;
}
2 )優化Linux內核參數(最大文件數量 )
[root@proxy ~]# ulimit -Hn 100000
[root@proxy ~]# ulimit -Sn 100000
\\永久生效寫進配置文件
[root@proxy ~]# vim /etc/security/limits.conf\* soft nofile 100000 \* hard nofile 1000003)優化後測試服務器併發量
[root@proxy ~]# ab –n 2000 –c 2000 http://127.0.0.1/
3.限制併發量
DDOS×××者會發送大量的併發連接,佔用服務器資源(包括連接數、帶寬等),這樣會導致正常用戶處於等待或無法訪問服務器的狀態,Nginx提供了一個ngx_http_limit_req_module模塊,可以有效降低DDOS×××的風險。
1 ) 修改配置文件
[root@svr5 ~]# vim /usr/local/nginx/conf/nginx.conf
… …
http{
… …
limit_req_zone $binary_remote_addr zone=one:10m rate=1r/s;
server {
listen 80;
server_name localhost;
limit_req zone=one burst=5;
#平均每秒不超過1個請求,並且突發不超過5個請求。
}
}
limit_req_zone語法格式如下:
limit_req_zone key zone=name:size rate=rate;
上面案例中是將客戶端IP信息存儲名稱爲one的共享內存,內存空間爲10M並且該區域的平均請求處理速率不能超過每秒1個請求。
客戶端IP地址作爲關鍵字。需要注意的是,而不是$remote_addr,該 $binary_remote_addr變量在這裏使用。$binary_remote_addr對於IPv4地址,變量的大小始終爲4個字節,對於IPv6地址則爲16個字節。存儲狀態在32位平臺上始終佔用64個字節,在64位平臺上佔用128個字節。1M可以存儲8千個IP信息,10M可以存儲8萬個主機連接的狀態,容量可以根據需要任意調整。
如果區域存儲耗盡,最近最少使用的狀態將被刪除。即使在此之後無法創建新狀態,該請求也會因錯誤而終止。
速率以每秒請求數(r / s)指定。如果需要每秒小於一個請求的速率,則按每分鐘請求(r / m)指定。例如,每秒半請求是30r / m。
2 )重啓利用ab測試
[root@proxy ~]# ab -c 100 -n 100 http://192.168.4.13/ |grep -2 "Complete requests:"
Concurrency Level:      100
Time taken for tests:   3.002 seconds
Complete requests:      100
Failed requests:        94
(Connect: 0, Receive: 0, Length: 94, Exceptions: 0)
4.拒絕非法的請求
網站使用的是HTTP協議,該協議中定義了很多方法,可以讓用戶連接服務器,獲得需要的資源。但實際應用中一般僅需要get和post。
| 請求方法 | 功能描述 |
|---|---|
| GET | 請求指定的頁面信息,並返回實體主體 |
| HEAD | 類似於get請求,只不過返回的響應中沒有具體的內容,用於獲取報頭 |
| POST | 向指定資源提交數據進行處理請求 |
| DELETE | 請求服務器刪除指定的頁面 |
| PUT | 向服務器特定位置上傳資料 |
1 )未修改服務器配置前,客戶端使用不同請求方法測試
[root@client ~]# curl -i -X GET http://192.168.4.13 //正常
[root@client ~]# curl -i -X HEAD http://192.168.4.13 //正常HTTP/1.1 200 OK Server: nginx Date: Sat, 02 Jun 2018 05:30:03 GMT Content-Type: text/html Content-Length: 612 Last-Modified: Thu, 31 May 2018 09:49:05 GMT Connection: keep-alive ETag: "5b0fc511-264" Accept-Ranges: bytescurl命令選項說明:
-i選項:訪問服務器頁面時,顯示HTTP的頭部信息
-X選項:指定請求服務器的方法
2 )通過如下設置可以讓Nginx拒絕非法的請求
[root@svr5 ~]# vim /usr/local/nginx/conf/nginx.conf
http{
server {
listen 80;
if ($request_method !~ ^(GET|POST)$ ) {
return 444;
}
}
}
3 )修改服務器配置後,客戶端使用不同請求方法測試:
[root@client ~]# curl -i -X GET http://192.168.4.5 //正常
[root@client ~]# curl -i -X HEAD http://192.168.4.5 //報錯curl: (52) Empty reply from server
5.防止buffer溢出
當客戶端連接服務器時,服務器會啓用各種緩存,用來存放連接的狀態信息。
如果×××者發送大量的連接請求,而服務器不對緩存做限制的話,內存數據就有可能溢出(空間不足)。修改Nginx配置文件,調整各種buffer參數,可以有效降低溢出風險。
[root@svr7 ~]# vim /usr/local/nginx/conf/nginx.conf
http{
client_body_buffer_size 8k;
client_max_body_size 2m;
client_body_in_file_only clean;
client_body_in_single_buffer on;
client_header_buffer_size 1m;
large_client_header_buffers 4 8k;
… …
}
// client_body_buffer_size 8k;此指令設置用於請求主體的緩衝區大小。 如果主體超過緩衝區大小,則完整主體或其一部分將寫入臨時文件。 如果NGINX配置爲使用文件而不是內存緩衝區,則該指令會被忽略。 默認情況下,該指令爲32位系統設置一個8k緩衝區,爲64位系統設置一個16k緩衝區。 該指令在NGINX配置的http,server和location區塊使用。
// client_max_body_size 2m;此指令設置NGINX能處理的最大請求主體大小。 如果請求大於指定的大小,則NGINX發回HTTP 413(Request Entity too large)錯誤。 如果服務器處理大文件上傳,則該指令非常重要。默認情況下,該指令值爲1m。
// client_body_in_file_only clean;此指令禁用NGINX緩衝區並將請求體存儲在臨時文件中。 文件包含純文本數據。 該指令在NGINX配置的http,server和location區塊使用。 可選值有:
off:該值將禁用文件寫入
clean:請求body將被寫入文件。 該文件將在處理請求後刪除。
on: 請求正文將被寫入文件。 處理請求後,將不會刪除該文件。
默認情況下,指令值爲關閉。
// client_body_in_single_buffer on;該指令設置NGINX將完整的請求主體存儲在單個緩衝區中。 默認情況下,指令值爲off。 如果啓用,它將優化讀取$request_body變量時涉及的I/O操作。
//client_header_buffer_size 1m;此指令與client_body_buffer_size類似。 它爲請求頭分配一個緩衝區。 如果請求頭大小大於指定的緩衝區,則使用large_client_header_buffers指令分配更大的緩衝區。
//large_client_header_buffers 4 8k;此指令規定了用於讀取大型客戶端請求頭的緩衝區的最大數量和大小。 這些緩衝區僅在缺省緩衝區不足時按需分配。 當處理請求或連接轉換到保持活動狀態時,釋放緩衝區。6.對頁面進行壓縮處理
[root@proxy ~]# cat /usr/local/nginx/conf/nginx.conf
http {
.. ..
gzip on;                                     //開啓壓縮
gzip_min_length 1000;                //小於1000KB文件不壓縮
gzip_comp_level 4;                    //壓縮比率
gzip_types text/plain text/css application/json application/x-javascript text/xml application/xml application/xml+rss text/javascript;
//對特定文件壓縮,類型參考/usr/local/nginx/conf/mime.types
.. ..
}
7.開啓Nginx監控頁面(with-http_stub_status_module)
1)修改Nginx配置文件,定義狀態頁面
[root@proxy ~]# vim /usr/local/nginx/conf/nginx.conf
… …
location /status {
stub_status on;
allow   127.0.0.1;                     #允許的ip
deny all;                              #拒絕的IP
}
2)優化後,查看狀態頁面信息
[root@proxy ~]# curl http://127.0.0.1/status
Active connections: 291
server accepts handled requests
16630948 16630948 31070465
Reading: 6 Writing: 179 Waiting: 106
第一行
當前的活躍連接數:291
第二行
服務器已接受的連接數:16630948(accepted connection )
服務器已處理的連接數:16630948(handled connection )
服務器已處理的請求:31070465(可以算出,平均每個連接有 1.8 個請求)(handled connection )
第三行
Reading – Nginx 讀取的請求頭次數爲 6;
Writting – Nginx 讀取請求體、處理請求併發送響應給客戶端的次數爲 179;
Waiting – 當前活動的長連接數:106。
Server accepts handled requests: Nginx總共處理了16630948個連接,成功創建16630948次握手(證明中間沒有失敗的),總共處理了31070465個請求.
Waiting: 開啓keep-alive的情況下,這個值等於 active – (reading + writing),意思就是Nginx已經處理完成,正在等候下一次請求指令的駐留連接.
所以,在訪問效率高,請求很快被處理完畢的情況下,Waiting數比較多是正常的.如果reading +writing數較多,則說明併發訪問量非常大,正在處理過程中.
8.自定義404頁面
[root@nginx nginx]# vim /usr/local/nginx/conf/nginx.conf
.. ..
server {
error_page  404              /404.html;
}
.. ..
9.expires作用和優點
expires可以降低網站的帶寬,節約成本,加快用戶訪問網站的速度,提升了用戶訪問體驗,服務器訪問量降低,服務器壓力就減輕了,服務器的成本也會降低,甚至可以節約人力成本,幾乎對於所有web服務來說,這是非常重要的功能之一,apache服務也有此功能
location ~ ^/(images|javascript|js|css|flash|media|static)/ {
    expires 360d;
}
當網站被緩存的頁面或數據更新了,此時用戶端看到的可能還是舊的已經緩存的內容,這樣就會影響用戶體驗,那麼如何解決這個問題呢?
第一:對於經常需要的變動圖片等文件,可以縮短對象緩存時間,例如,百度、谷歌等網站的首頁圖片經常會換成一些節日的圖,這裏可以將緩存期修改爲1天
第二:當網站改版或更新內容時,可以在服務器將緩存的對象改名(網站代碼程序)
對於網站的圖片、附件,一般不會被用戶直接修改,用戶層面上的修改圖片,實際上是重新傳到服務器,雖然內容一樣但是一個新的圖片名了
網站改版升級會修改JS、CSS元素,若改版的時候對這些元素改了名,會使得前端的CDN以及用戶端需要重新緩存內容