


Juniper vSRX防火牆HA配置
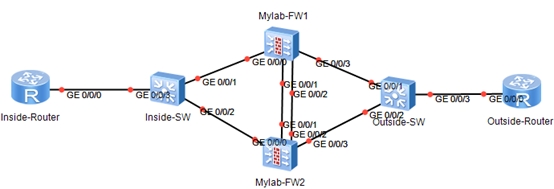
實驗網絡拓撲結構
實驗目標
- 完成SRX防火牆的Failover的配置
- 測試設備的連通性
實驗配置步驟:
- 使用網線或者使用Esxi或者VM的網絡將兩臺vSRX防火牆的ge-0/0/1和ge-0/0/2口互聯起來,ge-0/0/1接口作爲Control Link,ge-0/0/2接口作爲Fabric Link
- 將防火牆還原到只設置了root密碼的狀態,兩臺設備的root密碼保持一致
- 使用set chassis cluster cluster-id 2 node 0 reboot命令將第一臺防火牆配置爲集羣2的第一臺設備並重啓設備
- 使用set chassis cluster cluster-id 2 node 1 reboot命令將第二臺防火牆配置爲集羣2的第二臺設備並重啓設備
- 設備重啓完成後,需要在node0設備上進行以下配置來解決管理接口的地址衝突
set groups node0 system host-name Mylab-FW1
set groups node0 interfaces fxp0 unit 0 family inet address 100.100.100.1/24
set groups node1 system host-name Mylab-FW2
set groups node1 interfaces fxp0 unit 0 family inet address 100.100.100.2/24
set apply-groups ${node}
commit and quit
#這個時候防火牆的名稱分別變爲Mylab-FW1和Mylab-FW2
- 下面我們進行Redundancy Group的配置
#使用cluster reth-count明確聲明需要配置幾個RG組
set chassis cluster reth-count 2
set chassis cluster redundancy-group 0 node 0 priority 100
set chassis cluster redundancy-group 0 node 1 priority 99
set chassis cluster redundancy-group 1 node 0 priority 100
set chassis cluster redundancy-group 1 node 1 priority 99
#配置Fabric Link
set interfaces fab0 fabric-options member-interfaces ge-0/0/2
set interfaces fab1 fabric-options member-interfaces ge-7/0/2
#注意vSRX在完成Cluster之後,備用主機的接口爲主用設備接口+7
- 配置Redundant Interface
#配置冗餘接口
set interfaces ge-0/0/3 gigether-options redundant-parent reth0
set interfaces ge-0/0/4 gigether-options redundant-parent reth1
set interfaces ge-7/0/3 gigether-options redundant-parent reth0
set interfaces ge-7/0/4 gigether-options redundant-parent reth1
set interfaces reth0 redundant-ether-options redundancy-group 1
set interfaces reth0 unit 0 family inet address 10.1.1.10/24
set interfaces reth1 redundant-ether-options redundancy-group 1
set interfaces reth1 unit 0 family inet address 202.100.1.10/24
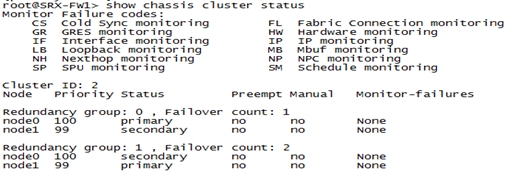
- 檢查HA的狀態

- 如果需要恢復到遠程的獨立使用狀態
#首先關閉集羣后重啓
set chassis cluster disable reboot
#使用load factory-default恢復至出廠設置
load factory-default
set system root-authentication plain-text-password
commit