


一. 概念說明
Broker:簡單來說就是消息隊列服務器實體。
Exchange:消息交換機,它指定消息按什麼規則,路由到哪個隊列。
Queue:消息隊列載體,每個消息都會被投入到一個或多個隊列。
Binding:綁定,它的作用就是把exchange和queue按照路由規則綁定起來。
Routing Key:路由關鍵字,exchange根據這個關鍵字進行消息投遞。
vhost:虛擬主機,一個broker裏可以開設多個vhost,用作不同用戶的權限分離。
producer:消息生產者,就是投遞消息的程序。
consumer:消息消費者,就是接受消息的程序。
channel:消息通道,在客戶端的每個連接裏,可建立多個channel,每個channel代表一個會話任務。交換機路由的幾種類型:
Direct Exchange:直接匹配,通過Exchange名稱+RountingKey來發送與接收消息.
Fanout Exchange:廣播訂閱,向所有的消費者發佈消息,但是隻有消費者將隊列綁定到該路由器才能收到消息,忽略Routing Key.
Topic Exchange:主題匹配訂閱,這裏的主題指的是RoutingKey,RoutingKey可以採用通配符,如:*或#,RoutingKey命名採用.來分隔多個詞,只有消息這將隊列綁定到該路由器且指定RoutingKey符合匹配規則時才能收到消息;
Headers Exchange:消息頭訂閱,消息發佈前,爲消息定義一個或多個鍵值對的消息頭,然後消費者接收消息同時需要定義類似的鍵值對請求頭:(如:x-mactch=all或者x_match=any),只有請求頭與消息頭匹配,才能接收消息,忽略RoutingKey.
默認的exchange:如果用空字符串去聲明一個exchange,那麼系統就會使用”amq.direct”這個exchange,我們創建一個queue時,默認的都會有一個和新建queue同名的routingKey綁定到這個默認的exchange上去
二、環境配置
項目基本配置參考SpringBoot入門一,使用myEclipse新建一個SpringBoot項目,使用myEclipse新建一個SpringBoot項目即可。下面開始Rabbitmq整合
2.1 pom.xml添加以下配置信息
<!-- 引入RabbitMq支持 -->
<dependency>
        <groupId>org.springframework.boot</groupId>
        <artifactId>spring-boot-starter-amqp</artifactId>
</dependency>
2.2 配置文件中添加以下配置信息
# RabbitMq配置
spring.rabbitmq.host=127.0.0.1
## spring.rabbitmq.port=
spring.rabbitmq.username=test
spring.rabbitmq.password=56789
## 消息發送確認(用來確認生產者將消息發送給交換器,交換器傳遞給隊列的過程中,消息是否成功投遞)
spring.rabbitmq.publisher-confirms=true
## 消息發送失敗退回(消息投遞失敗時觸發)
spring.rabbitmq.publisher-returns=true
## 消息接收確認,採用手動應答(none 不確認;auto 自動確認;manual 手動確認)
spring.rabbitmq.listener.simple.acknowledge-mode=manual
## 併發消費數量
spring.rabbitmq.listener.simple.concurrency=5
## 最大併發消費數量
spring.rabbitmq.listener.simple.max-concurrency=10
2.3 編寫RabbitMq配置類
import org.springframework.amqp.core.Binding;
import org.springframework.amqp.core.BindingBuilder;
import org.springframework.amqp.core.DirectExchange;
import org.springframework.amqp.core.FanoutExchange;
import org.springframework.amqp.core.Queue;
import org.springframework.amqp.core.TopicExchange;
import org.springframework.context.annotation.Bean;
import org.springframework.context.annotation.Configuration;

@Configuration
public class RabbitMqConfig {

    // =====================普通隊列模式,指定Queue名稱發送======================
    /**
     * <h5>功能:構建隊列,名稱,是否持久化</h5>
     * @return
     */
    @Bean
    public Queue springbootQueueTest01(){
        // durable:是否持久化
        return new Queue("springboot.Queue.01", true);
    }

    /**
     * <h5>功能:構建隊列,名稱,是否持久化</h5>
     * @return
     */
    @Bean
    public Queue springbootQueueTest02(){
        // durable:是否持久化
        return new Queue("springboot.Queue.02", true);
    }

    /**
     * <h5>功能:直連模式交換機</h5>
     * 用於實例間的任務分發
     * 是一種帶路由功能的交換機,一個隊列會和一個交換機綁定,除此之外再綁定一個routing_key
     * @return
     */
    @Bean
    public DirectExchange directExchange(){
        // durable:是否持久化;auto_delete:當所有消費客戶端連接斷開後,是否自動刪除隊列;
        return new DirectExchange("springboot.DirectExchange", true, false);
    }

    /**
     * <h5>功能:隊列和直連交換機綁定</h5>
     * @param springbootQueueTest01
     * @param directExchange
     * @return
     */
    @Bean
    public Binding binding01(Queue springbootQueueTest01, DirectExchange directExchange){
        return BindingBuilder.bind(springbootQueueTest01).to(directExchange).with("springboot.bindingkey.01");
    }

    /**
     * <h5>功能:隊列和直連交換機綁定</h5>
     * @param springbootQueueTest02
     * @param directExchange
     * @return
     */
    @Bean
    public Binding binding02(Queue springbootQueueTest02, DirectExchange directExchange){
        return BindingBuilder.bind(springbootQueueTest02).to(directExchange).with("springboot.bindingkey.02");
    }

    // =====================topic 主題匹配訂閱模式,匹配模式發送======================
    /**
     * <h5>功能:構建隊列,名稱,是否持久化</h5>
     * @return
     */
    @Bean
    public Queue springbootQueueTest03(){
        // durable:是否持久化
        return new Queue("springboot.Queue.03", true);
    }

    /**
     * <h5>功能:構建隊列,名稱,是否持久化</h5>
     * @return
     */
    @Bean
    public Queue springbootQueueTest04(){
        // durable:是否持久化
        return new Queue("springboot.Queue.04", true);
    }

    /**
     * <h5>功能:主題匹配訂閱模式交換機</h5>
     * 通過可配置的規則分發給綁定在該exchange上的隊列
     * 發送到主題交換機上的消息需要攜帶指定規則的routing_key
     * 交換機和隊列的binding_key需要採用*.#.*.....的格式,每個部分用.分開
     * *表示一個單詞
     * #表示任意數量(零個或多個)單詞
     * @return
     */
    @Bean
    public TopicExchange topicExchange(){
        // durable:是否持久化;auto_delete:當所有消費客戶端連接斷開後,是否自動刪除隊列;
        return new TopicExchange("springboot.TopicExchange", true, false);
    }

    /**
     * <h5>功能:隊列和主題匹配訂閱交換機綁定</h5>
     * @param springbootQueueTest03
     * @param topicExchange
     * @return
     */
    @Bean
    public Binding binding03(Queue springbootQueueTest03, TopicExchange topicExchange){
        return BindingBuilder.bind(springbootQueueTest03).to(topicExchange).with("springboot.topic.01");
    }

    // *(星號)僅代表一個單詞;#(井號)代表任意個單詞
    /**
     * <h5>功能:隊列和主題匹配訂閱交換機綁定</h5>
     * @param springbootQueueTest04
     * @param topicExchange
     * @return
     */
    @Bean
    public Binding binding04(Queue springbootQueueTest04, TopicExchange topicExchange){
        return BindingBuilder.bind(springbootQueueTest04).to(topicExchange).with("springboot.topic.#");
    }

    // ===============fanout廣播模式 隊列模式,只要綁定了Queue就全部發送(瞅誰誰懷孕)===============
    /**
     * <h5>功能:廣播模式交換機</h5>
     * 分發給所有綁定到該exchange上的隊列,忽略routing key
     * 速度是所有的交換機類型裏面最快的
     * @return
     */
    @Bean
    public FanoutExchange fanoutExchange(){
        // durable:是否持久化;auto_delete:當所有消費客戶端連接斷開後,是否自動刪除隊列;
        return new FanoutExchange("springboot.fanoutExchange", true, false);
    }

    // springbootQueueTest01中有模擬消費異常,重新發送消息到隊列的處理,廣播模式下會形成死循環,因此廣播模式下不要綁定有消息重發送處理的Queue
//  @Bean
//  public Binding binding05(Queue springbootQueueTest01, FanoutExchange fanoutExchange){
//      return BindingBuilder.bind(springbootQueueTest01).to(fanoutExchange);
//  }

    /**
     * <h5>功能:隊列和廣播模式交換機綁定</h5>
     * @param springbootQueueTest02
     * @param fanoutExchange
     * @return
     */
    @Bean
    public Binding binding06(Queue springbootQueueTest02, FanoutExchange fanoutExchange){
        return BindingBuilder.bind(springbootQueueTest02).to(fanoutExchange);
    }

    /**
     * <h5>功能:隊列和廣播模式交換機綁定</h5>
     * @param springbootQueueTest03
     * @param fanoutExchange
     * @return
     */
    @Bean
    public Binding binding07(Queue springbootQueueTest03, FanoutExchange fanoutExchange){
        return BindingBuilder.bind(springbootQueueTest03).to(fanoutExchange);
    }

    /**
     * <h5>功能:隊列和廣播模式交換機綁定</h5>
     * @param springbootQueueTest04
     * @param fanoutExchange
     * @return
     */
    @Bean
    public Binding binding08(Queue springbootQueueTest04, FanoutExchange fanoutExchange){
        return BindingBuilder.bind(springbootQueueTest04).to(fanoutExchange);
    }
}
2.4 編寫生產者類(可以把所有的send類都整合在一個類中,這裏只做演示,就不整合了)
RabbitMqSend01.java(普通模式)
import javax.annotation.PostConstruct;
import org.slf4j.Logger;
import org.slf4j.LoggerFactory;
import org.springframework.amqp.core.Message;
import org.springframework.amqp.rabbit.core.RabbitTemplate;
import org.springframework.amqp.rabbit.support.CorrelationData;
import org.springframework.beans.factory.annotation.Autowired;
import org.springframework.stereotype.Service;

// 如果有多個send類,只需要在其中一個類實現以下接口和對應的方法即可,其他類自動生效
@Service
public class RabbitMqSend01 implements RabbitTemplate.ConfirmCallback,RabbitTemplate.ReturnCallback {
    private final Logger log  = LoggerFactory.getLogger(this.getClass());
    @Autowired
    private RabbitTemplate rabbitTemplate;
    // 表示在類加載完畢之後執行
    @PostConstruct
    public void init() {
        rabbitTemplate.setConfirmCallback(this);
        rabbitTemplate.setReturnCallback(this);
    }

    public void send(String str){
        rabbitTemplate.convertAndSend("springboot.Queue.01", str);
    }

    // ReturnCallback接口用於實現消息發送到RabbitMQ交換器,但無相應隊列與交換器綁定時的回調(既發送到Queue失敗時回調)
    @Override
    public void returnedMessage(Message message, int i, String s,String s1, String queueName) {
        System.out.println("發送信息到隊列(Queue)"+queueName+"失敗" + message.toString()+"===["+i+"]===["+s+"]===["+s1+"]==="+queueName);
        log.warn("消息發送到隊列(Queue)[{}]時失敗,消息內容[{}]", queueName, message.toString());
    }

    // ConfirmCallback接口用於實現消息發送到RabbitMQ交換器後接收ack回調
    @Override
    public void confirm(CorrelationData correlationData, boolean ack, String cause) {
        if (ack) {
            System.out.println("消息發送成功:" + ack + ",correlationData["+correlationData+"],cause["+cause+"]");
        } else {
            System.out.println("消息發送失敗:" + ack + ",correlationData["+correlationData+"],cause["+cause+"]");
        }
    }
}
RabbitMqSend02.java(普通模式)
import org.springframework.amqp.rabbit.core.RabbitTemplate;
import org.springframework.beans.factory.annotation.Autowired;
import org.springframework.stereotype.Service;

@Service
public class RabbitMqSend02 {
    @Autowired
    private RabbitTemplate rabbitTemplate;
    public void send(String str){
        rabbitTemplate.convertAndSend("springboot.Queue.02", str);
    }
}
RabbitMqSend03.java(主題匹配訂閱模式,精確配置"springboot.topic.01"通道(Queue))
import org.springframework.amqp.rabbit.core.RabbitTemplate;
import org.springframework.beans.factory.annotation.Autowired;
import org.springframework.stereotype.Service;

@Service
public class RabbitMqSend03 {
    @Autowired
    private RabbitTemplate rabbitTemplate;
    public void send(String str){
        rabbitTemplate.convertAndSend("springboot.TopicExchange", "springboot.topic.01", str);
    }
}
RabbitMqSend04.java(主題匹配訂閱模式,配置"springboot.topic"開頭的任意通道(Queue))
import org.springframework.amqp.rabbit.core.RabbitTemplate;
import org.springframework.beans.factory.annotation.Autowired;
import org.springframework.stereotype.Service;

@Service
public class RabbitMqSend04 {
    @Autowired
    private RabbitTemplate rabbitTemplate;
    public void send(String str){
        rabbitTemplate.convertAndSend("springboot.TopicExchange", "springboot.topic.999", str);
    }
}
RabbitMqSend05.java(廣播模式,配備與廣播模式通道綁定的所有通道,忽略隊列名稱)
import org.springframework.amqp.rabbit.core.RabbitTemplate;
import org.springframework.beans.factory.annotation.Autowired;
import org.springframework.stereotype.Service;

@Service
public class RabbitMqSend05 {
    @Autowired
    private RabbitTemplate rabbitTemplate;
    public void send(String str){
        rabbitTemplate.convertAndSend("springboot.fanoutExchange", "", str);
    }
}
2.5 編寫消費者類(都已經整合在一個類中,也可以單獨拆分成多個處理類)
import java.io.IOException;

import org.springframework.amqp.core.Message;
import org.springframework.amqp.rabbit.annotation.RabbitListener;
import org.springframework.stereotype.Service;

import com.rabbitmq.client.Channel;

/**
 * <h5>描述:消息監聽</h5>
 *  @RabbitListener可以如本類一樣寫在一個類中,也可以每一個類對應一個監聽
 *  channel參數詳解 https://www.cnblogs.com/piaolingzxh/p/5448927.html
 */
@Service
public class RabbitMqReceiver01 {

    @RabbitListener(queues = "springboot.Queue.01")
    public void process(Message message , Channel channel) {
        String messageStr = new String(message.getBody());
        System.out.println("RabbitMqReceiver01,接收到信息:"+ messageStr);
//      basicAck(message, channel);         // 確認消費
        basicAckException(message, channel, false, "springboot.Queue.02");// 模擬消費異常,發回到隊列,重新消費
//      basicReject(message, channel);      // 丟棄此消息,方式一
//      basicNack(message, channel);        // 丟棄此消息,方式二
    }

    @RabbitListener(queues = "springboot.Queue.02")
    public void process2(Message message, Channel channel) {
        String messageStr = new String(message.getBody());
        System.out.println("RabbitMqReceiver02,接收到信息:"+ messageStr);
        basicAck(message, channel); // 確認消費
        System.out.println("RabbitMqReceiver02,確認消費了");
    }

    @RabbitListener(queues = "springboot.Queue.03")
    public void process3(Message message, Channel channel) {
        System.out.println("RabbitMqReceiver03,接收到信息:"+ new String(message.getBody()));
        basicReject(message, channel);  // 丟棄此消息,方式一
        System.out.println("RabbitMqReceiver03,丟棄此消息了,方式一");
    }

    @RabbitListener(queues = "springboot.Queue.04")
    public void process4(Message message, Channel channel) {
        System.out.println("RabbitMqReceiver04,接收到信息:"+ new String(message.getBody()));
        basicNack(message, channel);    // 丟棄此消息,方式二
        System.out.println("RabbitMqReceiver04,丟棄此消息了,方式一");
    }

    // ==================== private method ====================
    /**
     * <h5>功能:確認消費</h5>
     * @param message
     * @param channel
     */
    private void basicAck(Message message, Channel channel){
        try {
            // 確認消費
            channel.basicAck(message.getMessageProperties().getDeliveryTag(), false);
//          basicAck(message, channel);         // 確認消費
        } catch (IOException e) {
            e.printStackTrace();
        }
    }

    /**
     * <h5>功能:模擬消費異常,發回到隊列,重新消費</h5>
     *  廣播模式下不能使用此方法,否則會忽略Queue,進行再次廣播,形成死循環
     * @param message 接收到的消息
     * @param channel 通道信息
     * @param isMySelfQueue 是否重新發送到自己的當前的隊列(Queue)
     * @param newQueueName 發送到新的隊列(Queue的名稱)
     */
    private void basicAckException(Message message, Channel channel, boolean isMySelfQueue, String newQueueName){
        try {
            // 確認消費
            basicAck(message, channel);
            // 模擬業務處理髮生異常,發回到新的消息隊列
            String queueName = isMySelfQueue ? message.getMessageProperties().getReceivedRoutingKey() : newQueueName;
            System.out.println("RabbitMqReceiver01,業務處理髮生異常,重新發送消息到隊列["+ queueName + "]");
            channel.basicPublish(message.getMessageProperties().getReceivedExchange(), queueName, null, message.getBody());
        } catch (IOException e) {
            e.printStackTrace();
        }
    }

    /**
     * <h5>功能:丟棄此消息,方式一</h5>
     *  一次只能拒絕一條消息
     * @param message
     * @param channel
     */
    private void basicReject(Message message, Channel channel){
        try {
            // 拒絕消費,且拒絕再次進入隊列;true表示會再次進入隊列(如果一直拒絕,會造成死信),false標示不再進入隊列
            channel.basicReject(message.getMessageProperties().getDeliveryTag(), false);
        } catch (IOException e) {
            e.printStackTrace();
        }
    }

    /**
     * <h5>功能:丟棄此消息,方式二</h5>
     * @param message
     * @param channel
     */
    private void basicNack(Message message, Channel channel){
        try {
            // 拒絕消費,且拒絕再次進入隊列
            // 第二個參數爲false表示每次拒絕一條消息,如果爲true標示拒絕多條;
            // 第三個參數爲true表示會再次進入隊列(如果一直拒絕,會造成死信),false標示不再進入隊列
            channel.basicNack(message.getMessageProperties().getDeliveryTag(), false, false);
        } catch (IOException e) {
            e.printStackTrace();
        }
    }
}
2.6 編寫Controller進行調用
import javax.servlet.http.HttpServletRequest;
import org.springframework.beans.factory.annotation.Autowired;
import org.springframework.stereotype.Controller;
import org.springframework.web.bind.annotation.RequestMapping;
import com.qfx.system.service.RabbitMqSend01;
import com.qfx.system.service.RabbitMqSend02;
import com.qfx.system.service.RabbitMqSend03;
import com.qfx.system.service.RabbitMqSend04;
import com.qfx.system.service.RabbitMqSend05;
@Controller
@RequestMapping("send")
public class SendController {
@Autowired
private RabbitMqSend01 rabbitMqSend01;
@Autowired
private RabbitMqSend02 rabbitMqSend02;
@Autowired
private RabbitMqSend03 rabbitMqSend03;
@Autowired
private RabbitMqSend04 rabbitMqSend04;
@Autowired
private RabbitMqSend05 rabbitMqSend05;
private static String viewPath = "../index";
@RequestMapping("01")
public String send01(HttpServletRequest request){
rabbitMqSend01.send("你好,這是來自send01的一條信息");
request.setAttribute("message", "send01發送一條消息成功");
return viewPath;
}
@RequestMapping("02")
public String send02(HttpServletRequest request){
rabbitMqSend02.send("你好,這是來自send02的一條信息");
request.setAttribute("message", "send02發送一條消息成功");
return viewPath;
}
@RequestMapping("03")
public String send03(HttpServletRequest request){
rabbitMqSend03.send("你好,這是來自send03的一條信息");
request.setAttribute("message", "send03發送一條消息成功");
return viewPath;
}
@RequestMapping("04")
public String send04(HttpServletRequest request){
rabbitMqSend04.send("你好,這是來自send04的一條信息");
request.setAttribute("message", "send04發送一條消息成功");
return viewPath;
}
@RequestMapping("05")
public String send05(HttpServletRequest request){
rabbitMqSend05.send("你好,這是來自send05的一條信息");
request.setAttribute("message", "send05發送一條消息成功");
return viewPath;
}
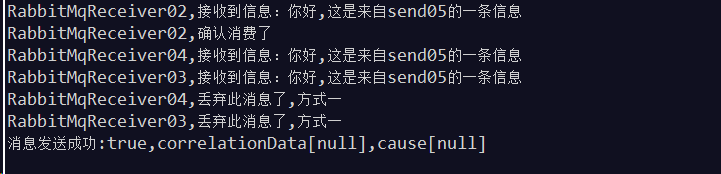
}三. 執行測試
send01,直連模式,模擬業務處理異常,重新發送消息到其他隊列

send02,直連模式,正常消費接收到的信息,並手工應答成功

send03,主題匹配訂閱模式,03和04都匹配

send04,主題匹配訂閱模式,僅04匹配

send05,廣播模式,配置02、03、04
四.參考
https://www.cnblogs.com/BobXie85/p/8696374.html
http://www.ityouknow.com/springboot/2016/11/30/spring-boot-rabbitMQ.html
https://www.jianshu.com/p/0d400d30936b
http://www.cnblogs.com/sky-chen/p/9817509.html
channel參數詳解
https://www.cnblogs.com/piaolingzxh/p/5448927.html
1.特別感謝以上文章的作者和其他信息來源者
2.本文如有錯誤之處,歡迎大神指正,謝謝