


前言
本文是筆者所著的 Spring Core Container 源碼分析系列之一;
本篇文章主要試圖梳理出 Spring Beans 的初始化主流程和相關核心代碼邏輯;
本文轉載自本人的私人博客,傷神的博客: http://www.shangyang.me/2017/04/01/spring-core-container-sourcecode-analysis-beans-instantiating-process/
本文爲作者的原創作品,轉載需註明出處;
源碼分析環境搭建
參考 Spring Core Container 源碼分析二:環境準備
測試用例
依然使用這個官網上的用例,來進行調試;
Person.java
    package org.shangyang.spring.container;

    /**
     -
     - @author shangyang
     *
     */
    public class Person {

        String name;

        Person spouse;

        public String getName() {
            return name;
        }

        public void setName(String name) {
            this.name = name;
        }

        public Person getSpouse() {
            return spouse;
        }

        public void setSpouse(Person spouse) {
            this.spouse = spouse;
        }

    }
beans.xml
<beans xmlns="http://www.springframework.org/schema/beans"
    xmlns:xsi="http://www.w3.org/2001/XMLSchema-instance"
    xmlns:p="http://www.springframework.org/schema/p"
    xsi:schemaLocation="http://www.springframework.org/schema/beans
        http://www.springframework.org/schema/beans/spring-beans.xsd">

    <!-- 傳統的方式 -->
    <bean name="john" class="org.shangyang.spring.container.Person">
        <property name="name" value="John Doe"/>
        <property name="spouse" ref="jane"/>
    </bean>

    <bean name="jane" class="org.shangyang.spring.container.Person">
        <property name="name" value="Jane Doe"/>
    </bean>
</beans>
@Test
public void testApplicationContext(){
@SuppressWarnings("resource")
ApplicationContext context = new ClassPathXmlApplicationContext("beans.xml");
Person p = context.getBean("john", Person.class);
assertEquals("John Doe", p.getName() );
assertEquals("Jane Doe", p.getSpouse().getName() );
}源碼分析
備註,這裏只針對 Spring 容器實例化 singleton bean 的主流程進行介紹;singleton bean 在 Spring 容器中被初始化的特點是,在 Spring 容器的啓動過程中就進行初始化;
(最好的分析源碼的方式,就是通過高屋建瓴,逐個擊破的方式;首先通過流程圖獲得它的藍圖(頂層設計圖),然後再根據藍圖上的點逐個擊破;最後才能達到融會貫通,胸有成竹的境界;所以,這裏作者用這樣的方式帶你深入剖析 Spring 容器裏面的核心點,以及相關主流程到底是如何運作的。)
主流程
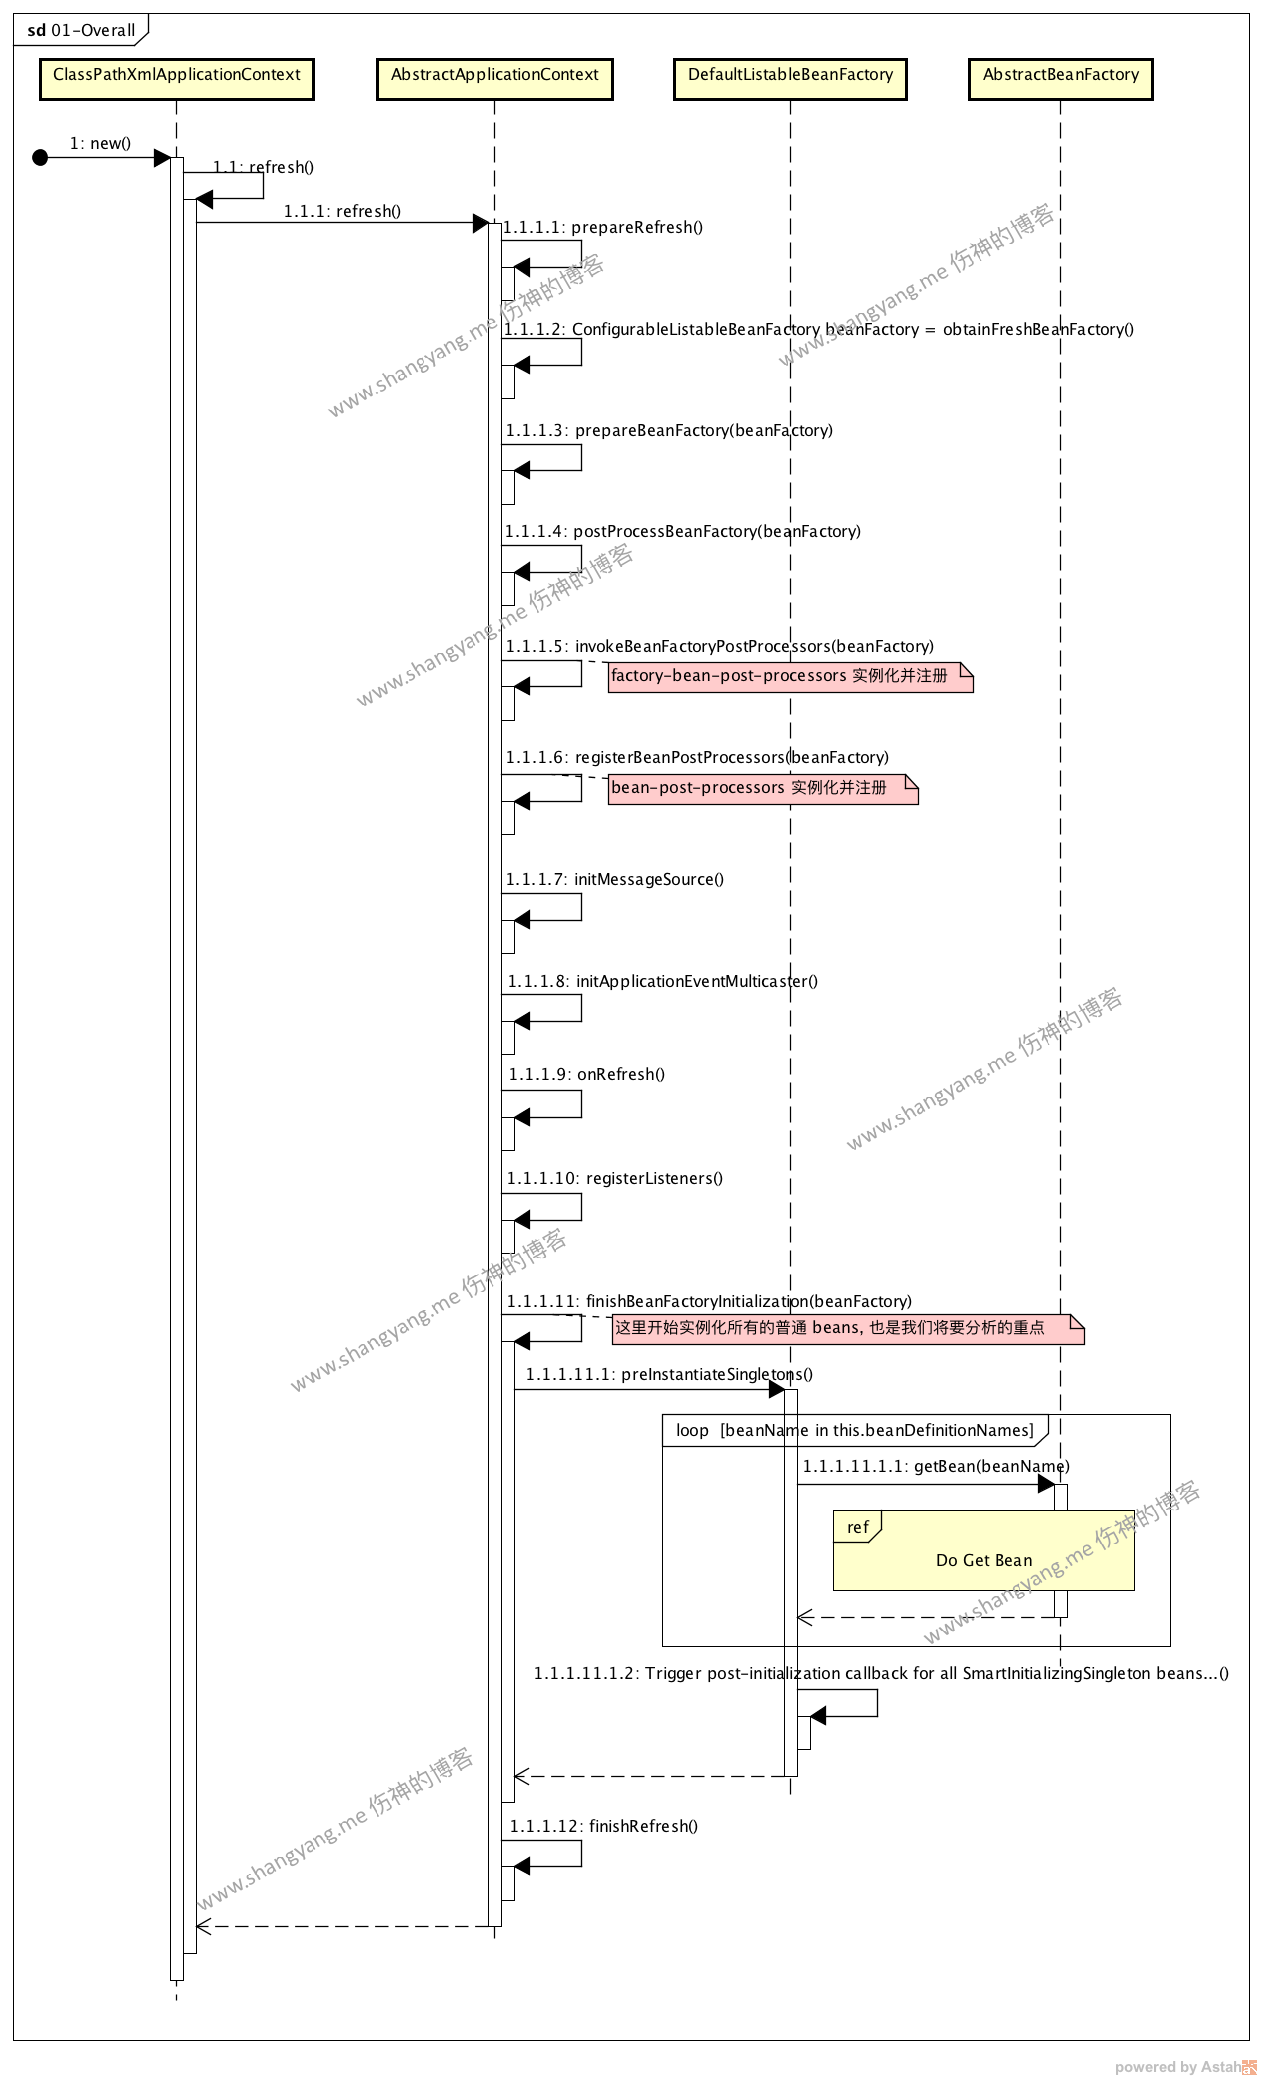
本章節我們將詳細去闡述的是,Spring 容器是如何對 Singleton bean 進行初始化並註冊到當前容器的;與之相關的主要有兩個流程,
-
解析 bean definitions 並註冊
解析 bean definitiions 並註冊到當前的 BeanFactory 中;此步驟是在 step 1.1.1.2 obtainFreshBeanFactory 完成;更詳細的介紹參考解析並註冊 bean definitions 流程 - 從 #1 中找到所有的已註冊的 singleton bean definitions,遍歷,實例化得到 Singleton beans;此步驟對應的是 step 1.1.1.11 finishBeanFactoryInitialization 開始進行 singleton bean 的構造過程,其後調用
AbstractBeanFactory#getBean(beanFactory)方法進行構造;更詳細的介紹參考 Do Get Bean 流程。
解析並註冊 bean definitions 流程
該部分參考新的博文 Spring Core Container 源碼分析七:註冊 Bean Definitions
Do Get Bean 流程
Do Get Bean 流程的入口是 AbstractBeanFactory#doGetBean 方法,主流程圖如下,
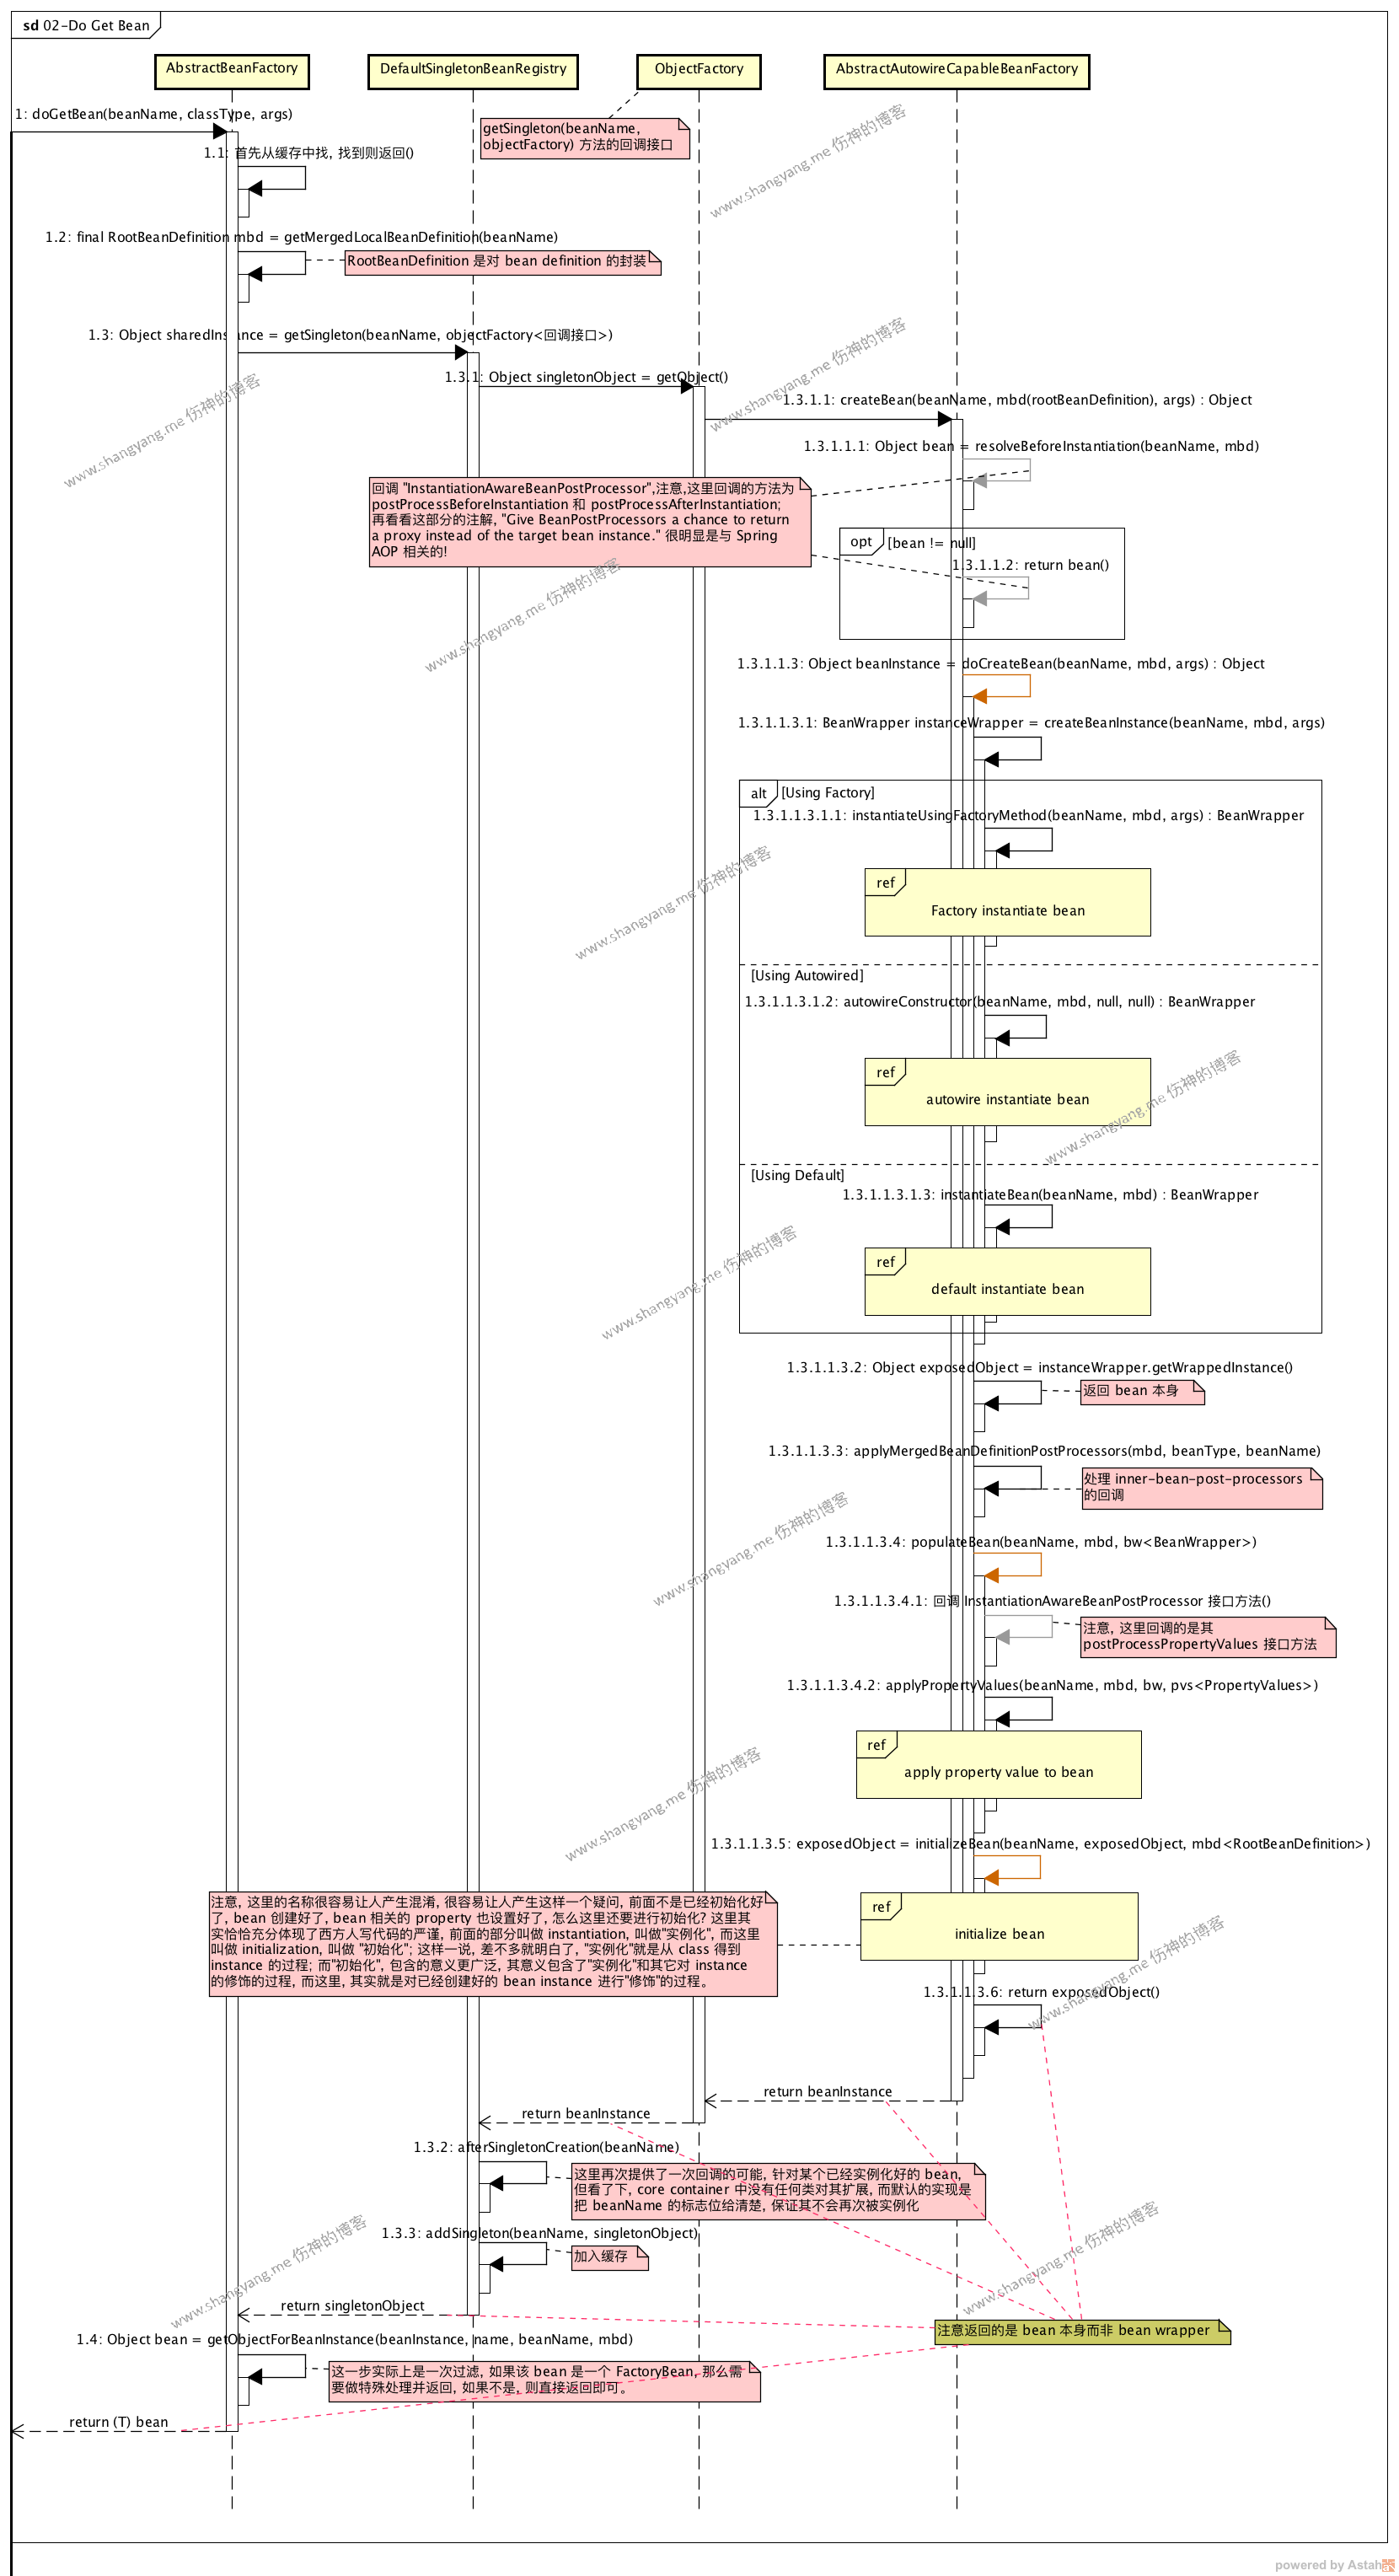
主流程大致爲,從緩存中找到是否已經實例化了該 singleton bean,如果已經實例化好了,那麼就直接返回;如果在緩存中沒有找到,則將當前的 bean 封裝爲 RootBeanDefinition,然後通過調用 DefaultSingletonBeanRegistry#getSingleton 得到初始化好的 singleton bean,然後將其註冊至緩存( step 1.3.3 addSingleton ),然後再判斷是普通 bean 還是 factory bean 作必要的處理( step 1.4 getObjectForBeanInstance )後,最後返回;
RootBeanDefinition
初始化了一個 RootBeanDefinition 對象,正如其類名描述的那樣,是該 bean 的頂層描述;包含了 bean 的字段屬性,ref屬性以及繼承相關等等屬性;
Step 1.3:DefaultSingletonBeanRegistry#getSingleton
此步驟的相關代碼如下,
// Create bean instance.
if (mbd.isSingleton()) {
    sharedInstance = getSingleton(beanName, new ObjectFactory<Object>() {
        @Override
        public Object getObject() throws BeansException {
            try {
                return createBean(beanName, mbd, args);
            }
            catch (BeansException ex) {
                // Explicitly remove instance from singleton cache: It might have been put there
                // eagerly by the creation process, to allow for circular reference resolution.
                // Also remove any beans that received a temporary reference to the bean.
                destroySingleton(beanName);
                throw ex;
            }
        }
    });
    bean = getObjectForBeanInstance(sharedInstance, name, beanName, mbd);
}
調用父類 DefaultSingletonBeanRegistry#getSingleton 方法;注意,這裏通過接口 ObjectFactory<Object> 定義了一個回調方法 getObject(),通過該回調方法調用 AbstractAutowireCapableBeanFactory#createBean 方法,通過此回調方法正式拉開了實例化 bean 的序幕。
Step 1.3.1.1:AbstractAutowireCapableBeanFactory#createBean
AbstractAutowireCapableBeanFactory#doCreateBean 方法是初始化 bean 的最核心的入口方法,執行流程如 Do Get Bean 流程所示,
-
主流程主要做了這麼三件事情,一、instantiate bean;二、populate bean;三、initialize bean;
- 包含五個子流程,他們分別是 factory instantiate bean、autwire instantiate bean、default instantiate bean、populate bean 以及 [initialize bean](),其中,前三個子流程對應第一件事情,[實例化 bean]();其次的子流程 [populate bean]() 對應的是第二件事情,[爲 bean 設置 property 參數]();最後一個子流程 [initialize bean] 對應最後一件事情既[初始化 bean](),這裏的初始化指的是是對創建好的 bean 做一些修飾動作的。
下面我們分別來分析這三件事情
第一件事情:instantiate bean
該步驟對應 Do Get Bean 流程中的 Step 1.3.1.1.3.1 createBeanInstance;根據 bean 的不同配置方式,實現了三種實例化 bean 的方式,分別是 factory instantiate bean、autwire instantiate bean 以及 default instantiate bean;
factory instantiate bean
用工廠方法實例化 bean,待敘;
autwire instantiate bean
通過 autowire 註解的方式實例化 bean,待敘;
default instantiate bean
此步驟對應 Do Get Bean 流程中的 Step 1.3.1.1.3.1.3 instantiateBean,其對應子流程 default instantiate bean 如下圖所示,
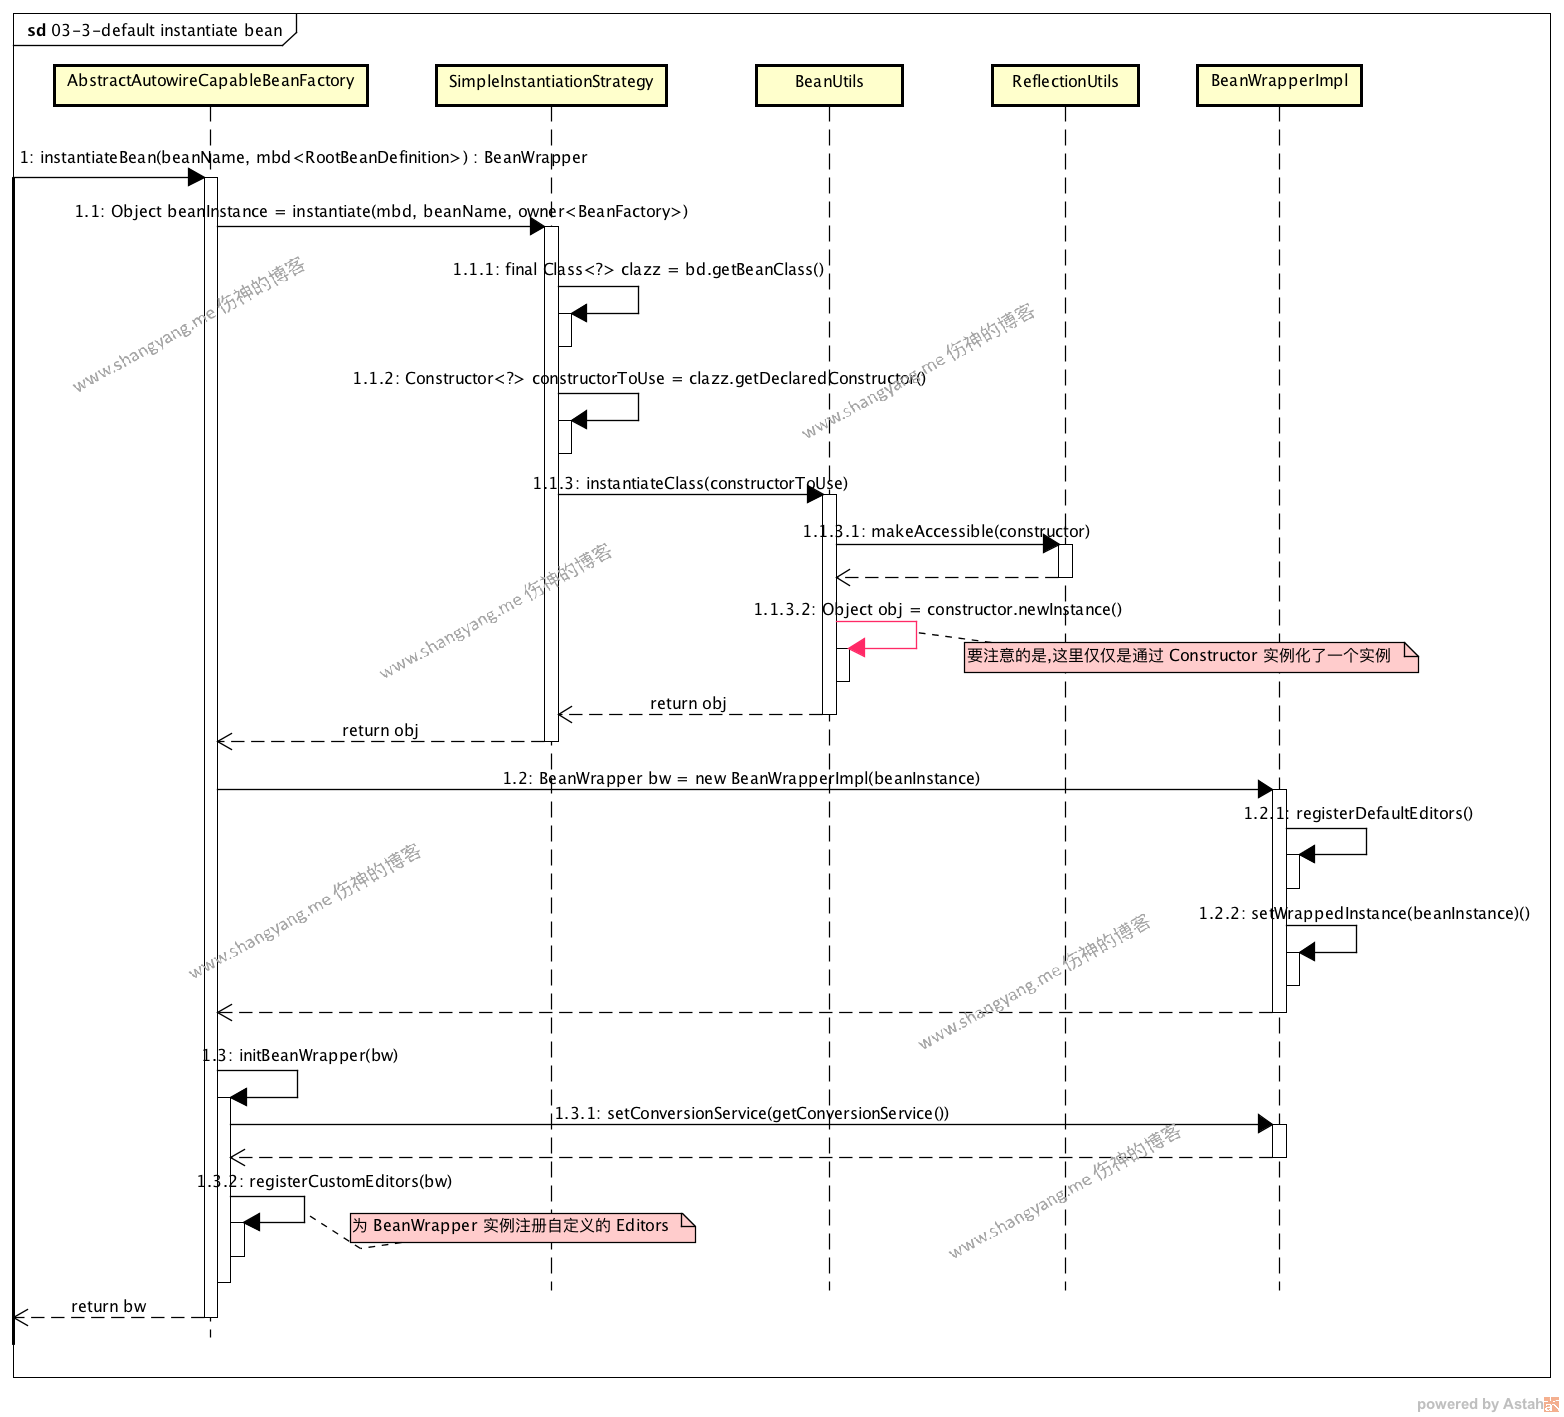
注意幾點
- 這裏僅僅是通過使用其構造函數 constructor 使用
Java 反射實例化了 bean,並沒有對其進行任何的參數賦值,賦值過程參考 populate bean 流程; - 將 bean 封裝爲 BeanWrapper,然後
- 註冊 default PropertyEditor
- 註冊 custom PropertyEditor
最後返回 BeanWrapper
第二件事情:populate bean
對應 Do Get Bean 流程中的 Step 1.3.1.1.3.4 populateBean,通過調用 AbstractAutowireCapableBeanFactory#populateBean 正式給 bean 的參數進行賦值;爲什麼方法名取名爲populate呢?查百度翻譯,結果是居住於、生活於、移民於、落戶於的意思,絲毫沒有賦值的意思,但是記得以前和美國人共事的時候,他們非常喜歡用這個詞populate,特別是在創建某個對象的時候,他們特別喜歡用這個詞;後來無意中發現,populate有創建和填充的意思,所以,這裏的意思就是,填充這個 bean;下面看看 populate bean 的流程圖,看看它是怎麼玩的,
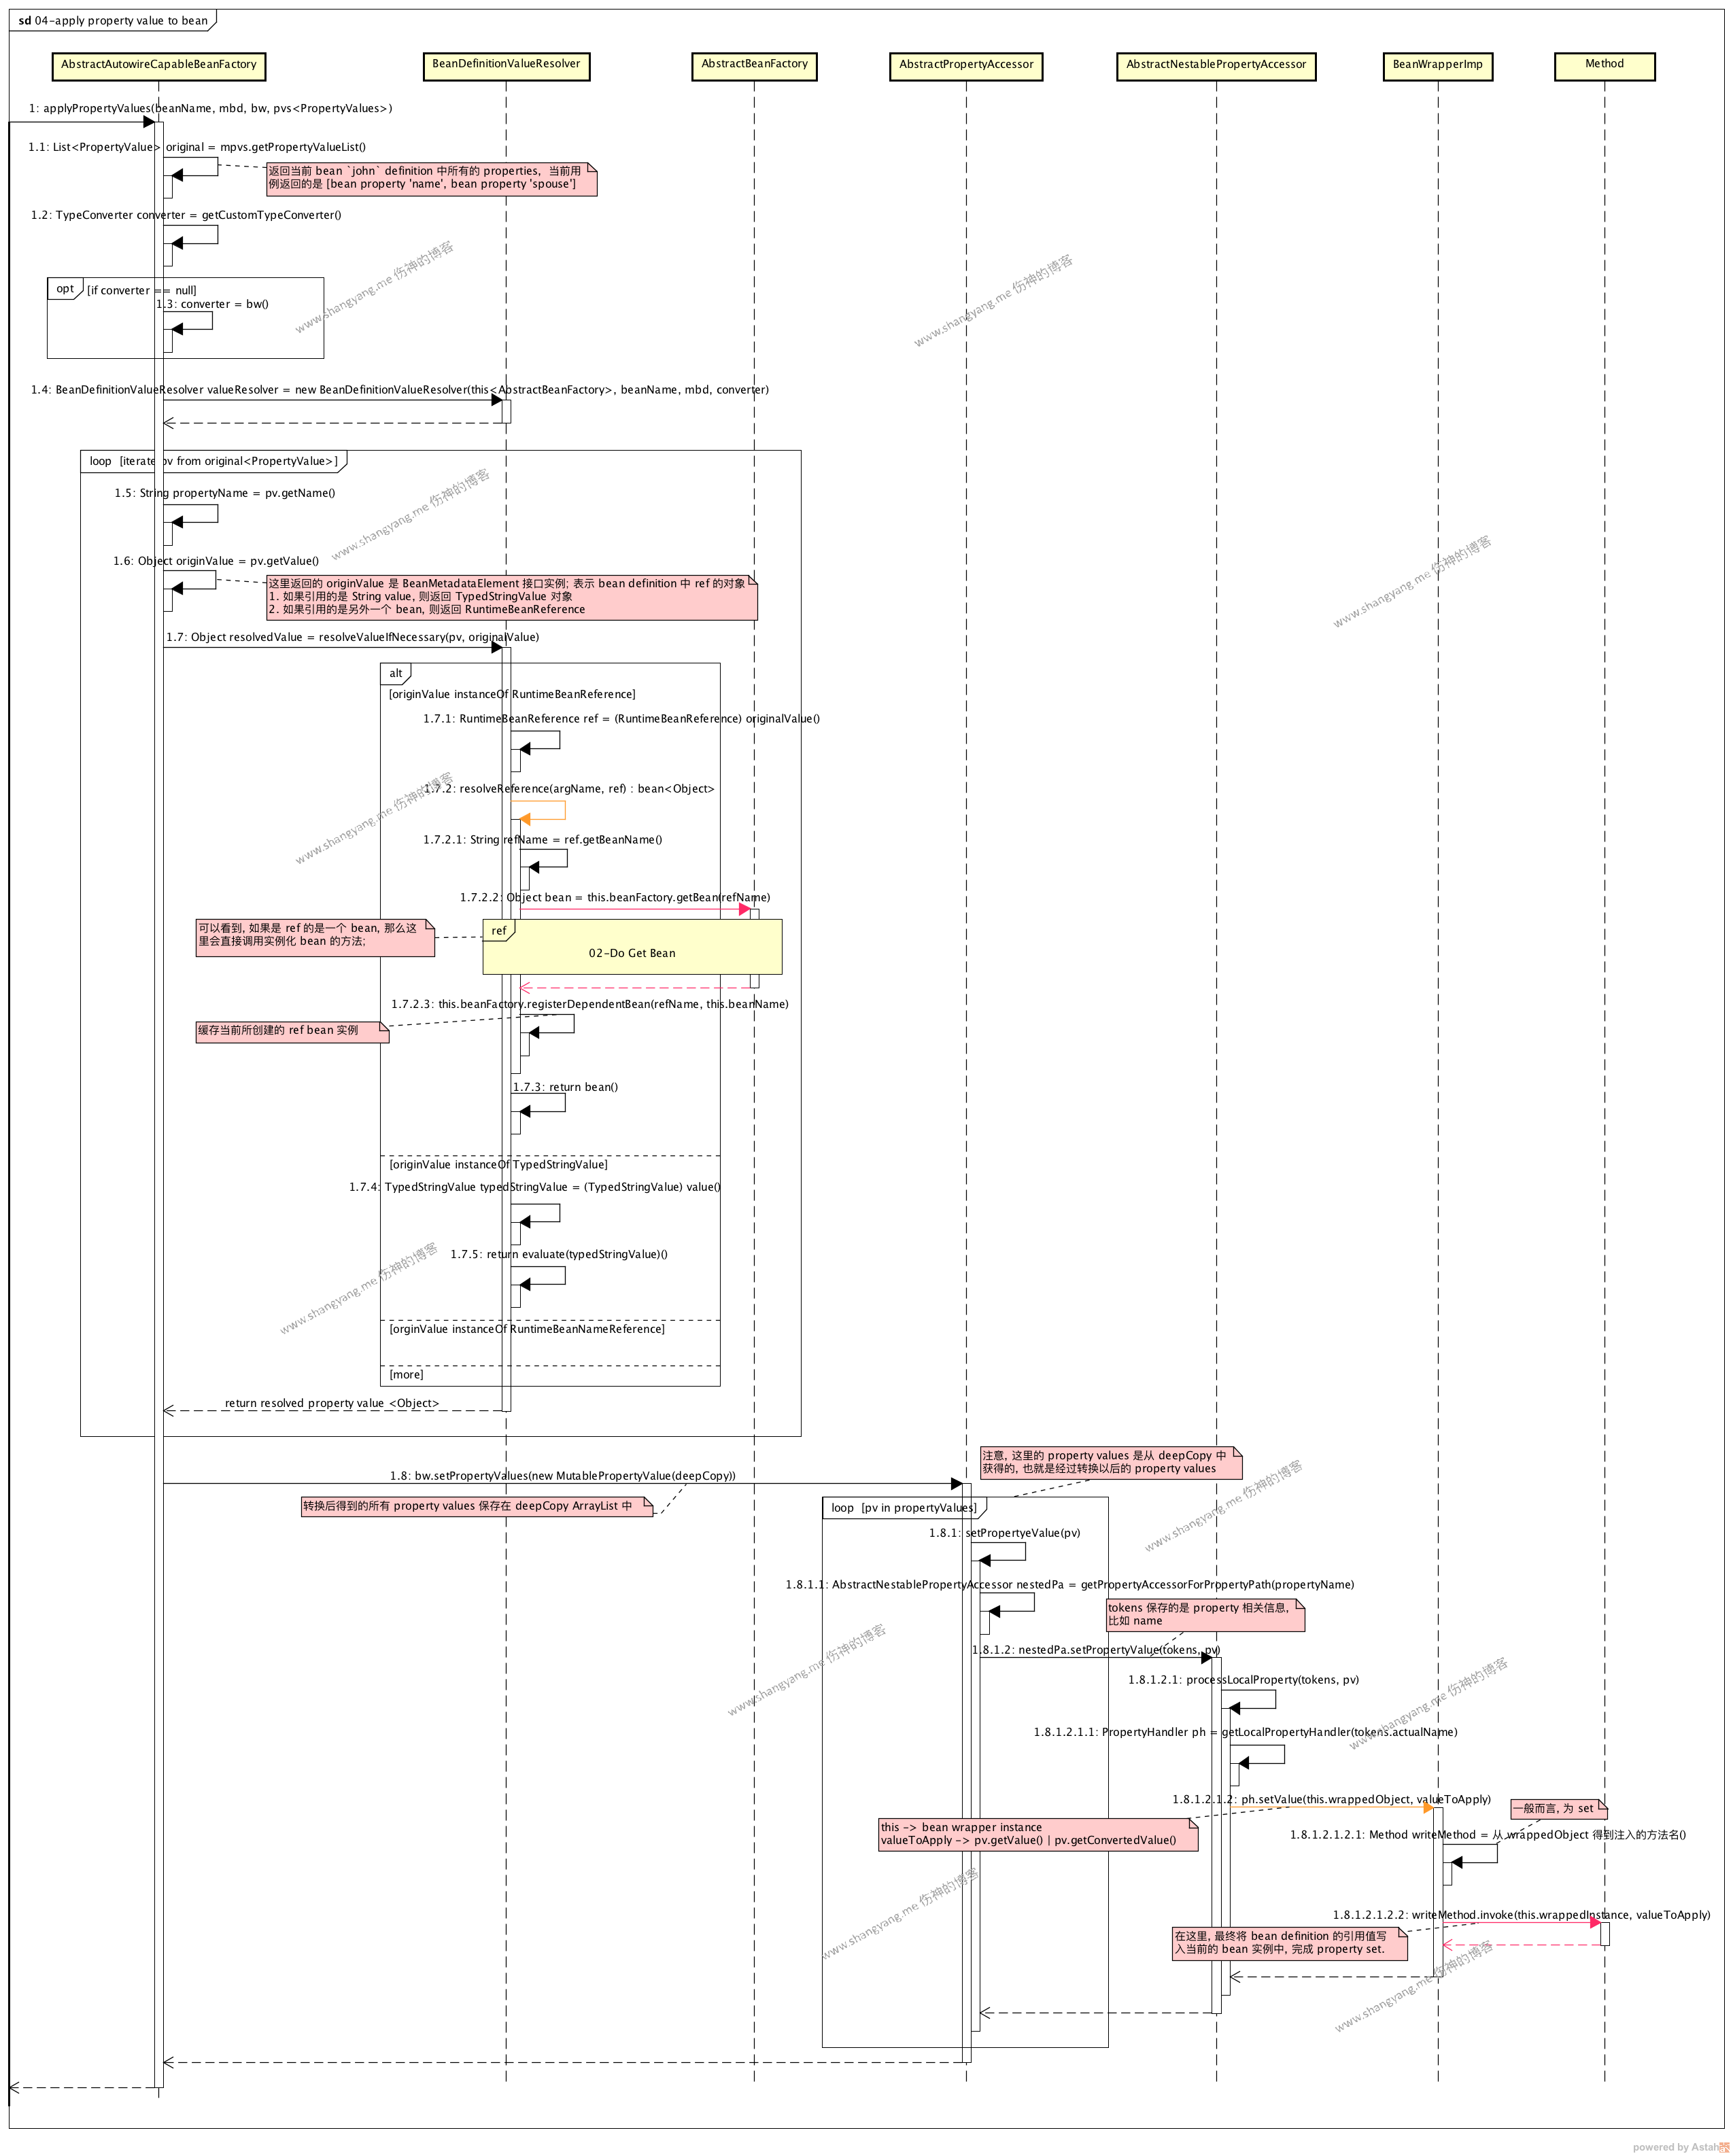
通過調用 AbstractAutowireCapableBeanFactory#applyPropertyValues 方法正式給 bean 進行賦值操作,賦值的主流程主要包括兩個部分,resolve property value object 和 set property value to bean
resolve property value
對應上面 Sequence Diagram 中的 Step 1.5 - Step 1.7;這一步主要是去遍歷當前 bean 所有的 property,並依次解析(resolve)得到對應的 Java 對象;通過方法 BeanDefinitionValueResolver#resolveValueIfNecessary 進行解析,解析的過程是針對不同類型的 Property,採用不同的解析方式,裏面目前總共對應了十種類型,先看看它的源碼,
public Object resolveValueIfNecessary(Object argName, Object value) {
    // We must check each value to see whether it requires a runtime reference
    // to another bean to be resolved.
    if (value instanceof RuntimeBeanReference) { // 這裏表示該 bean definition ref 引用的是一個 bean,那麼這裏,必須對該 bean 進行初始化操作;
        RuntimeBeanReference ref = (RuntimeBeanReference) value;
        return resolveReference(argName, ref);
    }
    else if (value instanceof RuntimeBeanNameReference) {
        String refName = ((RuntimeBeanNameReference) value).getBeanName();
        refName = String.valueOf(doEvaluate(refName));
        if (!this.beanFactory.containsBean(refName)) {
            throw new BeanDefinitionStoreException(
                    "Invalid bean name '" + refName + "' in bean reference for " + argName);
        }
        return refName;
    }
    else if (value instanceof BeanDefinitionHolder) {
        // Resolve BeanDefinitionHolder: contains BeanDefinition with name and aliases.
        BeanDefinitionHolder bdHolder = (BeanDefinitionHolder) value;
        return resolveInnerBean(argName, bdHolder.getBeanName(), bdHolder.getBeanDefinition());
    }
    else if (value instanceof BeanDefinition) {
        // Resolve plain BeanDefinition, without contained name: use dummy name.
        BeanDefinition bd = (BeanDefinition) value;
        String innerBeanName = "(inner bean)" + BeanFactoryUtils.GENERATED_BEAN_NAME_SEPARATOR +
                ObjectUtils.getIdentityHexString(bd);
        return resolveInnerBean(argName, innerBeanName, bd);
    }
    else if (value instanceof ManagedArray) {
        // May need to resolve contained runtime references.
        ManagedArray array = (ManagedArray) value;
        Class<?> elementType = array.resolvedElementType;
        if (elementType == null) {
            String elementTypeName = array.getElementTypeName();
            if (StringUtils.hasText(elementTypeName)) {
                try {
                    elementType = ClassUtils.forName(elementTypeName, this.beanFactory.getBeanClassLoader());
                    array.resolvedElementType = elementType;
                }
                catch (Throwable ex) {
                    // Improve the message by showing the context.
                    throw new BeanCreationException(
                            this.beanDefinition.getResourceDescription(), this.beanName,
                            "Error resolving array type for " + argName, ex);
                }
            }
            else {
                elementType = Object.class;
            }
        }
        return resolveManagedArray(argName, (List<?>) value, elementType);
    }
    else if (value instanceof ManagedList) {
        // May need to resolve contained runtime references.
        return resolveManagedList(argName, (List<?>) value);
    }
    else if (value instanceof ManagedSet) {
        // May need to resolve contained runtime references.
        return resolveManagedSet(argName, (Set<?>) value);
    }
    else if (value instanceof ManagedMap) {
        // May need to resolve contained runtime references.
        return resolveManagedMap(argName, (Map<?, ?>) value);
    }
    else if (value instanceof ManagedProperties) {
        Properties original = (Properties) value;
        Properties copy = new Properties();
        for (Map.Entry<Object, Object> propEntry : original.entrySet()) {
            Object propKey = propEntry.getKey();
            Object propValue = propEntry.getValue();
            if (propKey instanceof TypedStringValue) {
                propKey = evaluate((TypedStringValue) propKey);
            }
            if (propValue instanceof TypedStringValue) {
                propValue = evaluate((TypedStringValue) propValue);
            }
            copy.put(propKey, propValue);
        }
        return copy;
    }
    else if (value instanceof TypedStringValue) {
        // Convert value to target type here.
        TypedStringValue typedStringValue = (TypedStringValue) value;
        Object valueObject = evaluate(typedStringValue);
        try {
            Class<?> resolvedTargetType = resolveTargetType(typedStringValue);
            if (resolvedTargetType != null) {
                return this.typeConverter.convertIfNecessary(valueObject, resolvedTargetType);
            }
            else {
                return valueObject;
            }
        }
        catch (Throwable ex) {
            // Improve the message by showing the context.
            throw new BeanCreationException(
                    this.beanDefinition.getResourceDescription(), this.beanName,
                    "Error converting typed String value for " + argName, ex);
        }
    }
    else {
        return evaluate(value);
    }
}
這裏主要關注兩類解析,
RuntimeBeanReference 類型解析
對應需要被解析的配置爲john的 property spouse,它所對應的值是另一個 bean jane;既是一個去解析一個ref bean。
<property name="spouse" ref="jane"/> 所以可以看到,源碼中是通過 resolveReference 方法調用 AbstractBeanFactory#getBean 方法去實例化一個 bean jane 並返回;對應的源碼如下,
BeanDefinitionValueResolver#resolveReference
/**
 * Resolve a reference to another bean in the factory.
 */
private Object resolveReference(Object argName, RuntimeBeanReference ref) {
    try {
        String refName = ref.getBeanName();
        refName = String.valueOf(doEvaluate(refName));
        if (ref.isToParent()) {
            if (this.beanFactory.getParentBeanFactory() == null) {
                throw new BeanCreationException(
                        this.beanDefinition.getResourceDescription(), this.beanName,
                        "Can't resolve reference to bean '" + refName +
                        "' in parent factory: no parent factory available");
            }
            return this.beanFactory.getParentBeanFactory().getBean(refName);
        }
        else {
            Object bean = this.beanFactory.getBean(refName); // 去得到這個 ref bean
            this.beanFactory.registerDependentBean(refName, this.beanName); // 註冊
            return bean;
        }
    }
    catch (BeansException ex) {
        throw new BeanCreationException(
                this.beanDefinition.getResourceDescription(), this.beanName,
                "Cannot resolve reference to bean '" + ref.getBeanName() + "' while setting " + argName, ex);
    }
} 通過調用this.beanFactory.getBean(refName)再次進入Do Get Bean 流程初始化得到該 ref bean;
最後,將解析出來的 Property value 放在一個deepCopy的 ArrayList 列表對象中;顧名思義,就是對值進行了一次深度的拷貝,然後將其作爲 bean 的參數,隨後開始進行賦值操作);
TypedStringValue 類型解析
這裏主要被解析的 Property value 的類型配置爲
<property name="name" value="John Doe"/>其 Property value 的值在配置文件中就是一個純的字符串類型;但從源碼中可以知道,Property value 是可以包含 value type 的,所以,在解析 TypedStringValue 的時候,需要根據 value type 進行解析;具體邏輯參考resolveTargetType(typedStringValue);方法。
set property value to bean
此步驟的主流程主要是通過Java Method 反射將解析出來的值賦值給當前的 bean;對應時序圖中的 Step 1.8 setPropertyValues
可以看到,通過遍歷 deepCopy ArrayList 對象中已經解析過後的 PropertyValue,最終由 BeanWrapperImpl 對象通過方法的反射,將值注入給當前的 bean,Step 1.8.1.2.1.2.2 writeMethod.invoke
BeanWrapperImpl.java 省略了大部分無關緊要的代碼,
@Override
public void setValue(final Object object, Object valueToApply) throws Exception{
    final Method writeMethod = (this.pd instanceof GenericTypeAwarePropertyDescriptor ?
            ((GenericTypeAwarePropertyDescriptor) this.pd).getWriteMethodForActualAccess() :
            this.pd.getWriteMethod());
    if (!Modifier.isPublic(writeMethod.getDeclaringClass().getModifiers()) && !writeMethod.isAccessible()) {
        if (System.getSecurityManager() != null) {
            AccessController.doPrivileged(new PrivilegedAction<Object>() {
                @Override
                public Object run() {
                    writeMethod.setAccessible(true);
                    return null;
                }
            });
        }
        else {
            writeMethod.setAccessible(true);
        }
    }

    ....

    writeMethod.invoke(getWrappedInstance(), valueToApply);

    ....
}
通過這一步,將相關的 property populate 給 bean 以後,纔算 bean 的實例化完成;
第三件事情:initialize bean
正如流程圖中所描述的那樣,這個步驟的名字非常然人迷惑,我將流程圖中寫的備註摘錄如下,
"注意, 這裏的名稱很容易讓人產生混淆, 很容易讓人產生這樣一個疑問, 前面不是已經初始化好了, bean 創建好了, bean 相關的 property 也設置好了, 怎麼這裏還要進行初始化? 這裏其實恰恰充分體現了西方人寫代碼的嚴謹, 前面的部分叫做 instantiation, 叫做"實例化", 而這裏叫做 initialization, 叫做 "初始化"; 這樣一說, 差不多就明白了, "實例化"就是從 class 得到 instance 的過程; 而"初始化", 包含的意義更廣泛, 其意義包含了"實例化"和其它對 instance 的修飾的過程, 而這裏, 其實就是對已經創建好的 bean instance 進行"修飾"的過程。"
所以,這裏的 initialize 其實就是對通過 instantiate bean 和 populate bean 兩個步驟實例化好的 bean 進行後續必要的修飾;我們通過流程圖來看看,它是怎麼去修飾的,
通過 AbstractAutowireCapableBeanFactory#initializeBean 方法進行對 bean 的修飾過程,看源碼,(刪除了大部分不相關的代碼)
AbstractAutowireCapableBeanFactory.java
protected Object initializeBean(final String beanName, final Object bean, RootBeanDefinition mbd) {

    invokeAwareMethods(beanName, bean); // 調用實現了 *Aware 接口的方法,比如注入 ApplicationContext...

    Object wrappedBean = bean;
    if (mbd == null || !mbd.isSynthetic()) {
        // 調用 bean-post-processor 的 before initialization 回調方法
        wrappedBean = applyBeanPostProcessorsBeforeInitialization(wrappedBean, beanName);
    }

    try {
        invokeInitMethods(beanName, wrappedBean, mbd); // 調用 InitializingBean#afterPropertiesSet 回調
    }
    catch (Throwable ex) {
        throw new BeanCreationException(
                (mbd != null ? mbd.getResourceDescription() : null),
                beanName, "Invocation of init method failed", ex);
    }

    if (mbd == null || !mbd.isSynthetic()) {
        // 調用 bean-post-processor 的 after initialization 回調方法
        wrappedBean = applyBeanPostProcessorsAfterInitialization(wrappedBean, beanName);
    }

    return wrappedBean; // 這裏的 wrapped bean 指的是被 bean-post-processor 修飾以後的包裝 bean
}
整個過程可以理解爲三大塊,
- 注入 Aware 對象,見代碼第三行;
- 回調 bean-post-processors 接口方法,見代碼第 9 行和第 23 行;
- 回調 InitializingBean 接口方法,見代碼第 13 行
下面,我們依次來梳理這三個部分;
注入 Aware 對象
對應流程圖中的 Step 1.1 invokeAwareMethods,該步驟註冊所有實現了Aware接口的 beans
Aware.java
/**
 * Marker superinterface indicating that a bean is eligible to be
 * notified by the Spring container of a particular framework object
 * through a callback-style method. Actual method signature is
 * determined by individual subinterfaces, but should typically
 * consist of just one void-returning method that accepts a single
 * argument.
 *
 * <p>Note that merely implementing {@link Aware} provides no default
 * functionality. Rather, processing must be done explicitly, for example
 * in a {@link org.springframework.beans.factory.config.BeanPostProcessor BeanPostProcessor}.
 * Refer to {@link org.springframework.context.support.ApplicationContextAwareProcessor}
 * and {@link org.springframework.beans.factory.support.AbstractAutowireCapableBeanFactory}
 * for examples of processing {@code *Aware} interface callbacks.
 *
 * @author Chris Beams
 * @since 3.1
 */
public interface Aware {

}
從 Aware 接口的註釋中可以看到,允許實現了該 Aware 接口的當前 bean 能夠有機會通過回調的方式注入 Spring 容器中默認實現了 Aware 接口的 bean,比如 BeanFactory 等;看看源碼,
AbstractAutowireCapableBeanFactory.java
private void invokeAwareMethods(final String beanName, final Object bean) {
    if (bean instanceof Aware) {
        if (bean instanceof BeanNameAware) {
            ((BeanNameAware) bean).setBeanName(beanName);
        }
        if (bean instanceof BeanClassLoaderAware) {
            ((BeanClassLoaderAware) bean).setBeanClassLoader(getBeanClassLoader());
        }
        if (bean instanceof BeanFactoryAware) {
            ((BeanFactoryAware) bean).setBeanFactory(AbstractAutowireCapableBeanFactory.this);
        }
    }
}
可以看到,注入了三種情況,
-
噹噹前 bean 實現了 BeanNameAware 接口,只是調用了 setBeanName;給我目前的感覺是,沒有起到什麼大的作用,把自己的 beanName 設置給自己,有什麼用處?嗯,倒是想到一個,logging;
-
噹噹前 bean 實現了 BeanClassLoaderAware 接口,將 Spring 容器的 BeanClassLoader 注入到當前 bean;記住,如果想要獲得加載 Bean 當前的 ClassLoader 對象的時候,只需要讓 Bean 實現 BeanClassLoaderAware 接口並實現相應接口方法即可。
- 噹噹前 bean 實現了 BeanFactoryAware 接口,將 Spring 容器中與 bean 初始化相關的 BeanFactory 實例(這裏對應的是 DefaultListableBeanFactory 實例)註冊給當前的 bean。
當梳理完這個部分以後,我相信讀者會和我一樣有這樣的疑問,我們不是經常通過Aware的方式注入ApplicaitonContext對象的嗎?但和明顯,上述的代碼並沒有注入ApplicationContext對象呀?看如下部分分析,
下列部分是延生部分
但是要特別特別注意的是,這裏並沒有注入ApplicationContext對象,要注入ApplicaitonContext對象,bean 必須實現ApplicatonContextAware接口;
ApplicationContextAware.java
public interface ApplicationContextAware extends Aware {

    /**
     * Set the ApplicationContext that this object runs in.
     * Normally this call will be used to initialize the object.
     * <p>Invoked after population of normal bean properties but before an init callback such
     * as {@link org.springframework.beans.factory.InitializingBean#afterPropertiesSet()}
     * or a custom init-method. Invoked after {@link ResourceLoaderAware#setResourceLoader},
     * {@link ApplicationEventPublisherAware#setApplicationEventPublisher} and
     * {@link MessageSourceAware}, if applicable.
     * @param applicationContext the ApplicationContext object to be used by this object
     * @throws ApplicationContextException in case of context initialization errors
     * @throws BeansException if thrown by application context methods
     * @see org.springframework.beans.factory.BeanInitializationException
     */
    void setApplicationContext(ApplicationContext applicationContext) throws BeansException;

}
從註解中可以看到,它明確標註,是在 populate bean 以後,在 處理 InitializingBean 接口回調 之前調用,那是到底是在什麼時刻呢?我們查看下方法 setApplicationContext 方法在 workspace 中的引用,它是在 ApplicationContextAwareProcessor#invokeAwareInterfaces 方法中被調用,而 ApplicationContextAwareProcessor 正好是一個 BeanPostProcessor 對象,所以,ApplicaitonContext對象實際上是在 bean-post-procesor before initialization流程中被注入的,看源碼,
ApplicationContextAwareProcessor.java (省略了大部分不相關的代碼)
class ApplicationContextAwareProcessor implements BeanPostProcessor {

    private final ConfigurableApplicationContext applicationContext;

    private final StringValueResolver embeddedValueResolver;

    /**
     * Create a new ApplicationContextAwareProcessor for the given context.
     */
    public ApplicationContextAwareProcessor(ConfigurableApplicationContext applicationContext) {
        this.applicationContext = applicationContext;
        this.embeddedValueResolver = new EmbeddedValueResolver(applicationContext.getBeanFactory());
    }

    @Override
    public Object postProcessBeforeInitialization(final Object bean, String beanName) throws BeansException {
        AccessControlContext acc = null;

        ....

        invokeAwareInterfaces(bean);

        ....

        return bean;
    }

    private void invokeAwareInterfaces(Object bean) {
        if (bean instanceof Aware) {
            if (bean instanceof EnvironmentAware) {
                ((EnvironmentAware) bean).setEnvironment(this.applicationContext.getEnvironment());
            }
            if (bean instanceof EmbeddedValueResolverAware) {
                ((EmbeddedValueResolverAware) bean).setEmbeddedValueResolver(this.embeddedValueResolver);
            }
            if (bean instanceof ResourceLoaderAware) {
                ((ResourceLoaderAware) bean).setResourceLoader(this.applicationContext);
            }
            if (bean instanceof ApplicationEventPublisherAware) {
                ((ApplicationEventPublisherAware) bean).setApplicationEventPublisher(this.applicationContext);
            }
            if (bean instanceof MessageSourceAware) {
                ((MessageSourceAware) bean).setMessageSource(this.applicationContext);
            }
            if (bean instanceof ApplicationContextAware) {
                ((ApplicationContextAware) bean).setApplicationContext(this.applicationContext);
            }
        }
    }

    @Override
    public Object postProcessAfterInitialization(Object bean, String beanName) {
        return bean;
    }

}
回調 bean-post-processors 接口方法
先來看看BeanPostProcessor接口的源碼,
public interface BeanPostProcessor {

    /**
     * Apply this BeanPostProcessor to the given new bean instance <i>before</i> any bean
     * initialization callbacks (like InitializingBean's {@code afterPropertiesSet}
     * or a custom init-method). The bean will already be populated with property values.
     * The returned bean instance may be a wrapper around the original.
     * @param bean the new bean instance
     * @param beanName the name of the bean
     * @return the bean instance to use, either the original or a wrapped one;
     * if {@code null}, no subsequent BeanPostProcessors will be invoked
     * @throws org.springframework.beans.BeansException in case of errors
     * @see org.springframework.beans.factory.InitializingBean#afterPropertiesSet
     */
    Object postProcessBeforeInitialization(Object bean, String beanName) throws BeansException;

    /**
     * Apply this BeanPostProcessor to the given new bean instance <i>after</i> any bean
     * initialization callbacks (like InitializingBean's {@code afterPropertiesSet}
     * or a custom init-method). The bean will already be populated with property values.
     * The returned bean instance may be a wrapper around the original.
     * <p>In case of a FactoryBean, this callback will be invoked for both the FactoryBean
     * instance and the objects created by the FactoryBean (as of Spring 2.0). The
     * post-processor can decide whether to apply to either the FactoryBean or created
     * objects or both through corresponding {@code bean instanceof FactoryBean} checks.
     * <p>This callback will also be invoked after a short-circuiting triggered by a
     * {@link InstantiationAwareBeanPostProcessor#postProcessBeforeInstantiation} method,
     * in contrast to all other BeanPostProcessor callbacks.
     * @param bean the new bean instance
     * @param beanName the name of the bean
     * @return the bean instance to use, either the original or a wrapped one;
     * if {@code null}, no subsequent BeanPostProcessors will be invoked
     * @throws org.springframework.beans.BeansException in case of errors
     * @see org.springframework.beans.factory.InitializingBean#afterPropertiesSet
     * @see org.springframework.beans.factory.FactoryBean
     */
    Object postProcessAfterInitialization(Object bean, String beanName) throws BeansException;

}
該接口定義了兩個回調方法,
-
Object postProcessBeforeInitialization(Object bean, String beanName)
從方法的註釋中不難發現,該方法是在回調 InitializeBean 接口方法之前調用,並且是在 populate bean) 之後進行的調用,通常是對原有 bean 做一層封裝,然後返回該封裝對象;這就是我在前文所描述的,其實就是是對原有 bean 起到修飾的作用; - Object postProcessAfterInitialization(Object bean, String beanName)
從方法的註釋中不難發現,該方法是在回調 InitializeBean 接口方法之前調用,同樣也是在 populate bean) 之後進行的調用
所以,bean-post-processors 總共有兩次調用的時機,分別是 before initialization 和 after initialization,而且要特別注意的是,該回調方法是針對對容器中所有的普通 bean 進行的回調;
before initialization
該步驟對應 Step 1.2 applyBeanPostProcessorsBeforeInitialization,然後正式調用 Step 1.2.1 beanPostProcessor.postProcessBeforeInitialization bean-post-processor 的回調方法,不過這裏要注意的是,如果 Step 1.2.1 返回 null,會終止餘下的 post-bean-processor 的執行,並且直接返回一個 null,該 null 同樣被視爲是封裝後的產物,既然是 null,那麼後續的 bean-post-processor 也無需處理了,也無法對原有的 bean 進行包裝了.. 不過,我到覺得這裏的 Spring 源碼的邏輯應該改進一下,不允許返回 null 的情況,如果返回 null 則報錯最好,因爲 bean-post-processor 是對原有 bean 進行修飾,是新增屬性,而非幹掉實例本身.. 來看看源碼,
AbstractAutowireCapableBeanFactory.java
@Override
public Object applyBeanPostProcessorsBeforeInitialization(Object existingBean, String beanName)
        throws BeansException {

    Object result = existingBean;
    for (BeanPostProcessor beanProcessor : getBeanPostProcessors()) {
        result = beanProcessor.postProcessBeforeInitialization(result, beanName);
        if (result == null) {
            return result;
        }
    }
    return result;
}
如果某個 beanProcessor 處理返回一個 null 則直接返回,並且終止其餘的 bean-post-processors
after initialization
對應的是 step 1.4 applyBeanPostProcessorsAfterInitialization 步驟,裏面的邏輯和 before initialization 邏輯類似,不再贅述。
回調 InitializingBean 接口方法
該步驟對應的是 Step 1.3: invokeInitMethod,回調 InitializingBean 接口方法,看源碼,
AbstractAutowireCapableBeanFactory.java (刪除了大部分不相關的代碼)
protected void invokeInitMethods(String beanName, final Object bean, RootBeanDefinition mbd)
        throws Throwable {

    boolean isInitializingBean = (bean instanceof InitializingBean);
    if (isInitializingBean && (mbd == null || !mbd.isExternallyManagedInitMethod("afterPropertiesSet"))) {
        if (logger.isDebugEnabled()) {
            logger.debug("Invoking afterPropertiesSet() on bean with name '" + beanName + "'");
        }
        .....
        ((InitializingBean) bean).afterPropertiesSet();
        .....
    }

    if (mbd != null) {
        String initMethodName = mbd.getInitMethodName();
        if (initMethodName != null && !(isInitializingBean && "afterPropertiesSet".equals(initMethodName)) &&
                !mbd.isExternallyManagedInitMethod(initMethodName)) {
            invokeCustomInitMethod(beanName, bean, mbd);
        }
    }
}可以看到,主要回調的是InitializingBean接口的afterPropertiesSet方法,所以,我們可以讓某個 bean 實現 InitializingBean 接口,並通過該接口實現一些當 bean 實例化好以後的回調方法,注意afterPropertiesSet並不返回任何值,所以,這裏不是像 bean-post-processor 那樣對 bean 起到修飾的作用,而是起到純粹的調用作用;
總結(我的思考)
以上便是 Spring IoC 容器的核心實現了,容器要達到的最本質的目的就是IoC既反轉控制,由容器來負責管理對象實例相關依賴的初始化和注入,而不再是由 bean 自己去控制自己的依賴的初始化和注入過程了;而IoC的實現是通過DI既是依賴注入實現的;也就是爲什麼上面所介紹的內容都是圍繞着 Spring 容器如何實例化一個 bean,如何賦值,如何進行回調等一系列在 bean 的構建聲明週期過程中的種種行爲;
這樣做能達到的好處就是,
-
實現了對象的依賴屬性和依賴對象的高度可定製化,我們可以通過容器配置的方式,輕鬆的修改 bean 所的依賴對象,以改變原有的其行爲;
(這裏我突然想到“微內核架構”,Java 的一種內置的依賴注入的方式,通過在 META-INF 中配置接口屬性文件,裏面其實就是配置的一個接口的實現類,通過它來控制接口在 JVM 中該接口所使用的實現類;但它只是控制某個接口如何在 JVM 中實現,將接口的實現翻轉控制了,而 Spring 是對所有的 Class Instance 進行翻轉控制,所以一個是站在局部上的反轉控制設計,一個是站在全局上的反轉控制設計,不可同日而語!)
- 通過 bean-post-processor 擴展點能夠對原始的 bean 進行包裝,通過這樣的方式,我們可以包裝得到一個 proxy bean,提供相關的 AOP 操作,比如提供事務,異常處理等等方法注入的實現;