


Python 之路 Day5 - 常用模塊學習
本節大綱:
-
模塊介紹
-
time & datetime
-
random
-
os
-
sys
-
shutil
-
json & picle
-
shelve
-
xml處理
-
yaml處理
-
configparser
-
hashlib
-
subprocess
-
logging模塊
- re正則表達式
模塊,用一砣代碼實現了某個功能的代碼集合。
類似於函數式編程和麪向過程編程,函數式編程則完成一個功能,其他代碼用來調用即可,提供了代碼的重用性和代碼間的耦合。而對於一個複雜的功能來,可能需要多個函數才能完成(函數又可以在不同的.py文件中),n個 .py 文件組成的代碼集合就稱爲模塊。
如:os 是系統相關的模塊;file是文件操作相關的模塊
模塊分爲三種:
- 自定義模塊
- 內置標準模塊(又稱標準庫)
- 開源模塊
自定義模塊 和開源模塊的使用參考 http://www.cnblogs.com/wupeiqi/articles/4963027.html
time & datetime模塊
#_*_coding:utf-8_*_
__author__ = 'Alex Li'
import time
# print(time.clock()) #返回處理器時間,3.3開始已廢棄 , 改成了time.process_time()測量處理器運算時間,不包括sleep時間,不穩定,mac上測不出來
# print(time.altzone) #返回與utc時間的時間差,以秒計算\
# print(time.asctime()) #返回時間格式"Fri Aug 19 11:14:16 2016",
# print(time.localtime()) #返回本地時間 的struct time對象格式
# print(time.gmtime(time.time()-800000)) #返回utc時間的struc時間對象格式
# print(time.asctime(time.localtime())) #返回時間格式"Fri Aug 19 11:14:16 2016",
#print(time.ctime()) #返回Fri Aug 19 12:38:29 2016 格式, 同上
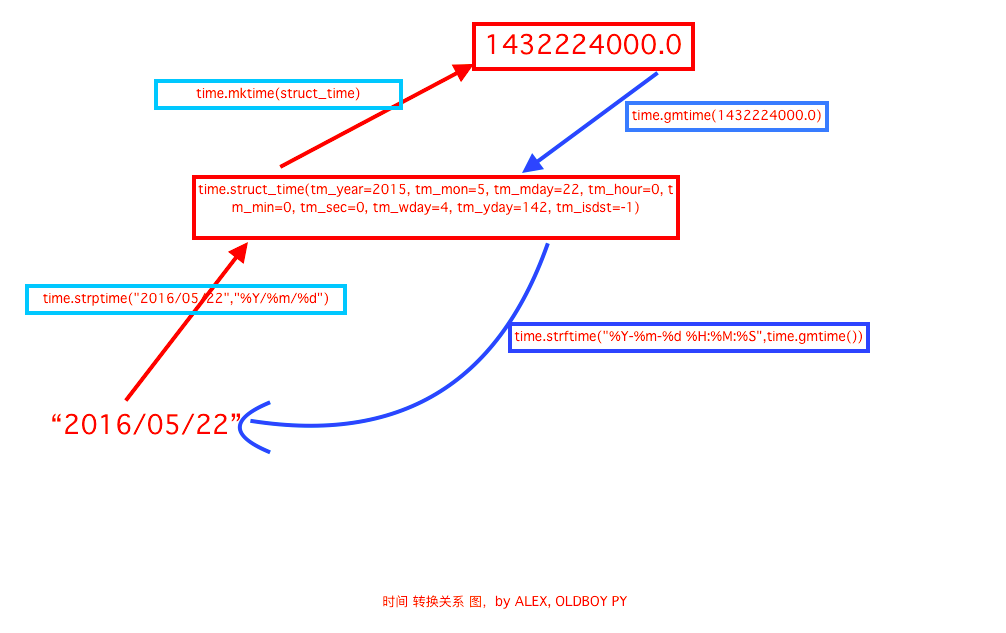
# 日期字符串 轉成 時間戳
# string_2_struct = time.strptime("2016/05/22","%Y/%m/%d") #將 日期字符串 轉成 struct時間對象格式
# print(string_2_struct)
#
# struct_2_stamp = time.mktime(string_2_struct) #將struct時間對象轉成時間戳
# print(struct_2_stamp)
#將時間戳轉爲字符串格式
# print(time.gmtime(time.time()-86640)) #將utc時間戳轉換成struct_time格式
# print(time.strftime("%Y-%m-%d %H:%M:%S",time.gmtime()) ) #將utc struct_time格式轉成指定的字符串格式
#時間加減
import datetime
# print(datetime.datetime.now()) #返回 2016-08-19 12:47:03.941925
#print(datetime.date.fromtimestamp(time.time()) ) # 時間戳直接轉成日期格式 2016-08-19
# print(datetime.datetime.now() )
# print(datetime.datetime.now() + datetime.timedelta(3)) #當前時間+3天
# print(datetime.datetime.now() + datetime.timedelta(-3)) #當前時間-3天
# print(datetime.datetime.now() + datetime.timedelta(hours=3)) #當前時間+3小時
# print(datetime.datetime.now() + datetime.timedelta(minutes=30)) #當前時間+30分
# c_time = datetime.datetime.now()
# print(c_time.replace(minute=3,hour=2)) #時間替換| Directive | Meaning | Notes |
|---|---|---|
| %a | Locale’s abbreviated weekday name. | |
| %A | Locale’s full weekday name. | |
| %b | Locale’s abbreviated month name. | |
| %B | Locale’s full month name. | |
| %c | Locale’s appropriate date and time representation. | |
| %d | Day of the month as a decimal number [01,31]. | |
| %H | Hour (24-hour clock) as a decimal number [00,23]. | |
| %I | Hour (12-hour clock) as a decimal number [01,12]. | |
| %j | Day of the year as a decimal number [001,366]. | |
| %m | Month as a decimal number [01,12]. | |
| %M | Minute as a decimal number [00,59]. | |
| %p | Locale’s equivalent of either AM or PM. | (1) |
| %S | Second as a decimal number [00,61]. | (2) |
| %U | Week number of the year (Sunday as the first day of the week) as a decimal number [00,53]. All days in a new year preceding the first Sunday are considered to be in week 0. | (3) |
| %w | Weekday as a decimal number [0(Sunday),6]. | |
| %W | Week number of the year (Monday as the first day of the week) as a decimal number [00,53]. All days in a new year preceding the first Monday are considered to be in week 0. | (3) |
| %x | Locale’s appropriate date representation. | |
| %X | Locale’s appropriate time representation. | |
| %y | Year without century as a decimal number [00,99]. | |
| %Y | Year with century as a decimal number. | |
| %z | Time zone offset indicating a positive or negative time difference from UTC/GMT of the form +HHMM or -HHMM, where H represents decimal hour digits and M represents decimal minute digits [-23:59, +23:59]. | |
| %Z | Time zone name (no characters if no time zone exists). | |
| %% | A literal '%' character. |
random模塊
隨機數
 mport random
 print random.random()
 print random.randint(1,2)
 print random.randrange(1,10)
生成隨機驗證碼
import random
checkcode = ''
for i in range(4):
current = random.randrange(0,4)
if current != i:
temp = chr(random.randint(65,90))
else:
temp = random.randint(0,9)
checkcode += str(temp)
print checkcode
OS模塊
提供對操作系統進行調用的接口
os.getcwd() 獲取當前工作目錄,即當前python腳本工作的目錄路徑
os.chdir("dirname")  改變當前腳本工作目錄;相當於shell下cd
os.curdir  返回當前目錄: ('.')
os.pardir  獲取當前目錄的父目錄字符串名:('..')
os.makedirs('dirname1/dirname2')可生成多層遞歸目錄
os.removedirs('dirname1')若目錄爲空,則刪除,並遞歸到上一級目錄,如若也爲空,則刪除,依此類推
os.mkdir('dirname')生成單級目錄;相當於shell中mkdir dirname
os.rmdir('dirname')刪除單級空目錄,若目錄不爲空則無法刪除,報錯;相當於shell中rmdir dirname
os.listdir('dirname')列出指定目錄下的所有文件和子目錄,包括隱藏文件,並以列表方式打印
os.remove()  刪除一個文件
os.rename("oldname","newname")  重命名文件/目錄
os.stat('path/filename')  獲取文件/目錄信息
os.sep輸出操作系統特定的路徑分隔符,win下爲"\\",Linux下爲"/"
os.linesep輸出當前平臺使用的行終止符,win下爲"\t\n",Linux下爲"\n"
os.pathsep輸出用於分割文件路徑的字符串
os.name輸出字符串指示當前使用平臺。win->'nt'; Linux->'posix'
os.system("bash command")  運行shell命令,直接顯示
os.environ  獲取系統環境變量
os.path.abspath(path)  返回path規範化的絕對路徑
os.path.split(path)  將path分割成目錄和文件名二元組返回
os.path.dirname(path)  返回path的目錄。其實就是os.path.split(path)的第一個元素
os.path.basename(path)  返回path最後的文件名。如何path以/或\結尾,那麼就會返回空值。即os.path.split(path)的第二個元素
os.path.exists(path)  如果path存在,返回True;如果path不存在,返回False
os.path.isabs(path)  如果path是絕對路徑,返回True
os.path.isfile(path)  如果path是一個存在的文件,返回True。否則返回False
os.path.isdir(path)  如果path是一個存在的目錄,則返回True。否則返回False
os.path.join(path1[, path2[, ...]])  將多個路徑組合後返回,第一個絕對路徑之前的參數將被忽略
os.path.getatime(path)  返回path所指向的文件或者目錄的最後存取時間
os.path.getmtime(path)  返回path所指向的文件或者目錄的最後修改時間
更多猛擊這裏
sys模塊
sys.argv   命令行參數List,第一個元素是程序本身路徑
sys.exit(n)退出程序,正常退出時exit(0)
sys.version獲取Python解釋程序的版本信息
sys.maxint 最大的Int值
sys.path   返回模塊的搜索路徑,初始化時使用PYTHONPATH環境變量的值
sys.platform   返回操作系統平臺名稱
sys.stdout.write('please:')
val = sys.stdin.readline()[:-1]
shutil 模塊
直接參考 http://www.cnblogs.com/wupeiqi/articles/4963027.html
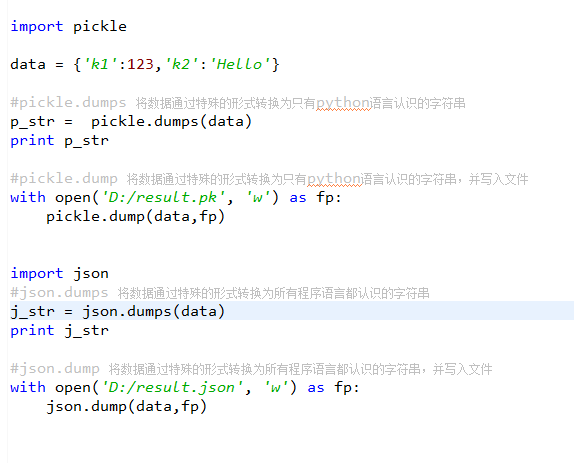
json & pickle 模塊
用於序列化的兩個模塊
- json,用於字符串 和 python數據類型間進行轉換
- pickle,用於python特有的類型 和 python的數據類型間進行轉換
Json模塊提供了四個功能:dumps、dump、loads、load
pickle模塊提供了四個功能:dumps、dump、loads、load
shelve 模塊
shelve模塊是一個簡單的k,v將內存數據通過文件持久化的模塊,可以持久化任何pickle可支持的python數據格式
import shelve

d = shelve.open('shelve_test') #打開一個文件

class Test(object):
    def __init__(self,n):
        self.n = n

t = Test(123)
t2 = Test(123334)

name = ["alex","rain","test"]
d["test"] = name #持久化列表
d["t1"] = t  #持久化類
d["t2"] = t2

d.close()
xml處理模塊
xml是實現不同語言或程序之間進行數據交換的協議,跟json差不多,但json使用起來更簡單,不過,古時候,在json還沒誕生的黑暗年代,大家只能選擇用xml呀,至今很多傳統公司如金融行業的很多系統的接口還主要是xml。
xml的格式如下,就是通過<>節點來區別數據結構的:
<?xml version="1.0"?>
<data>
    <country name="Liechtenstein">
        <rank updated="yes">2</rank>
        <year>2008</year>
        <gdppc>141100</gdppc>
        <neighbor name="Austria" direction="E"/>
        <neighbor name="Switzerland" direction="W"/>
</country>
<country name="Singapore">
    <rank updated="yes">5</rank>
    <year>2011</year>
    <gdppc>59900</gdppc>
    <neighbor name="Malaysia" direction="N"/>
</country>
<country name="Panama">
    <rank updated="yes">69</rank>
    <year>2011</year>
    <gdppc>13600</gdppc>
    <neighbor name="Costa Rica" direction="W"/>
    <neighbor name="Colombia" direction="E"/>
    </country>
</data>
xml協議在各個語言裏的都 是支持的,在python中可以用以下模塊操作xml
import xml.etree.ElementTree as ET

tree = ET.parse("xmltest.xml")
root = tree.getroot()
print(root.tag)

#遍歷xml文檔
for child in root:
    print(child.tag, child.attrib)
for i in child:
    print(i.tag,i.text)

#只遍歷year 節點
for node in root.iter('year'):
    print(node.tag,node.text)
修改和刪除xml文檔內容
import xml.etree.ElementTree as ET
tree = ET.parse("xmltest.xml")
root = tree.getroot()

#修改
for node in root.iter('year'):
    new_year = int(node.text) + 1
    node.text = str(new_year)
    node.set("updated","yes")

tree.write("xmltest.xml")

#刪除node
for country in root.findall('country'):
   rank = int(country.find('rank').text)
   if rank > 50:
     root.remove(country)

tree.write('output.xml')
自己創建xml文檔
import xml.etree.ElementTree as ET

new_xml = ET.Element("namelist")
name = ET.SubElement(new_xml,"name",attrib={"enrolled":"yes"})
age = ET.SubElement(name,"age",attrib={"checked":"no"})
sex = ET.SubElement(name,"sex")
sex.text = '33'
name2 = ET.SubElement(new_xml,"name",attrib={"enrolled":"no"})
age = ET.SubElement(name2,"age")
age.text = '19'

et = ET.ElementTree(new_xml) #生成文檔對象
et.write("test.xml", encoding="utf-8",xml_declaration=True)

ET.dump(new_xml) #打印生成的格式
PyYAML模塊
Python也可以很容易的處理ymal文檔格式,只不過需要安裝一個模塊,參考文檔:http://pyyaml.org/wiki/PyYAMLDocumentation
ConfigParser模塊
用於生成和修改常見配置文檔,當前模塊的名稱在 python 3.x 版本中變更爲 configparser。
來看一個好多軟件的常見文檔格式如下
[DEFAULT]
ServerAliveInterval = 45
Compression = yes
CompressionLevel = 9
ForwardX11 = yes

[bitbucket.org]
User = hg

[topsecret.server.com]
Port = 50022
ForwardX11 = no
如果想用python生成一個這樣的文檔怎麼做呢?
import configparser

config = configparser.ConfigParser()
config["DEFAULT"] = {'ServerAliveInterval': '45',
  'Compression': 'yes',
 'CompressionLevel': '9'}

config['bitbucket.org'] = {}
config['bitbucket.org']['User'] = 'hg'
config['topsecret.server.com'] = {}
topsecret = config['topsecret.server.com']
topsecret['Host Port'] = '50022' # mutates the parser
topsecret['ForwardX11'] = 'no'  # same here
config['DEFAULT']['ForwardX11'] = 'yes'
with open('example.ini', 'w') as configfile:
   config.write(configfile)
寫完了還可以再讀出來哈。
>>> import configparser
>>> config = configparser.ConfigParser()
>>> config.sections()
[]
>>> config.read('example.ini')
['example.ini']
>>> config.sections()
['bitbucket.org', 'topsecret.server.com']
>>> 'bitbucket.org' in config
True
>>> 'bytebong.com' in config
False
>>> config['bitbucket.org']['User']
'hg'
>>> config['DEFAULT']['Compression']
'yes'
>>> topsecret = config['topsecret.server.com']
>>> topsecret['ForwardX11']
'no'
>>> topsecret['Port']
'50022'
>>> for key in config['bitbucket.org']: print(key)
...
user
compressionlevel
serveraliveinterval
compression
forwardx11
>>> config['bitbucket.org']['ForwardX11']
'yes'
configparser增刪改查語法
[section1]
k1 = v1
k2:v2

[section2]
k1 = v1

import ConfigParser

config = ConfigParser.ConfigParser()
config.read('i.cfg')

# ########## 讀 ##########
#secs = config.sections()
#print secs
#options = config.options('group2')
#print options

#item_list = config.items('group2')
#print item_list

#val = config.get('group1','key')
#val = config.getint('group1','key')

# ########## 改寫 ##########
#sec = config.remove_section('group1')
#config.write(open('i.cfg', "w"))

#sec = config.has_section('wupeiqi')
#sec = config.add_section('wupeiqi')
#config.write(open('i.cfg', "w"))

#config.set('group2','k1',11111)
#config.write(open('i.cfg', "w"))

#config.remove_option('group2','age')
#config.write(open('i.cfg', "w"))
hashlib模塊
用於加密相關的操作,3.x裏代替了md5模塊和sha模塊,主要提供 SHA1, SHA224, SHA256, SHA384, SHA512 ,MD5 算法
import hashlib
m = hashlib.md5()
m.update(b"Hello")
m.update(b"It's me")
print(m.digest())
m.update(b"It's been a long time since last time we ...")

print(m.digest()) #2進制格式hash
print(len(m.hexdigest())) #16進制格式hash
'''
def digest(self, *args, **kwargs): # real signature unknown
    """ Return the digest value as a string of binary data. """
pass

def hexdigest(self, *args, **kwargs): # real signature unknown
    """ Return the digest value as a string of hexadecimal digits. """
pass

'''
import hashlib

# ######## md5 ########

hash = hashlib.md5()
hash.update('admin')
print(hash.hexdigest())

# ######## sha1 ########

hash = hashlib.sha1()
hash.update('admin')
print(hash.hexdigest())

# ######## sha256 ########

hash = hashlib.sha256()
hash.update('admin')
print(hash.hexdigest())

# ######## sha384 ########

hash = hashlib.sha384()
hash.update('admin')
print(hash.hexdigest())

# ######## sha512 ########

hash = hashlib.sha512()
hash.update('admin')
print(hash.hexdigest())
還不夠吊?python 還有一個 hmac 模塊,它內部對我們創建 key 和 內容 再進行處理然後再加密
散列消息鑑別碼,簡稱HMAC,是一種基於消息鑑別碼MAC(Message Authentication Code)的鑑別機制。使用HMAC時,消息通訊的雙方,通過驗證消息中加入的鑑別密鑰K來鑑別消息的真僞;
一般用於網絡通信中消息加密,前提是雙方先要約定好key,就像接頭暗號一樣,然後消息發送把用key把消息加密,接收方用key + 消息明文再加密,拿加密後的值 跟 發送者的相對比是否相等,這樣就能驗證消息的真實性,及發送者的合法性了。
import hmac
h = hmac.new(b'天王蓋地虎', b'寶塔鎮河妖')
print h.hexdigest()更多關於md5,sha1,sha256等介紹的文章看這裏https://www.tbs-certificates.co.uk/FAQ/en/sha256.html
Subprocess模塊
The subprocess module allows you to spawn new processes, connect to their input/output/error pipes, and obtain their return codes. This module intends to replace several older modules and functions:
os.system
os.spawn*
The recommended approach to invoking subprocesses is to use the run() function for all use cases it can handle. For more advanced use cases, the underlying Popen interface can be used directly.
The run() function was added in Python 3.5; if you need to retain compatibility with older versions, see the Older high-level API section.
subprocess.run(args, *, stdin=None, input=None, stdout=None, stderr=None, shell=False, timeout=None, check=False)
Run the command described by args. Wait for command to complete, then return a CompletedProcess instance.
The arguments shown above are merely the most common ones, described below in Frequently Used Arguments (hence the use of keyword-only notation in the abbreviated signature). The full function signature is largely the same as that of the Popen constructor - apart from timeout, input and check, all the arguments to this function are passed through to that interface.
This does not capture stdout or stderr by default. To do so, pass PIPE for the stdout and/or stderr arguments.
The timeout argument is passed to Popen.communicate(). If the timeout expires, the child process will be killed and waited for. The TimeoutExpired exception will be re-raised after the child process has terminated.
The input argument is passed to Popen.communicate() and thus to the subprocess’s stdin. If used it must be a byte sequence, or a string if universal_newlines=True. When used, the internal Popen object is automatically created withstdin=PIPE, and the stdin argument may not be used as well.
If check is True, and the process exits with a non-zero exit code, a CalledProcessError exception will be raised. Attributes of that exception hold the arguments, the exit code, and stdout and stderr if they were captured.
常用subprocess方法示例
#執行命令,返回命令執行狀態 , 0 or 非0
>>> retcode = subprocess.call(["ls", "-l"])

#執行命令,如果命令結果爲0,就正常返回,否則拋異常
>>> subprocess.check_call(["ls", "-l"])
0

#接收字符串格式命令,返回元組形式,第1個元素是執行狀態,第2個是命令結果
>>> subprocess.getstatusoutput('ls /bin/ls')
(0, '/bin/ls')

#接收字符串格式命令,並返回結果
>>> subprocess.getoutput('ls /bin/ls')
'/bin/ls'

#執行命令,並返回結果,注意是返回結果,不是打印,下例結果返回給res
>>> res=subprocess.check_output(['ls','-l'])
>>> res
b'total 0\ndrwxr-xr-x 12 alex staff 408 Nov 2 11:05 OldBoyCRM\n'

#上面那些方法,底層都是封裝的subprocess.Popen
poll()
Check if child process has terminated. Returns returncode

wait()
Wait for child process to terminate. Returns returncode attribute.

terminate() 殺掉所啓動進程
communicate() 等待任務結束

stdin 標準輸入

stdout 標準輸出

stderr 標準錯誤

pid
The process ID of the child process.

#例子
>>> p = subprocess.Popen("df -h|grep disk",stdin=subprocess.PIPE,stdout=subprocess.PIPE,shell=True)
>>> p.stdout.read()
b'/dev/disk1 465Gi 64Gi 400Gi 14% 16901472 104938142 14% /\n'
例
>>> subprocess.run(["ls", "-l"])  # doesn't capture output
CompletedProcess(args=['ls', '-l'], returncode=0)

>>> subprocess.run("exit 1", shell=True, check=True)
Traceback (most recent call last):
  ...
subprocess.CalledProcessError: Command 'exit 1' returned non-zero exit status 1

>>> subprocess.run(["ls", "-l", "/dev/null"], stdout=subprocess.PIPE)
CompletedProcess(args=['ls', '-l', '/dev/null'], returncode=0,
stdout=b'crw-rw-rw- 1 root root 1, 3 Jan 23 16:23 /dev/null\n')
調用subprocess.run(...)是推薦的常用方法,在大多數情況下能滿足需求,但如果你可能需要進行一些複雜的與系統的交互的話,你還可以用subprocess.Popen(),語法如下:
p = subprocess.Popen("find / -size +1000000 -exec ls -shl {} \;",shell=True,stdout=subprocess.PIPE)
print(p.stdout.read())
可用參數:
- args:shell命令,可以是字符串或者序列類型(如:list,元組)
- bufsize:指定緩衝。0 無緩衝,1 行緩衝,其他 緩衝區大小,負值 系統緩衝
- stdin, stdout, stderr:分別表示程序的標準輸入、輸出、錯誤句柄
- preexec_fn:只在Unix平臺下有效,用於指定一個可執行對象(callable object),它將在子進程運行之前被調用
- close_sfs:在windows平臺下,如果close_fds被設置爲True,則新創建的子進程將不會繼承父進程的輸入、輸出、錯誤管道。
- 所以不能將close_fds設置爲True同時重定向子進程的標準輸入、輸出與錯誤(stdin, stdout, stderr)。
- shell:同上
- cwd:用於設置子進程的當前目錄
- env:用於指定子進程的環境變量。如果env = None,子進程的環境變量將從父進程中繼承。
- universal_newlines:不同系統的換行符不同,True -> 同意使用 \n
- startupinfo與createionflags只在windows下有效
- 將被傳遞給底層的CreateProcess()函數,用於設置子進程的一些屬性,如:主窗口的外觀,進程的優先級等等
終端輸入的命令分爲兩種:
- 輸入即可得到輸出,如:ifconfig
- 輸入進行某環境,依賴再輸入,如:python
需要交互的命令示例
import subprocess

obj = subprocess.Popen(["python"], stdin=subprocess.PIPE, stdout=subprocess.PIPE, stderr=subprocess.PIPE)
obj.stdin.write('print 1 \n ')
obj.stdin.write('print 2 \n ')
obj.stdin.write('print 3 \n ')
obj.stdin.write('print 4 \n ')

out_error_list = obj.communicate(timeout=10)
print out_error_list
subprocess實現sudo 自動輸入密碼
import subprocess

def mypass():
    mypass = '123' #or get the password from anywhere
    return mypass

echo = subprocess.Popen(['echo',mypass()],
                stdout=subprocess.PIPE,
                )

sudo = subprocess.Popen(['sudo','-S','iptables','-L'],
                stdin=echo.stdout,
                stdout=subprocess.PIPE,
                )

end_of_pipe = sudo.stdout

print "Password ok \n Iptables Chains %s" % end_of_pipe.read()
logging模塊
很多程序都有記錄日誌的需求,並且日誌中包含的信息即有正常的程序訪問日誌,還可能有錯誤、警告等信息輸出,python的logging模塊提供了標準的日誌接口,你可以通過它存儲各種格式的日誌,logging的日誌可以分爲 debug(), info(), warning(), error() and critical() 5個級別,下面我們看一下怎麼用。
最簡單用法
import logging

logging.warning("user [alex] attempted wrong password more than 3 times")
logging.critical("server is down")

#輸出
WARNING:root:user [alex] attempted wrong password more than 3 times
CRITICAL:root:server is down
看一下這幾個日誌級別分別代表什麼意思
| Level | When it’s used |
|---|---|
| DEBUG | Detailed information, typically of interest only when diagnosing problems. |
| INFO | Confirmation that things are working as expected. |
| WARNING | An indication that something unexpected happened, or indicative of some problem in the near future (e.g. ‘disk space low’). The software is still working as expected. |
| ERROR | Due to a more serious problem, the software has not been able to perform some function. |
| CRITICAL | A serious error, indicating that the program itself may be unable to continue running. |
如果想把日誌寫到文件裏,也很簡單
import logging

logging.basicConfig(filename='example.log',level=logging.INFO)
logging.debug('This message should go to the log file')
logging.info('So should this')
logging.warning('And this, too')
其中下面這句中的level=loggin.INFO意思是,把日誌紀錄級別設置爲INFO,也就是說,只有比日誌是INFO或比INFO級別更高的日誌纔會被紀錄到文件裏,在這個例子, 第一條日誌是不會被紀錄的,如果希望紀錄debug的日誌,那把日誌級別改成DEBUG就行了。
logging.basicConfig(filename='example.log',level=logging.INFO)感覺上面的日誌格式忘記加上時間啦,日誌不知道時間怎麼行呢,下面就來加上!
import logging
logging.basicConfig(format='%(asctime)s %(message)s', datefmt='%m/%d/%Y %I:%M:%S %p')
logging.warning('is when this event was logged.')

#輸出
12/12/2010 11:46:36 AM is when this event was logged.
日誌格式
| %(name)s | Logger的名字 |
|---|---|
| %(levelno)s | 數字形式的日誌級別 |
| %(levelname)s | 文本形式的日誌級別 |
| %(pathname)s | 調用日誌輸出函數的模塊的完整路徑名,可能沒有 |
| %(filename)s | 調用日誌輸出函數的模塊的文件名 |
| %(module)s | 調用日誌輸出函數的模塊名 |
| %(funcName)s | 調用日誌輸出函數的函數名 |
| %(lineno)d | 調用日誌輸出函數的語句所在的代碼行 |
| %(created)f | 當前時間,用UNIX標準的表示時間的浮 點數表示 |
| %(relativeCreated)d | 輸出日誌信息時的,自Logger創建以 來的毫秒數 |
| %(asctime)s | 字符串形式的當前時間。默認格式是 “2003-07-08 16:49:45,896”。逗號後面的是毫秒 |
| %(thread)d | 線程ID。可能沒有 |
| %(threadName)s | 線程名。可能沒有 |
| %(process)d | 進程ID。可能沒有 |
| %(message)s | 用戶輸出的消息 |
如果想同時把log打印在屏幕和文件日誌裏,就需要了解一點複雜的知識 了
Python 使用logging模塊記錄日誌涉及四個主要類,使用官方文檔中的概括最爲合適:
- logger提供了應用程序可以直接使用的接口;
- handler將(logger創建的)日誌記錄發送到合適的目的輸出;
- filter提供了細度設備來決定輸出哪條日誌記錄;
- formatter決定日誌記錄的最終輸出格式。
logger
每個程序在輸出信息之前都要獲得一個Logger。Logger通常對應了程序的模塊名,比如聊天工具的圖形界面模塊可以這樣獲得它的Logger:
LOG=logging.getLogger(”chat.gui”)
而核心模塊可以這樣:
LOG=logging.getLogger(”chat.kernel”)
Logger.setLevel(lel):指定最低的日誌級別,低於lel的級別將被忽略。debug是最低的內置級別,critical爲最高
Logger.addFilter(filt)、Logger.removeFilter(filt):添加或刪除指定的filter
Logger.addHandler(hdlr)、Logger.removeHandler(hdlr):增加或刪除指定的handler
Logger.debug()、Logger.info()、Logger.warning()、Logger.error()、Logger.critical():可以設置的日誌級別
handler
handler對象負責發送相關的信息到指定目的地。Python的日誌系統有多種Handler可以使用。有些Handler可以把信息輸出到控制檯,有些Logger可以把信息輸出到文件,還有些 Handler可以把信息發送到網絡上。如果覺得不夠用,還可以編寫自己的Handler。可以通過addHandler()方法添加多個多handler
Handler.setLevel(lel):指定被處理的信息級別,低於lel級別的信息將被忽略
Handler.setFormatter():給這個handler選擇一個格式
Handler.addFilter(filt)、Handler.removeFilter(filt):新增或刪除一個filter對象
每個Logger可以附加多個Handler。接下來我們就來介紹一些常用的Handler:
1) logging.StreamHandler
使用這個Handler可以向類似與sys.stdout或者sys.stderr的任何文件對象(file object)輸出信息。它的構造函數是:
StreamHandler([strm])
其中strm參數是一個文件對象。默認是sys.stderr
2) logging.FileHandler
和StreamHandler類似,用於向一個文件輸出日誌信息。不過FileHandler會幫你打開這個文件。它的構造函數是:
FileHandler(filename[,mode])
filename是文件名,必須指定一個文件名。
mode是文件的打開方式。參見Python內置函數open()的用法。默認是’a',即添加到文件末尾。
3) logging.handlers.RotatingFileHandler
這個Handler類似於上面的FileHandler,但是它可以管理文件大小。當文件達到一定大小之後,它會自動將當前日誌文件改名,然後創建 一個新的同名日誌文件繼續輸出。比如日誌文件是chat.log。當chat.log達到指定的大小之後,RotatingFileHandler自動把 文件改名爲chat.log.1。不過,如果chat.log.1已經存在,會先把chat.log.1重命名爲chat.log.2。。。最後重新創建 chat.log,繼續輸出日誌信息。它的構造函數是:
RotatingFileHandler( filename[, mode[, maxBytes[, backupCount]]])
其中filename和mode兩個參數和FileHandler一樣。
maxBytes用於指定日誌文件的最大文件大小。如果maxBytes爲0,意味着日誌文件可以無限大,這時上面描述的重命名過程就不會發生。
backupCount用於指定保留的備份文件的個數。比如,如果指定爲2,當上面描述的重命名過程發生時,原有的chat.log.2並不會被更名,而是被刪除。
4) logging.handlers.TimedRotatingFileHandler
這個Handler和RotatingFileHandler類似,不過,它沒有通過判斷文件大小來決定何時重新創建日誌文件,而是間隔一定時間就 自動創建新的日誌文件。重命名的過程與RotatingFileHandler類似,不過新的文件不是附加數字,而是當前時間。它的構造函數是:
TimedRotatingFileHandler( filename [,when [,interval [,backupCount]]])
其中filename參數和backupCount參數和RotatingFileHandler具有相同的意義。
interval是時間間隔。
when參數是一個字符串。表示時間間隔的單位,不區分大小寫。它有以下取值:
S 秒
M 分
H 小時
D 天
W 每星期(interval==0時代表星期一)
midnight 每天凌晨
import logging

#create logger
logger = logging.getLogger('TEST-LOG')
logger.setLevel(logging.DEBUG)

# create console handler and set level to debug
ch = logging.StreamHandler()
ch.setLevel(logging.DEBUG)

# create file handler and set level to warning
fh = logging.FileHandler("access.log")
fh.setLevel(logging.WARNING)
# create formatter
formatter = logging.Formatter('%(asctime)s - %(name)s - %(levelname)s - %(message)s')

# add formatter to ch and fh
ch.setFormatter(formatter)
fh.setFormatter(formatter)

# add ch and fh to logger
logger.addHandler(ch)
logger.addHandler(fh)

# 'application' code
logger.debug('debug message')
logger.info('info message')
logger.warn('warn message')
logger.error('error message')
logger.critical('critical message')
文件自動截斷例子
import logging

from logging import handlers

logger = logging.getLogger(__name__)

log_file = "timelog.log"
#fh = handlers.RotatingFileHandler(filename=log_file,maxBytes=10,backupCount=3)
fh = handlers.TimedRotatingFileHandler(filename=log_file,when="S",interval=5,backupCount=3)

formatter = logging.Formatter('%(asctime)s %(module)s:%(lineno)d %(message)s')

fh.setFormatter(formatter)

logger.addHandler(fh)

logger.warning("test1")
logger.warning("test12")
logger.warning("test13")
logger.warning("test14")
re模塊
常用正則表達式符號
'.'     默認匹配除\n之外的任意一個字符,若指定flag DOTALL,則匹配任意字符,包括換行
'^'     匹配字符開頭,若指定flags MULTILINE,這種也可以匹配上(r"^a","\nabc\neee",flags=re.MULTILINE)
'$'     匹配字符結尾,或e.search("foo$","bfoo\nsdfsf",flags=re.MULTILINE).group()也可以
'*'     匹配*號前的字符0次或多次,re.findall("ab*","cabb3abcbbac")  結果爲['abb', 'ab', 'a']
'+'     匹配前一個字符1次或多次,re.findall("ab+","ab+cd+abb+bba") 結果['ab', 'abb']
'?'     匹配前一個字符1次或0次
'{m}'       匹配前一個字符m次
'{n,m}'     匹配前一個字符n到m次,re.findall("ab{1,3}","abb abc abbcbbb") 結果'abb', 'ab', 'abb']
'|'     匹配|左或|右的字符,re.search("abc|ABC","ABCBabcCD").group() 結果'ABC'
'(...)'     分組匹配,re.search("(abc){2}a(123|456)c", "abcabca456c").group() 結果 abcabca456c

'\A'    只從字符開頭匹配,re.search("\Aabc","alexabc") 是匹配不到的
'\Z'    匹配字符結尾,同$
'\d'    匹配數字0-9
'\D'    匹配非數字
'\w'    匹配[A-Za-z0-9]
'\W'    匹配非[A-Za-z0-9]
's'     匹配空白字符、\t、\n、\r , re.search("\s+","ab\tc1\n3").group() 結果 '\t'

'(?P<name>...)'     分組匹配 re.search("(?P<province>[0-9]{4})(?P<city>[0-9]{2})(?P<birthday>[0-9]{4})","371481199306143242").groupdict("city") 結果{'province': '3714', 'city': '81', 'birthday': '1993'}
最常用的匹配語法
re.match 從頭開始匹配
re.search 匹配包含
re.findall 把所有匹配到的字符放到以列表中的元素返回
re.splitall 以匹配到的字符當做列表分隔符
re.sub  匹配字符並替換
反斜槓的困擾
與大多數編程語言相同,正則表達式裏使用"\"作爲轉義字符,這就可能造成反斜槓困擾。假如你需要匹配文本中的字符"\",那麼使用編程語言表示的正則表達式裏將需要4個反斜槓"\\":前兩個和後兩個分別用於在編程語言裏轉義成反斜槓,轉換成兩個反斜槓後再在正則表達式裏轉義成一個反斜槓。Python裏的原生字符串很好地解決了這個問題,這個例子中的正則表達式可以使用r"\"表示。同樣,匹配一個數字的"\d"可以寫成r"\d"。有了原生字符串,你再也不用擔心是不是漏寫了反斜槓,寫出來的表達式也更直觀。
僅需輕輕知道的幾個匹配模式
re.I(re.IGNORECASE): 忽略大小寫(括號內是完整寫法,下同)
M(MULTILINE): 多行模式,改變'^'和'$'的行爲(參見上圖)
S(DOTALL): 點任意匹配模式,改變'.'的行爲
本節作業
開發一個簡單的python計算器
- 實現加減乘除及拓號優先級解析
-
用戶輸入 1 - 2 ( (60-30 +(-40/5) (9-25/3 + 7 /399/42998 +10 568/14 )) - (-43)/ (16-32) )等類似公式後,必須自己解析裏面的(),+,-,*,/符號和公式(不能調用eval等類似功能偷懶實現),運算後得出結果,結果必須與真實的計算器所得出的結果一致
hint:
re.search(r'([^()]+)',s).group()
'(-40/5)'
注:該文章由alex的blog搬運而來