


爲Apache添加SSL模塊
一、相關知識介紹:
有時候在使用一個WEB應用的時候,爲了讓HTTP的傳輸更加的安全,那就要用到SSL(Security Socket Layer 安全套接層)協議,也就是用HTTPS來訪問。
在介紹之前來簡單的說說對稱加密和非對稱加密:
對稱加密:在對稱加密算法中,加密的雙方都持有一個相同的密鑰,用這個密鑰來加密和解密。由於在加密和解密的過程中使用同一種密鑰,所以稱其爲對稱加密算法。
非對稱加密:在非對稱加密算法中,引進了公鑰和私鑰這兩個概念。公鑰:就是大家都知道的,可以加密,也可以解密。私鑰:只有私鑰持有人才知道的,不能公佈於從的一個密鑰。公鑰和私鑰是成對出現的,單獨的一個是沒有任何意義的,而且不能由一個摧算出另一個。用公鑰加密的數據可以用私鑰來解密,這就實現了數據的加密;同樣用私鑰加密的數據,也只有用公鑰才能解密,這實現了身份驗證。
HTTPS的原理大致是這樣的:客戶端在通過https訪問網站的時候,WEB服務器會給客戶機自己的公鑰(也就是下面要說的server.crt),然後客戶機就會隨機的產生一個對稱的密鑰,之後,再用剛纔這個公鑰來給對稱密鑰來加密,最後,再把這個加了密的對稱密鑰發給服務器,服務器在接收到這個加密了的對稱密鑰後,用自己的私鑰來解密,這樣服務器也得到了這個對稱密鑰。當客戶機有請求要發給服務器的時候,或是服務器在給客戶機發數據的時候,都用這個對稱密鑰來加密所傳輸的數據。這樣安全性就大提高了。如下圖所示:
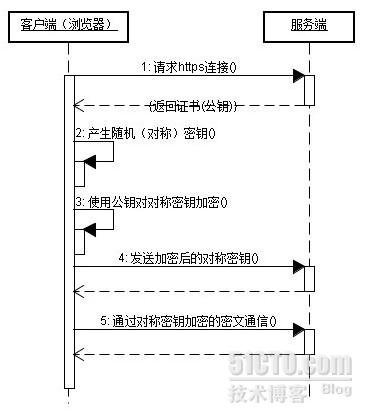
由上可以看出,HTTPS中先是使用非對稱加密算法,把對稱的密鑰給傳到服務器端,然後再用這個對稱的密鑰來對要傳輸的數據進行加密的!
二、安裝Apache並讓其支持SSL,在安裝之前還是要把apr和apr-util這兩個給安裝上:
1、安裝apr:
# ./configure –prefix=/usr/local/apr
# make && make install
2、安裝apr-util:
# ./configure –prefix=/usr/local/apr-util –with-apr=/usr/local/apr/
# make && make install
3、安裝apache:
# ./configure –prefix=/usr/local/apache –enable-modules=most –enable-mods-shared=all –with-apr=/usr/local/apr/ --with-apr-util=/usr/local/apr-util/
# make && make install
注:這裏的—enable-modules=most 是將大部分的模塊靜態的編譯到httpd二進制文件中,
--enable-mods-shared=all 是讓apache動態的加載所有的模塊,如果去掉shared的話,那就是靜態加載所有的模塊。
當然你不用這兩個參數也可以,用—enable-ssl,但是這樣做的話,如果以後要添加新的模塊的話,有點麻煩。
4、安裝oenssl:
openssl衆多的密碼算法、公鑰基礎設施標準以及SSL協議。更多的信息請百度,這寫不下了。
# ./config //注意看清楚哦,這裏是config不是configure
# make && make install
三、爲服務器生成私鑰(server.key)和公鑰(server.crt):
1、用openssl命令爲服務器生成server.key私鑰:
[root@ns openssl-1.0.0e]# cd /usr/local/ssl/bin/
[root@ns bin]# ./openssl genrsa -des3 -out server.key
Generating RSA private key, 512 bit long modulus
.....++++++++++++
....++++++++++++
e is 65537 (0x10001)
Enter pass phrase for server.key:
Verifying - Enter pass phrase for server.key:
[root@ns bin]#
注:這裏的默認長度是512位的密碼,自己還可以在後面加上個長度如1024,並且最後還會讓你輸入一個私鑰的保護密碼。防止私鑰被盜後,被人亂用。
2、用剛纔的私鑰給服務器生成一個證書申請文件server.csr:
[root@ns bin]# ./openssl req -new -key server.key -out server.csr
Enter pass phrase for server.key:
You are about to be asked to enter information that will be incorporated
into your certificate request.
What you are about to enter is what is called a Distinguished Name or a DN.
There are quite a few fields but you can leave some blank
For some fields there will be a default value,
If you enter '.', the field will be left blank.
-----
Country Name (2 letter code) [AU]:CN //輸入國家代碼中國CN
State or Province Name (full name) [Some-State]:SHANGHAI //省份名稱
Locality Name (eg, city) []:SHANGHAI //城市名稱
Organization Name (eg, company) [Internet Widgits Pty Ltd]:. //組織名稱,也可填公司名,我這沒有填。
Organizational Unit Name (eg, section) []:xfzhou.com //單位名稱,
Common Name (eg, YOUR name) []:xfzhou.com //這個填的要與ServerName一樣
Email Address []:[email protected] //聯繫的郵件地址
Please enter the following 'extra' attributes
to be sent with your certificate request
A challenge password []:123456 //這個密碼有人說不填,但是,我這填了也沒有用到。
An optional company name []:xfzhou.com //還是公司名稱。
[root@ns bin]#
3、用前面兩步生成的私鑰(server.key)文件和證書申請文件(server.csr)來給服務器申請證書:
[root@ns bin]# ./openssl x509 -req -days 3650 -in server.csr -signkey server.key -out server.crt
Signature ok
subject=/C=CN/ST=SHANGHAI/L=SHANGHAI/OU=xfzhou.com/CN=xfzhou.com/[email protected]
Getting Private key
Enter pass phrase for server.key: //輸入私鑰的保護密碼
[root@ns bin]# ls
c_rehash openssl server.crt server.csr server.key
[root@ns bin]#
4、再把上面生成的私鑰文件和證書(公鑰)文件CP到/usr/local/apache/conf/目錄下面:
[root@ns bin]# cp ./server.key /usr/local/apache/conf/
[root@ns bin]# cp ./server.crt /usr/local/apache/conf/
四、修改/usr/local/apache/conf/httpd.conf,啓用SSL模塊,並啓動HTTPD服務:
# vi /usr/local/apache/conf/httpd.conf
LoadModule socache_shmcb_module modules/mod_socache_shmcb.so //這個模塊也要加載,否則啓動不了。
LoadModule ssl_module modules/mod_ssl.so
Include conf/extra/httpd-ssl.conf //找到這三行然後把註釋給去掉。
[root@ns bin]# /usr/local/apache/bin/apachectl start
Apache/2.4.3 mod_ssl (Pass Phrase Dialog)
Some of your private key files are encrypted for security reasons.
In order to read them you have to provide the pass phrases.
Server www.example.com:443 (RSA)
Enter pass phrase: //這裏輸入的是那個第一次創建的那server.key的密碼。
OK: Pass Phrase Dialog successful.
[root@ns bin]# netstat -anpt| grep httpd
tcp 0 0 0.0.0.0:80 0.0.0.0:* LISTEN 14242/httpd
tcp 0 0 0.0.0.0:443 0.0.0.0:* LISTEN 14242/httpd
[root@ns bin]#
若你的某個web服務器上運行了多個網站,某個網站比如說後臺管理的網站可能需要htts加密傳輸,但是前臺的不需要,如果遇到這樣的問題,你就可以把你的網站的後臺管理的頁面用HTTPS來訪問,具體做法是把網站的後臺管理的根目錄放到httpd-ssl.conf文件中的虛擬主機中。
五、驗證:
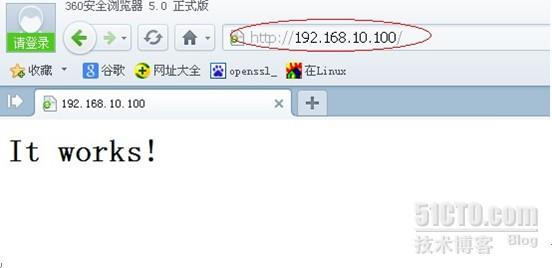
1、在瀏覽器中直接輸入http://192.168.10.100發現是可以訪問的如下圖:
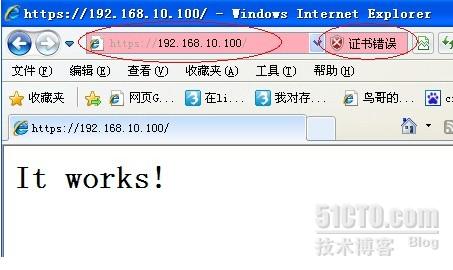
2、用https://192.168.10.100訪問的時候如下,會出現證書錯誤的警告:

點擊繼續瀏覽,就可以看到網站的內容了,如下:
再點擊下“證書錯誤”——“查看證書”就可以看到證書了。如下:

發現一個問題,就是在啓動apache的時候每次都會讓你輸入密碼,這樣會很麻煩的,要是你的服務器重啓了,那麼你就必須要手工輸入密碼你的網站纔會起來。。
下面給出了一個解決辦法:
在/usr/local/apache/conf/目錄下創建一個sendsslpwd的文件。內容如下:
[root@ns conf]# cat sendsslpwd
#!/bin/bash
sslpwd='xfzhou' //這個就是私鑰的保護密碼
echo $sslpwd
[root@ns conf]#
再來修改下httpd-ssl.conf這個文件:
找到 SSLPassPhraseDialog builtin 這一行,將其註釋掉
加入 SSLPassPhraseDialog exec:/usr/local/apache2/conf/sendsslpwd
這樣,每次啓動將不會提示輸入SSL密碼瞭如下:
[root@ns conf]#
[root@ns conf]# /usr/local/apache/bin/apachectl stop
[root@ns conf]# /usr/local/apache/bin/apachectl start
[root@ns conf]#
還有一種解決辦法就是執行下面的這個命令:
# openssl rsa -in server.key -out server.key
然後再輸入一次密碼,接下來你再重啓服務的時候就不會讓你手工輸入密碼了!