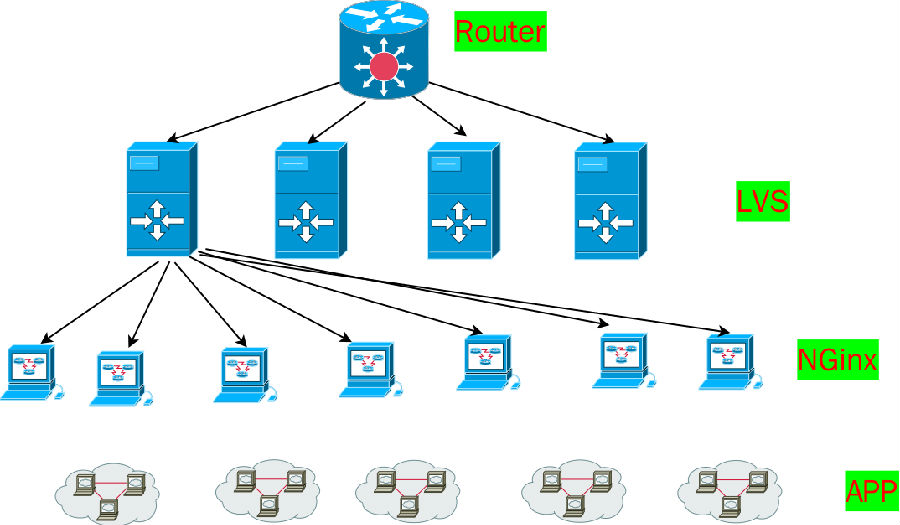
隨着開源技術的發展,以及商業設備價格的不斷攀升。大公司總是希望能使用開源的方案來替換過去使用的商業設備。比如之前大家用的很多的F5和A10,現在已經在逐步被LVS替換。傳統的單個lvs的性能是比不上商業設備的,而且穩定性等也相對會差些。告訴大家很多大公司都在用這些技術的。
基本思路就是把多個LVS組成一個OSPF集羣,這樣可以使得LVS集羣的性能可以遠遠超過單個傳統的商業設備(當然,對於F5等等其實也可以做這樣的集羣做水平化的擴展)
原來就是把服務器也模擬成ospf中的一份子,是他可以在實現ospf的負載均衡,以及高可用性。
在這裏網絡層的東西就不寫了,往簡單配置,沒意思。往難裏配置我也不懂,上線服務器的時候,這些東西都是網絡組的負責,我只是負責服務器上的ospf的介入和業務方面的。
我這裏只是簡單的說下ospf的框架
OSPF(Open Shortest Path First開放式最短路徑優先)是一個內部網關協議(Interior Gateway Protocol,簡稱IGP),用於在單一自治系統(autonomous system,AS)內決策路由。
ECMP(Equal-CostMultipathRouting)等價多路徑,存在多條不同鏈路到達同一目的地址的網絡環境中,如果使用傳統的路由技術,發往該目的地址的數據包只能利用其中的一條鏈路,其它鏈路處於備份狀態或無效狀態,並且在動態路由環境下相互的切換需要一定時間,而等值多路徑路由協議可以在該網絡環境下同時使用多條鏈路,不僅增加了傳輸帶寬,並且可以無時延無丟包地備份失效鏈路的數據傳輸。
特點:
1 2 3 4 | 4層負載均衡,效率高配置簡單,只需安裝基於linux的路由軟件quagga無法進行監控檢查,服務異常無法處理無session保持等,功能過於簡單 |
貼上一個操作的例子:
OSPF(Open Shortest Path First開放式最短路徑優先)是一個內部網關協議(Interior
Gateway Protocol,簡稱IGP),用於在單一自治系統(autonomous system,AS)內決
策路由。
ECMP(Equal-CostMultipathRouting)等價多路徑,存在多條不同鏈路到達同一目的地址的網絡
環境中,如果使用傳統的路由技術,發往該目的地址的數據包只能利用其中的一條鏈路,其它鏈路處
於備份狀態或無效狀態,並且在動態路由環境下相互的切換需要一定時間,而等值多路徑路由協議可
以在該網絡環境下同時使用多條鏈路,不僅增加了傳輸帶寬,並且可以無時延無丟包地備份失效鏈路
的數據傳輸。
特點:1.4層負載均衡,效率高2.配置簡單,只需安裝基於linux的路由軟件quagga3.無法進行監控檢查,服務異常無法處理4. 無session保持等,功能過於簡單路由器上的ospf的操作 ,這只是簡單的配置,大家可以按照自己的想法和網絡組的同學們扯淡提需求就行了。
1 2 3 4 5 6 7 8 9 10 11 12 13 14 15 16 17 18 19 20 21 22 23 24 25 26 27 28 29 30 | 配置命令:R0配置:Router>enRouter#config tEnter configuration commands, one per line. End withCNTL/Z.Router(config)#hostname r0r0(config)#r0(config)#inte1/0r0(config-if)#ip address 192.168.2.222255.255.255.0r0(config-if)#no shutdownr0(config)#inte1/1r0(config-if)#ip address 192.168.0.111255.255.255.0r0(config-if)#no shutdownr0(config-if)#exitr0(config)#router ospf 100r0(config-router)#netr0(config-router)#network 192.168.0.00.0.0.255area 0r0(config-router)#network 192.168.2.00.0.0.255area 0r0(config-router)#exitr0(config)#inte1/1r0(config-if)#ip ospf cost 2r0(config-if)#inte1/0r0(config-if)#ip ospf cost 2r0(config-if)#endr0#ping 192.168.0.14Type escapesequence to abort.Sending 5, 100-byte ICMP Echos to 192.168.0.14, timeout is2seconds:!!!!!Success rate is100percent (5/5), round-trip min/avg/max = 64/93/1========================================================================== |
cisco默認的是hello時間是10s,死亡時間是hello時間的4倍,默認爲40s,當然這個時間是可以修改的。
在接口模式下面,通過命令:
ip ospf hello-interval <time>來修改hello時間。
ip ospf dead-interval <time>來修改死亡時間。服務器端的配置
其實就是安裝一個軟路由,讓他進到ospf的圈子裏面。
先說下qugga的基本安裝配置
1 2 3 4 5 6 7 8 9 10 11 12 13 14 15 16 17 18 19 20 21 22 23 24 25 26 27 28 29 30 31 32 33 34 35 36 37 38 39 40 41 42 43 44 45 46 47 48 49 50 51 52 53 54 55 56 57 58 59 60 61 62 63 64 65 66 67 68 69 70 71 72 73 74 75 76 77 78 79 80 81 82 83 84 85 86 87 88 89 90 91 92 93 94 95 96 97 98 99 100 101 102 103 104 105 106 107 108 109 110 111 112 113 | 1. 下載源碼quagga-0.99.10.tar.gz2. 解壓縮tar xzvf quagga-0.99.10.tar.gz3. 配置cd quagga-0.99.10./configure --prefix =/usr--sysconfdir=/etc/quagga--localstatedir=/var/run/quagga--enable-vtysh--enable-user='test'--enable-group='test'--enable-vty-group='test'配置輸出:Quagga configuration--------------------quagga version : 0.99.10host operationg system : linux-gnusource code location : .compiler : gcccompiler flags : -Os -fno-omit-frame-pointer -g -std=gnu99 -Wall -Wsign-compare -Wpointer-arith -Wbad-function-cast -Wwrite-strings -Wmissing-prototypes -Wmissing-declarations -Wchar-subscripts -Wcast-qualmake : makeincludes :linker flags : -lcrypt -lcap -ltermcap -lreadline -lmstate file directory : /var/run/quaggaconfig file directory : /etc/quaggaexample directory : /etc/quaggauser to run as: testgroup to run as: testgroup forvty sockets : testconfig file mask : 0600log file mask : 0600The above user and group must have read/write accessto the state file directory andto the config files inthe config file directory.4. 編譯和安裝make ;make install5. 添加test組和用戶groupadd test;useradd test -g test6. 改變權限 //最好寫入啓動腳本chown test:test /var/run/quaggachmod 777/var/run/quaggachown test:test /etc/quagga //需要將配置寫入操作系統chmod 777/etc/quagga/* 7. 增加log權限//最好寫入啓動腳本Mkdir /var/log/quagga/Vi /var/log/quagga/zebra.logChmod 777/var/log/quagga/zebra.log8. 修改 /etc/services //just for telnetzebrasrv 2600/tcp # zebra servicezebra 2601/tcp # zebra vtyripd 2602/tcp # RIPd vtyripngd 2603/tcp # RIPngd vtyospfd 2604/tcp # OSPFd vtybgpd 2605/tcp # BGPd vtyospf6d 2606/tcp # OSPF6d vtyospfapi 2607/tcp # ospfapiisid 2608/tcp # ISISd vty9. 編輯配置文件copy /etc/quagga/zebra.conf.example /etc/quagga/zebra.conf! -*- zebra -*-!! zebra sample configuration file!hostname Routerpassword zebraenable password zebralog file /var/log/quagga/zebra.log//注意zebra.conf啓用log,這樣便於查找錯誤10. 啓動zebra –d如果啓動不成功,察看/var/log/quagga/zebra.log一般由於權限設置會出現以下錯誤:2008/10/2216:59:22ZEBRA: Could not lock pid_file /var/run/quagga/zebra.pid, exiting11. 登陸telnet localhost zebra(0r 2601)[root@localhost quagga-0.99.10]# telnet localhost 2601Trying 127.0.0.1...Connected to localhost.Escape character is'^]'.Hello, thisisQuagga (version 0.99.10).Copyright 1996-2005Kunihiro Ishiguro, et al.User Access VerificationPassword:Router> enablePassword:Router# helpQuagga VTY provides advanced help feature. When you need help,anytime at the command line please press '?'.If nothing matches, the help list will be empty and you must backupuntil entering a '?'shows the available options.Two styles of help are provided:1. Full help isavailable when you are ready to enter acommand argument (e.g. 'show ?') and describes eachpossibleargument.2. Partial help isprovided when an abbreviated argument isenteredand you want to know what arguments match the input(e.g. 'show me?'.)Router# |
在lvs server上的配置
1 2 3 4 5 6 7 8 9 10 11 12 13 14 15 16 17 18 19 20 21 22 23 24 25 26 27 28 29 30 31 32 33 34 35 | 安裝LVS服務器192.168.0.14、192.168.0.15上安裝quagga軟件配置1). 配置web服務器quagga使用root用戶登錄192.168.0.14和192.168.0.15cd /etc/quaggacp ospfd.conf.sample ospfd.confchkconfig zebra onchkconfig ospfd onservice zebra startservice ospfd starttelnet localhost ospfd輸入默認密碼zebraospfd> enospfd# conf tospfd(config)# router ospfospfd(config-router)# router-id 192.168.2.64ospfd(config-router)# network 192.168.0.23/32area 0.0.0.0(lo IP)ospfd(config-router)# network 192.168.2.64/24area 0.0.0.0(接口IP)ospfd(config-router)#endospfd#wr2). 配置交換機端根據交換機類型配置ospf與主機quagga建立ospf鄰居關係3). 配置主機使用root用戶分別在2臺web服務上執行以下命令ifconfig lo:0192.168.0.23netmask 255.255.255.255up驗證多次訪問http://192.168.0.23顯示相應頁面即說明負載成功3.2功能測試負載均衡測試多次訪問http://192.168.0.23顯示realserver ip address 在192.168.0.14和192.168.0.15之間切換服務切換測試Down掉192.168.0.14/15上的服務IP 192.168.0.23可以正常訪問應用 |
總結,淘寶的lvs已經做了fullnat的技術,原理也是ospf的負載的,騰訊不少業務也早已經用這樣的方案了,知道騰訊的dns爲啥能抗住幾百萬的流量請求併發,10g網壓力測試能保持在1800w 流量請求併發, 除了dns的性能牛逼外,網絡的框架用的就是這個方案。當然裏面有些具體的流程方案不方便向大家show出來,比如 各種情況下的健康度檢查,ospf的hello包的判斷,自動化的ospf的配置,定時的負載調整。 但這些東西可以自己用shell配合網絡組的同學們一起搞定製的。
這樣的方案,在上一家公司用過很多次,qugga的性能和穩定是沒有問題的~大家可以放心用。 還有一點 用之前一直要搞清楚ospf的cost負載的原理,或者公司有專門的網絡的同學,要是沒有的話最好別衝動去線上嘗試,不然會。。。。你懂的。


