


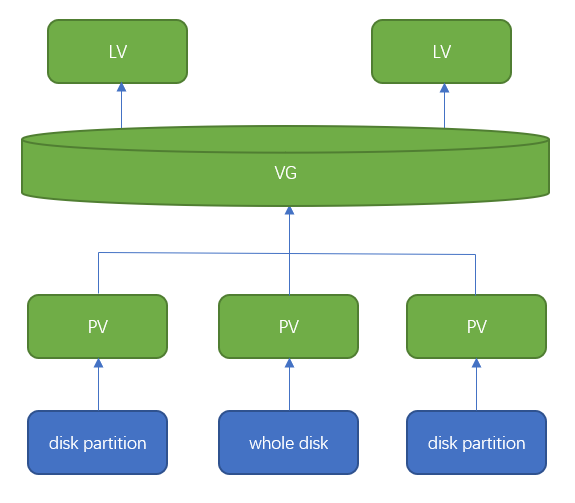
LVM(Logical Volume Manager)邏輯卷管理器,是一種磁盤管理工具,在磁盤和分區之上建立一個邏輯層實現了靈活的磁盤管理。LVM可將多個物理分區整合在一起,可按需添加或刪除其管理的物理分區,邏輯分區可跨磁盤,容量可動態調整。LVM不僅應用在操作系統上,也廣泛應用在容器(如docker)存儲、分佈式文件系統等方面。
LVM術語
- Physical Volume (PV) 物理卷,一個PV對應一個磁盤或一個磁盤分區
- Volume Group (VG) 卷組,一個或多個PV的集合,可動態增減PV,LVM系統中可含有多個VG
- Logical Volume(LV) 邏輯卷,建立在VG之上的虛擬block設備, 容量可動態增減
- Physical Extent(PE) PV的最小存儲單元,最小爲128KB,默認爲4MB,在創建VG時設定,一旦設定很難更改,只能重建VG
下面是CentOS 7默認安裝,使用LVM命令顯示的一些LVM信息,可幫助理解LVM:
# pvdisplay
  --- Physical volume ---
  PV Name               /dev/sda2
  VG Name               centos
  PV Size               <39.00 GiB / not usable 3.00 MiB
  Allocatable           yes
  PE Size               4.00 MiB
  Total PE              9983
  Free PE               1
  Allocated PE          9982
  PV UUID               fVpHC4-LcnW-IkvS-q1Iu-ZkIF-6dEo-BBuXFp
# vgdisplay
--- Volume group ---
VG Name centos
System ID
Format lvm2
Metadata Areas 1
Metadata Sequence No 3
VG Access read/write
VG Status resizable
MAX LV 0
Cur LV 2
Open LV 2
Max PV 0
Cur PV 1
Act PV 1
VG Size <39.00 GiB
PE Size 4.00 MiB
Total PE 9983
Alloc PE / Size 9982 / 38.99 GiB
Free PE / Size 1 / 4.00 MiB
VG UUID YXgJ03-dlJZ-rgu9-VNDB-pEuJ-7RZg-Dg9rEK# lvdisplay
--- Logical volume ---
LV Path /dev/centos/swap
LV Name swap
VG Name centos
LV UUID ZRTNg0-Y44i-VbIb-cVxG-kCuq-U7Og-WI33wo
LV Write Access read/write
LV Creation host, time localhost, 2018-11-10 00:36:21 +0800
LV Status available
# open 2
LV Size 2.00 GiB
Current LE 512
Segments 1
Allocation inherit
Read ahead sectors auto
- currently set to 8192
Block device 253:1
--- Logical volume ---
LV Path /dev/centos/root
LV Name root
VG Name centos
LV UUID gkAo2f-v8vS-GKZi-NfDz-F6qM-BhrD-IIXa12
LV Write Access read/write
LV Creation host, time localhost, 2018-11-10 00:36:22 +0800
LV Status available
# open 1
LV Size 36.99 GiB
Current LE 9470
Segments 1
Allocation inherit
Read ahead sectors auto
- currently set to 8192
Block device 253:0查看磁盤分區信息:
# fdisk -l

Disk /dev/sda: 42.9 GB, 42949672960 bytes, 83886080 sectors
Units = sectors of 1 * 512 = 512 bytes
Sector size (logical/physical): 512 bytes / 512 bytes
I/O size (minimum/optimal): 512 bytes / 512 bytes
Disk label type: dos
Disk identifier: 0x0003d1dd

   Device Boot      Start         End      Blocks   Id  System
/dev/sda1   *        2048     2099199     1048576   83  Linux
/dev/sda2         2099200    83886079    40893440   8e  Linux LVM

Disk /dev/mapper/centos-root: 39.7 GB, 39720058880 bytes, 77578240 sectors
Units = sectors of 1 * 512 = 512 bytes
Sector size (logical/physical): 512 bytes / 512 bytes
I/O size (minimum/optimal): 512 bytes / 512 bytes

Disk /dev/mapper/centos-swap: 2147 MB, 2147483648 bytes, 4194304 sectors
Units = sectors of 1 * 512 = 512 bytes
Sector size (logical/physical): 512 bytes / 512 bytes
I/O size (minimum/optimal): 512 bytes / 512 bytes
查看塊設備信息:
# lsblk
NAME            MAJ:MIN RM  SIZE RO TYPE MOUNTPOINT
sda               8:0    0   40G  0 disk
├─sda1            8:1    0    1G  0 part /boot
└─sda2            8:2    0   39G  0 part
  ├─centos-root 253:0    0   37G  0 lvm  /
  └─centos-swap 253:1    0    2G  0 lvm  [SWAP]
查看文件系統信息:
# df -hT
Filesystem              Type      Size  Used Avail Use% Mounted on
/dev/mapper/centos-root xfs        37G  6.3G   31G  17% /
/dev/sda1               xfs      1014M  169M  846M  17% /boot
LVM管理
CentOS/RHEL 7默認了安裝了LVM工具:
# yum install lvm2查看LVM文檔和支持的命令:
# man lvmLVM配置目錄:/etc/lvm
LVM命令
lvmconfig 顯示LVM配置信息
lvmdiskscan 查詢LVM設備
# lvmdiskscan
  /dev/centos/root [      36.99 GiB]
  /dev/sda1        [       1.00 GiB]
  /dev/centos/swap [       2.00 GiB]
  /dev/sda2        [     <39.00 GiB] LVM physical volume
  /dev/sdb1        [      <1.91 GiB] LVM physical volume
  /dev/sdb2        [      <1.91 GiB] LVM physical volume
  /dev/sdb3        [       4.18 GiB] LVM physical volume
  2 disks
  1 partition
  0 LVM physical volume whole disks
  4 LVM physical volumes
lvmdump 爲診斷目的創建 lvm信息轉儲
PV
PV命令
pvchange 修改PV屬性
pvck 檢查PV metadata
pvcreate 從磁盤或分區創建PV
pvdisplay 顯示PV屬性
pvmove 移動PV內容(Physical Extents)
pvremove 擦除PV標籤,LVM不再將其識別爲PV。活動LV使用的PV不能刪除
pvresize 調整PV容量
pvs 查詢PV信息
# pvs
  PV         VG     Fmt  Attr PSize   PFree
  /dev/sda2  centos lvm2 a--  <39.00g 4.00m
pvscan 查找PV
# pvscan
  PV /dev/sda2   VG centos          lvm2 [<39.00 GiB / 4.00 MiB free]
  Total: 1 [<39.00 GiB] / in use: 1 [<39.00 GiB] / in no VG: 0 [0   ]
創建PV
在創建PV前,先掛載一塊硬盤sdb,掛載後查詢結果如下:
# lsblk
NAME            MAJ:MIN RM  SIZE RO TYPE MOUNTPOINT
sda               8:0    0   40G  0 disk
├─sda1            8:1    0    1G  0 part /boot
└─sda2            8:2    0   39G  0 part
  ├─centos-root 253:0    0   37G  0 lvm  /
  └─centos-swap 253:1    0    2G  0 lvm  [SWAP]
sdb 8:16 0 8G 0 disk- 從磁盤創建PV
# pvcreate /dev/sdb
  Physical volume "/dev/sdb" successfully created.
查看新建PV狀態:
# pvdisplay
  "/dev/sdb" is a new physical volume of "8.00 GiB"
  --- NEW Physical volume ---
  PV Name               /dev/sdb
  VG Name
  PV Size               8.00 GiB
  Allocatable           NO
  PE Size               0
  Total PE              0
  Free PE               0
  Allocated PE          0
  PV UUID               SuVbLN-KNmT-DlpW-acPI-HqFQ-Sn9w-p3zZJd
刪除PV:
# pvremove /dev/sdb
Labels on physical volume "/dev/sdb" successfully wiped.- 從分區創建PV
先用fdisk創建分區sdb1、sdb2、sdb3,分區類型必須是8e(Linux LVM):
# fdisk /dev/sdb
Welcome to fdisk (util-linux 2.23.2).

Changes will remain in memory only, until you decide to write them.
Be careful before using the write command.

Command (m for help): n
Partition type:
   p   primary (0 primary, 0 extended, 4 free)
   e   extended
Select (default p):
Using default response p
Partition number (1-4, default 1):
First sector (2048-16777215, default 2048):
Using default value 2048
Last sector, +sectors or +size{K,M,G} (2048-16777215, default 16777215): +2048MB
Partition 1 of type Linux and of size 1.9 GiB is set

Command (m for help): t
Selected partition 1
Hex code (type L to list all codes): 8e
Changed type of partition 'Linux' to 'Linux LVM'

Command (m for help): n
Partition type:
   p   primary (1 primary, 0 extended, 3 free)
   e   extended
Select (default p):
Using default response p
Partition number (2-4, default 2):
First sector (4001792-16777215, default 4001792):
Using default value 4001792
Last sector, +sectors or +size{K,M,G} (4001792-16777215, default 16777215): +2048MB
Partition 2 of type Linux and of size 1.9 GiB is set

Command (m for help): t
Partition number (1,2, default 2):
Hex code (type L to list all codes): 8e
Changed type of partition 'Linux' to 'Linux LVM'

Command (m for help): n
Partition type:
   p   primary (2 primary, 0 extended, 2 free)
   e   extended
Select (default p):
Using default response p
Partition number (3,4, default 3):
First sector (8001536-16777215, default 8001536):
Using default value 8001536
Last sector, +sectors or +size{K,M,G} (8001536-16777215, default 16777215):
Using default value 16777215
Partition 3 of type Linux and of size 4.2 GiB is set

Command (m for help): t
Partition number (1-3, default 3):
Hex code (type L to list all codes): 8e
Changed type of partition 'Linux' to 'Linux LVM'

Command (m for help): w
The partition table has been altered!

Calling ioctl() to re-read partition table.
Syncing disks.
加載後查詢分區:
# partprobe
# fdisk -l
...
   Device Boot      Start         End      Blocks   Id  System
/dev/sdb1            2048     4001791     1999872   8e  Linux LVM
/dev/sdb2         4001792     8001535     1999872   8e  Linux LVM
/dev/sdb3         8001536    16777215     4387840   8e  Linux LVM
...
創建PV:
# pvcreate /dev/sdb1 /dev/sdb2
  Physical volume "/dev/sdb1" successfully created.
  Physical volume "/dev/sdb2" successfully created.
VG
VG命令
vgcfgbackup 備份VG配置
vgcfgrestore 恢復VG配置
vgchange 修改VG屬性
vgck 檢查VG元數據
vgconvert 轉換VG元數據格式
vgcreate 創建VG
vgdisplay 顯示VG屬性
vgexport 從系統中註銷VG
vgextend 向VG中增加PV
vgimport 註冊已註銷的VG
vgimportclone 註冊和重命名克隆的VG
# vgimportclone --basevgname vg00_snap /dev/sdc /dev/sddvgmerge 將兩個VG合併
vgmknodes Create the special files for volume group devices in /dev
vgreduce 刪除VG中的一個或多個PV
vgremove 刪除VG
vgrename 重命名VG
vgs 查詢VG信息
# vgs
  VG     #PV #LV #SN Attr   VSize   VFree
  centos   1   2   0 wz--n- <39.00g 4.00m
vgscan 查找VG
# vgscan
  Reading volume groups from cache.
  Found volume group "centos" using metadata type lvm2
vgsplit 將VG拆分爲兩個, 通過移動整個PV將任何LV從一個VG移動到另一個VG
創建VG
從PV /dev/sdb1、/dev/sdb2創建VG,VG名稱爲testvg,指定PE爲16M:
# vgcreate -s 16M testvg /dev/sdb{1,2}
  Volume group "testvg" successfully created
查看新建VG的狀態:
# vgdisplay
--- Volume group ---
  VG Name               testvg
  System ID
  Format                lvm2
  Metadata Areas        2
  Metadata Sequence No  1
  VG Access             read/write
  VG Status             resizable
  MAX LV                0
  Cur LV                0
  Open LV               0
  Max PV                0
  Cur PV                2
  Act PV                2
  VG Size               3.81 GiB
  PE Size               16.00 MiB
  Total PE              244
  Alloc PE / Size       0 / 0
  Free  PE / Size       244 / 3.81 GiB
  VG UUID               dnUeP6-AktH-EUlJ-ok1Z-CvhS-L5Op-zgecve
# pvscan
PV /dev/sdb1 VG testvg lvm2 [1.98 GiB / 1.98 GiB free]
PV /dev/sdb2 VG testvg lvm2 [5.98 GiB / 5.98 GiB free]增加VG容量
可從PV創建VG,也可直接從磁盤和分區創建,這樣會自動創建PV,如下將/dev/sdb3添加到VG中:
# vgextend testvg /dev/sdb3
  Physical volume "/dev/sdb3" successfully created.
  Volume group "testvg" successfully extended
刪除VG
# vgremove testvg
  Volume group "testvg" successfully removed
LV
LV命令
lvchange 修改LV屬性
lvconvert Convert a Logical Volume from linear to mirror or snapshot.
lvcreate 創建LV
lvdisplay 顯示LV屬性
lvextend 擴展LV容量
lvreduce 減少LV容量
lvremove 刪除LV
lvrename 重命名LV
lvresize 調整LV容量
lvs 查詢LV信息
# lvs
  LV   VG     Attr       LSize  Pool Origin Data%  Meta%  Move Log Cpy%Sync Convert
  root centos -wi-ao---- 36.99g
  swap centos -wi-ao----  2.00g
lvscan 查詢LV
# lvscan
  ACTIVE            '/dev/centos/swap' [2.00 GiB] inherit
  ACTIVE            '/dev/centos/root' [36.99 GiB] inherit
創建LV
從testvg創建名爲lv1,容量爲4G的LV
# lvcreate -L 4G -n lv1 testvg
  Logical volume "lv1" created.
查看新建LV狀態:
# lvdisplay
--- Logical volume ---
  LV Path                /dev/testvg/lv1
  LV Name                lv1
  VG Name                testvg
  LV UUID                Dt6e9v-1NGf-HIZp-tUYh-2Rbl-SAEk-W8YOpL
  LV Write Access        read/write
  LV Creation host, time localhost.localdomain, 2019-02-24 13:10:28 +0800
  LV Status              available
  # open                 0
  LV Size                4.00 GiB
  Current LE             256
  Segments               1
  Allocation             inherit
  Read ahead sectors     auto
  - currently set to     8192
  Block device           253:2
格式化和mount:
LV必須使用全名。
# mkfs -t xfs /dev/testvg/lv1
# mkdir /mnt/lvm
# mount /dev/testvg/lv1 /mnt/lvm
查看LV:
# df -h
Filesystem               Size  Used Avail Use% Mounted on
/dev/mapper/testvg-lv1   4.0G   33M  4.0G   1% /mnt/lvm