


MySQL讀寫分離(ProxySQL)
讀寫分離原理
讀寫分離就是用戶在發送請求時,請求經過中間件,中間件將請求中的讀和寫操作分辨出來將讀請求發送給後端的從服務器,將寫請求發送給後端的主服務器,再又主服務器通過主從複製將數據複製給其他從服務器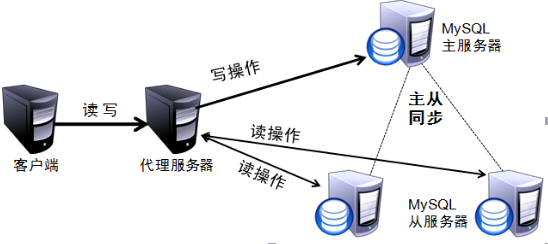
常見MySQL中間件
| 名稱 | 公司 | 站點地址 |
|---|---|---|
| mysql-proxy | Oracle | https://downloads.mysql.com/archives/proxy |
| Atlas | Qihoo | https://github.com/Qihoo360/Atlas/blob/master/README_ZH.md |
| dbproxy | 美團 | https://github.com/Meituan-Dianping/DBProxy |
| Cetus | 網易樂得 | https://github.com/Lede-Inc/cetus |
| Amoeba | https://sourceforge.net/projects/amoeba/ | |
| Cobar | 阿里巴巴 | Amoeba的升級版 |
| Mycat | 基於Cobar | http://www.mycat.io |
| ProxySQL | https://proxysql.com/ |
本文以ProxySQL爲例來介紹讀寫分離的使用方法
ProxySQL簡介
ProxySQL爲MySQL的中間件,其有兩個版本官方版和percona版,percona版是基於官方版基礎上修改而來。ProxySQL是由C++語言開發,輕量級但性能優異(支持處理千億級數據),其具有中間件所需要的絕大多數功能,如:
- 多種方式的讀寫分離
- 定製基於用戶、基於schema、基於語言的規則對SQL語句進行路由
- 緩存查詢結果
- 後端節點的控制
...
官方站點:https://proxysql.com/
官方手冊:https://github.com/sysown/proxysql/wiki
ProxySQL安裝後生成的文件
/etc/init.d/proxysql            #此爲服務腳本存放在init.d目錄下所以需要使用service命令去啓動他
/etc/proxysql.cnf
/usr/bin/proxysql
/usr/share/proxysql/tools/proxysql_galera_checker.sh
/usr/share/proxysql/tools/proxysql_galera_writer.pl
ProxySQL所使用的端口
ProxySQL所使用的端口爲6032和6033
6032:用來配置ProxySQL,是個管理接口
6033:用來被遠程用戶連接端口
ProxySQL內置數據庫
MySQL [(none)]> SHOW DATABASES;
+-----+---------------+-------------------------------------+
| seq | name          | file                                |
+-----+---------------+-------------------------------------+
| 0   | main          |                                     |
| 2   | disk          | /var/lib/proxysql/proxysql.db       |
| 3   | stats         |                                     |
| 4   | monitor       |                                     |
| 5   | stats_history | /var/lib/proxysql/proxysql_stats.db |
+-----+---------------+-------------------------------------+
5 rows in set (0.00 sec)
以上這些庫中主要配置的庫爲main庫,裏面存放了ProxySQL的各種配置。
ProxySQL main庫內的表
MySQL [(none)]> show tables;
+--------------------------------------------+
| tables                                     |
+--------------------------------------------+
| global_variables                           |
| mysql_collations                           |
| mysql_group_replication_hostgroups         |
| mysql_query_rules                          |
| mysql_query_rules_fast_routing             |
| mysql_replication_hostgroups               |
| mysql_servers                              |
| mysql_users                                |
| proxysql_servers                           |
| runtime_checksums_values                   |
| runtime_global_variables                   |
| runtime_mysql_group_replication_hostgroups |
| runtime_mysql_query_rules                  |
| runtime_mysql_query_rules_fast_routing     |
| runtime_mysql_replication_hostgroups       |
| runtime_mysql_servers                      |
| runtime_mysql_users                        |
| runtime_proxysql_servers                   |
| runtime_scheduler                          |
| scheduler                                  |
+--------------------------------------------+
20 rows in set (0.00 sec)
main庫中的表分爲runtime開頭和非runtime開頭
runtime開頭爲運行時的設置
非runtime開頭爲需要設置的配置
所有的配置修改後需要執行命令才能加載到runtime生效
LOAD ... TO RUNTIME所有的配置修改後需要執行命令才能永久保存
SAVE ... TO DISK日誌查看
查看read_only和replication_log的監控日誌
MySQL [(none)]> select * from mysql_server_read_only_log;
Empty set (0.00 sec)

MySQL [(none)]> select * from mysql_server_replication_lag_log;
Empty set (0.00 sec)
ProxySQL實現讀寫分離
ProxySQL在實現讀寫分離之前先要實現主從複製的共功能
本實驗總計使用4臺主機,詳細配置如下
| 主機 | ip地址 |
|---|---|
| Client | 192.168.73.113 |
| ProxySQL | 192.168.73.112 |
| Master | 192.168.73.110 |
| Slave | 192.168.73.111 |
注意事項:在實現主從複製時從節點在配置文件中必須要設置read_only,這是ProxySQL區分是用來作爲讀服務器還是寫服務器的依據
一、實現主從複製
主節點配置
1.修改配置文件
[root@Master ~]# vim /etc/my.cnf
[mysqld]
server-id=1
log-bin
binlog-format=row
2.啓動MySQL服務
[root@Master ~]# systemctl start mariadb
[root@Master ~]# mysql -e "SHOW MASTER LOGS;"
+--------------------+-----------+
| Log_name           | File_size |
+--------------------+-----------+
| mariadb-bin.000001 |       245 |
+--------------------+-----------+
3.創建用來複制的賬號
[root@Master ~]# mysql -e "GRANT REPLICATION SLAVE ON *.* TO 'repluser'@'192.168.73.%' IDENTIFIED BY 'centos';"從節點配置
1.修改配置文件
[root@Slave ~]# vim /etc/my.cnf
[mysqld]
server-id=2
log-bin
binlog-format=row
read-only               #必須寫
2.啓動數據庫服務
[root@Slave ~]# systemctl start mariadb3.寫入CHANGE MASTSER TO信息
MariaDB [(none)]> CHANGE MASTER TO MASTER_HOST='192.168.73.110', MASTER_USER='repluser',MASTER_PASSWORD='centos',MASTER_PORT=3306,MASTER_LOG_FILE='mariadb-bin.000001',MASTER_LOG_POS=245;
Query OK, 0 rows affected (0.00 sec)
4.啓動複製線程
MariaDB [(none)]> START SLAVE;
Query OK, 0 rows affected (0.00 sec)
5.查看狀態
MariaDB [(none)]> SHOW SLAVE STATUS\G;
*************************** 1. row ***************************
               Slave_IO_State: Waiting for master to send event
                  Master_Host: 192.168.73.110
                  Master_User: repluser
                  Master_Port: 3306
                Connect_Retry: 60
              Master_Log_File: mariadb-bin.000001
          Read_Master_Log_Pos: 402
               Relay_Log_File: mariadb-relay-bin.000002
                Relay_Log_Pos: 688
        Relay_Master_Log_File: mariadb-bin.000001
             Slave_IO_Running: Yes
            Slave_SQL_Running: Yes
測試
1.主節點導入數據庫
[root@Master ~]# mysql < hellodb_innodb.sql
[root@Master ~]# mysql -e "SHOW DATABASES;"
+--------------------+
| Database           |
+--------------------+
| information_schema |
| hellodb            |
| mysql              |
| performance_schema |
| test               |
+--------------------+
2.從節點查看
[root@Slave ~]# mysql -e "SHOW DATABASES;"
+--------------------+
| Database           |
+--------------------+
| information_schema |
| hellodb            |
| mysql              |
| performance_schema |
| test               |
+--------------------+
主從複製配置完畢
二、在ProxySQL上配置讀寫分離
1.在ProxySQL主機上配置yum源
[root@ProxySQL ~]# vim /etc/yum.repos.d/proxysql.repo
[proxysql_repo]
name= ProxySQL YUM repository
baseurl=http://repo.proxysql.com/ProxySQL/proxysql-1.4.x/centos/\$releasever
gpgcheck=1
gpgkey=http://repo.proxysql.com/ProxySQL/repo_pub_key
2.安裝ProxySQL和mariadb客戶端
ProxySQL內置了一個輕量級的數據庫,所以需要有MySQL客戶端連上去對其進行配置
[root@ProxySQL ~]# yum install proxysql mariadb -y3.啓動ProxySQL服務
[root@ProxySQL ~]# service proxysql start
Starting ProxySQL: 2019-05-08 14:03:07 [INFO] Using config file /etc/proxysql.cnf
DONE!
4.連接管理端口
[root@ProxySQL ~]# mysql -uadmin -padmin -P6032 -h127.0.0.1
Welcome to the MariaDB monitor.  Commands end with ; or \g.
Your MySQL connection id is 1
Server version: 5.5.30 (ProxySQL Admin Module)

Copyright (c) 2000, 2018, Oracle, MariaDB Corporation Ab and others.

Type 'help;' or '\h' for help. Type '\c' to clear the current input statement.
5.將MySQL主從服務器信息添加入mysql_servers表中
先將主從服務器存放在同一組內,等指定好讀寫規則後,系統會根據配置文件中的read-only值自動將其分別添加至讀組和寫組。
MySQL [(none)]> INSERT INTO mysql_servers(hostgroup_id,hostname,port) VALUES (10,'192.168.73.110',3306);
Query OK, 1 row affected (0.00 sec)

MySQL [(none)]> INSERT INTO mysql_servers(hostgroup_id,hostname,port) VALUES (10,'192.168.73.111',3306);
Query OK, 1 row affected (0.00 sec)

MySQL [(none)]> SELECT * FROM mysql_servers
    -> ;
+--------------+----------------+------+--------+--------+-------------+-----------------+---------------------+---------+----------------+---------+
| hostgroup_id | hostname       | port | status | weight | compression | max_connections | max_replication_lag | use_ssl | max_latency_ms | comment |
+--------------+----------------+------+--------+--------+-------------+-----------------+---------------------+---------+----------------+---------+
| 10           | 192.168.73.110 | 3306 | ONLINE | 1      | 0           | 1000            | 0                   | 0       | 0              |         |
| 10           | 192.168.73.111 | 3306 | ONLINE | 1      | 0           | 1000            | 0                   | 0       | 0              |         |
+--------------+----------------+------+--------+--------+-------------+-----------------+---------------------+---------+----------------+---------+
2 rows in set (0.00 sec)
6.在MySQL服務器的主節點上爲ProxySQL添加賬號用來查看MySQL節點是主還是從
[root@Master ~]# mysql -e "GRANT REPLICATION SLAVE ON *.* TO 'monitor'@'192.168.73.%' IDENTIFIED BY 'centos';"7.在Proxy上配置監控賬號
MySQL [(none)]> SET mysql-monitor_username='monitor';
Query OK, 1 row affected (0.00 sec)

MySQL [(none)]> SET mysql-monitor_password='centos';
Query OK, 1 row affected (0.00 sec)
8.將配置加載至內存,將配置保存至磁盤
MySQL [(none)]> LOAD MYSQL VARIABLES TO RUNTIME;
Query OK, 0 rows affected (0.00 sec)

MySQL [(none)]> SAVE MYSQL VARIABLES TO DISK;
Query OK, 97 rows affected (0.00 sec)
9.測試
9.1查看連接狀態
MySQL [(none)]> select * from mysql_server_connect_log;
+----------------+------+------------------+-------------------------+-------------------------------------------------------------------------+
| hostname       | port | time_start_us    | connect_success_time_us | connect_error                                                           |
+----------------+------+------------------+-------------------------+-------------------------------------------------------------------------+
| 192.168.73.110 | 3306 | 1557296528658352 | 0                       | Access denied for user 'monitor'@'192.168.73.112' (using password: YES) |
| 192.168.73.111 | 3306 | 1557296648056186 | 0                       | Access denied for user 'monitor'@'192.168.73.112' (using password: YES) |
| 192.168.73.110 | 3306 | 1557296649025169 | 0                       | Access denied for user 'monitor'@'192.168.73.112' (using password: YES) |
| 192.168.73.110 | 3306 | 1557296708057600 | 0                       | Access denied for user 'monitor'@'192.168.73.112' (using password: YES) |
| 192.168.73.111 | 3306 | 1557296708872496 | 0                       | Access denied for user 'monitor'@'192.168.73.112' (using password: YES) |
| 192.168.73.110 | 3306 | 1557296758752550 | 2763                    | NULL                                                                    |  #此前由於沒有創建監控賬號所以連接一直失敗
| 192.168.73.111 | 3306 | 1557296759862679 | 3205                    | NULL                                                                    |
| 192.168.73.110 | 3306 | 1557296818752346 | 1014                    | NULL                                                                    |
| 192.168.73.111 | 3306 | 1557296819498108 | 3120                    | NULL                                                                    |
| 192.168.73.110 | 3306 | 1557296878752978 | 3245                    | NULL                                                                    |
| 192.168.73.111 | 3306 | 1557296879410404 | 3063                    | NULL                                                                    |
+----------------+------+------------------+-------------------------+-------------------------------------------------------------------------+
22 rows in set (0.00 sec)
9.2測試連接ping
MySQL [(none)]> select * from mysql_server_ping_log;
+----------------+------+------------------+----------------------+-------------------------------------------------------------------------+
| hostname       | port | time_start_us    | ping_success_time_us | ping_error                                                              |
+----------------+------+------------------+----------------------+-------------------------------------------------------------------------+
| 192.168.73.111 | 3306 | 1557296508118738 | 0                    | Access denied for user 'monitor'@'192.168.73.112' (using password: YES) |
| 192.168.73.110 | 3306 | 1557296508302837 | 0                    | Access denied for user 'monitor'@'192.168.73.112' (using password: YES) |

...中間省略...

| 192.168.73.110 | 3306 | 1557297088874658 | 675                  | NULL                                                                    |
| 192.168.73.111 | 3306 | 1557297089037256 | 435                  | NULL                                                                    |
| 192.168.73.110 | 3306 | 1557297098875954 | 1144                 | NULL                                                                    |
| 192.168.73.111 | 3306 | 1557297099069333 | 1252                 | NULL                                                                    |
+----------------+------+------------------+----------------------+-------------------------------------------------------------------------+
122 rows in set (0.00 sec)
#已經可以聯通
10.設置讀寫分組
MySQL [(none)]> INSERT INTO mysql_replication_hostgroups VALUES(10,20,"test");
Query OK, 1 row affected (0.00 sec)

MySQL [(none)]> SELECT * FROM mysql_replication_hostgroups;
+------------------+------------------+---------+
| writer_hostgroup | reader_hostgroup | comment |
+------------------+------------------+---------+
| 10               | 20               | test    |
+------------------+------------------+---------+
1 row in set (0.00 sec)
11.讓讀寫表生效
MySQL [(none)]> LOAD MYSQL SERVERS TO RUNTIME;
Query OK, 0 rows affected (0.00 sec)
12.查看mysql_server表此時已經將服務器分組
MySQL [(none)]> SELECT * FROM mysql_servers;
+--------------+----------------+------+--------+--------+-------------+-----------------+---------------------+---------+----------------+---------+
| hostgroup_id | hostname       | port | status | weight | compression | max_connections | max_replication_lag | use_ssl | max_latency_ms | comment |
+--------------+----------------+------+--------+--------+-------------+-----------------+---------------------+---------+----------------+---------+
| 10           | 192.168.73.110 | 3306 | ONLINE | 1      | 0           | 1000            | 0                   | 0       | 0              |         |
| 20           | 192.168.73.111 | 3306 | ONLINE | 1      | 0           | 1000            | 0                   | 0       | 0              |         |
+--------------+----------------+------+--------+--------+-------------+-----------------+---------------------+---------+----------------+---------+
2 rows in set (0.00 sec)
13.保存配置至磁盤
MySQL [(none)]> SAVE MYSQL SERVERS TO DISK;
Query OK, 0 rows affected (0.02 sec)
至此讀寫分離配置完畢,接下來需要定義讀寫分離的規則
三、定義讀寫分離規則
1.在主節點上創建一個賬戶讓客戶端連接調度器去訪問主從服務器(此處授予的權限較大,實際生產中可以根據需要定義指定的那張表)
[root@Master ~]# mysql -e "GRANT ALL ON *.* TO 'sqluser'@'192.168.73.%' IDENTIFIED BY 'centos';"2.在ProxySQL服務器上,將sqluser用戶添加至mysql_users表中
MySQL [(none)]> INSERT INTO mysql_users(username,password,default_hostgroup) VALUES ('sqluser','centos',10);
Query OK, 1 row affected (0.00 sec)
3.查看mysql_user表信息
MySQL [(none)]> SELECT * FROM mysql_users;
+----------+----------+--------+---------+-------------------+----------------+---------------+------------------------+--------------+---------+----------+-----------------+
| username | password | active | use_ssl | default_hostgroup | default_schema | schema_locked | transaction_persistent | fast_forward | backend | frontend | max_connections |
+----------+----------+--------+---------+-------------------+----------------+---------------+------------------------+--------------+---------+----------+-----------------+
| sqluser  | centos   | 1      | 0       | 10                | NULL           | 0             | 1                      | 0            | 1       | 1        | 10000           |
+----------+----------+--------+---------+-------------------+----------------+---------------+------------------------+--------------+---------+----------+-----------------+
1 row in set (0.00 sec)
4.生效存盤
MySQL [(none)]> load mysql users to runtime;
Query OK, 0 rows affected (0.00 sec)

MySQL [(none)]> SAVE MYSQL USERS TO DISK;
Query OK, 0 rows affected (0.00 sec)
5.測試
目前尚未設置讀寫路由規則,所有的請求都是發往主節點
[root@Client ~]# mysql -usqluser -pcentos -h192.168.73.112 -P6033 -e "SELECT @@server_id;"
+-------------+
| @@server_id |
+-------------+
|           1 |
+-------------+
6.在ProxySQL上定義調度規則
MySQL [(none)]> INSERT INTO mysql_query_rules(rule_id,active,match_digest,destination_hostgroup,apply) VALUES (1,1,'^SELECT.*FOR UPDATE$',10,1),(2,1,'^SELECT',20,1);
Query OK, 2 rows affected (0.00 sec)
7.查看定義規則
MySQL [(none)]>  SELECT * FROM mysql_query_rules\G;
*************************** 1. row ***************************
              rule_id: 1
               active: 1
             username: NULL
           schemaname: NULL
               flagIN: 0
          client_addr: NULL
           proxy_addr: NULL
           proxy_port: NULL
               digest: NULL
         match_digest: ^SELECT.*FOR UPDATE$
        match_pattern: NULL
 negate_match_pattern: 0
         re_modifiers: CASELESS
              flagOUT: NULL
      replace_pattern: NULL
destination_hostgroup: 10
            cache_ttl: NULL
            reconnect: NULL
              timeout: NULL
              retries: NULL
                delay: NULL
    next_query_flagIN: NULL
       mirror_flagOUT: NULL
     mirror_hostgroup: NULL
            error_msg: NULL
               OK_msg: NULL
          sticky_conn: NULL
            multiplex: NULL
                  log: NULL
                apply: 1
              comment: NULL
*************************** 2. row ***************************
              rule_id: 2
               active: 1
             username: NULL
           schemaname: NULL
               flagIN: 0
          client_addr: NULL
           proxy_addr: NULL
           proxy_port: NULL
               digest: NULL
         match_digest: ^SELECT
        match_pattern: NULL
 negate_match_pattern: 0
         re_modifiers: CASELESS
              flagOUT: NULL
      replace_pattern: NULL
destination_hostgroup: 20
            cache_ttl: NULL
            reconnect: NULL
              timeout: NULL
              retries: NULL
                delay: NULL
    next_query_flagIN: NULL
       mirror_flagOUT: NULL
     mirror_hostgroup: NULL
            error_msg: NULL
               OK_msg: NULL
          sticky_conn: NULL
            multiplex: NULL
                  log: NULL
                apply: 1
              comment: NULL
2 rows in set (0.00 sec)
8.生效存盤
MySQL [(none)]> LOAD MYSQL QUERY RULES TO RUNTIME;
Query OK, 0 rows affected (0.00 sec)

MySQL [(none)]> SAVE MYSQL QUERY RULES TO DISK;
Query OK, 0 rows affected (0.00 sec)
四、在Client端測試
1.查詢操作
[root@Client ~]# mysql -usqluser -pcentos -h192.168.73.112 -P6033 -e "SELECT @@server_id;"
+-------------+
| @@server_id |
+-------------+
|           2 |
+-------------+
2.寫操作
[root@Client ~]# mysql -usqluser -pcentos -h192.168.73.112 -P6033 -e "BEGIN;INSERT hellodb.teachers VALUE(5,'Long',30,'M');SELECT @@server_id;commit;"
+-------------+
| @@server_id |
+-------------+
|           1 |
+-------------+