


本地環境
節點一:
[root@CentOS7_node1 src]# hostname
CentOS7_node1
[root@CentOS7_node1 src]# ip a | grep 10.211.55.7 |  awk -F ' ' '{print $2}'
10.211.55.7/24
[root@CentOS7_node1 src]# cat /etc/redhat-release
CentOS Linux release 7.6.1810 (Core)
節點二:
[root@CentOS7_node2 src]# hostname
CentOS7_node2
[root@CentOS7_node2 src]# ip a | grep 10.211.55.9 |  awk -F ' ' '{print $2}'
10.211.55.9/24
[root@CentOS7_node2 src]# cat /etc/redhat-release
CentOS Linux release 7.6.1810 (Core)
節點三:
[root@CentOS7_node3 src]# hostname
CentOS7_node3
[root@CentOS7_node3 src]# ip a | grep 10.211.55.10 |  awk -F ' ' '{print $2}'
10.211.55.10/24
[root@CentOS7_node3 src]# cat /etc/redhat-release
CentOS Linux release 7.6.1810 (Core)
ES安裝
所需ES版本爲:elasticsearch-5.6.16.tar.gz
所需JDK版本爲:jdk-8u161-linux-x64.tar.gz
下載地址:https://pan.baidu.com/s/1wdzQokfMFXDtTY2BXg2Fbw
節點一
部署JDK環境
[root@CentOS7_node1 src]# tar xf jdk-8u161-linux-x64.tar.gz  -C /usr/local/
[root@CentOS7_node1 src]# mv /usr/local/jdk1.8.0_161 /usr/local/java
[root@CentOS7_node1 src]# vim /etc/profile
[root@CentOS7_node1 src]# tail -5 /etc/profile
#################JAVA#################
export JAVA_HOME=/usr/local/java
export JRE_HOME=/usr/local/java/jre
export CLASSPATH=.:$JAVA_HOME/lib/dt.jar:$JAVA_HOME/lib/tools.jar:$JRE_HOME/lib
export PATH=$JAVA_HOME/bin:$JRE_HOME/bin:$PATH
[root@CentOS7_node1 src]# source /etc/profile
[root@CentOS7_node1 src]# java -version
java version "1.8.0_161"
Java(TM) SE Runtime Environment (build 1.8.0_161-b12)
Java HotSpot(TM) 64-Bit Server VM (build 25.161-b12, mixed mode)
安裝elasticsearch
[root@CentOS7_node1 src]# tar xf elasticsearch-5.6.16.tar.gz  -C /usr/local/
[root@CentOS7_node1 src]# groupadd elasticsearch
[root@CentOS7_node1 src]# useradd elasticsearch -g elasticsearch
[root@CentOS7_node1 src]# echo '3edc#EDC' | passwd --stdin elasticsearch
Changing password for user elasticsearch.
passwd: all authentication tokens updated successfully.
[root@CentOS7_node1 src]# chown -Rf elasticsearch:elasticsearch /usr/local/elasticsearch-5.6.16
更改elasticsearch.yml配置文件
注:以下修改的配置文件詳解請點擊:https://www.dockerc.com/elasticsearch_config/
[root@CentOS7_node1 config]# cat elasticsearch.yml
cluster.name: elasticsearch_dockerc
node.name: elasticsearch-node1
node.master: true
node.data: true
path.data: /data/dockerc/data1,/data/dockerc/data2,/data/dockerc/data3
path.logs: /data/docker/logs
bootstrap.memory_lock: true
network.host: 10.211.55.7
network.tcp.no_delay: true
network.tcp.keep_alive: true
network.tcp.reuse_address: true
network.tcp.send_buffer_size: 64mb
network.tcp.receive_buffer_size: 64mb
transport.tcp.port: 9301
transport.tcp.compress: true
http.max_content_length: 100mb
http.enabled: true
http.port: 9201
discovery.zen.ping.unicast.hosts: ["10.211.55.7:9301", "10.211.55.10:9301", "10.211.55.9:9301"]
discovery.zen.minimum_master_nodes: 2
discovery.zen.fd.ping_timeout: 150s
discovery.zen.fd.ping_retries: 6
discovery.zen.fd.ping_interval: 15s
cluster.routing.allocation.cluster_concurrent_rebalance: 16
cluster.routing.allocation.node_concurrent_recoveries: 16
cluster.routing.allocation.node_initial_primaries_recoveries: 16
更改jvm.options配置文件
堆內存的初始內存和最大內存建議保持一致,因爲我在設置不一致的時候產生了錯誤
內存大小根據物理資源情況給定
[root@CentOS7_node1 config]# vim jvm.options
-Xms1g
-Xmx1g
創建數據及日誌目錄
[root@CentOS7_node1 ~]# mkdir -pv /data/dockerc/{data1,data2,data3,logs}
mkdir: created directory ‘/data’
mkdir: created directory ‘/data/dockerc’
mkdir: created directory ‘/data/dockerc/data1’
mkdir: created directory ‘/data/dockerc/data2’
mkdir: created directory ‘/data/dockerc/data3’
mkdir: created directory ‘/data/dockerc/logs’
[root@CentOS7_node1 ~]# chown -Rf elasticsearch /data
[root@CentOS7_node1 ~]# ll /data/dockerc/
total 16
drwxr-xr-x 2 elasticsearch root 4096 May 10 00:13 data1
drwxr-xr-x 2 elasticsearch root 4096 May 10 00:13 data2
drwxr-xr-x 2 elasticsearch root 4096 May 10 00:13 data3
drwxr-xr-x 2 elasticsearch root 4096 May 10 00:13 logs
注:現在node1算是配置完了,但是還不能啓動,因爲我們配置了discvery,如果超過150s*6次未檢測到node2和node3將會啓動失敗
修改elasticsearch潛在問題
1.修改文件描述符
echo '* soft nofile 65536' >> /etc/security/limits.conf
echo '* hard nofile 65536' >> /etc/security/limits.conf
然後重新登錄終端
[root@CentOS7_node1 ~]# ulimit -n
65536
2.修改修改max_map_count值
臨時設置:
[root@CentOS7_node1 ~]# sysctl -w vm.max_map_count=655360
vm.max_map_count = 655360

永久設置:
[root@CentOS7_node1 ~]# echo 'vm.max_map_count=655360' >> /etc/sysctl.conf
[root@CentOS7_node1 ~]# sysctl -p
vm.max_map_count = 655360
3.無法分配內存問題
[root@CentOS7_node1 ~]# echo '* soft memlock unlimited' >> /etc/security/limits.conf
[root@CentOS7_node1 ~]# echo '* hard memlock unlimited' >> /etc/security/limits.conf
[root@CentOS7_node1 ~]# tail -2 /etc/security/limits.conf
* soft memlock unlimited
* hard memlock unlimited
節點二
注:node2就除了elasticsearch.yml不一致之外,其它無區別,除配置文件外,其它一律和node1保持一致
elasticsearch配置文件
[root@CentOS7_node2 ~]# cat /usr/local/elasticsearch-5.6.16/config/elasticsearch.yml
cluster.name: elasticsearch_dockerc
node.name: elasticsearch-node2
node.master: true
node.data: true
path.data: /data/dockerc/data1,/data/dockerc/data2,/data/dockerc/data3
path.logs: /data/docker/logs
bootstrap.memory_lock: true
network.host: 10.211.55.9
network.tcp.no_delay: true
network.tcp.keep_alive: true
network.tcp.reuse_address: true
network.tcp.send_buffer_size: 64mb
network.tcp.receive_buffer_size: 64mb
transport.tcp.port: 9301
transport.tcp.compress: true
http.max_content_length: 100mb
http.enabled: true
http.port: 9201
discovery.zen.ping.unicast.hosts: ["10.211.55.7:9301", "10.211.55.10:9301", "10.211.55.9:9301"]
discovery.zen.minimum_master_nodes: 2
discovery.zen.fd.ping_timeout: 150s
discovery.zen.fd.ping_retries: 6
discovery.zen.fd.ping_interval: 15s
cluster.routing.allocation.cluster_concurrent_rebalance: 16
cluster.routing.allocation.node_concurrent_recoveries: 16
cluster.routing.allocation.node_initial_primaries_recoveries: 16
配置文件修改完成以後,同樣不要啓動elasticsearch
節點三
配置除配置文件外其餘和node2一樣,配置文件如下
[root@CentOS7_node3 ~]# cat /usr/local/elasticsearch-5.6.16/config/elasticsearch.yml
cluster.name: elasticsearch_dockerc
node.name: elasticsearch-node3
node.master: true
node.data: true
path.data: /data/dockerc/data1,/data/dockerc/data2,/data/dockerc/data3
path.logs: /data/docker/logs
bootstrap.memory_lock: true
network.host: 10.211.55.10
network.tcp.no_delay: true
network.tcp.keep_alive: true
network.tcp.reuse_address: true
network.tcp.send_buffer_size: 64mb
network.tcp.receive_buffer_size: 64mb
transport.tcp.port: 9301
transport.tcp.compress: true
http.max_content_length: 100mb
http.enabled: true
http.port: 9201
discovery.zen.ping.unicast.hosts: ["10.211.55.7:9301", "10.211.55.10:9301", "10.211.55.9:9301"]
discovery.zen.minimum_master_nodes: 2
discovery.zen.fd.ping_timeout: 150s
discovery.zen.fd.ping_retries: 6
discovery.zen.fd.ping_interval: 15s
cluster.routing.allocation.cluster_concurrent_rebalance: 16
cluster.routing.allocation.node_concurrent_recoveries: 16
cluster.routing.allocation.node_initial_primaries_recoveries: 16
啓動Elasticsearch
三個節點啓動時間儘量不要差很久,以下三條啓動信息,我只截取了一部分,但是我的服務啓動時正常的
節點一啓動信息
root@CentOS7_node1 ~]# su elasticsearch /usr/local/elasticsearch-5.6.16/bin/elasticsearch
[2019-05-10T00:17:51,097][WARN ][o.e.d.z.ZenDiscovery     ] [elasticsearch-node1] not enough master nodes discovered during pinging (found [[Candidate{node={elasticsearch-node1}{Zwvq1z3TQZK-oPALgixXEw}{Eu1dFZSbRX6tYMwiOtqeZg}{10.211.55.7}{10.211.55.7:9301}, clusterStateVersion=-1}]], but needed [2]), pinging again
[2019-05-10T00:17:54,346][INFO ][o.e.c.s.ClusterService   ] [elasticsearch-node1] detected_master {elasticsearch-node3}{RNO7uYb-QOSJCQJ7EIkUMw}{VM3cXe-_TDOc_1qyq7yW3A}{10.211.55.10}{10.211.55.10:9301}, added {{elasticsearch-node3}{RNO7uYb-QOSJCQJ7EIkUMw}{VM3cXe-_TDOc_1qyq7yW3A}{10.211.55.10}{10.211.55.10:9301},}, reason: zen-disco-receive(from master [master {elasticsearch-node3}{RNO7uYb-QOSJCQJ7EIkUMw}{VM3cXe-_TDOc_1qyq7yW3A}{10.211.55.10}{10.211.55.10:9301} committed version [1]])
[2019-05-10T00:17:54,361][INFO ][o.e.h.n.Netty4HttpServerTransport] [elasticsearch-node1] publish_address {10.211.55.7:9201}, bound_addresses {10.211.55.7:9201}
[2019-05-10T00:17:54,362][INFO ][o.e.n.Node               ] [elasticsearch-node1] started
啓動的時候有個WARN警告信息,是因爲剛啓動還沒找到誰是主節點,所以參生了一條警告信息,不過當集羣建立後,很快就沒了
節點二啓動信息
[2019-05-10T00:17:51,244][INFO ][o.e.b.BootstrapChecks    ] [elasticsearch-node2] bound or publishing to a non-loopback address, enforcing bootstrap checks
[2019-05-10T00:17:54,493][INFO ][o.e.c.s.ClusterService   ] [elasticsearch-node2] detected_master {elasticsearch-node3}{RNO7uYb-QOSJCQJ7EIkUMw}{VM3cXe-_TDOc_1qyq7yW3A}{10.211.55.10}{10.211.55.10:9301}, added {{elasticsearch-node1}{Zwvq1z3TQZK-oPALgixXEw}{Eu1dFZSbRX6tYMwiOtqeZg}{10.211.55.7}{10.211.55.7:9301},{elasticsearch-node3}{RNO7uYb-QOSJCQJ7EIkUMw}{VM3cXe-_TDOc_1qyq7yW3A}{10.211.55.10}{10.211.55.10:9301},}, reason: zen-disco-receive(from master [master {elasticsearch-node3}{RNO7uYb-QOSJCQJ7EIkUMw}{VM3cXe-_TDOc_1qyq7yW3A}{10.211.55.10}{10.211.55.10:9301} committed version [3]])
[2019-05-10T00:17:54,556][INFO ][o.e.h.n.Netty4HttpServerTransport] [elasticsearch-node2] publish_address {10.211.55.9:9201}, bound_addresses {10.211.55.9:9201}
[2019-05-10T00:17:54,556][INFO ][o.e.n.Node               ] [elasticsearch-node2] started
節點三啓動信息
[root@CentOS7_node3 ~]# su elasticsearch /usr/local/elasticsearch-5.6.16/bin/elasticsearch
[2019-05-10T00:17:51,240][INFO ][o.e.b.BootstrapChecks    ] [elasticsearch-node3] bound or publishing to a non-loopback address, enforcing bootstrap checks
[2019-05-10T00:17:54,332][INFO ][o.e.c.s.ClusterService   ] [elasticsearch-node3] new_master {elasticsearch-node3}{RNO7uYb-QOSJCQJ7EIkUMw}{VM3cXe-_TDOc_1qyq7yW3A}{10.211.55.10}{10.211.55.10:9301}, added {{elasticsearch-node1}{Zwvq1z3TQZK-oPALgixXEw}{Eu1dFZSbRX6tYMwiOtqeZg}{10.211.55.7}{10.211.55.7:9301},}, reason: zen-disco-elected-as-master ([1] nodes joined)[{elasticsearch-node1}{Zwvq1z3TQZK-oPALgixXEw}{Eu1dFZSbRX6tYMwiOtqeZg}{10.211.55.7}{10.211.55.7:9301}]
[2019-05-10T00:17:54,397][INFO ][o.e.h.n.Netty4HttpServerTransport] [elasticsearch-node3] publish_address {10.211.55.10:9201}, bound_addresses {10.211.55.10:9201}
[2019-05-10T00:17:54,397][INFO ][o.e.n.Node               ] [elasticsearch-node3] started
[2019-05-10T00:17:54,474][INFO ][o.e.g.GatewayService     ] [elasticsearch-node3] recovered [0] indices into cluster_state
簡單看下我們的主節點時哪臺設備
[root@CentOS7_node1 config]#  curl -XGET 'http://10.211.55.7:9201/_cat/nodes?v'
ip           heap.percent ram.percent cpu load_1m load_5m load_15m node.role master name
10.211.55.7            10          52   0    0.00    0.01     0.05 mdi       -      elasticsearch-node1
10.211.55.9            14          55   0    0.00    0.01     0.05 mdi       -      elasticsearch-node2
10.211.55.10           12          74   0    0.00    0.01     0.05 mdi       *      elasticsearch-node3
安裝插件
安裝elasticsearch最出名的插件叫elasticsearch-head,但是elasticsearch-head由nodejs開發,所以需要nodejs環境,然後使用npm命令來管理,所以我們先安裝nodejs環境,3個節點安裝一臺就可以了,因爲在一臺上就可以看到所有的節點狀態
安裝nodejs
[root@CentOS7_node1 src]# curl --silent --location https://rpm.nodesource.com/setup_10.x | bash -
#setup_10.x這個參數爲版本,如果想安裝8版本的nodejs就改爲setup_8.x
[root@CentOS7_node1 /]# yum info nodejs
Loaded plugins: fastestmirror, langpacks
Loading mirror speeds from cached hostfile
 * base: mirrors.aliyun.com
 * extras: mirrors.aliyun.com
 * updates: mirrors.aliyun.com
Available Packages
Name        : nodejs
Arch        : x86_64
Epoch       : 2
Version     : 10.15.3
Release     : 1nodesource
Size        : 18 M
Repo        : nodesource/x86_64
Summary     : JavaScript runtime
URL         : http://nodejs.org
License     : MIT and ASL 2.0 and ISC and BSD
Description : Node.js is a platform built on Chrome's JavaScript runtime
            : for easily building fast, scalable network applications.
            : Node.js uses an event-driven, non-blocking I/O model that
            : makes it lightweight and efficient, perfect for data-intensive
            : real-time applications that run across distributed devices.
[root@CentOS7_node1 /]# yum install nodejs -y
[root@CentOS7_node1 /]# node -v
v10.15.3
[root@CentOS7_node1 /]# npm -v
6.4.1
安裝git
編譯安裝nodejs完成後,要開始下載elasticsearch-head插件了,但是此插件在github上:https://github.com/mobz/elasticsearch-head#running-with-built-in-server,下載方式還必須要使用git方式來克隆下載:下載鏈接:https://github.com/mobz/elasticsearch-head.git
所以我們還需要安裝git來下載此插件
[root@CentOS7_node1 src]# yum install git -y
[root@CentOS7_node1 src]# git --version
git version 1.8.3.1
克隆elasticsearch-head插件
[root@CentOS7_node1 local]# git clone git://github.com/mobz/elasticsearch-head.git
Cloning into 'elasticsearch-head'...
remote: Enumerating objects: 4260, done.
remote: Total 4260 (delta 0), reused 0 (delta 0), pack-reused 4260
Receiving objects: 100% (4260/4260), 2.02 MiB | 372.00 KiB/s, done.
Resolving deltas: 100% (2373/2373), done.
[root@CentOS7_node1 local]# cd elasticsearch-head/
[root@CentOS7_node1 elasticsearch-head]# npm install
npm WARN deprecated [email protected]: Use the built-in module in node 9.0.0 or newer, instead
npm WARN deprecated [email protected]: CoffeeScript on NPM has moved to "coffeescript" (no hyphen)

> [email protected] install /usr/local/elasticsearch-head/node_modules/phantomjs-prebuilt
> node install.js

PhantomJS not found on PATH
Downloading https://github.com/Medium/phantomjs/releases/download/v2.1.1/phantomjs-2.1.1-linux-x86_64.tar.bz2
Saving to /tmp/phantomjs/phantomjs-2.1.1-linux-x86_64.tar.bz2
Receiving...
  [===============================---------] 76%
Received 22866K total.
Extracting tar contents (via spawned process)
Removing /usr/local/elasticsearch-head/node_modules/phantomjs-prebuilt/lib/phantom
Copying extracted folder /tmp/phantomjs/phantomjs-2.1.1-linux-x86_64.tar.bz2-extract-1557423580353/phantomjs-2.1.1-linux-x86_64 -> /usr/local/elasticsearch-head/node_modules/phantomjs-prebuilt/lib/phantom
Writing location.js file
Done. Phantomjs binary available at /usr/local/elasticsearch-head/node_modules/phantomjs-prebuilt/lib/phantom/bin/phantomjs
npm notice created a lockfile as package-lock.json. You should commit this file.
npm WARN [email protected] license should be a valid SPDX license expression
npm WARN optional SKIPPING OPTIONAL DEPENDENCY: [email protected] (node_modules/fsevents):
npm WARN notsup SKIPPING OPTIONAL DEPENDENCY: Unsupported platform for [email protected]: wanted {"os":"darwin","arch":"any"} (current: {"os":"linux","arch":"x64"})

added 515 packages from 619 contributors and audited 1752 packages in 30.005s
found 34 vulnerabilities (19 low, 8 moderate, 7 high)
  run `npm audit fix` to fix them, or `npm audit` for details
啓動elasticsearch-head插件
elasticsearch-head插件默認和elasticsearch一樣是前臺啓動,我這裏給他送到後臺運行
elasticsearch-head插件默認佔用9100端口來提供服務
[root@CentOS7_node1 elasticsearch-head]# nohup npm run start &
[root@CentOS7_node1 src]# ss -anplt | grep 9100
LISTEN     0      128          *:9100                     *:*                   users:(("grunt",pid=6708,fd=18))
服務雖然啓動了,但是如果讓elasticsearch-head插件連接Elasticsearch,我們還需要修改配置來實現
修改插件配置文件
[root@CentOS7_node1 elasticsearch-head]# pwd
/usr/local/elasticsearch-head
[root@CentOS7_node1 elasticsearch-head]# vim Gruntfile.js
                connect: {
                        server: {
                                options: {
                                        port: 9100,
                                        hostname: '*',  //在此新加hostname參數,代表添加所有主機
                                        base: '.',
                                        keepalive: true
                                }
                        }
                }
修改elasticsearch-head/_site/app.js文件
進入vi之後直接搜索9200然後會自動跳轉到目的地,把9200前面的localhost修改爲我們需要對外訪問的節點地址,然後再把9200修改爲我們對外的端口,一般都是把9200修改爲9100端口
[root@CentOS7_node1 elasticsearch-head]# vim _site/app.js
this.base_uri = this.config.base_uri || this.prefs.get("app-base_uri") || "http://10.211.55.7:9100";
修改完成後,我們需要重新啓動elasticsearch-head插件
殺掉grunt進程,此進程是elasticsearch-head插件進程
[root@CentOS7_node1 elasticsearch-head]# ps -ef|grep grunt
root      6708  6694  0 01:43 pts/0    00:00:00 grunt
root     11438  3351  0 02:06 pts/0    00:00:00 grep --color=auto grunt
[root@CentOS7_node1 elasticsearch-head]# killall grunt
[root@CentOS7_node1 elasticsearch-head]# ps -ef|grep grunt
root     11482  3351  0 02:06 pts/0    00:00:00 grep --color=auto grunt
[1]+  Done                    nohup npm run start
[root@CentOS7_node1 elasticsearch-head]# ss -anplt
State      Recv-Q Send-Q                             Local Address:Port                                            Peer Address:Port
LISTEN     0      128                                            *:111                                                        *:*                   users:(("rpcbind",pid=3782,fd=4),("systemd",pid=1,fd=46))
LISTEN     0      5                                  192.168.122.1:53                                                         *:*                   users:(("dnsmasq",pid=13167,fd=6))
LISTEN     0      128                                            *:22                                                         *:*                   users:(("sshd",pid=4448,fd=3))
LISTEN     0      128                                    127.0.0.1:631                                                        *:*                   users:(("cupsd",pid=4446,fd=12))
LISTEN     0      100                                    127.0.0.1:25                                                         *:*                   users:(("master",pid=4797,fd=13))
LISTEN     0      128                                           :::111                                                       :::*                   users:(("rpcbind",pid=3782,fd=6),("systemd",pid=1,fd=48))
LISTEN     0      128                           ::ffff:10.211.55.7:9201                                                      :::*                   users:(("java",pid=6176,fd=187))
LISTEN     0      128                           ::ffff:10.211.55.7:9301                                                      :::*                   users:(("java",pid=6176,fd=121))
LISTEN     0      128                                           :::22                                                        :::*                   users:(("sshd",pid=4448,fd=4))
LISTEN     0      128                                          ::1:631                                                       :::*                   users:(("cupsd",pid=4446,fd=11))
LISTEN     0      100                                          ::1:25                                                        :::*                   users:(("master",pid=4797,fd=14))

然後再次啓動此進程
[root@CentOS7_node1 elasticsearch-head]# nohup npm run start &
[root@CentOS7_node1 elasticsearch-head]# ps -ef|grep grunt
root     11750 11739  4 02:08 pts/0    00:00:00 grunt
root     11791  3351  0 02:08 pts/0    00:00:00 grep --color=auto grunt
[root@CentOS7_node1 elasticsearch-head]# ss -anplt
State      Recv-Q Send-Q                             Local Address:Port                                            Peer Address:Port
LISTEN     0      128                                            *:111                                                        *:*                   users:(("rpcbind",pid=3782,fd=4),("systemd",pid=1,fd=46))
LISTEN     0      5                                  192.168.122.1:53                                                         *:*                   users:(("dnsmasq",pid=13167,fd=6))
LISTEN     0      128                                            *:22                                                         *:*                   users:(("sshd",pid=4448,fd=3))
LISTEN     0      128                                    127.0.0.1:631                                                        *:*                   users:(("cupsd",pid=4446,fd=12))
LISTEN     0      100                                    127.0.0.1:25                                                         *:*                   users:(("master",pid=4797,fd=13))
LISTEN     0      128                                           :::9100                                                      :::*                   users:(("grunt",pid=11750,fd=18))
LISTEN     0      128                                           :::111                                                       :::*                   users:(("rpcbind",pid=3782,fd=6),("systemd",pid=1,fd=48))
LISTEN     0      128                           ::ffff:10.211.55.7:9201                                                      :::*                   users:(("java",pid=6176,fd=187))
LISTEN     0      128                           ::ffff:10.211.55.7:9301                                                      :::*                   users:(("java",pid=6176,fd=121))
LISTEN     0      128                                           :::22                                                        :::*                   users:(("sshd",pid=4448,fd=4))
LISTEN     0      128                                          ::1:631                                                       :::*                   users:(("cupsd",pid=4446,fd=11))
LISTEN     0      100                                          ::1:25                                                        :::*
訪問測試
在瀏覽器中輸入我們修改elasticsearch-head/_site/app.js文件的IP和端口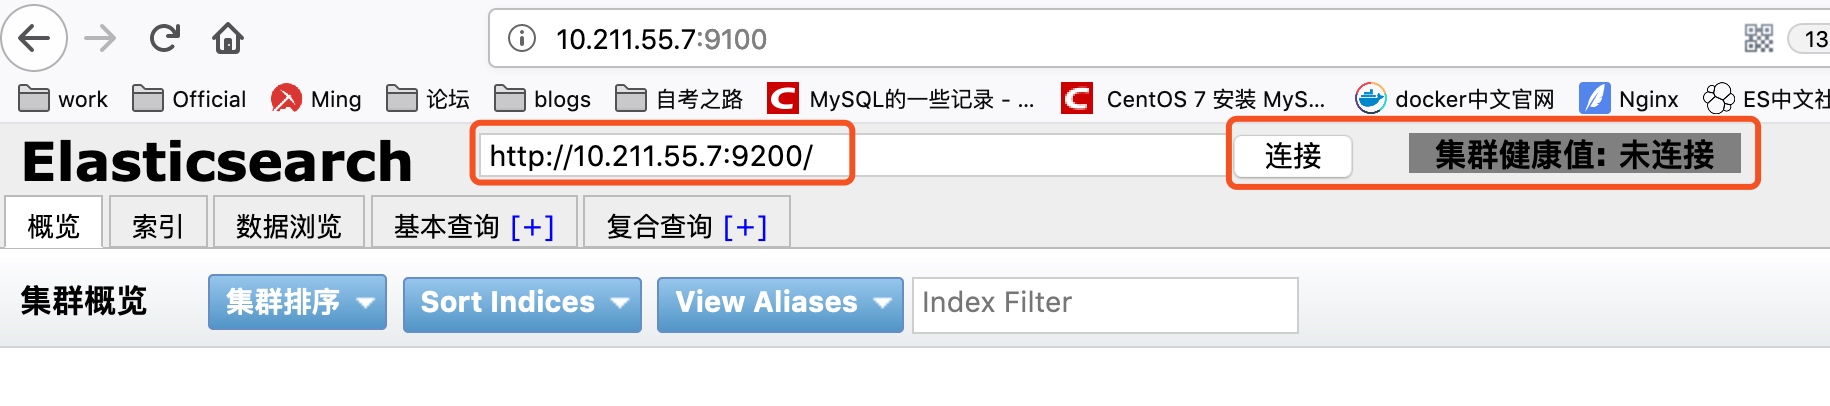 

我們訪問了9100端口,但是9100端口只不過是grunt插件的端口,我們要通過此插件來連接es集羣,所以下面要輸入連接es集羣端口的http鏈接,但是並沒有連接上,原因是因爲未在elasticsearch.yml文件中開啓以下參數
http.cors.enabled: true
#是否允許跨源 REST 請求
http.cors.allowed.origin: "*"
#指定允許REST請求來自何處,這裏*號,代表無限制
修改node1的elasticsearch.yml
[root@CentOS7_node1 elasticsearch-head]# echo 'http.cors.enabled: true' >> /usr/local/elasticsearch-5.6.16/config/elasticsearch.yml
[root@CentOS7_node1 elasticsearch-head]# echo 'http.cors.allow-origin: "*"' >> /usr/local/elasticsearch-5.6.16/config/elasticsearch.yml
[root@CentOS7_node1 elasticsearch-head]# tail -2 /usr/local/elasticsearch-5.6.16/config/elasticsearch.yml
http.cors.enabled: true
http.cors.allow-origin: "*"
重啓es和grunt
[root@CentOS7_node1 elasticsearch-head]# ps -ef|grep java
elastic+  6176  6175  0 01:41 pts/4    00:00:19 /usr/local/java/bin/java -Xms1g -Xmx1g -XX:+UseConcMarkSweepGC -XX:CMSInitiatingOccupancyFraction=75 -XX:+UseCMSInitiatingOccupancyOnly -XX:+AlwaysPreTouch -server -Xss1m -Djava.awt.headless=true -Dfile.encoding=UTF-8 -Djna.nosys=true -Djdk.io.permissionsUseCanonicalPath=true -Dio.netty.noUnsafe=true -Dio.netty.noKeySetOptimization=true -Dio.netty.recycler.maxCapacityPerThread=0 -Dlog4j.shutdownHookEnabled=false -Dlog4j2.disable.jmx=true -Dlog4j.skipJansi=true -XX:+HeapDumpOnOutOfMemoryError -Des.path.home=/usr/local/elasticsearch-5.6.16 -cp /usr/local/elasticsearch-5.6.16/lib/* org.elasticsearch.bootstrap.Elasticsearch
root     14254  3351  0 02:20 pts/0    00:00:00 grep --color=auto java
[root@CentOS7_node1 elasticsearch-head]# kill -9 6176
[root@CentOS7_node1 elasticsearch-head]# ps -ef|grep grunt
root     11750 11739  0 02:08 pts/0    00:00:00 grunt
root     14319  3351  0 02:21 pts/0    00:00:00 grep --color=auto grunt
[root@CentOS7_node1 elasticsearch-head]# kill -9 11750

[root@CentOS7_node1 elasticsearch-head]# su elasticsearch /us^C
[root@CentOS7_node1 elasticsearch-head]# nohup su elasticsearch /usr/local/elasticsearch-5.6.16/bin/elasticsearch &
[root@CentOS7_node1 elasticsearch-head]# nohup npm run start &

[root@CentOS7_node1 elasticsearch-head]# ss -anplt
State      Recv-Q Send-Q                             Local Address:Port                                            Peer Address:Port
LISTEN     0      128                                            *:111                                                        *:*                   users:(("rpcbind",pid=3782,fd=4),("systemd",pid=1,fd=46))
LISTEN     0      5                                  192.168.122.1:53                                                         *:*                   users:(("dnsmasq",pid=13167,fd=6))
LISTEN     0      128                                            *:22                                                         *:*                   users:(("sshd",pid=4448,fd=3))
LISTEN     0      128                                    127.0.0.1:631                                                        *:*                   users:(("cupsd",pid=4446,fd=12))
LISTEN     0      100                                    127.0.0.1:25                                                         *:*                   users:(("master",pid=4797,fd=13))
LISTEN     0      128                                           :::9100                                                      :::*                   users:(("grunt",pid=14587,fd=18))
LISTEN     0      128                                           :::111                                                       :::*                   users:(("rpcbind",pid=3782,fd=6),("systemd",pid=1,fd=48))
LISTEN     0      128                           ::ffff:10.211.55.7:9201                                                      :::*                   users:(("java",pid=15790,fd=187))
LISTEN     0      128                           ::ffff:10.211.55.7:9301                                                      :::*                   users:(("java",pid=15790,fd=121))
LISTEN     0      128                                           :::22                                                        :::*                   users:(("sshd",pid=4448,fd=4))
LISTEN     0      128                                          ::1:631                                                       :::*                   users:(("cupsd",pid=4446,fd=11))
LISTEN     0      100                                          ::1:25                                                        :::*                   users:(("master",pid=4797,fd=14))
再次嘗試連接 

再次連接發現還是並沒有連接上,xuwl犯了一個煞筆錯誤,我的10.211.55.7的端口是9201
修改端口再次連接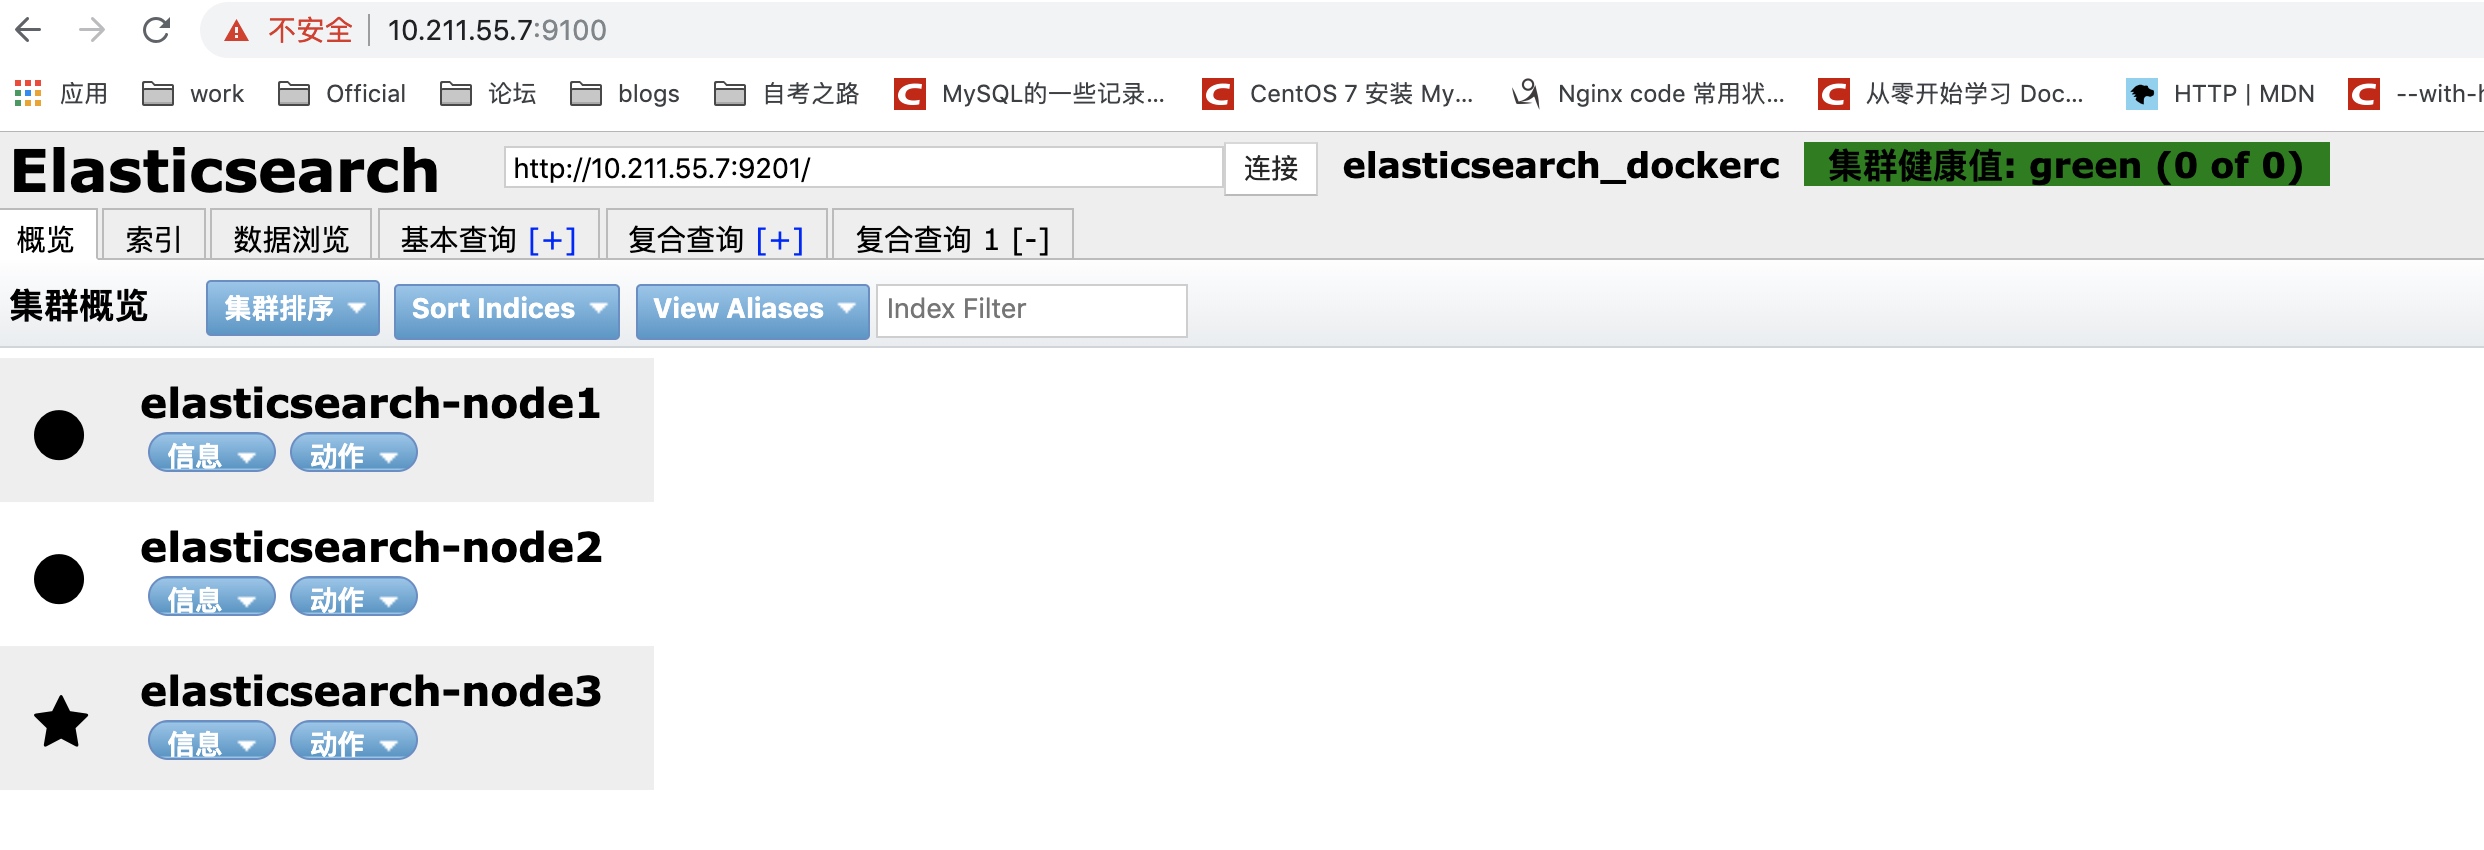 

在這個窗口裏可以很直觀的看到節點以及集羣的狀態信息
擴展
elasticsearch-head插件詳解,還請查看這篇文章:https://www.dockerc.com/elasticsearch-head/
其實ES的cerebro這款插件挺好的,更美觀的展現ES cluster節點信息,界面美觀,安裝簡單,功能強大,如果感興趣去看cerebro插件講解:https://www.dockerc.com/elasticsearch-cerebro/