


OSGi模塊化框架是很早就出來的一個插件化框架,最早Eclipse用它而出名,但這些年也沒有大熱雖然OSGi已經發布了 版本1到版本5。現在用的最多的,也是本文講述基於的是Equinox的OSGi實現,同時也是Eclipse核心,Spring Dynamic Module也是基於Equinox。OSGi框架爲java系統提供了一個通用的容器,該系統中的 bundle,無需停止系統,即可實現 bundle 的安裝、卸載。OSGi是Java中目前唯一的一個模塊化、動態化的規範。在模塊化方面OSGi聯盟已經研究了很多年了,因此OSGi規範對於模塊的物理隔離、模塊的交互、多版本這些方面都有了非常完善的機制,並且也得到了現在幾乎所有的App Server廠商或開源社區的認可,但至今沒有被JAVA納入語言級(有待觀察)。OSGi的突出特點有:
可以動態加載、更新和卸載模塊而不用停止服務
實現系統的模塊化、版本化,允許多版本bundule同時服務
Service model允許模塊/插件相互依賴但鬆耦合,分享服務更簡單
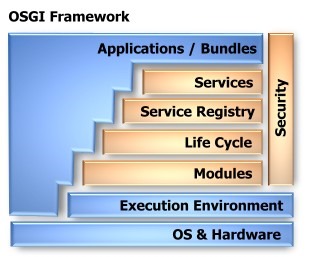
OSGi運行在JVM之上,其架構圖如下圖所示:
OSGi適用場景
很多人錯誤的使用了OSGi, 套用了OSGi架構把系統複雜化。在我看來,OSGi的用處在於“模塊化”和“熱插拔”。模塊化包括模塊化、版本化和麪向服務的設計。熱插拔也就是說模塊/bundle的熱插拔,它可以實現更新和升級模塊/bundle(即系統的一部分)而無需重啓整個系統。
如果你的系統套用了OSGi架構,bundle的相互依賴關係複雜,又沒有bundle動態加載、動態更新、動態卸載和動態監聽的機制,都是靜態啓動所有bundle,那就是爲了OSGi架構而OSGi架構,把問題複雜化了。其代價也是很大的,因爲原來你的jar包用maven來處理依賴關係和自動更新也很方便,而由於整個系統建立在OSGi規範上,你的應用所依賴的其他組件也“不得不”遷移到OSGI上來,再加上OSGI獨特的ClassLoader設計,使bundle間的類互相訪問受到一定的約束,一切都需要遷移到OSGi的約束上來。
舉個例子來說,就像Eclipse提供了動態加載、更新和刪除插件的機制,因爲它裏面有一個插件註冊和反註冊的接口和插件加載、更新和刪除的監聽線程,這樣允許你動態加載、更新和刪除Eclipse插件而無需重啓Eclipse。當然,如果你當前進程調用了某插件,比如js語法高亮,而某插件更新了,那麼當前的js實例還是需要重新打開的。但整個Eclispe無需重啓。
Java模塊化的難點
OSGi的一個重要特性就是模塊化,OSGi提供了一套模塊化的體系,這其中則會有明確的模塊之間接口暴露以及依賴的定義,因此能夠更好的實現高內聚和低耦合。那麼,Java模塊化難點在哪?模塊的實現和傳統的編程方法確實有一些差別,主要體現在模塊之間類訪問的隔離、版本選擇這兩個方面。如希望更好的設計模塊化的系統,開發者需要掌握ClassLoader機制、模塊之間類的交互方法(這包括了模塊怎麼樣對外提供可訪問的package、怎麼樣訪問其他模塊提供的package、如何選擇適合版本的package等)。如果不懂以上這些,貿然套用OSGi框架會誤入歧途。
重要概念:Bundle
Bundle — A bundle is a JAR file with special OSGi entries in its manifest and containing classes, resources, and other JARs。Bundle,可以將其理解爲自描述的 JAR 文件。Bundle在OSGi中是部署的最小單位,因此,可以把它理解爲模塊。在 bundle 的 manifest 文件中,會有對本 bundle 的標識、提供的功能 (Export-package) 及依賴性 (Import-Package/Require-Bundle) 的定義。每個 bundle 在運行時自己的類加載器 (Class Loader),這樣可以做到一方面把不同的 bundle 裏面的類區別開來,當 bundle 被卸載時,只有這個 bundle 的類加載器中的信息會丟失;另一方面,可以在自己的 bundle 內部充分利用 Java 的成員訪問控制機制。
Bundle通過MANIFEST.MF進行自描述,下面是一個例子:
| Manifest-Version: 1.0 Bundle-ManifestVersion: 2 Bundle-Name: Popup Plug-in Bundle-SymbolicName: com.example.myosgi; singleton:=true Bundle-Version: 1.0.0 Bundle-Activator: com.example.myosgi.Activator Require-Bundle: org.eclipse.ui, org.eclipse.core.runtime Bundle-ActivationPolicy: lazy Bundle-RequiredExecutionEnvironment: JavaSE-1.6 |
Bundle類隔離機制
每個Bundle均爲獨立的ClassLoader,是java動態化實現的基礎。默認情況下有Boostrap classLoader (jre/lib/classes)、Extension classloader (jre/lib/ext)、 System classloader (classpath指定),應用可以自行實現classloader及動態的加載類,或加載特定目錄下的類。
Bundle的生命週期
Lifecycle — A lifecycle is the sequence of states a bundle goes through: uninstalled, installed, resolved, starting, stopping, active. 生命週期圖如下所示:
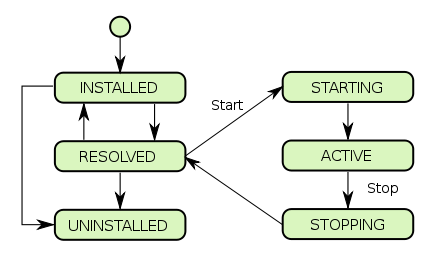
要注意的是:bundle狀態變爲Resolved並不表示能提供服務,所以啓動所有的bundle不表示類都已經加載到內存了。Resolve bundle做以下的幾件事情:尋找bundle依賴的包是否存在以及被resolve,尋找匹配的import package,required bundle,如尋找則進入檢查,檢查沒有衝突就形成綁定關係,以便加載類的時候能直接加載(但僅僅Resolved,不代表類被加載了)。在此我向大家推薦一個架構學習交流羣。交流學習羣號:948368769裏面會分享一些資深架構師錄製的視頻錄像:有Spring,MyBatis,Netty源碼分析,高併發、高性能、分佈式、微服務架構的原理,JVM性能優化、分佈式架構等這些成爲架構師必備的知識體系。還能領取免費的學習資源,目前受益良多如果你的BundleActivationPolicy是LAZY惰性加載,bundle.loadClass()調用纔會到達Active狀態。如果你的bundle的MANIFEST.MF中配置的Bundle-activator存在,那就調用其start方法,從starting進入active狀態。
| osgi> ss "Framework is launched." id State Bundle 15STARTING com.example.serviceconsumer_1.0.0.X 16RESOLVED com.example.serviceprovider_1.0.0.X --------------------- |

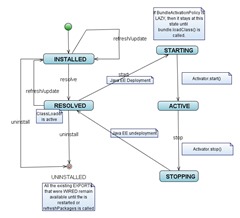
下面的圖更詳細的解釋了這一點:
OSGi Service
Service — A service is an object instance exposed under the one or more interfaces that it implements and a map of properties. 簡單來說,Service model允許每個bundle對外分享一組服務,其它的bundle都可以調用這些接口的服務。這也就是OSGi bundle之間調用的方式。Service可以用來:
Export functionality from a bundle to other bundles
Import functionality from other bundles
Register listeners for events from other bundles
Expose external devices, such as UPnP devices or even hardware, to other OSGi bundles. See theDeviceandUPnPAPIs
Expose java code running in OSGI to an external network, e.g. via the UPnP orSOAPprotocols.
Bundle configuration, using theConfiguration Manager
實際做法來看,通常會把接口和實現分開。接口放到一個bundle裏面。實現(service)放到另外一個bundle裏面,類似下面的圖示中,bundle A和B是Service,其interface放到Bundle C:

也可以是提供一個jar包,裏面定義了擴展接口,然後規定新的擴展bundle必須實現該jar包裏面定義的interface。實現示意圖如下所示(OsgiCommand接口定義在擴展點jar包裏面,新的bundle必須包含):

Bundle的Service之間交換方式和註冊方式:
通過bundleContext.registerService註冊服務,然後通過bundleContext.getServiceReference獲取服務(不推薦)
使用監聽器listeners
ServiceListener和ServiceTracker提供bundle和service的動態監聽,ServiceTracker可以動態監聽未來的bundle和service(OSGi Release 2提供的ServiceTracker,一般推薦)
通過Declarative Service(OSGiDS,或者Spring Dynamic Module(DM))的方式(OSGi Release 4開始,重點推薦!)
第二種通過ServiceTracker來查詢或偵聽服務註冊和註銷的例子代碼:
| package com.ibm.osg.example.mygetservice; import org.osgi.framework.BundleActivator; import org.osgi.framework.BundleContext; import org.osgi.util.tracker.ServiceTracker; import com.ibm.osg.example.mtservice.MyTestService; public class MyBundleActivator implements BundleActivator, Runnable { private boolean done=false; private ServiceTracker testServiceTracker; // Bundle Activator Start Method public void start(BundleContext context) { /* Here we initialize and open our ServiceTracker. It will track any service registering under the "com.ibm.osg.example.mtservice.MyTestService" interface. */ testServiceTracker = new ServiceTracker(context, "com.ibm.osg.example.mtservice.MyTestService", null); testServiceTracker.open(); // Here we start a thread that will continue // to use our service until // the bundle is stopped. Thread t = new Thread(this); t.setName("mygetservice thread"); t.start(); } /*Bundle Activator Stop Method -- here we stop the thread and close the ServiceTracker*/ public void stop(BundleContext context) { done=true; testServiceTracker.close(); } //Here is a method that uses the service //we are tracking. First we get //the service //from the tracker, then we call its printMessage //method. public void useService(String message){ MyTestService testService = (MyTestService) testServiceTracker.getService(); if( testService != null ) { // If the service is available then use it. testService.printMessage(message); } else{ // If the service is not available then perform an acceptable action. // Here we just print the message to standard out and indicate the service // was not available. System.out.println("No MyTestService available - " + message); } } // Simply continues to use the test service // every second until the done flag is set. public void run(){ int i = 0; done = false; while (!done) { useService("message from test " + i++); try{ Thread.sleep(1000); } catch( InterruptedException ie ){ } } } } |
OSGi簡單起步
從Eclipse創建OSGi的bundle是非常簡單的
Slideshare: OSGi理論與實戰
OSGi動態加載刪除bundle
使用監聽器listeners
ServiceListener和ServiceTracker提供bundle和service的動態監聽,ServiceTracker可以動態監聽未來的bundle和service(OSGi Release 2提供的ServiceTracker,一般推薦)在此我向大家推薦一個架構學習交流羣。交流學習羣號:948368769裏面會分享一些資深架構師錄製的視頻錄像:有Spring,MyBatis,Netty源碼分析,高併發、高性能、分佈式、微服務架構的原理,JVM性能優化、分佈式架構等這些成爲架構師必備的知識體系。還能領取免費的學習資源,目前受益良多
通過Declarative Service(OSGiDS,或者Spring Dynamic Module(DM))的方式(OSGi Release 4開始,重點推薦!)
具體實現:
對於DS,<Define a declarative OSGi Service>, <IBM: Declaring your services to OSGi Declarative Services>,<java OSGI Declarative Services Component bundles Example>。
對於Spring DM,<OSGI and Spring Dynamic Modules – Simple Hello World>, <Hello, OSGi, Part 2: Introduction to Spring Dynamic Modules>
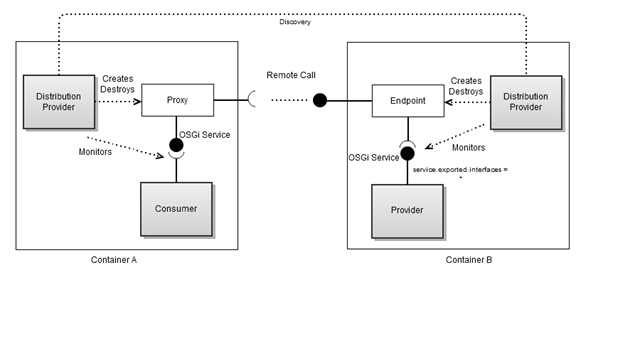
分佈式OSGi(Distributed OSGi)
OSGi容器可以包含幾千個bundlue沒有問題,但如何應對幾十萬個的情況?如何像EJB3一樣具有分佈式部署和便攜性呢?有一個OSGi的子項目:分佈式OSGi(Distributed OSGi)。
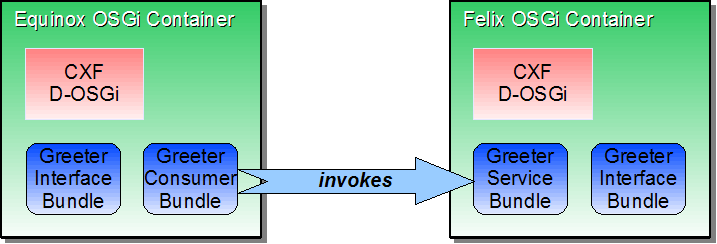
上圖是一個demo演示,兩個分佈式OSGi Container,都部署了Greeter接口bundle,都基於分佈式OSGi實現,能實現分佈式調用OSGi Service。分佈式OSGi(Distributed OSGi)還可以與RESTful Service (JAX-RS / JSR-339)整合。分佈式OSGi有幾十萬個bundle怎麼管理,這是個麻煩,而且如何啓動停止,啓動順序怎麼樣?可管理性是個麻煩,ACE項目試圖解決這個事情。
DOSGi的原理(由Distribution provider來給OSGi Service創建Endpoint,使這些Service在OSGi Container外部可訪問,另外一端則創建代理;此外,有監聽器來偵聽OSGi Service的創建和啓停等):
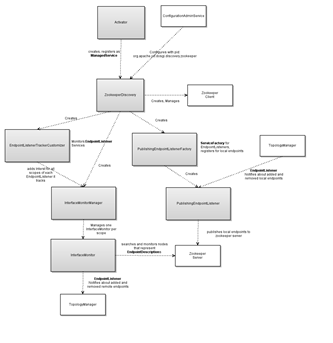
分佈式OSGi與ZooKeeper
ZooKeeper是Hadoop的一個子項目,它是一個針對大型分佈式系統的可靠協調系統,提供的功能包括:配置維護、名字服務、分佈式同步、組服務等。ZooKeeper的目標就是封裝好複雜易出錯的關鍵服務,將簡單易用的接口和性能高效、功能穩定的系統提供給用戶。
分佈式OSGi(Distributed OSGi)在Discovery這一塊使用了ZooKeeper。所謂Discovery模塊就是用來發現和偵聽分佈式的遠端的可用的Endpoints。Discovery Ditributed with Zookeeper的架構圖:
參考:DOSGi使用ZooKeeper server的安裝和Demo