


安裝生產環境業務機使用的CentOS系統
確保開啓虛擬化、準備好網線,準備centos7.2系統(建議最小化鏡像),進行如下操作:
1.CentOS系統的安裝(以CentOS7.2爲例)
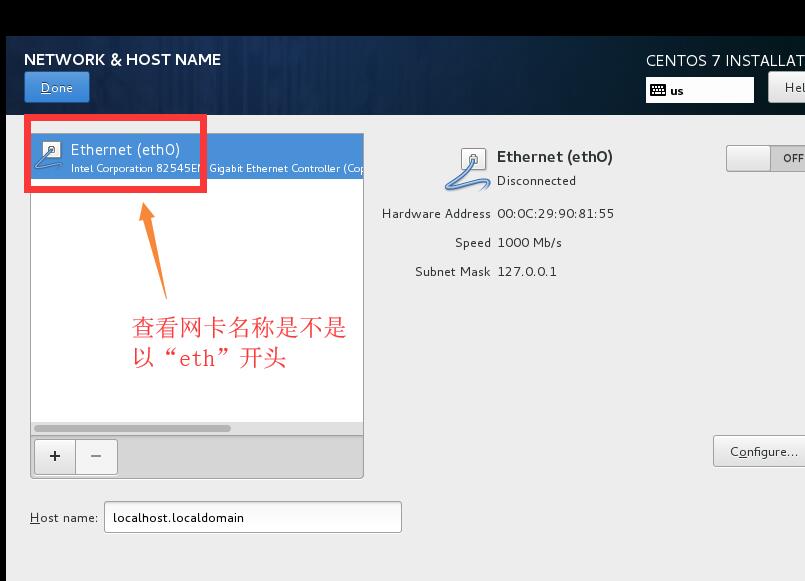
1.1命名centos系統網卡名爲“eth”
在centos7版本的系統,默認網卡名以“ens”開頭,爲了統一網卡名稱,我們需要改爲以“eth”開頭
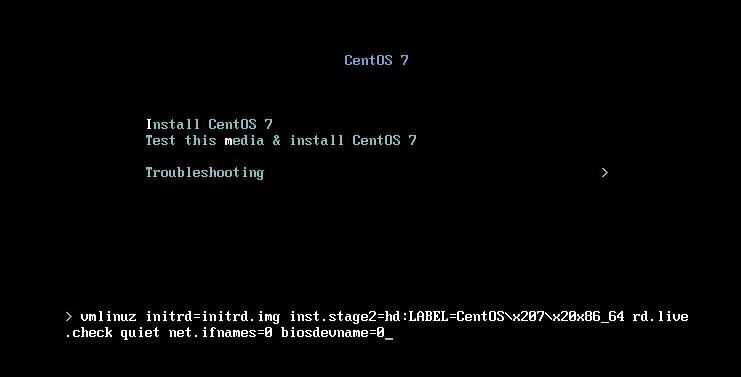
1.在開機界面,按下“Tab”鍵,輸入“net.ifnames=0 biosdevname=0”,如下圖。
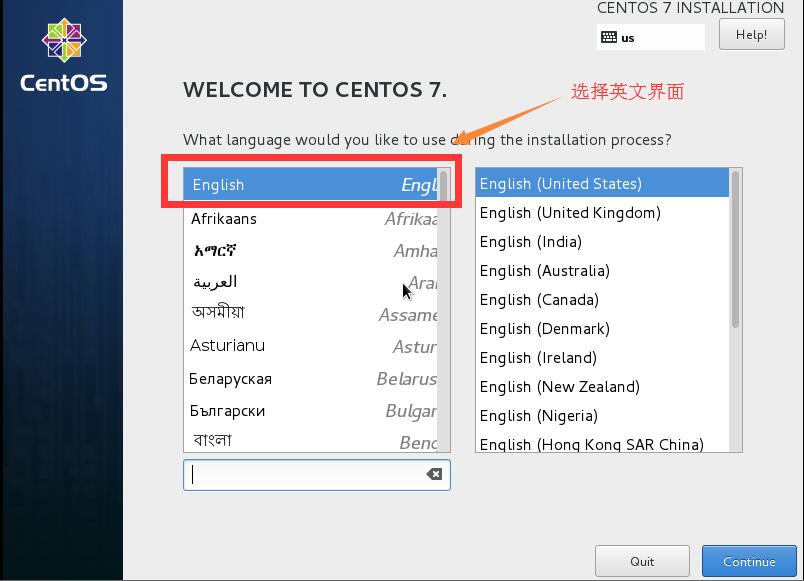
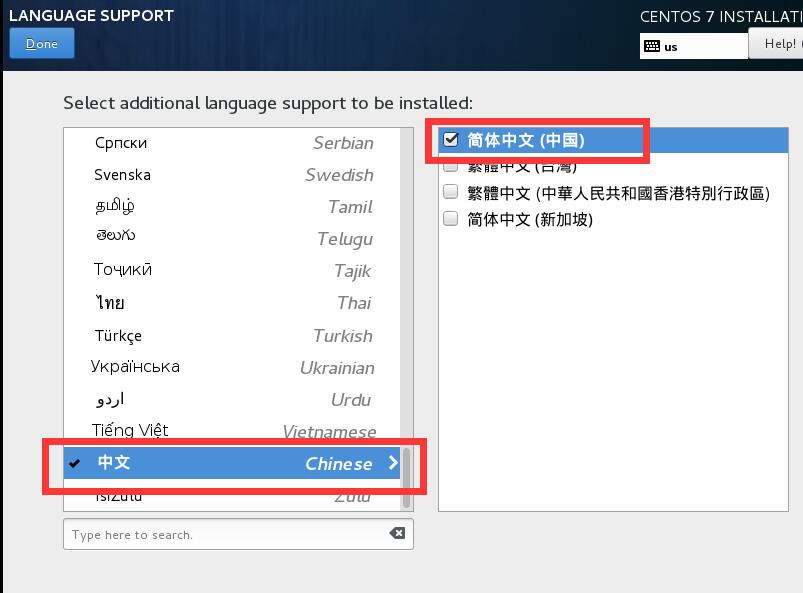
1.2選擇英文界面,添加中文語言包
安裝英文版本的系統比較穩定,添加中文語言包,是因爲在生產使用中,查看日誌有時會出現亂碼,或菜單奇形怪狀等等,這些都是沒有中文語言包產生的問題

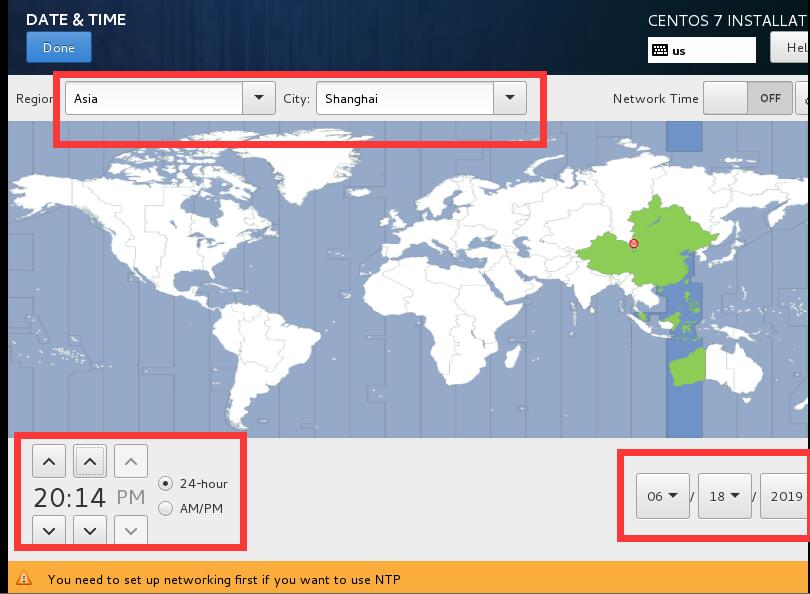
1.3修改時區爲“上海”
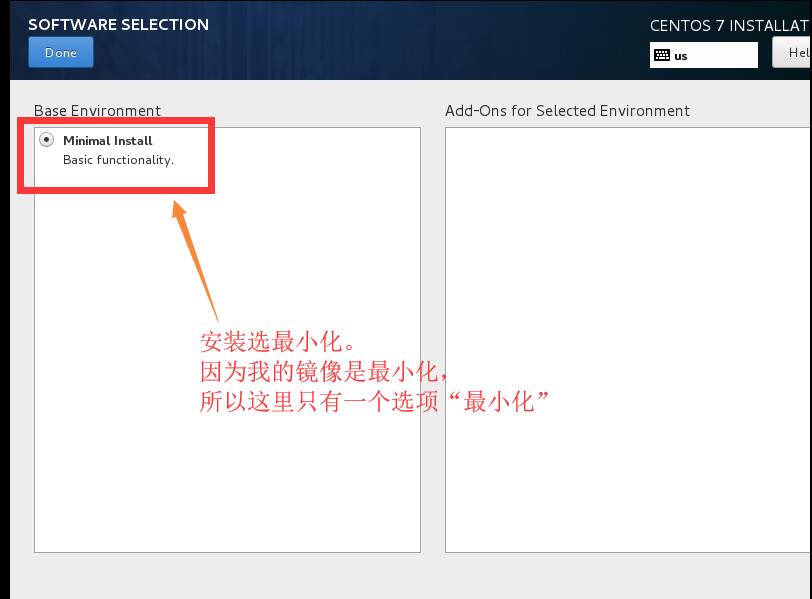
1.4選擇“最小化”安裝
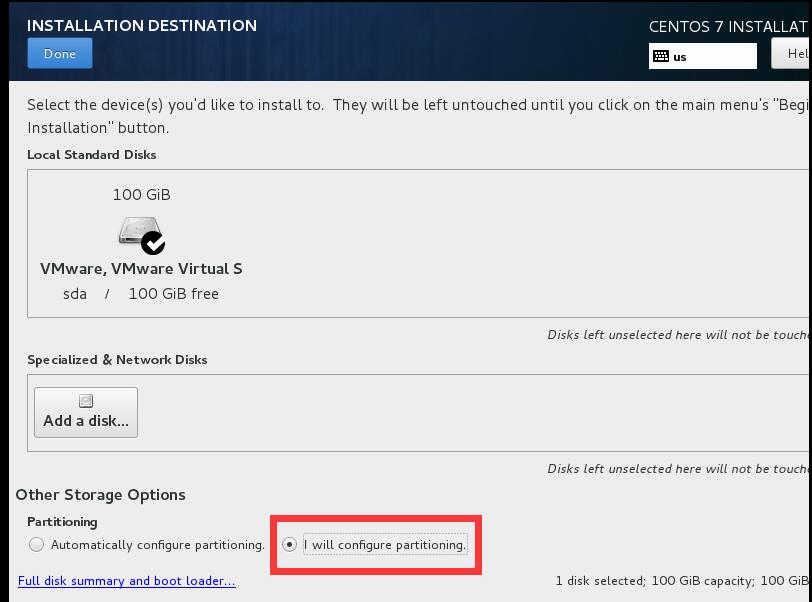
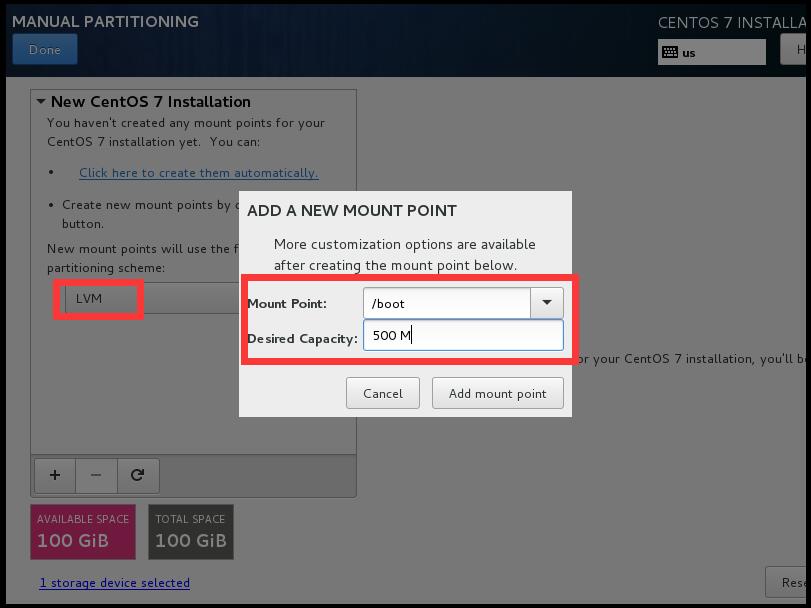
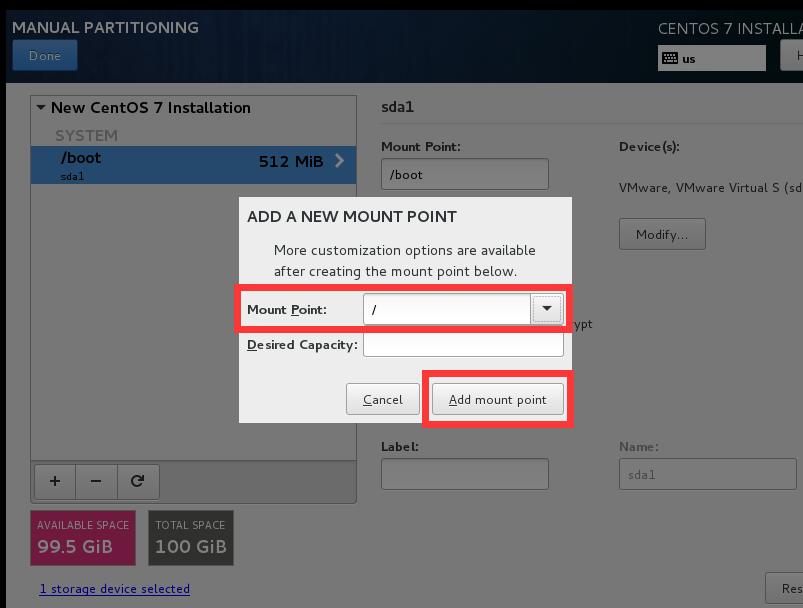
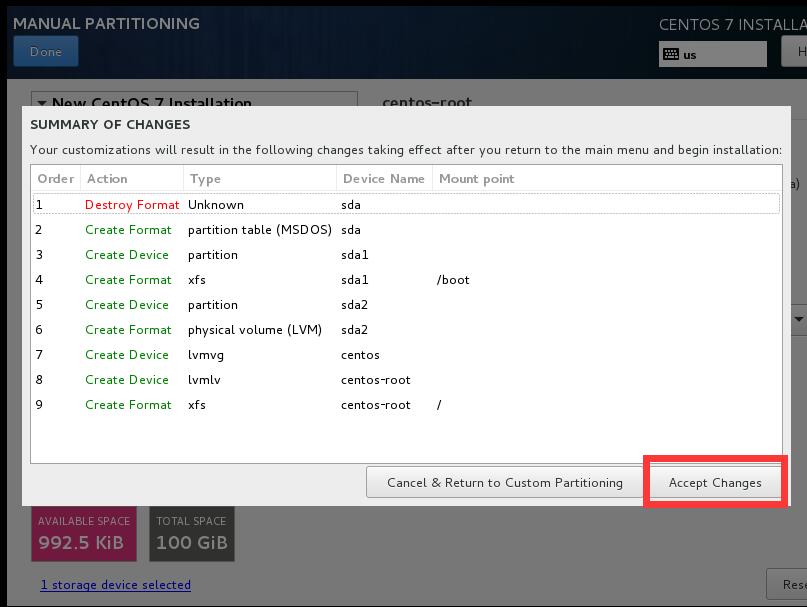
1.5創建分區
- 說明:因爲在生產環境,如果內存不足會選擇升級內存,而“SWAP”分區依靠機械磁盤的性能模擬內存效果很一般,如果是固態硬盤還好點,所以“SWAP”分區用處不大,就不創建了。
1.6查看網卡名是否以“eth”開頭
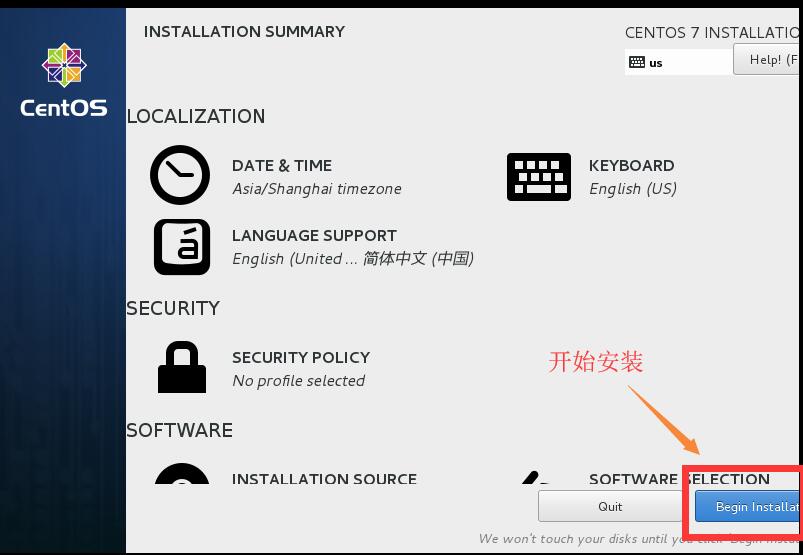
1.7開啓安裝系統
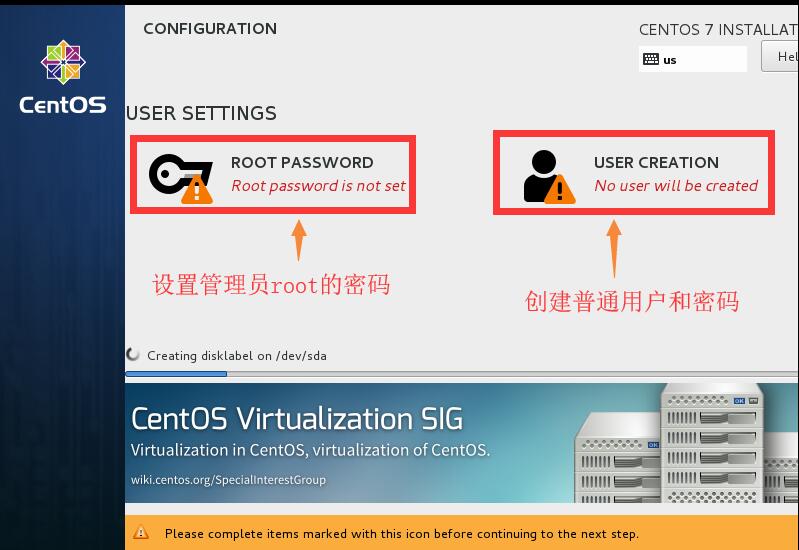
1.8設置管理員root的密碼和創建普通用戶
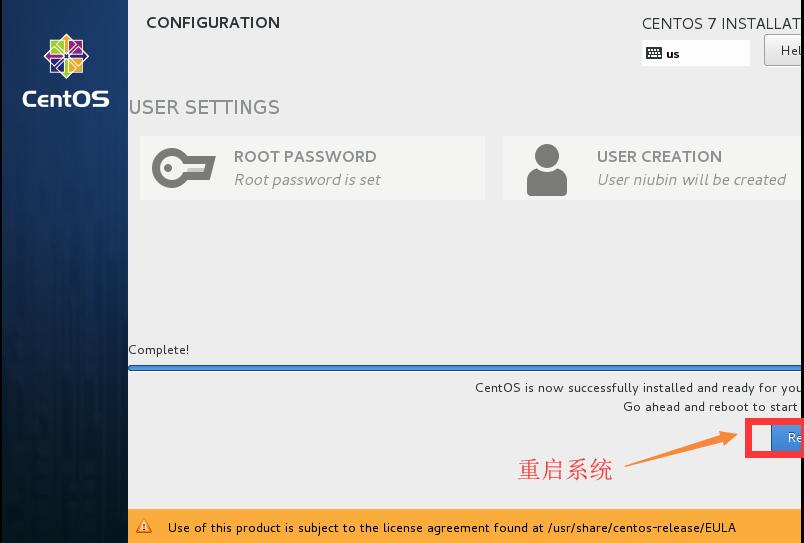
1.9等待安裝,之後按照提示重啓系統
1.10輸入root用戶及密碼,進入系統

注意:在安裝界面,沒有說明的,就保存默認設置
2.CentOS系統的優化配置
2.1 修改網絡配置文件,安裝集成工具包“net-tools”,查看網絡
1.編輯eth0的配置文件中“ONBOOT”項爲“yes”,使eth0網絡開啓自動啓動
[root@centos7 ~]# vi /etc/sysconfig/network-scripts/ifcfg-eth0
ONBOOT=yes
[root@centos7 ~]#

2.重啓網絡服務
[root@centos7 ~]# systemctl restart network
[root@centos7 ~]#

3.安裝集成工具包“net-tools”
[root@centos7 ~]# yum -y install net-tools
2.2 查看網絡IP地址,使用遠程工具連接
查看IP地址
[root@centos7 ~]# ifconfig
2.3 永久關閉“防火牆、SElinux、NetworkManager”服務
1.永久關閉NetworkManager服務
[root@localhost ~]# systemctl stop NetworkManager
[root@localhost ~]# systemctl disable NetworkManager

2.永久關閉SElinux服務
[root@localhost ~]# vi /etc/sysconfig/selinux
“SELINUX=enforcing” 改爲 “SELINUX=disabled”
[root@localhost ~]#

3.永久關閉防火牆服務
因爲有時會用到防火牆,如WEB服務,所以先安裝防火牆,在把防火牆永久關閉,需要時在啓用

(1)安裝防火牆
[root@localhost ~]# yum -y install firewalld

(2)永久關閉防火牆
[root@localhost ~]# systemctl disable firewalld

4.重啓系統
[root@localhost ~]# reboot
2.4 修改yum源
系統默認yum源是CentOS官網,連接緩慢,所以要修改yum源。修改“/etc/yum.repos.d/CentOS-Base.repo”文件爲公司的yum源,或網絡上常用的yum源(如阿里等)
2.5 安裝常用的基礎命令
[root@localhost ~]# yum install  vim iotop bc gcc gcc-c++ glibc glibc-devel pcre \
> pcre-devel openssl  openssl-devel zip unzip zlib-devel  net-tools \
> lrzsz tree ntpdate telnet lsof tcpdump wget libevent libevent-devel \
> bc  systemd-devel bash-completion traceroute -y

重要:
這裏我沒有安裝epel源的包,如果此虛擬機用於安裝Openstack,則不能安裝epel源,因爲會與Openstack的源衝突;
如果不用於Openstack,則可以安裝epel源。
2.6 優化內核參數
1.查看優化文件
[root@localhost ~]# ll
-rw-r--r--  1 root root 2895 Jun 18 18:51 limits.conf
-rw-r--r--  1 root root 2232 Jun 18 18:51 sysctl.conf
[root@localhost ~]#

2.把centos系統內核文件替換爲優化文件
[root@localhost ~]# mv sysctl.conf /etc/sysctl.conf
mv: overwrite ‘/etc/sysctl.conf’? y
[root@localhost ~]#
[root@localhost ~]# mv limits.conf /etc/security/limits.conf
mv: overwrite ‘/etc/security/limits.conf’? y
[root@localhost ~]#

3.查看優化文件“sysctl.conf”

[root@localhost ~]# cat /etc/sysctl.conf
# Controls source route verification
net.ipv4.conf.default.rp_filter = 1
net.ipv4.ip_nonlocal_bind = 1
net.ipv4.ip_forward = 1

# Do not accept source routing
net.ipv4.conf.default.accept_source_route = 0

# Controls the System Request debugging functionality of the kernel
kernel.sysrq = 0

# Controls whether core dumps will append the PID to the core filename.
# Useful for debugging multi-threaded applications.
kernel.core_uses_pid = 1

# Controls the use of TCP syncookies
net.ipv4.tcp_syncookies = 1

# Disable netfilter on bridges.
net.bridge.bridge-nf-call-ip6tables = 0
net.bridge.bridge-nf-call-iptables = 0
net.bridge.bridge-nf-call-arptables = 0

# Controls the default maxmimum size of a mesage queue
kernel.msgmnb = 65536

# # Controls the maximum size of a message, in bytes
kernel.msgmax = 65536

# Controls the maximum shared segment size, in bytes
kernel.shmmax = 68719476736

# # Controls the maximum number of shared memory segments, in pages
kernel.shmall = 4294967296

# TCP kernel paramater
net.ipv4.tcp_mem = 786432 1048576 1572864
net.ipv4.tcp_rmem = 4096        87380   4194304
net.ipv4.tcp_wmem = 4096        16384   4194304
net.ipv4.tcp_window_scaling = 1
net.ipv4.tcp_sack = 1

# socket buffer
net.core.wmem_default = 8388608
net.core.rmem_default = 8388608
net.core.rmem_max = 16777216
net.core.wmem_max = 16777216
net.core.netdev_max_backlog = 262144
net.core.somaxconn = 20480
net.core.optmem_max = 81920

# TCP conn
net.ipv4.tcp_max_syn_backlog = 262144
net.ipv4.tcp_syn_retries = 3
net.ipv4.tcp_retries1 = 3
net.ipv4.tcp_retries2 = 15

# tcp conn reuse
net.ipv4.tcp_tw_reuse = 1
net.ipv4.tcp_tw_recycle = 1
net.ipv4.tcp_fin_timeout = 1

net.ipv4.tcp_max_tw_buckets = 20000
net.ipv4.tcp_max_orphans = 3276800
net.ipv4.tcp_timestamps = 1 #?
net.ipv4.tcp_synack_retries = 1
net.ipv4.tcp_syncookies = 1

# keepalive conn
net.ipv4.tcp_keepalive_time = 300
net.ipv4.tcp_keepalive_intvl = 30
net.ipv4.tcp_keepalive_probes = 3
net.ipv4.ip_local_port_range = 10001    65000

# swap
vm.overcommit_memory = 0
vm.swappiness = 10

#net.ipv4.conf.eth1.rp_filter = 0
#net.ipv4.conf.lo.arp_ignore = 1
#net.ipv4.conf.lo.arp_announce = 2
#net.ipv4.conf.all.arp_ignore = 1
#net.ipv4.conf.all.arp_announce = 2

[root@localhost ~]#

4.查看優化文件“limits.conf”
[root@localhost ~]# cat /etc/security/limits.conf
# /etc/security/limits.conf
#
#This file sets the resource limits for the users logged in via PAM.
#It does not affect resource limits of the system services.
#
#Also note that configuration files in /etc/security/limits.d directory,
#which are read in alphabetical order, override the settings in this
#file in case the domain is the same or more specific.
#That means for example that setting a limit for wildcard domain here
#can be overriden with a wildcard setting in a config file in the
#subdirectory, but a user specific setting here can be overriden only
#with a user specific setting in the subdirectory.
#
#Each line describes a limit for a user in the form:
#
#<domain>        <type>  <item>  <value>
#
#Where:
#<domain> can be:
#        - a user name
#        - a group name, with @group syntax
#        - the wildcard *, for default entry
#        - the wildcard %, can be also used with %group syntax,
#                 for maxlogin limit
#
#<type> can have the two values:
#        - "soft" for enforcing the soft limits
#        - "hard" for enforcing hard limits
#
#<item> can be one of the following:
#        - core - limits the core file size (KB)
#        - data - max data size (KB)
#        - fsize - maximum filesize (KB)
#        - memlock - max locked-in-memory address space (KB)
#        - nofile - max number of open file descriptors
#        - rss - max resident set size (KB)
#        - stack - max stack size (KB)
#        - cpu - max CPU time (MIN)
#        - nproc - max number of processes
#        - as - address space limit (KB)
#        - maxlogins - max number of logins for this user
#        - maxsyslogins - max number of logins on the system
#        - priority - the priority to run user process with
#        - locks - max number of file locks the user can hold
#        - sigpending - max number of pending signals
#        - msgqueue - max memory used by POSIX message queues (bytes)
#        - nice - max nice priority allowed to raise to values: [-20, 19]
#        - rtprio - max realtime priority
#
#<domain>      <type>  <item>         <value>
#

#*               soft    core            0
#*               hard    rss             10000
#@student        hard    nproc           20
#@faculty        soft    nproc           20
#@faculty        hard    nproc           50
#ftp             hard    nproc           0
#@student        -       maxlogins       4

# End of file

*                soft    core               unlimited
*                hard    core             unlimited
*                soft    nproc            1000000
*                hard    nproc          1000000
*                soft    nofile            1000000
*                hard    nofile          1000000
*                soft    memlock      32000
*                hard    memlock    32000
*                soft    msgqueue    8192000
*                hard    msgqueue  8192000
[root@localhost ~]#
2.7 修改主機名
[root@localhost ~]# vim /etc/hostname
centos7
[root@localhost ~]#

重啓系統生效以上配置:[root@localhost ~]#  reboot
到此,就可以用於生產環境
擴展
一.同步時間
二.修改爲靜態IP地址
三.如果做網卡綁定,需要安裝“bridge-utils”軟件包
網卡綁定可通過“brctl”命令(需要安裝“bridge-utils”軟件包)實現臨時綁定;還可通過網卡配置文件設置永久綁定
linux操作系統下雙網卡綁定有七種模式。現在一般的企業都會使用雙網卡接入,這樣既能添加網絡帶寬,同時又能做相應的冗餘,可以說是好處多多。而一般企業都會使用linux操作系統下自帶的網卡綁定模式,當然現在網卡產商也會出一些針對windows操作系統網卡管理軟件來做網卡綁定(windows操作系統沒有網卡綁定功能 需要第三方支持),一共有其中方式,其中比較長用的是0/1/6:
雙網卡綁定的前提:安裝“bridge-utils”軟件包
[root@centos7 ~]# yum -y install bridge-utils
1:網卡綁定案例,先做綁定,然後再把綁定後的網卡配置成橋接:
1.1:第一組配置,將eth1和eth5綁定爲bond0:
1.1.1:先創建bond0配置那文件步驟及內容如下:
[root@linux-host1 ~]# cd /etc/sysconfig/network-scripts/
[root@linux-host1 network-scripts]# cp ifcfg-eth0   ifcfg-bond0
[root@linux-host1 network-scripts]# cat ifcfg-bond0 #內容如下:
BOOTPROTO=static
NAME=bond0
DEVICE=bond0
ONBOOT=yes
BONDING_MASTER=yes
BONDING_OPTS="mode=1 miimon=100" #指定綁定類型爲1及鏈路狀態監測間隔時間
BRIDGE=br0 #橋接到br0
1.1.2:配置br0:
TYPE=Bridge
BOOTPROTO=static
DEFROUTE=yes
PEERDNS=yes
PEERROUTES=yes
IPV4_FAILURE_FATAL=no
IPV6INIT=yes
IPV6_AUTOCONF=yes
IPV6_DEFROUTE=yes
IPV6_PEERDNS=yes
IPV6_PEERROUTES=yes
IPV6_FAILURE_FATAL=no
NAME=br0
DEVICE=br0
ONBOOT=yes
IPADDR=X.X.X.X
NETMASK=255.255.255.0
GATEWAY=X.X.X.X
1.1.3:eth1配置:
[root@linux-host1 network-scripts]# vim ifcfg-eth1
BOOTPROTO=static
NAME=eth1
DEVICE=eth1
ONBOOT=yes
NM_CONTROLLED=no
MASTER=bond0
USERCTL=no
SLAVE=yes
1.1.4:eth5的配置:
[root@linux-host1 network-scripts]# cp ifcfg-eth1  ifcfg-eth5
[root@linux-host1 network-scripts]# vim ifcfg-eth5
BOOTPROTO=static
NAME=eth5
DEVICE=eth5
ONBOOT=yes
NM_CONTROLLED=no
MASTER=bond0
USERCTL=no
SLAVE=yes
1.1.5:重啓網絡服務:
[root@linux-host1 network-scripts]# systemctl restart network1.1.6:驗證網絡是否正常:
[root@linux-host1 network-scripts]# ping www.baidu.com
PING www.a.shifen.com (61.135.169.125) 56(84) bytes of data.
64 bytes from 61.135.169.125: icmp_seq=1 ttl=128 time=6.17 ms
64 bytes from 61.135.169.125: icmp_seq=2 ttl=128 time=10.3 ms
64 bytes from 61.135.169.125: icmp_seq=3 ttl=128 time=5.36 ms
64 bytes from 61.135.169.125: icmp_seq=4 ttl=128 time=6.74 ms
64 bytes from 61.135.169.125: icmp_seq=5 ttl=128 time=5.71 ms
1.1.7:可以驗證當前是綁定在哪一塊網卡上的:
[root@linux-host1 ~]# cat /proc/net/bonding/bond0
Ethernet Channel Bonding Driver: v3.7.1 (April 27, 2011)

Bonding Mode: fault-tolerance (active-backup)
Primary Slave: None
Currently Active Slave: eth1 #備份鏈路網卡
MII Status: up
MII Polling Interval (ms): 100
Up Delay (ms): 0
Down Delay (ms): 0

Slave Interface: eth1
MII Status: up
Speed: 1000 Mbps
Duplex: full
Link Failure Count: 0
Permanent HW addr: 18:66:da:f3:34:e5
Slave queue ID: 0

Slave Interface: eth5
MII Status: up
Speed: 1000 Mbps
Duplex: full
Link Failure Count: 0
Permanent HW addr: 00:0a:f7:99:ba:d1
Slave queue ID: 0
1.2:第二組配置,將eth2和eth6綁定爲bond1:
1.2.1:創建bond1配置文件:
[root@linux-host1 network-scripts]# cp ifcfg-bond0  ifcfg-bond1
[root@linux-host1 network-scripts]# vim ifcfg-bond1
BOOTPROTO=static
NAME=bond1
DEVICE=bond1
TYPE=Bond
BONDING_MASTER=yes
BOOTPROTO=static
NAME=bond1
ONBOOT=yes
BONDING_OPTS="mode=1 miimon=100"
BRIDGE=br1
1.2.2:配置br1:
TYPE=Bridge
BOOTPROTO=static
DEFROUTE=yes
PEERDNS=yes
PEERROUTES=yes
IPV4_FAILURE_FATAL=no
IPV6INIT=yes
IPV6_AUTOCONF=yes
IPV6_DEFROUTE=yes
IPV6_PEERDNS=yes
IPV6_PEERROUTES=yes
IPV6_FAILURE_FATAL=no
NAME=br1
DEVICE=br1
ONBOOT=yes
IPADDR=X.X.X.X
NETMASK=255.255.255.0
GATEWAY=X.X.X.X
DNS1=X.X.X.X
1.2.3:eth2的配置:
[root@linux-host1 network-scripts]# vim ifcfg-eth2
BOOTPROTO=static
NAME=eth2
DEVICE=eth2
ONBOOT=yes
NM_CONTROLLED=no
MASTER=bond1
USERCTL=no
SLAVE=yes
1.2.4:eth6的配置:
[root@linux-host1 network-scripts]# vim ifcfg-eth6
BOOTPROTO=static
NAME=eth6
DEVICE=eth6
ONBOOT=yes
NM_CONTROLLED=no
MASTER=bond1
USERCTL=no
SLAVE=yes
1.2.5:重啓網絡服務:
[root@linux-host1 network-scripts]# systemctl restart network1.2.6:測試內網網絡是否正常:
[root@linux-host1 network-scripts]# ping 192.168.20.12
PING 192.168.20.12 (192.168.20.12) 56(84) bytes of data.
64 bytes from 192.168.20.12: icmp_seq=1 ttl=64 time=1.86 ms
64 bytes from 192.168.20.12: icmp_seq=2 ttl=64 time=0.570 ms
64 bytes from 192.168.20.12: icmp_seq=3 ttl=64 time=0.410 ms
1.3:設置開機啓動:
[root@linux-host1 network-scripts]# vim /etc/rc.d/rc.local
ifenslave eth1 eth5
ifenslave eth2 eth6
[root@linux-host1 network-scripts]# chmod  a+x /etc/rc.d/rc.local
1.4:重啓系統後驗證網絡