環境介紹:
master:23.247.76.253
[root@nagios_client1 tool]#
mysql -V
mysql Ver 14.14 Distrib 5.6.32, for linux-glibc2.5 (x86_64) using EditLine wrapper
[root@nagios_client1 tool]#
cat /etc/redhat-release
CentOS release 6.7 (Final)
slave:23.247.78.254
[root@nagios_client2 ~]#
mysql -V
mysql Ver 14.14 Distrib 5.6.32, for linux-glibc2.5 (x86_64) using EditLine wrapper
[root@nagios_client2 ~]#
cat /etc/redhat-release
CentOS release 6.9 (Final)
1. 設置master
修改配置文件:
vim /usr/local/mysql_2/my.cnf
在[mysqld]部分查看是否有以下內容,如果沒有則添加:
server-id=1
log-bin=mysql-bin
除了這兩行是必須的外,還有兩個參數,你可以選擇性的使用:
binlog-do-db=test3,databasename2
binlog-ignore-db=databasename1,databasename2
binlog-do-db=需要複製的數據庫名,多個數據庫名,使用逗號分隔。binlog-ignore-db=不需要複製的數據庫庫名,多個數據庫名,使用逗號分隔。這兩個參數其實用一個就可以了。設置的test3爲我要同步的數據庫。
修改後重啓:
/etc/init.d/mysqld restart
Shutting down MySQL.. SUCCESS!
Starting MySQL. SUCCESS!
mysql> grant replication slave on *.* to 'repl'@'23.247.78.254' identified by '123456';
//這裏的repl是爲slave端設置的訪問master端mysql數據的用戶,密碼爲123456,這裏的23.247.78.254爲slave的ip。
mysql> flush tables with read lock; //鎖定數據庫,此時不允許更改任何數據
Query OK, 0 rows affected (0.00 sec)
mysql> show master status; //查看狀態,這些數據是要記錄的,一會要在slave端用到
+------------------+----------+--------------+------------------+-------------------+
| File | Position | Binlog_Do_DB | Binlog_Ignore_DB | Executed_Gtid_Set |
+------------------+----------+--------------+------------------+-------------------+
| mysql-bin.000002 | 330 | test3 | | |
+------------------+----------+--------------+------------------+-------------------+
1 row in set (0.00 sec)
設置slave:
先修改slave的配置文件my.cnf:
vim /etc/my.cnf
找到 “server-id = 1” 這一行,刪除掉或者改爲 “server-id = 2” 總之不能讓這個id和master一樣,否則會報錯。另外在從上,你也可以選擇性的增加如下兩行,對應於主上增加的兩行:
replicate-do-db=databasename1,databasename2
replicate-ignore-db=databasename1,databasename2
改完後,重啓slave:
service mysqld restart
然後在slave上配置主從:
mysql> stop slave;
Query OK, 0 rows affected, 1 warning (0.00 sec)
mysql> change master to master_host='23.247.76.253', master_port=3306,
-> master_user='repl', master_password='123456',
-> master_log_file='mysql-bin.000002', master_log_pos=330;
Query OK, 0 rows affected, 2 warnings (0.02 sec)
mysql> start slave;
//其中master_log_file和master_log_pos是在上面使用 show master status 查到的數據。執行完這一步後,需要在master上執行一步:
mysql> unlock tables;
Query OK, 0 rows affected (0.00 sec)
然後查看slave的狀態:
mysql> show slave status\G;
遇到錯誤:
Slave_IO_Running: No
Slave_SQL_Running: Yes
Last_IO_Errno: 1593
Last_IO_Error: Fatal error: The slave I/O thread stops because master and slave have equal MySQL server ids; these ids must be different for replication to work (or the --replicate-same-server-id option must be used on slave but this does not always make sense; please check the manual before using it).
解決:
mysql> show variables like 'server_id'; //查看服務器的id號set global server_id=XX 修改id號
+---------------+-------+
| Variable_name | Value |
+---------------+-------+
| server_id | 1 |
+---------------+-------+
1 row in set (0.00 sec)
mysql> set global server_id=2;
Query OK, 0 rows affected (0.00 sec)
mysql> show variables like 'server_id';
+---------------+-------+
| Variable_name | Value |
+---------------+-------+
| server_id | 2 |
+---------------+-------+
1 row in set (0.00 sec)
確認以下兩項參數都爲yes:
Slave_IO_Running: Yes
Slave_SQL_Running: Yes
測試主從同步:
master執行:
mysql> select count(*) from t1
-> ;
+----------+
| count(*) |
+----------+
| 0 |
+----------+
1 row in set (0.00 sec)
mysql> drop table t1; //刪除t1表
Query OK, 0 rows affected (0.01 sec)
mysql> select count(*) from t1;
ERROR 1146 (42S02): Table 'test3.t1' doesn't exist
slave執行:
mysql> select count(*) from t1
-> ;
+----------+
| count(*) |
+----------+
| 0 |
+----------+
1 row in set (0.00 sec)
mysql> select count(*) from t1;
ERROR 1146 (42S02): Table 'test3.t1' doesn't exist
在mster執行刪除t1表,然後再slave查下t1表,提示t1表不存在。證明已經同步了master的操作;
主從配置起來很簡單,但是這種機制也是非常脆弱的,一旦我們不小心在從上寫了數據,那麼主從也就被破壞了。另外如果重啓master,務必要先把slave停掉,也就是說需要在slave上去執行stop slave 命令,然後再去重啓master的mysql服務,否則很有可能就會中斷了。當然重啓完後,還需要把slave給開啓 start slave。
slave查詢
[root@nagios_client2 ~]# mysql -uroot -p"123456" -e "show slave status\G"|grep "Running:"
Warning: Using a password on the command line interface can be insecure.
Slave_IO_Running: Yes
Slave_SQL_Running: Yes
"Slave_IO_Running: Yes“和“Slave_SQL_Running: Yes”,這兩個值全是"Yes"就表明主從庫同步成功
命令:
[root@nagios_client2 ~]#
slave_status=($(mysql -uroot -p"123456" -e "show slave status\G"|grep Running |awk '{print $2}'))Warning: Using a password on the command line interface can be insecure.
[root@nagios_client2 ~]#
echo ${slave_status[0]}Yes
[root@nagios_client2 ~]#
echo ${slave_status[1]}Yes
查看檢查腳本:
cat /usr/local/nagios/libexec/check_mysql_slave
#!/bin/sh
slave_status=($(mysql -uroot -p"123456" -e "show slave status\G"|grep Running |awk '{print $2}'))
if [ "${slave_status[0]}" = "Yes" -a "${slave_status[1]}" = "Yes" ]
     then
     echo "OK nagios_client2-slave is running"
     exit 0
else
     echo "Critical nagios_client2-slave is error"
     exit 2
fi
在nrpe.cfg文件里加:
vi /usr/local/nagios/etc/nrpe.cfg
command[check_mysql_slave]=/usr/local/nagios/libexec/check_mysql_slave
重啓nrpe:
pkill nrpe
/usr/local/nagios/bin/nrpe -c /usr/local/nagios/etc/nrpe.cfg -d
服務器端的配置:
[root@nagios_server objects]#
/usr/local/nagios/libexec/check_nrpe -H 23.247.78.254 -c check_mysql_slave
OK nagios_client2-slave is running
編輯mysql服務監控配置文件
vi /usr/local/nagios/etc/services/mysql.cfg
加上:
define service {
use generic-service
host_name nagios_client2
service_description check_mysql_replication_status
check_command check_nrpe!check_mysql_slave
max_check_attempts 2
normal_check_interval 2
retry_check_interval 2
check_period 24x7
notification_interval 10
notification_period 24x7
notification_options w,u,c,r
contact_groups admins
process_perf_data 1
}
加到mysql服務組:vi servicegroups.cfg
members nagios_client1,port_3306,nagios_client2,port_3306,nagios_client2,check_mysql_replication_status
/etc/init.d/nagios
checkconfig   #檢測配置文件
[root@nagios_server services]#
/etc/init.d/nagios reload #重新加載配置文件
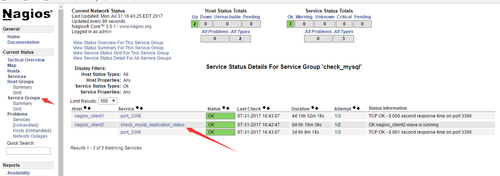
最後結果:

