1,ansible角色
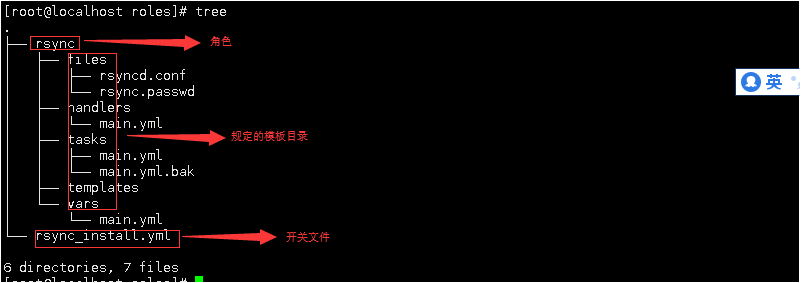
ansible官方指定的一套統一規範規則叫角色比如我們可以把配置nginx過程抽象成一個nginx角色
同理像redis也是一樣可以理解爲一個角色,它的配置過程有ansible固定模板
[root@m01 ~]# cd /etc/ansible/roles/
[root@m01 /etc/ansible/roles]# tree
.
├── rsync #角色名稱
│ ├── files #存放需要copy的文件
│ ├── handlers #觸發任務劇本
│ ├── tasks #具體任務劇本
│ ├── templates #模版文件
│ └── vars #存放變量文件
2,ansible角色目錄模板(以配置rsync服務爲例)
mkdir -p /etc/ansible/roles/rsync (創建角色目錄,做到統一管理)
mkdir {files,handlers,tasks,templates,vars} (規定死的目錄)
1)cd rsync
vi tasks/main.yml
- name: 01-add-group
    group:
      name: www
      gid: 666
    tags: 01-add-group
  - name: 02-add-user
    user:
      name: www
      create_home: no
      shell: /sbin/nologin
      uid: 666
      group: www
    tags: 02-add-user
  - name: 03-install rsync
    yum:
      name: rsync
      state: installed
    tags: 03-install rsync
  - name: 04-copy rsyncd.conf
    copy:
      src: rsyncd.conf
      dest: /etc/
    notify:
      - restarted rsyncd
    tags: 04-copy rsyncd.conf
  - name: 05-create rsync.passwd
    copy:
      src: rsync.passwd
      dest: /etc/
      mode: 600
    tags: 05-create rsync.passwd
  - name: 06-create backup and data directory
    file:
      path: "{{ item }}"
      state: directory
      owner: www
      group: www
    loop:
      - "{{ path_backup }}"
      - "{{ path_data }}"
    tags: 06-create backup and data directory
  - name: 08-start rsyncd
    service:
      name: rsyncd
      state: started
    tags: 08-start rsyncd
  - name: 09-enbaled rsyncd
    systemd:
      name: rsyncd
      enabled: yes
    tags: 09-enbaled rsyncd
2)cd files (配置文件統一歸到files目錄)
3)vi vars/main.yml (放定義的變量)
path_backup: /backup
path_data: /data
4)vi handlers/main.yml (notify的觸發重啓機制)
- name: restart rsyncd
  service:
    name: rsyncd
    state: restarted
5)創建一個開關文件
6)執行
ansible-playbook -C rsync_install.yml
ansible-playbook rsync_install.yml
7,ansible角色templates功能調用
templates模塊的功能和files模塊的功能類似。使用場景是不一樣的:files模塊裏的配置文件直接批量複製到其他主機就行
它裏面的配置參數你寫好了就不用變,像rsync和nfs配置文件,但像SSH優化配置文件,裏面的設置的登錄ip是要跟相應主機ip變化而變化。這個時候templates模塊就簡單很多
1)這裏我們創建一個init角色,這是一個初始化角色,就是將我們主機需要的所有基礎配置統一用這個角色去做好
mkdir -p /etc/ansible/roles/init
mkdir {files,handlers,tasks,templates,vars}
2)vi tasks/main.yml
#01.配置base源
- name: 01_configure_yum_repos
  yum_repository:
    name: base
    description: base yum repo
    baseurl:
      - http://mirrors.tuna.tsinghua.edu.cn/centos/$releasever/os/$basearch/
    gpgcheck: no
#02.配置epel源
- name: 02_configure_yum_Repos
  yum_repository:
    name: epel
    description: epel yum repo
    baseurl:
      - https://mirrors.tuna.tsinghua.edu.cn/epel/7/$basearch
    gpgcheck: no
#03.安裝常用軟件
- name: 03_install_server
  yum:
    name: "{{ packages }}"
  vars:
    packages:
    - ntpdate
    - lsof
    - tree
    - iftop
    - iotop
#04.創建用戶組
- name: 04_create_group
  group:
    name: www
    gid: 666
#05.創建用戶
- name: 05_create_user
  user:
    name: www
    uid: 666
    group: www
    shell: /sbin/nologin
    create_home: no
#06.創建數據目錄和腳本目錄
- name: 06_create_dir
  file:
    path: "{{ item }}"
    state: directory
    mode: '0755'
  loop:
    - /data
    - /server/scripts
#07.創建同步時間定時任務
- name: 07_cron_ntpdate
  cron:
    name: Time_Update
    minute: "*/5"
    job: '/sbin/ntpdate time1.aliyun.com'
#08.拷貝優化後的ssh配置文件
- name: 08_copy_ssh
  template:
    src: sshd_config.j2
    dest: /etc/ssh/sshd_config
    mode: '0600'
    backup: yes
  notify: restart sshd
3)cp /etc/ssh/sshd_config templates/sshd_config.j2(這裏配置文件就不用寫在files模塊下了)優化參數
#Port 22
#AddressFamily any
ListenAddress {{ ansible_facts.eth0.ipv4.address }}
#ListenAddress ::


