OSPF動態路由協議高級配置
路由重分發配置
一.路由重分發配置命令:
Router(config-router)#redistribute protocol metric metric-value metric-type type-value subnets二.路由重分發配置實例:
OSPF協議與RIP協議
router rip                               //在rip協議中注入ospf協議

  redistribute ospf metric 10            //metric爲度量值,這裏標準爲跳數

router ospf 1                            //在ospf協議中注入rip協議

  redistribute rip metric 200 subnets    //度量值爲帶寬
OSPF重分發靜態路由
router ospf 1

  redistribute static metric 100 subnets metric-type2
OSPF重分發默認路由
 router ospf 1

  network 192.168.0.0 0.0.0.255 area 0

  default-information originate metric 10 netric-type 1

ip route 0.0.0.0 0.0.0.0 10.0.1.1
建立實驗拓撲圖並完成先期準備
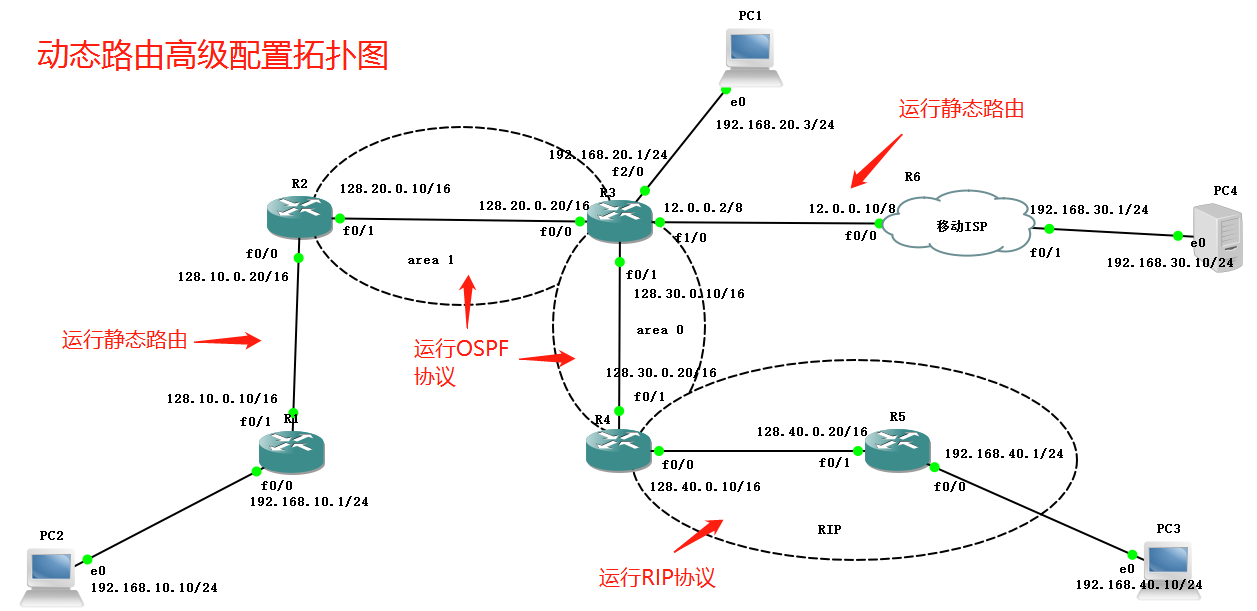
實驗環境準備:GNS3中的6臺路由器,四臺PC機
打開GNS3
1、按照拓撲圖完成路由間的連接(注意:R3路由需要右鍵點擊選擇configure,在Slots中添加兩塊NM-1FE-TX工作單板。)
2、將R6路由圖標樣式修改爲cloud雲樣式,這裏將R6路由模擬爲移動ISP。
3、將各個設備連接並開啓。
正式開始實驗過程
第一步:根據拓撲圖對路由設備端口進行配置
R1
R1#configure terminal                                    //進入全局模式
R1(config)#interface fastEthernet 0/0                    //進入f0/0接口
R1(config-if)#ip address 192.168.10.1 255.255.255.0      //設置IP地址與子網掩碼
R1(config-if)#no shut
R1(config-if)#interface fastEthernet 0/1
R1(config-if)#ip address 128.10.0.10 255.255.0.0
R1(config-if)#no shut
R1(config-if)#exit                                      //退回全局模式
R1(config)#ip route 0.0.0.0 0.0.0.0 128.10.0.20         //創建默認路由(128.10.0.20爲下一跳地址)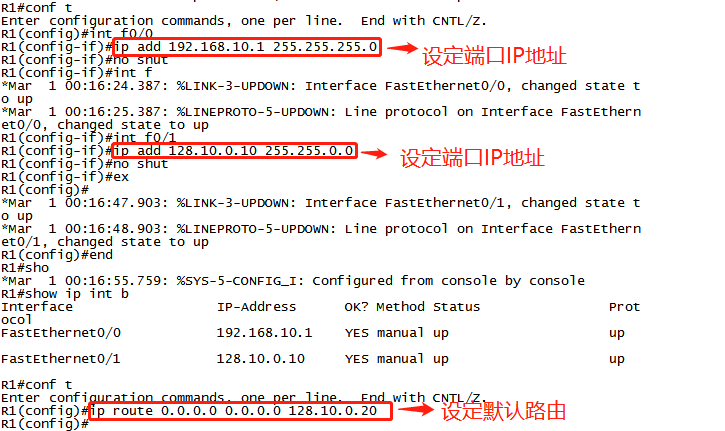
R2
R2#configure terminal                                   //進入全局模式
R2(config)#interface fastEthernet 0/0                   //進入f0/0接口
R2(config-if)#ip address 128.10.0.20 255.255.0.0        //設置IP地址與子網掩碼
R2(config-if)#no shut
R2(config-if)#interface fastEthernet 0/1
R2(config-if)#ip address 128.20.0.10 255.255.0.0
R2(config-if)#no shut
R2(config-if)#exit                                     //退回全局模式
R2(config)#ip route 192.168.10.0 255.255.255.0 128.10.0.10       //創建靜態路由
R2(config)#router ospf 1                               //進入OSPF協議1號進程
R2(config-router)#router-id 2.2.2.2                    //指定Router ID
R2(config-router)#network 128.20.0.0 0.0.255.255 area 1         //宣告自身網段
R2(config-router)#redistribute connected subnets       //將直連網段注入OSPF中
R2(config-router)#redistribute static subnets          //將非直連網段注入OSPF中
R2(config-router)#ex 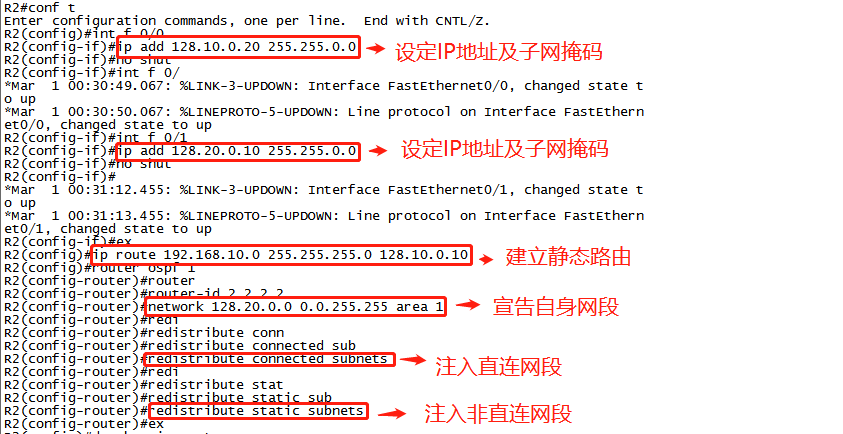
R3
R3#configure terminal                                   //進入全局模式
R3(config)#interface fastEthernet 0/0                   //進入f0/0接口
R3(config-if)#ip address 128.20.0.20 255.255.0.0        //設置IP地址與子網掩碼
R3(config-if)#no shut
R3(config-if)#interface fastEthernet 0/1
R3(config-if)#ip address 128.30.0.10 255.255.0.0
R3(config-if)#no shut
R3(config-if)#interface fastEthernet 1/0
R3(config-if)#ip address 12.0.0.2 255.0.0.0
R3(config-if)#no shut
R3(config-if)#interface fastEthernet 2/0
R3(config-if)#ip address 192.168.20.1 255.255.255.0
R3(config-if)#no shut
R3(config-if)#exit                                                                        //退回全局模式
R3(config)#ip route 192.168.30.0 255.255.255.0 12.0.0.10       //創建靜態路由
R3(config)#router ospf 1
R3(config-router)#router-id 3.3.3.3
R3(config-router)#network 128.20.0.0 0.0.255.255 area 1    //在area1中宣告自身網段
R3(config-router)#network 128.30.0.0 0.0.255.255 area 0    //在area0中宣告自身網段
R3(config-router)#network 192.168.20.0 0.0.0.255 area 1    //在area1中宣告自身網段
R3(config-router)#redi con sub                         //將直連網段注入OSPF中
R3(config-router)#redi static sub                      //將非直連網段注入OSPF中
R3(config-router)#ex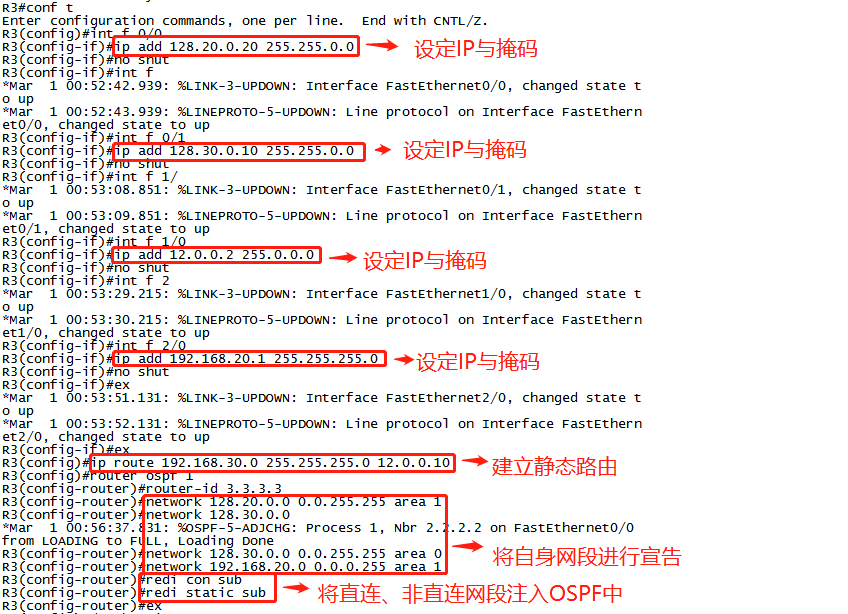
R4
R4#configure terminal                                   //進入全局模式
R4(config)#int f 0/1                                       //進入f0/0接口
R4(config-if)#ip add 128.30.0.20 255.255.0.0            //設置IP地址與子網掩碼
R4(config-if)#no shut
R4(config-if)#int f0/0
R4(config-if)#ip add 128.40.0.10 255.255.0.0
R4(config-if)#no shut
R4(config-if)#ex
R4(config)#router rip                                               //建立RIP協議
R4(config-router)#version 2                                   //選擇版本2
R4(config-router)#no auto-summary                     //關閉子網彙總功能
R4(config-router)#network 128.40.0.0                  //宣告自身網段
R4(config-router)#redi ospf 1 metric 5                  //將ospf進行注入
R4(config-router)#ex
R4(config)#router ospf 1
R4(config-router)#router-id 4.4.4.4
R4(config-router)#network 128.30.0.0 0.0.255.255 area 0
R4(config-router)#redi rip sub                         //將rip進行注入
R4(config-router)#ex 
R5
R5#conf t
R5(config)#int f 0/1
R5(config-if)#ip add 128.40.0.20 255.255.0.0
R5(config-if)#no shut
R5(config-if)#int f 0/0
R5(config-if)#ip add 192.168.40.1 255.255.255.0
R5(config-if)#no shut
R5(config-if)#ex
R5(config)#router rip
R5(config-router)#ver 2
R5(config-router)#no auto-summ
R5(config-router)#network 128.40.0.0
R5(config-router)#network 192.168.40.0
R5(config-router)#ex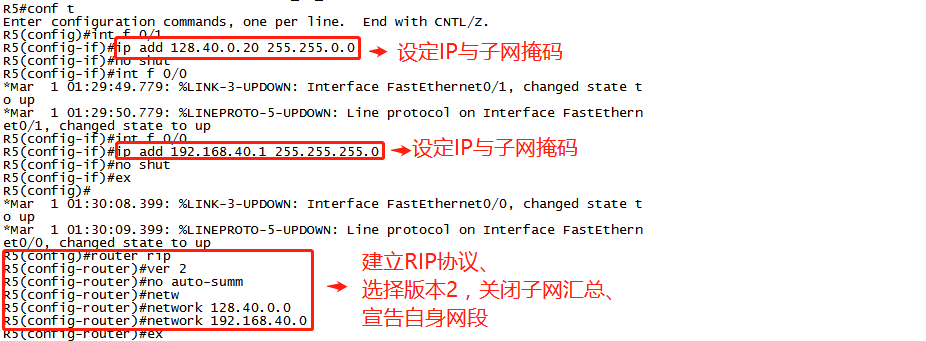
R6
R6#conf t
R6(config)#int f 0/0
R6(config-if)#ip add 12.0.0.10 255.0.0.0
R6(config-if)#no shut
R6(config-if)#int f 0/1
R6(config-if)#iP add 192.168.30.1 255.255.255.0
R6(config-if)#no shut
R6(config-if)#ex
R6(config)#ip route 0.0.0.0 0.0.0.0 12.0.0.2
R6(config)#end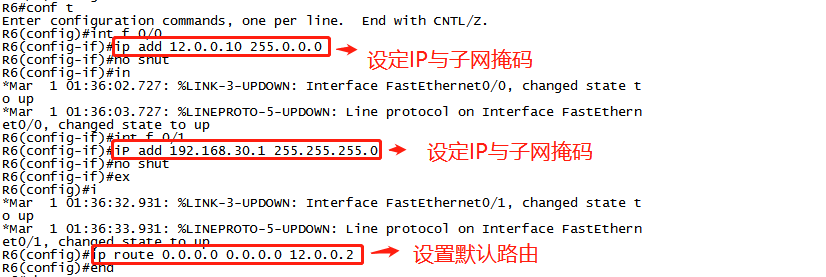
以上,就是所有路由的設置過程。下面只要我們爲PC機設定好IP地址,即可完成全網互通。
第二步:爲PC機添加IP
實施步驟:
PC1
PC1>
PC1> ip 192.168.20.3 192.168.20.1
Checking for duplicate address...
PC1 : 192.168.20.3 255.255.255.0 gateway 192.168.20.1

PC1>
PC2
PC2>
PC2> ip 192.168.10.10 192.168.10.1
Checking for duplicate address...
PC1 : 192.168.10.10 255.255.255.0 gateway 192.168.10.1

PC2>
PC3
PC3>
PC3> ip 192.168.40.10 192.168.40.1
Checking for duplicate address...
PC1 : 192.168.40.10 255.255.255.0 gateway 192.168.40.1

PC3>
4號PC機
4號PC機>
4號PC機> ip 192.168.30.10 192.168.30.1
Checking for duplicate address...
PC1 : 192.168.30.10 255.255.255.0 gateway 192.168.30.1

4號PC>
第三步:查看每個動態路由的學習情況
查看命令:Rn(n=2~5)#show ip route
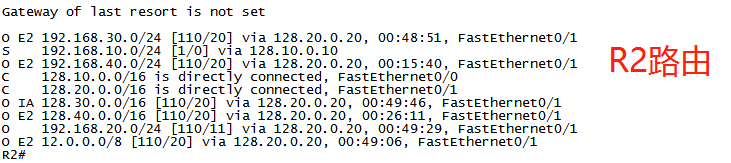
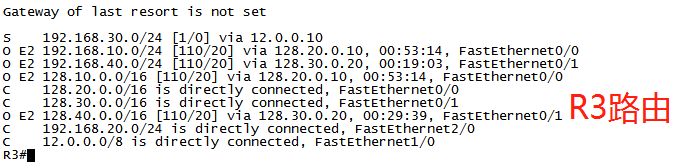
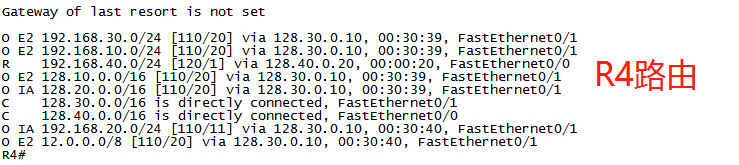
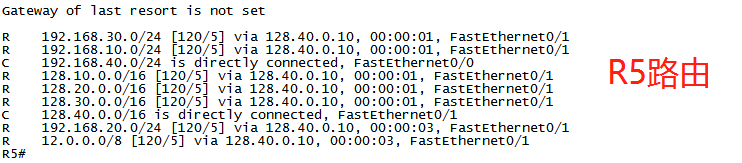
注意:只有運行了動態路由協議的路由纔可進行學習!!因此,R1和R6兩個路由的路由表中是不可能含有其它網段的
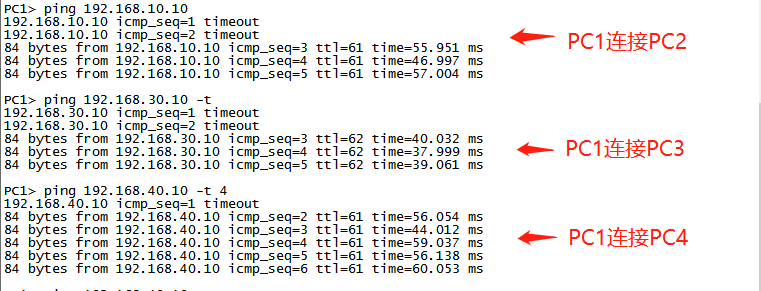
第四步:檢查全網互通
檢查命令(PC機上):ping IP地址